


Clearing the cache in Elementor follows a structured process to ensure your changes appear correctly. Instead of adjusting settings at random, the process focuses on refreshing each layer that may be holding onto outdated files.
Each step builds on the last, so working through them in order keeps things simple and avoids missing anything. With the right approach, you can update your site and see those changes reflected without delays or confusion.
Why Clearing Elementor Cache Matters
Clearing the Elementor cache helps ensure that the changes you make are actually reflected on your live site. Without refreshing cached files, your website may continue to display outdated layouts, styles, or content even after updates are saved. This can create confusion when edits appear correct in the editor but not on the front end, even when everything is properly configured in your WordPress hosting environment.
Keeping the cache cleared regularly helps with:
⇒ Accurate updates – changes saved in the editor are reflected on the live site as expected
⇒ Cross-device consistency – every visitor loads the most recent version of your site, regardless of browser or device
⇒ Design integrity – reduces the risk of broken layouts, missing styles, or incomplete updates caused by stored files
⇒ Site performance – prevents outdated files from loading unnecessarily, helping speed up your WordPress site
When done regularly, clearing the cache is a simple step that keeps your workflow smooth and your site accurate.
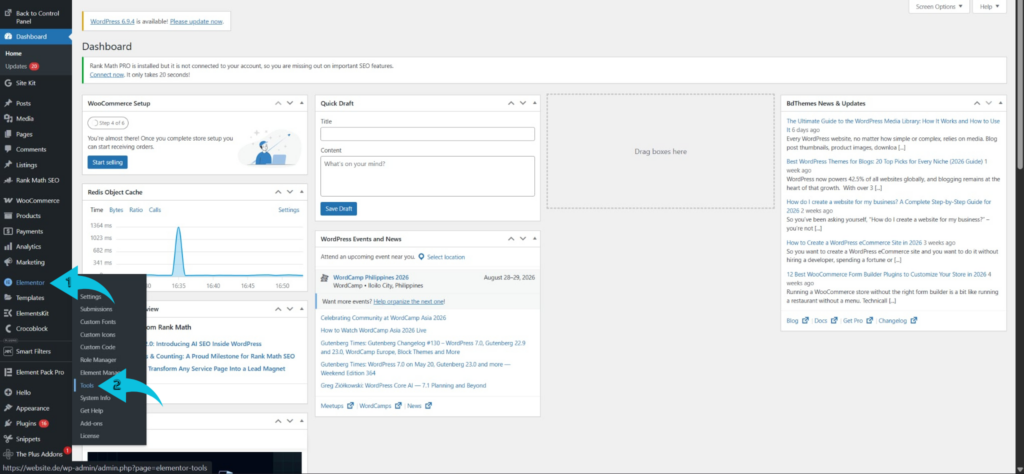
Step 1: Go to Elementor Tools in the WordPress Dashboard
Start by logging into your WordPress dashboard, where your site is managed. From the left-hand menu, navigate to Elementor > Tools, which is where Elementor keeps important maintenance and system settings.
This section is specifically designed to help resolve display and performance issues tied to cached files. Opening this panel gives you access to the controls needed to refresh Elementor’s stored data. It’s the first place to check when your design changes aren’t appearing correctly on the front end.
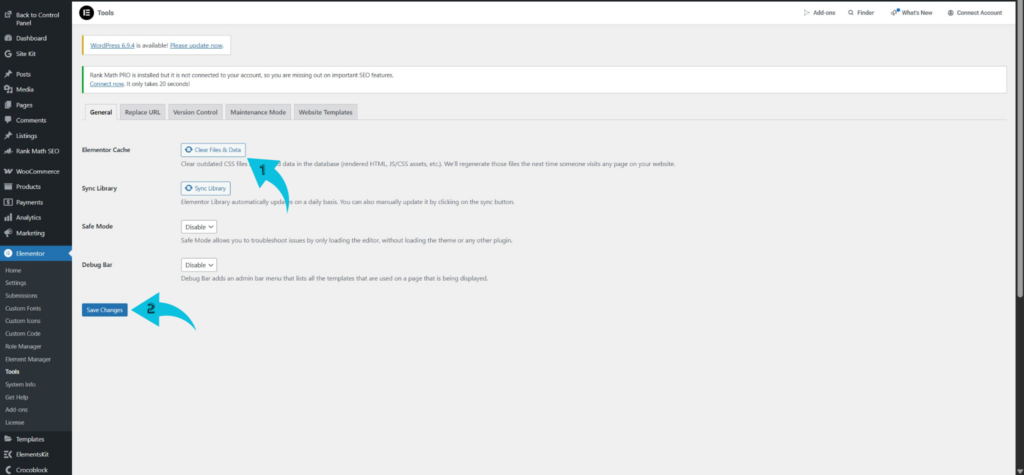
Step 2: Click “Regenerate Files & Data”
Inside the Tools section, stay on the General tab and look for the option labeled “Regenerate Files & Data.” This function clears Elementor’s internal cache by rebuilding CSS and layout files from scratch.
Click the button, then save changes if prompted to ensure the process completes. Once done, Elementor will generate fresh files based on your latest website design edits. This step alone resolves most issues where styling or layout updates fail to show.
Step 3: Refresh and Check Your Website Changes
After clearing Elementor’s cache, refresh your website to check if the updates are now visible. It helps to do a hard refresh so your browser requests the newest version of the page instead of loading a saved one.
You can do this using Ctrl + Shift + R, which forces the page to reload without cached files. This step confirms whether Elementor’s regenerated files are displayed correctly. If everything looks correct, the issue was likely limited to Elementor’s internal cache.
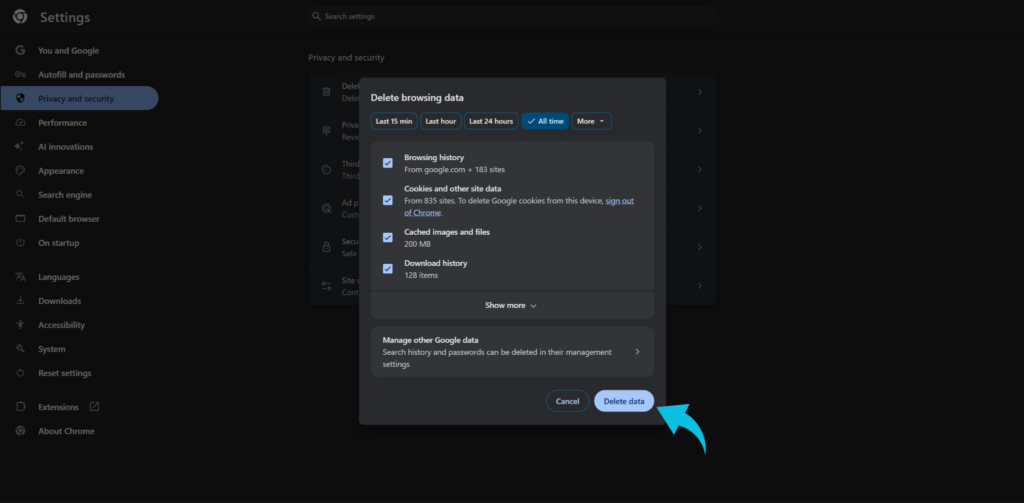
Step 4: Clear Your Browser Cache
If your updates still are not showing, your browser may be holding onto an older version of the page. Clearing the browser cache forces it to load fresh files directly from your website. You can quickly access this by pressing Ctrl + Shift + Del, which opens the clear browsing data window, then remove cached images and files before reloading your site.
This step is often overlooked but can make a significant difference. Browsers are designed to prioritize speed, which sometimes means showing outdated content until manually refreshed.
Conclusion
Clearing Elementor cache gives you direct control over how your updates appear on your live site. Instead of relying on a single reset, the process works across multiple layers to ensure everything reflects your most recent changes. From regenerating files to clearing browser and server caches, each step helps produce more consistent and reliable results. When handled properly, this approach removes outdated elements and keeps your site functioning as expected.
The workflow remains simple, but skipping even one layer can affect how your changes display. At the same time, how each cache level is cleared affects overall site consistency and performance. With a structured approach and attention to detail, you can keep your Elementor site up to date, accurate, and free of unnecessary display issues.