Website Builder
- Customize Website
- How to Edit Button
- How to Download the Website
- Sites in multiple languages
- Password Protect Pages
- How to Add Custom links in Menu
- How to Add Unique ID
- How to Add Background to Section
- How to Edit Header and Footer
- How to Add Tags to Blog Post
- How to Add Categories to Blog Post
- How to Edit Custom Site Title
- How to Add CSS using Custom HTML
- How to Insert Custom HTML
- How to Reset Pages, Blogs or Site
- How to Change Language
- How to Clone a Site
- How to Clone a Page
- How to Create Menu
- How to Add Add Site Title and Tagline
- How to Add Custom Logo
- How to Add New Blog
- How to Add New Page
- Add New Site
- How to Create Website
- Miscellaneous
- How to Add Cookie Consent
- How to Add Email Template
- How to Configure SMTP/PHP Mail
- How to Publish the Site
- How to Add SiteMap
- How to Add reCAPTCHA
- How to Add Meta Tags
- How to add Google Map API Keys
- How to Add MailChimp Code
- How to Switch Site
- How to Add Google Analytics Account
- What Is the Website Builder Assistant
- Widgets
Customize Website
How to Edit Button
This Guide will Help you to edit Button Widget Settings and Style.
BUTTON WIDGET SETTINGS
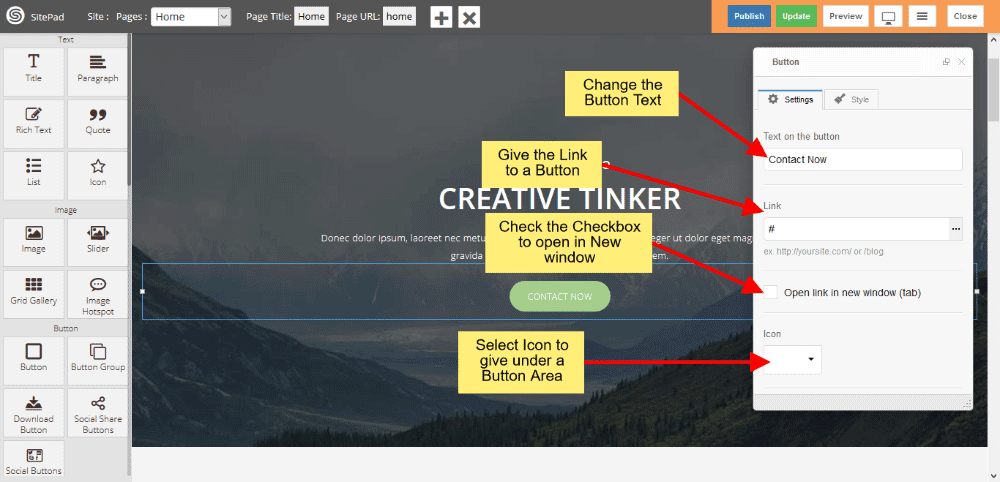
When you Drag and Drop Button Widget in SitePad Website Builder Dashboard. You will see Button Settings and Style in Button Widget. Go to Button Settings. You will see the image like below. You can change the Button Text and Button Link and after that one checkbox is there, if you check this checkbox you can open that link in another window.
If you want to display Icon under the Button then click the Icon, Choose particular Icon from a list.
If you want the Button in full width style then check the checkbox of Stretch, and Alignment Settings gives you Button Alignment.
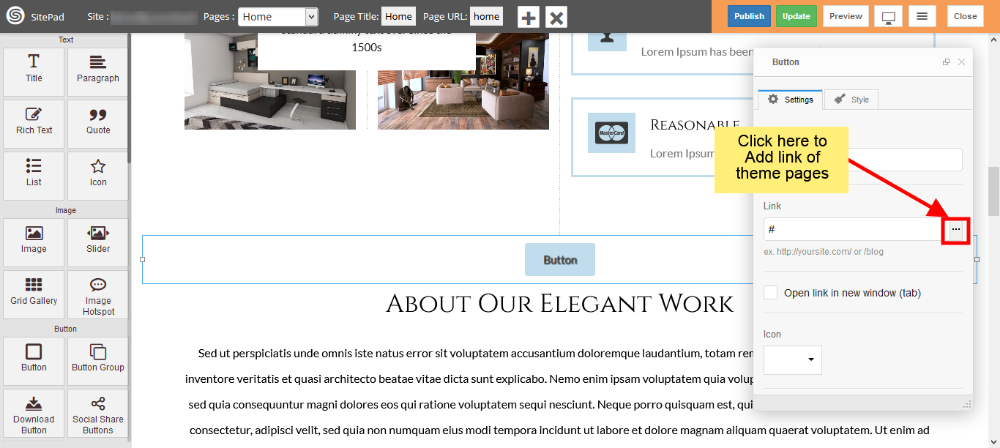
LINK BUTTON TO THEME PAGES
To link you Button to existing theme page just click on three dots of Link section as shown in image below.
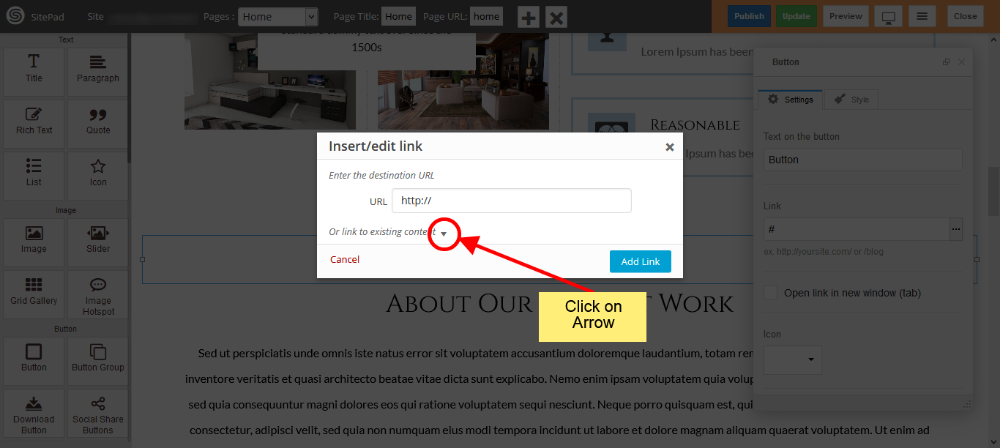
Now in popup box click on Arrow.
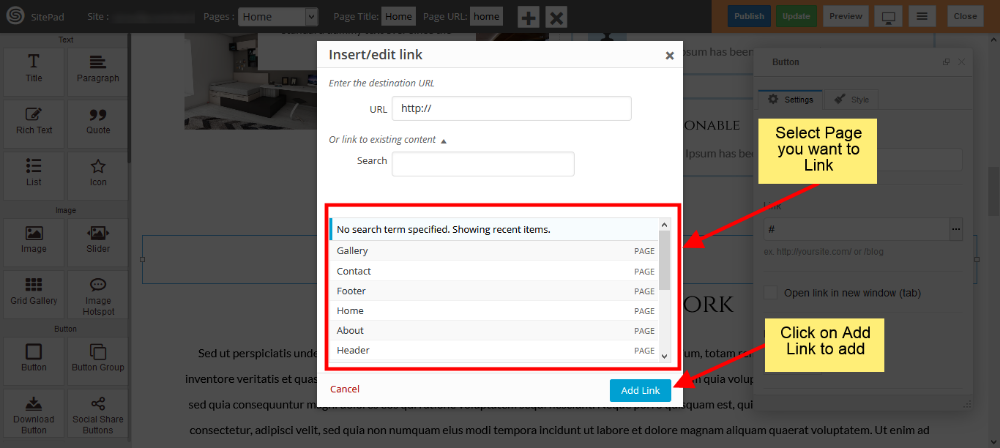
Select page which you want to link and in the end click on Add Link.
EDIT BUTTON ELEMENT STYLES AND PRESETS
If you want to change the Button Custom Styles like Background color, Text color etc. then click Edit Element Style.
For Predefined styles which comes in widget like Background color and Text color then you can click Predefined Styles.
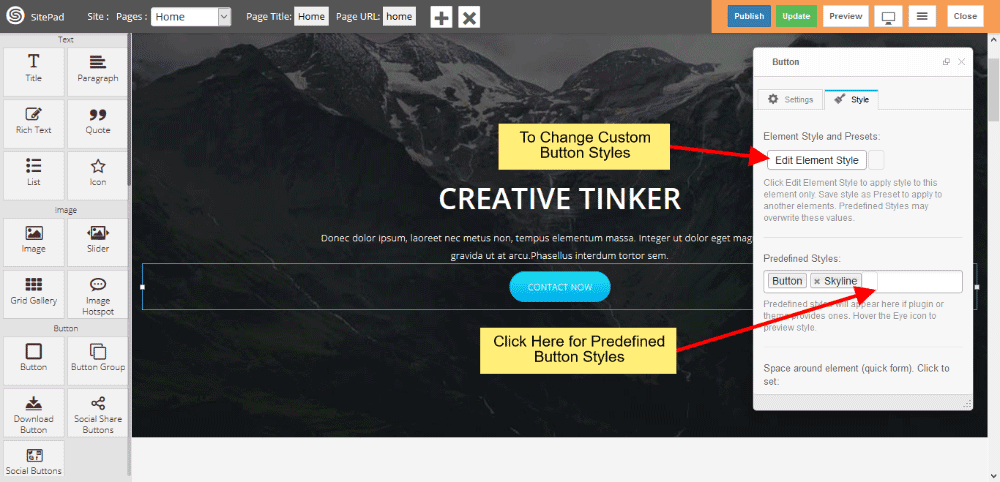
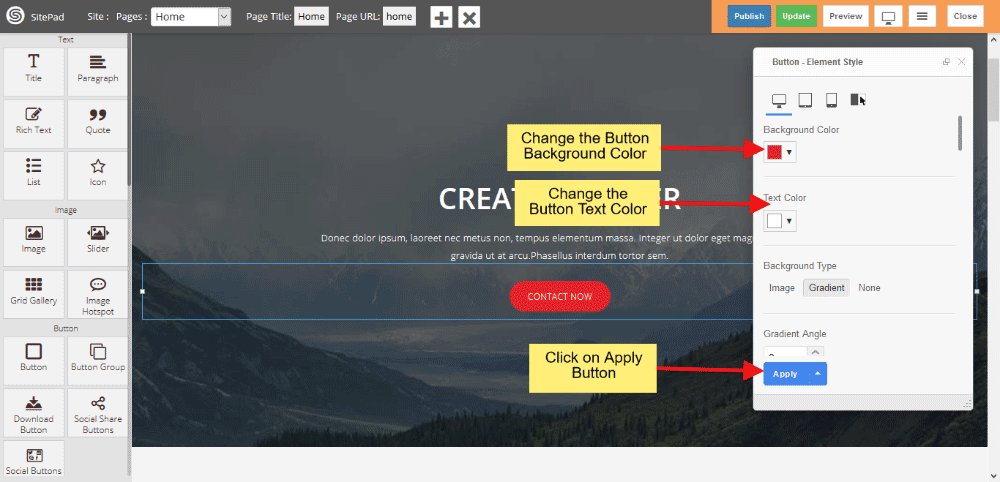
BUTTON CUSTOM STYLE
Button Custom Styles gives you to change Button Background color, Text color, Padding, Border-radius etc. When all are set then click on Apply button.
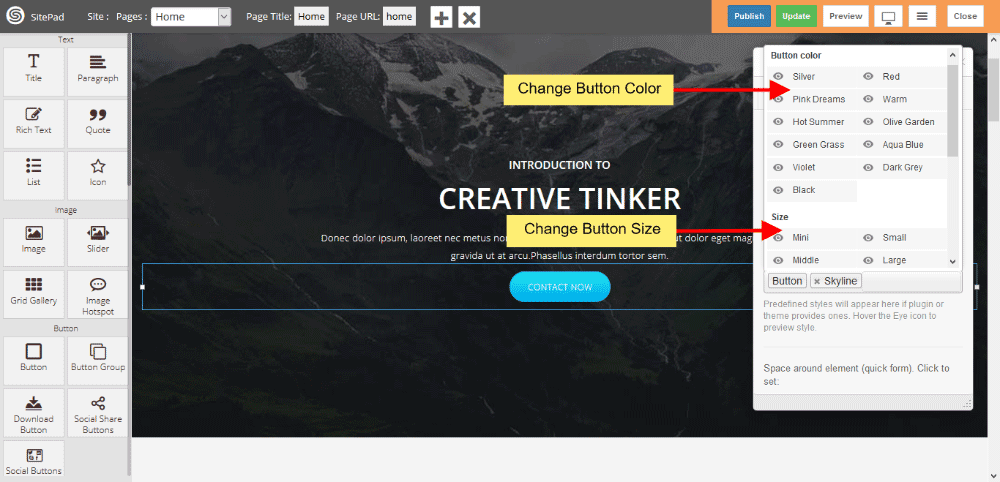
BUTTON PREDEFINED STYLE
Predefined style gives you clasees of various predefined button for Background and Text color. And Size gives you various types of Button Size.
How to Download the Website
In this tutorial, we will show you How to Download the Website.
Note: By default Download option is disabled, if you want to use the Download option you will need to contact your web host to enable the Allow Download Website setting from SitePad admin panel. The download option is not available in SitePad Free plan.
GO TO SITEPAD EDITOR
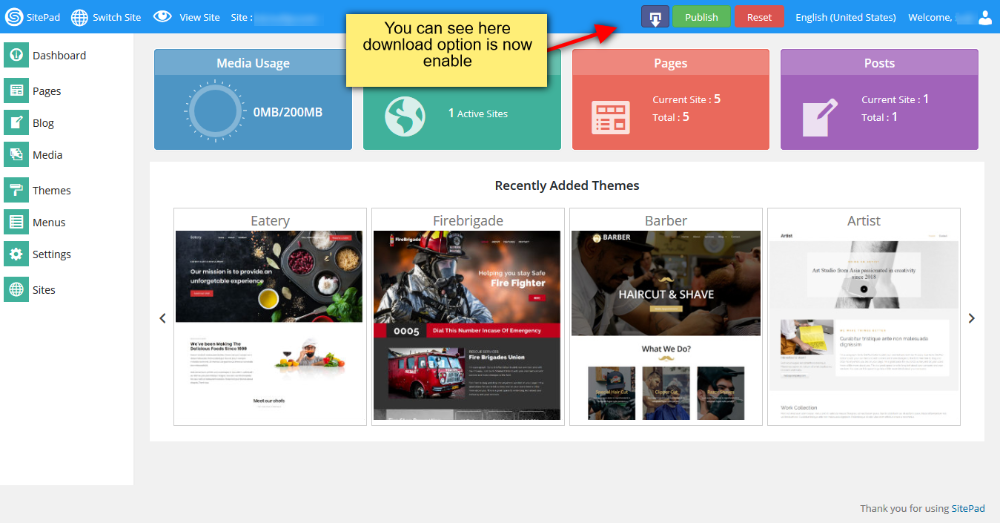
From your Control Panel click on SitePad Website Builder. You will be redirected to SitePad Editor Server.

Once you are redirected to the Editor Server you will see Download button in the top bar.
DOWNLOAD ZIP FILE
Click on Download Now button to download the website files in ZIP package.

Once the ZIP file is downloaded, upload that file on your server in your web directory e.g. public_html/ and unzip that file in same directory. You can use the File Manager feature in your control panel to upload the file.
That’s it ! Your site should now be accessible when you access your domain name in the browser.
Sites in multiple languages
This guide helps you how to make a site in multiple languages.
Make a full website with one language and clone that site so you have a full copy of your website and change the language strings with the other language string using the editor. For easily understanding, you can follow the below steps:
CLONE FULL SITE
For cloning the website go to the Dashboard -> Sites -> Clone Site or you can also do by clicking of Dashboard -> All Sites, click the button of cloning which sites you want to clone.
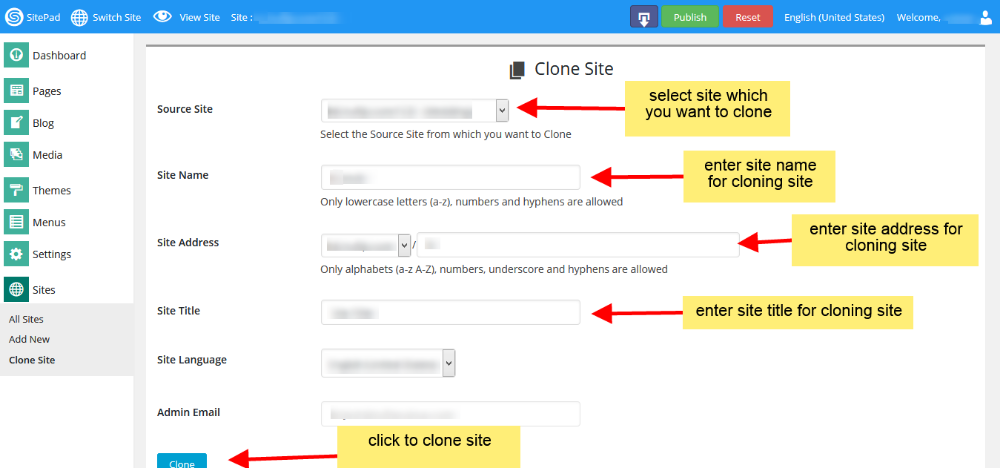
Select the source site which you want to clone from dropdown list. Enter site name which show in SitePad editor url, Select domain name and enter site address for your cloning site. This will be your site address for your cloned site after publish. And enter Site Titlefor the language which you want, after that click on Clone button for cloning the site.
After completing the cloning process it shows two links Visit Dashboard and Visit Site, click on Visit Dashboard link for editing the cloning site.
EDIT ON CLONE SITE
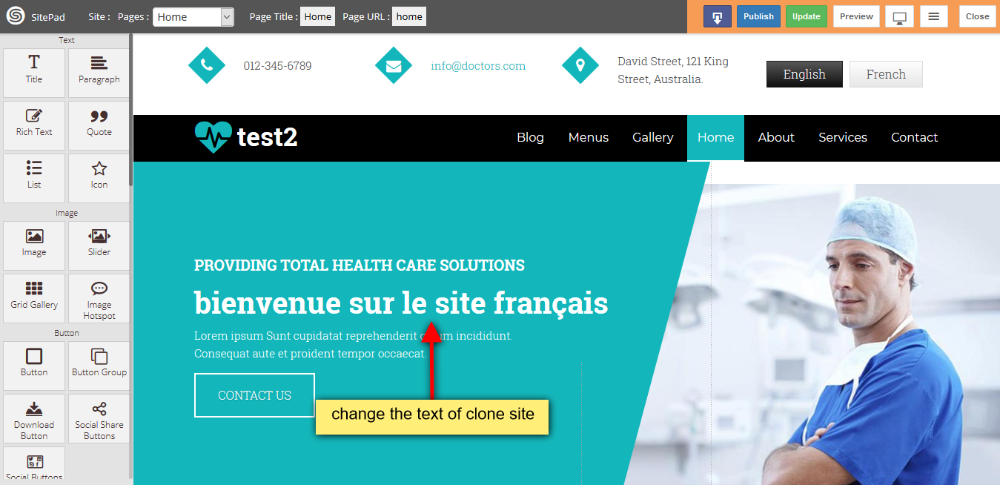
After cloning, click on Visit Dashboard link for editing the cloning site. You will get exact copy of site with same style and properties, and make changes on cloned site of French language.
ADD LINKS IN HEADER
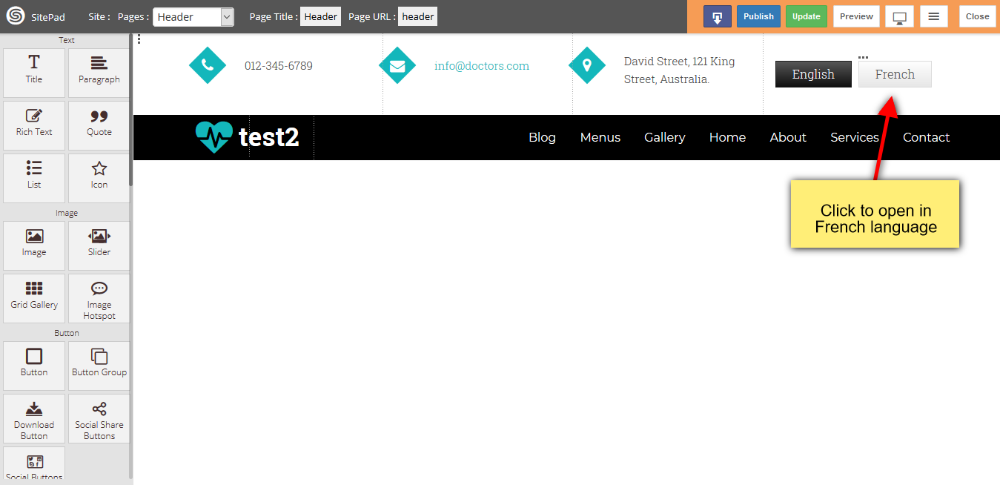
Suppose you have a domain www.example.com, this domain point to your English language and make button link for English and French languages in the header of both the sites, on clicking of their button it redirects to their languages and French domain is like this www.example.com/fr
PUBLISH BOTH SITES
When all changes are done then publish both the sites.
Password Protect Pages
This documentation will guide you on How to Password Protect your pages.
Note: Password Protection is supported only for Apache web server.
GO TO EDITOR
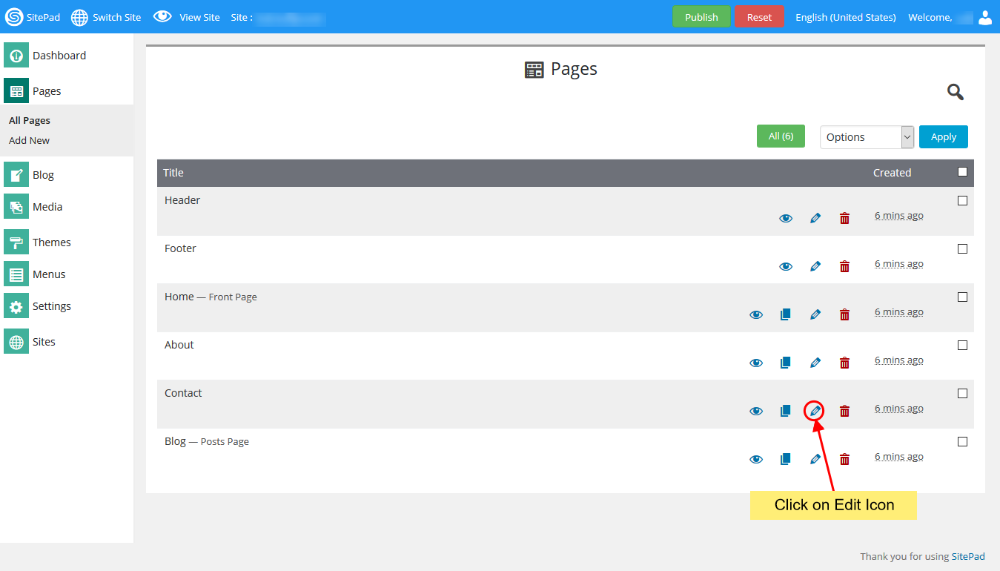
When on SitePad Website Builder Dashboard. Hover on Pages option given on the left sidebar and then click on All Pages. Once on all Pages Click on Edit Icon of Any Page.
You will be redirected to Editor.
SELECT PASSWORD PROTECT
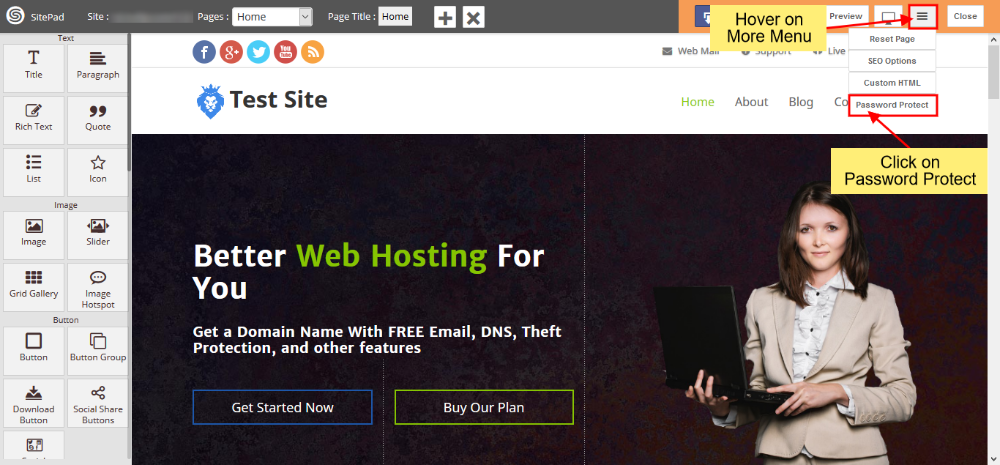
On SitePad Editor hover on more menu on the navigation bar. When you hover over more menu four buttons will be drop down i.e Reset Page, SEO Options, Custom HTML and Password Protect.
Click on Password Protect.
PASSWORD PROTECT PAGES
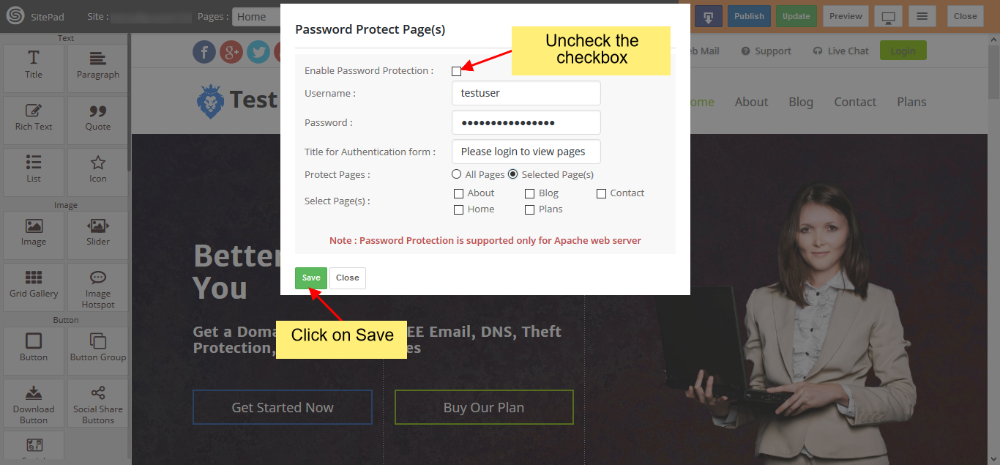
On clicking Password Protect you will see a dialog box will appear. Click on Enable Password Protection checkbox. Insert Username, Password and Title for Authentication. Then select the option from Protect Pages i.e All Pages or Selected Pages.

- On click of Enable Password Protection your password protection option will be enabled.
- Insert Username that you want. It will be asked when you Log-in to password-protected pages/site.
- Insert Password that you can remember. It will be asked when you Log-in to password-protected pages/site.
- Insert Title for Authentication. This will be shown on the Log-in a Dialog box.
- Select an option from Protect Pages i.e All Pages if you want to password protect the full site or if you want only Selected Pages then choose the given option.
- If Selected Pages option has been selected you will find Select Pages option through which you can select which page to password protect.
Once you have made the changes then click on Save to save the Password Protect Pages Option.
REMOVING PASSWORD PROTECTION
To Remove Password Protect Pages click on Password Protect option. Uncheck the Enable Password Protection checkbox. Click on Save.
How to Add Custom links in Menu
This guide will show you how to add custom links in Menu.
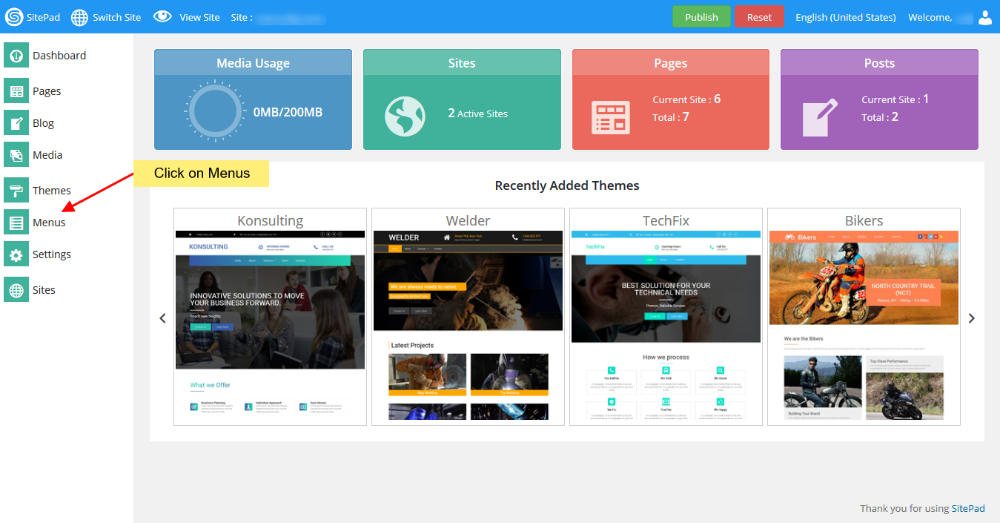
GO TO MENUS
First you will need to go to the Menus as shown in image below.
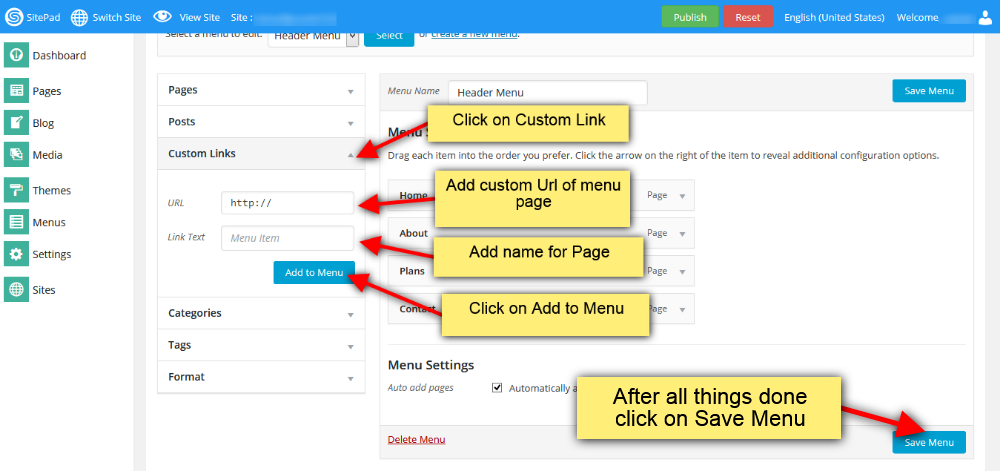
After all things done please click on Save Menu. This will add your custom link into menu.
How to Add Unique ID
This guide will show you how to add Unique ID.
GO TO PAGE EDITOR
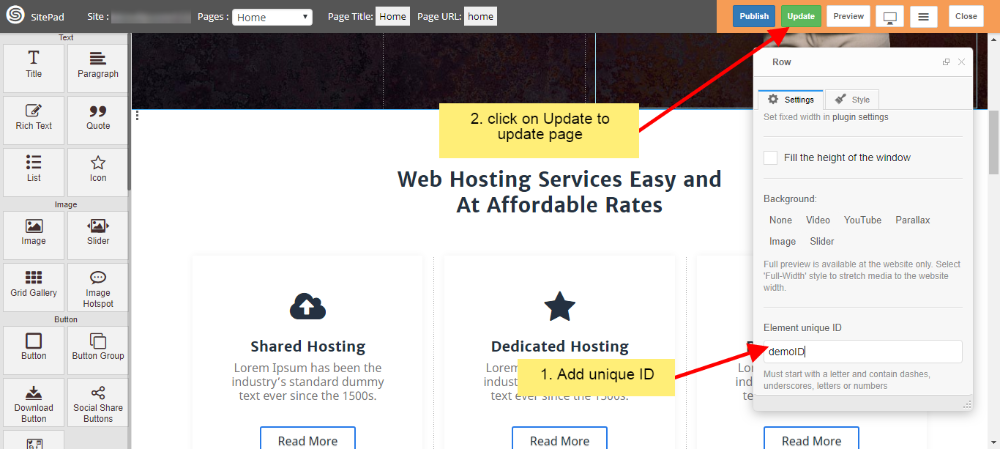
Go to the page editor and select the row where you want to add unique id as shown in below image. Then click on settings in dialog box and add id for that row in Element unique Id section.
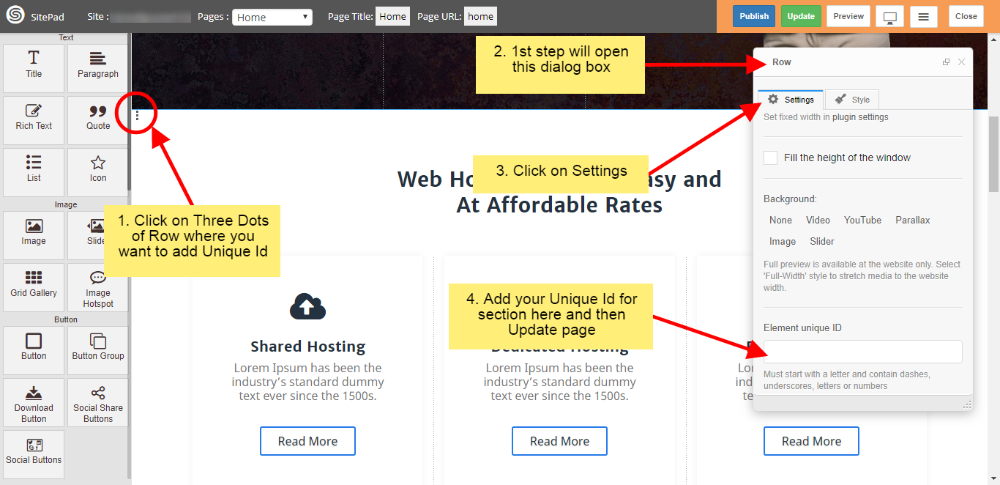
After adding unique id please update the page as shown in image below.
How to Add Background to Section
This guide will help you to Add Background to Section.
There are two Different ways to do that.
USING ROW DIALOG BOX
1) Open Page you want to edit in editor. To do that Click on Edit icon present next to page name as shown image below.
2) Once you open Page in Editor follow steps below
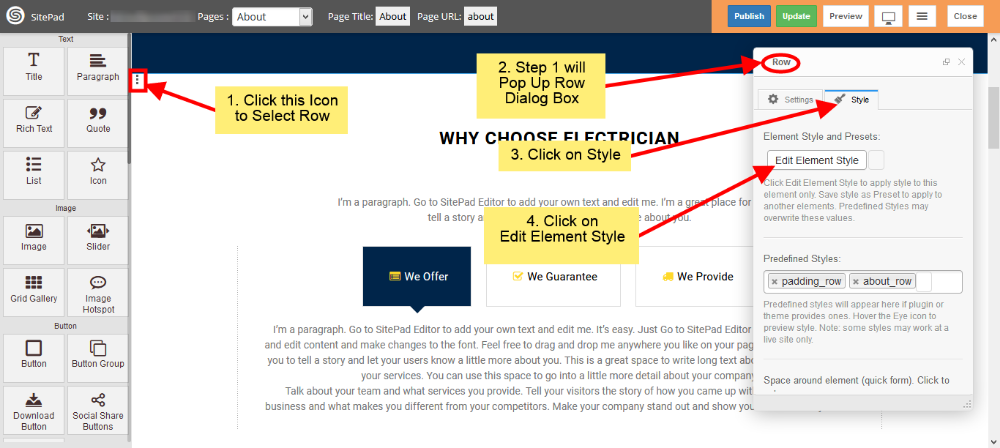
- Select Row where you want to Add Background by Clicking on Three Vertical Dots as shown image below.
- Step i will pop up the Dialog Box for that Row.
- Now Click on Settings option in Dialog Box.
- Now Select the Type of Background you want to give for that Particular Row

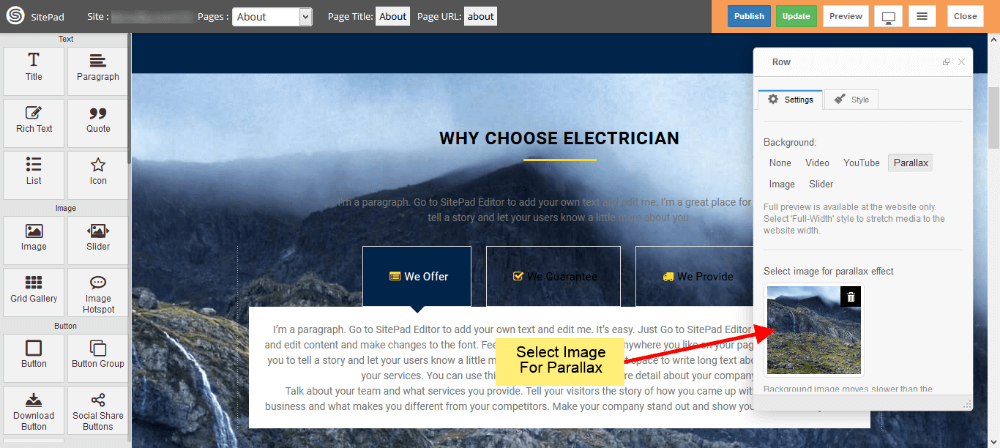
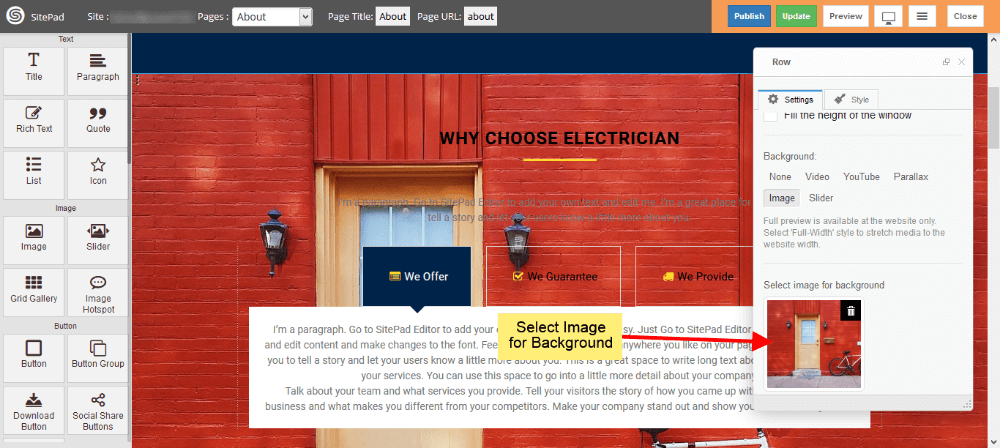
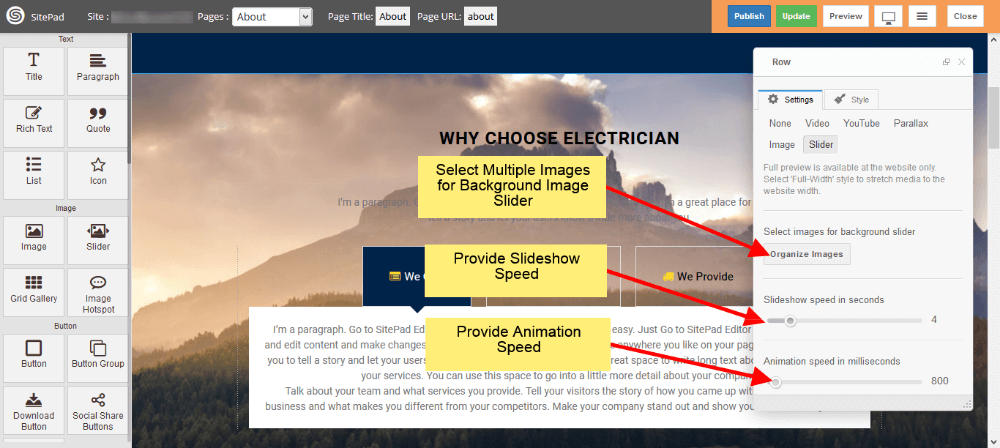
3) When you select one of the Option for Background then it will need some inputs just Fill that as shown below.
FOR VIDEO BACKGROUND
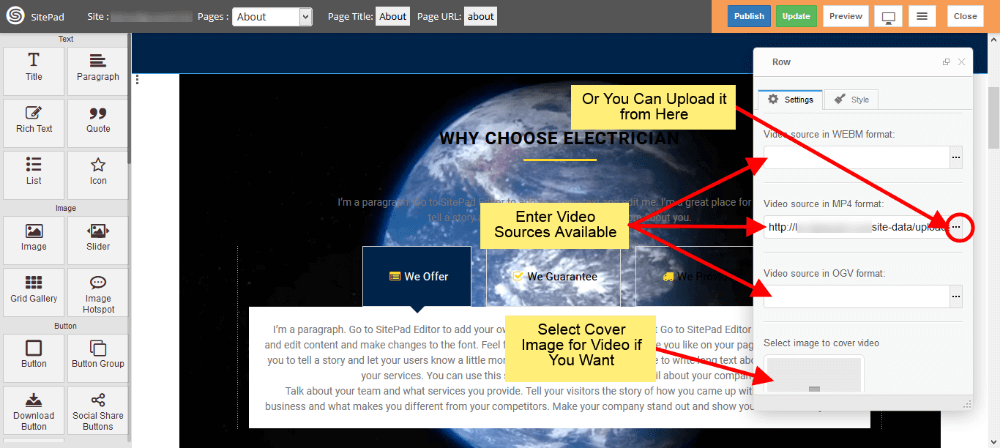
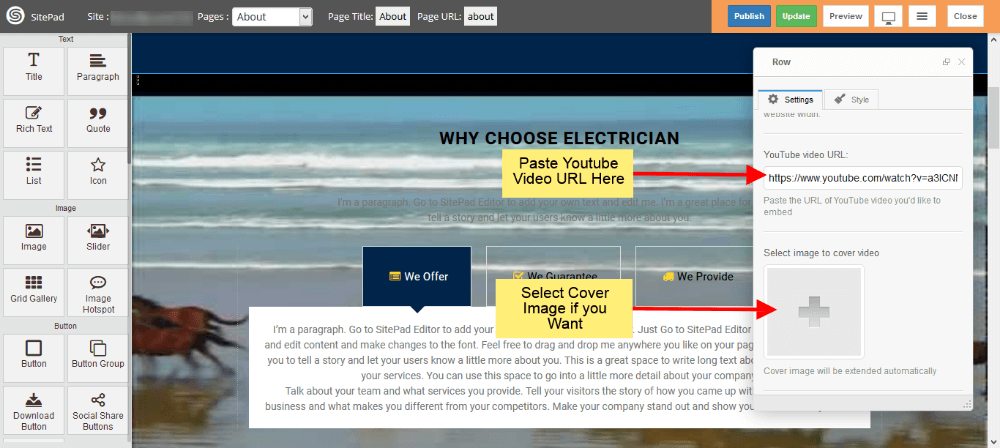
FOR YOUTUBE VIDEO BACKGROUND
FOR PARALLAX IMAGE BACKGROUND
FOR IMAGE BACKGROUND
FOR IMAGE SLIDER BACKGROUND
USING EDIT ELEMENT STYLE
1) Once you open Page in Editor follow steps below
- Select Row where you want to Add Background by Clicking on Three Vertical Dots as shown image below.
- Step i will pop up the Dialog Box for that Row.
- Now Click on Style option in Dialog Box.
- Now Click on Edit Element Style.
2) Now in Edit Element Style select Background Color or Background Type you want as shown in image below.
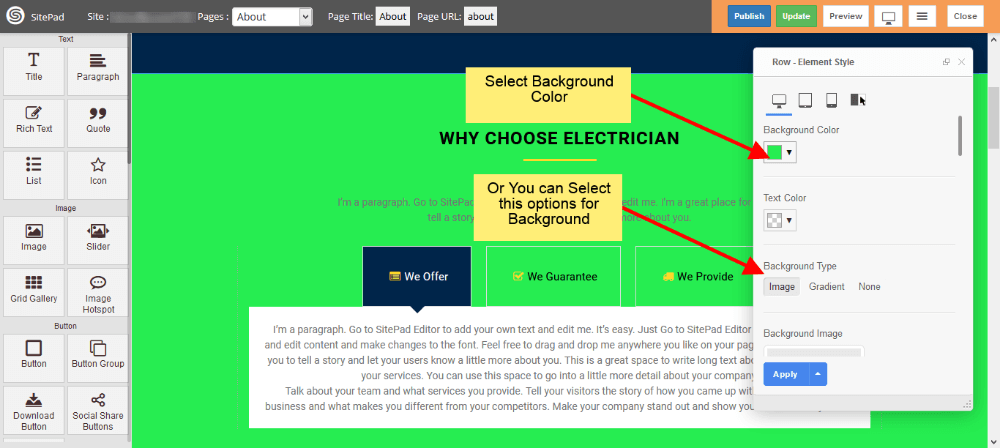
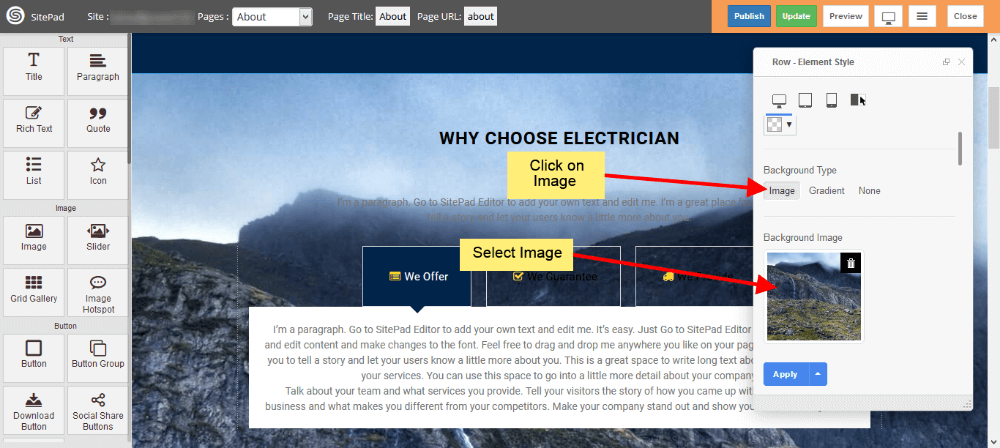
FOR IMAGE BACKGROUND
If you want Image Background then just click on Image and select Image you want as shown in image below.
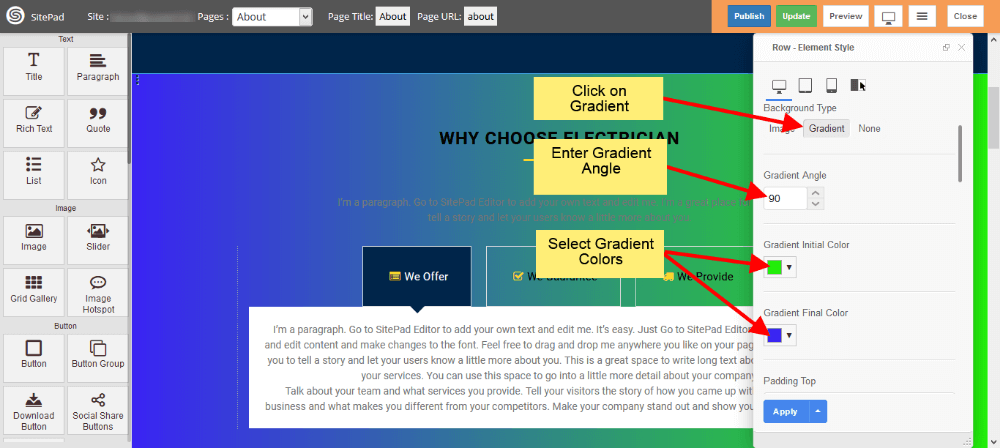
FOR GRADIENT BACKGROUND
If you want Gradient Background then just click on Gradient and select Gradient Angle and Color as shown in image below.
How to Edit Header and Footer
This Guide will Help you to edit Header and Footer Page.
GO TO PAGES AND EDIT
When you are on SitePad Website Builder dashboard. You will see Pages option on Sidebar Navigation Menu. Hover on Pages and Click on All Pages
Once you see all Pages. Click on the Edit Icon of the Header Page or Footer Page whichever you want to Edit shown like in the image below.

EDIT HEADER
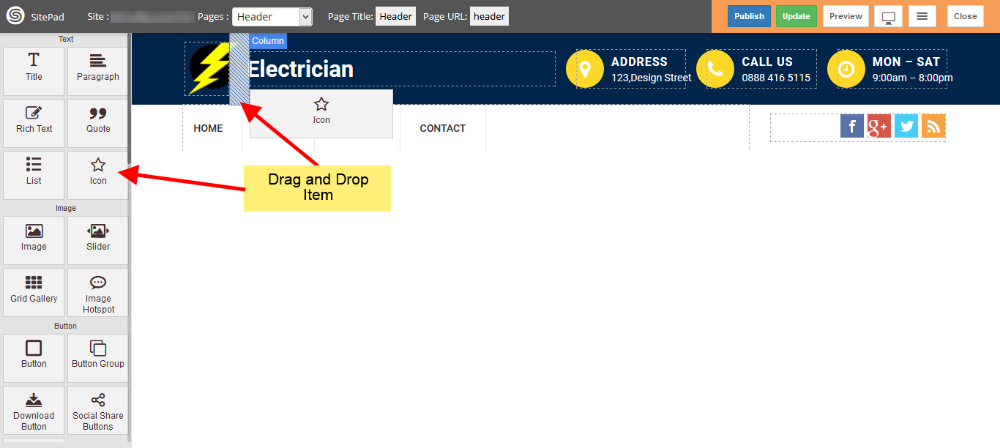
Once you open Header Page in editor you will be able to Edit all the stuff from Header Page as shown image below.
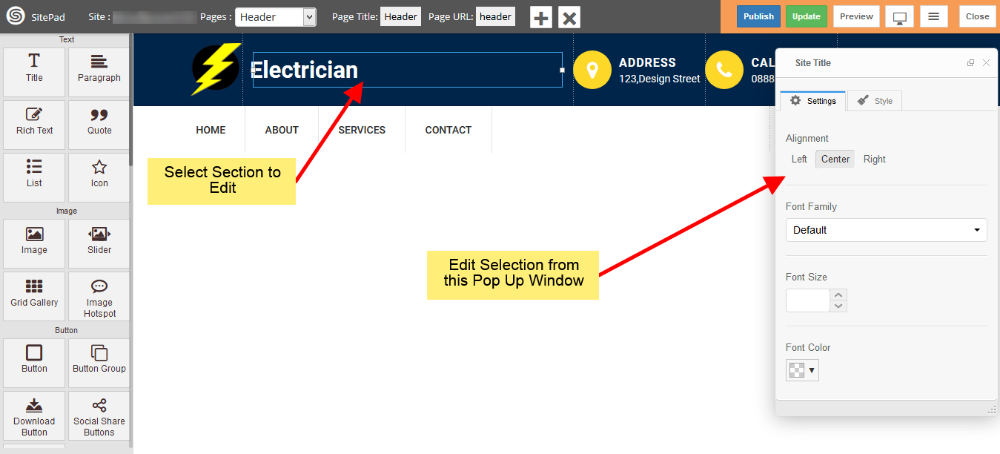
Note: You can also add extra items that you want to display in Header. Just Drag and Drop them as shown in image below.
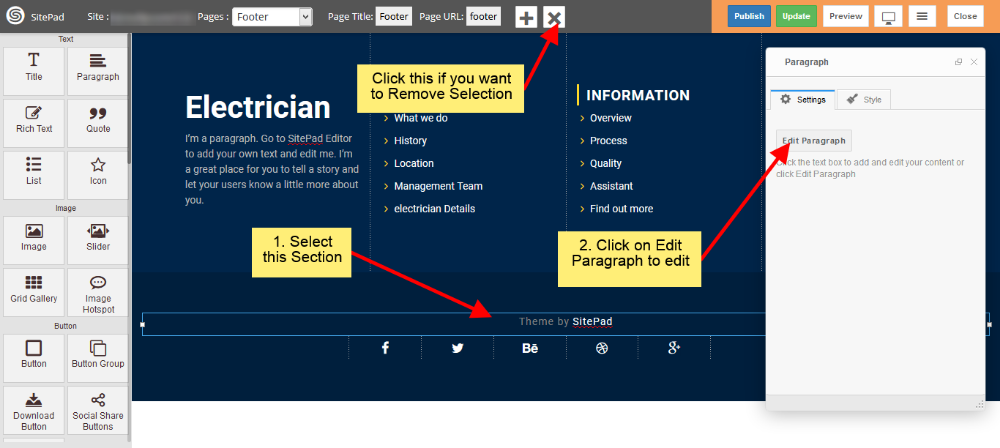
EDIT FOOTER COPYRIGHT TEXT
You can also edit Footer Page as similar to Header Page shown above. Click edit icon of Footer Page as shown in above images and edit.
How to Add Tags to Blog Post
In this tutorial, we will show you How to Add Tags to Blog Post.
GO TO SITEPAD EDITOR
From your Control Panel click on SitePad Website Builder. You will be redirected to SitePad Editor Server.
Once you are redirected to the Editor Server you will see Blog in the Main menu. Click on All Posts and then click on Edit Icon to edit the Post. You will be redirected to the Editor.

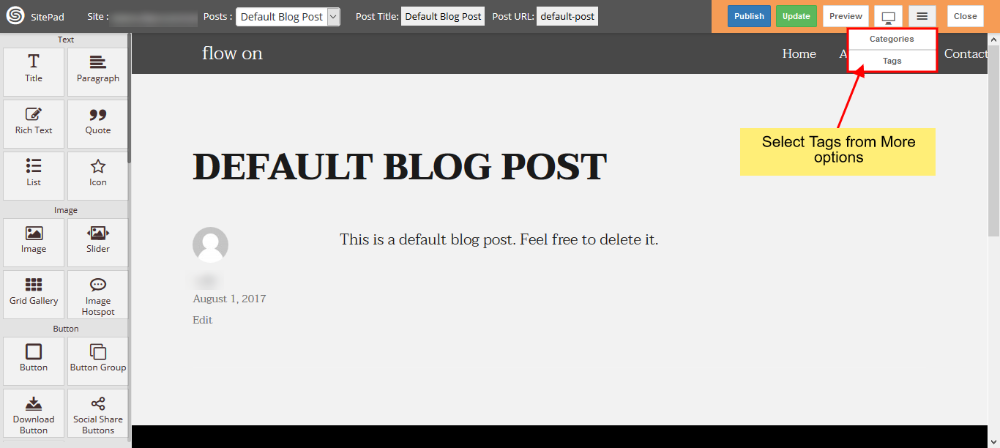
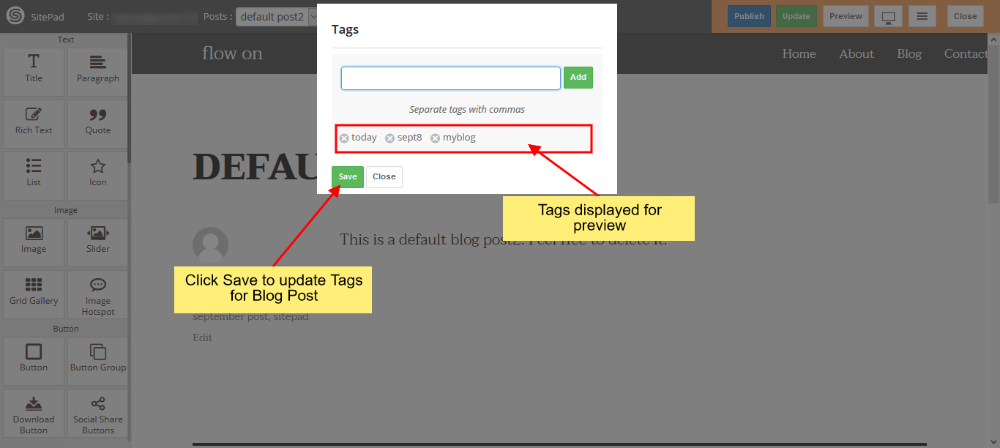
MORE OPTION AND TAGS BUTTON
In Editor, you will need to hover the mouse on More then select Tags Button
A dialog box will appear in which you can add a New Tags as shown in the image below.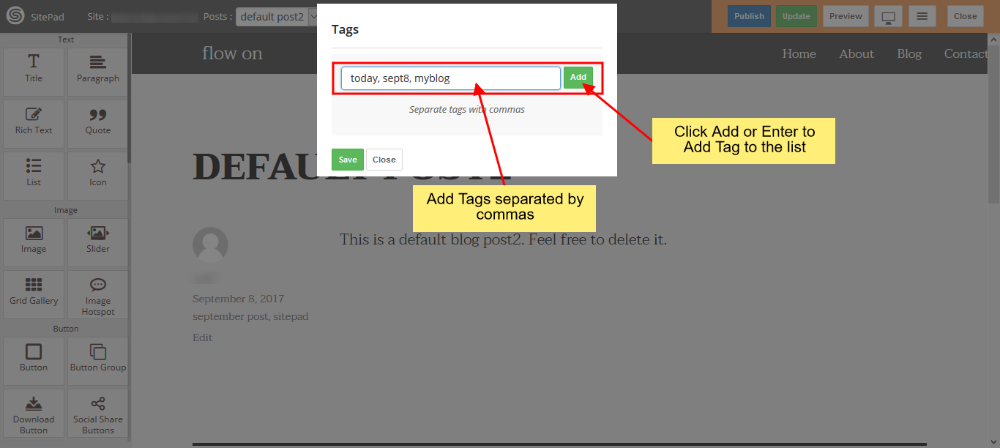
After selecting the Tags that you want to assign to your post click on Save to update the Tags for the Post as shown in the image below.
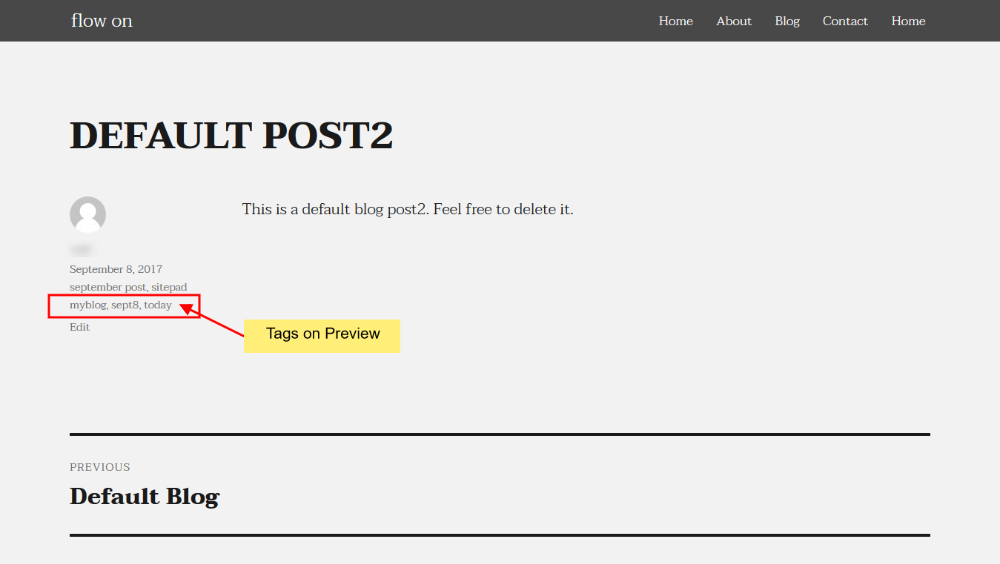
PREVIEW CHANGES
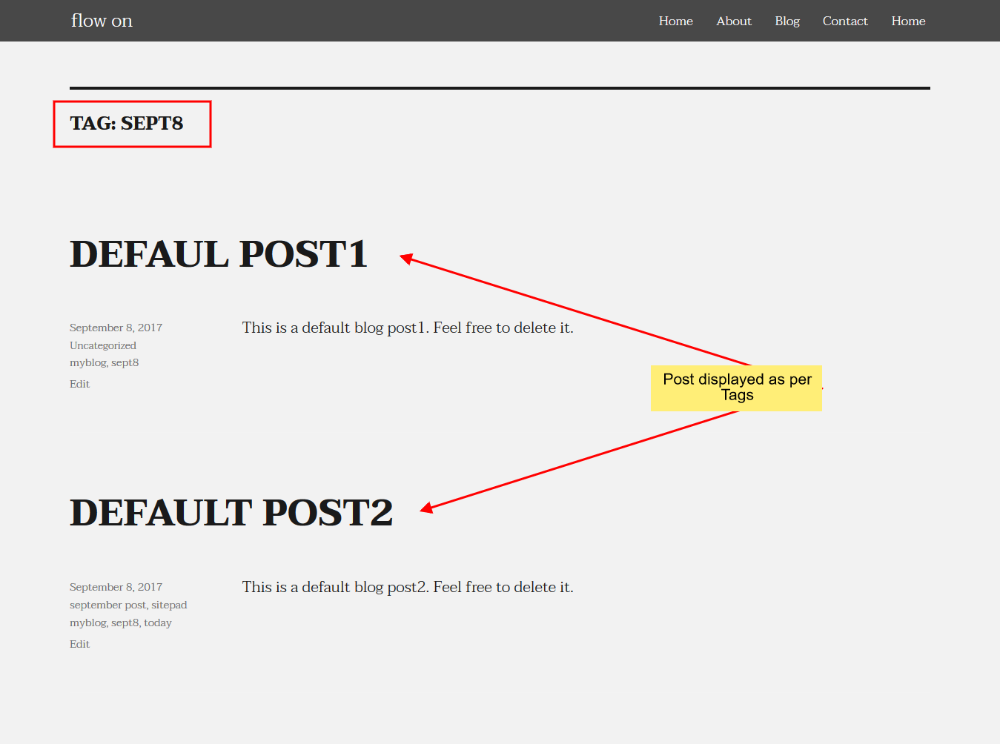
Also if you assign a single tag to more than one post and when you click on that tag name it will show all the blog post assigned to that tag as shown in the image below:.
How to Add Categories to Blog Post
In this tutorial, we will show you How to Add Categories to Blog Post.
For Adding Categories to your Blog Post you will need to access SitePad Editor.
GO TO SITEPAD EDITOR
From your Control Panel click on SitePad Website Builder. You will be redirected to SitePad Editor Server.
Once you are redirected to the Editor Server you will see Blog in the Main menu. Click on All Posts and then click on Edit Icon to edit the Post. You will be redirected to the Editor.
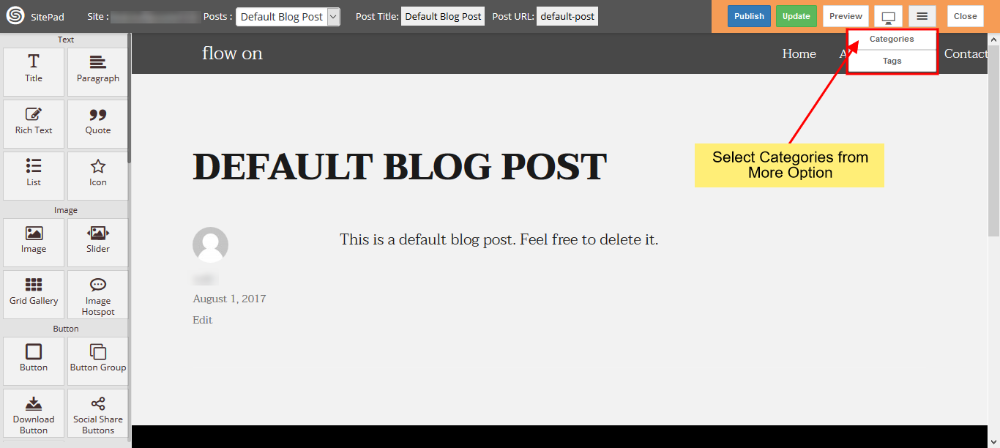
MORE OPTION AND CATEGORIES BUTTON
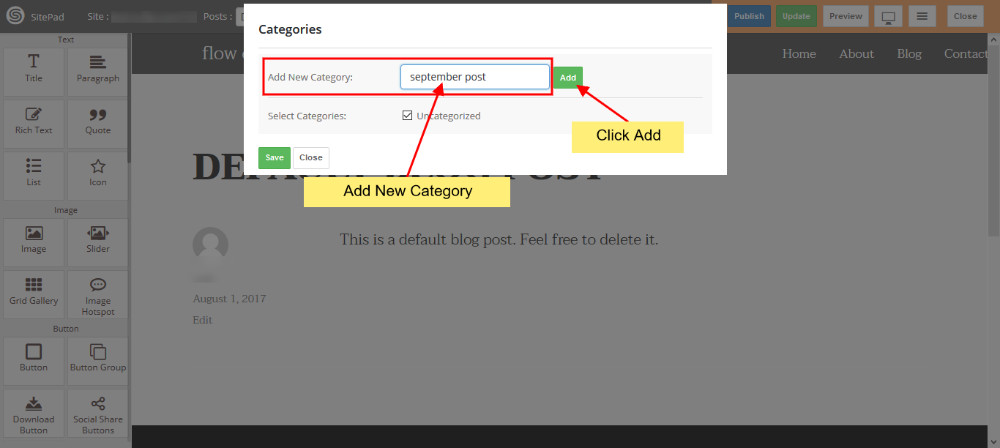
In Editor, you will need to hover the mouse on More then select Categories Button.
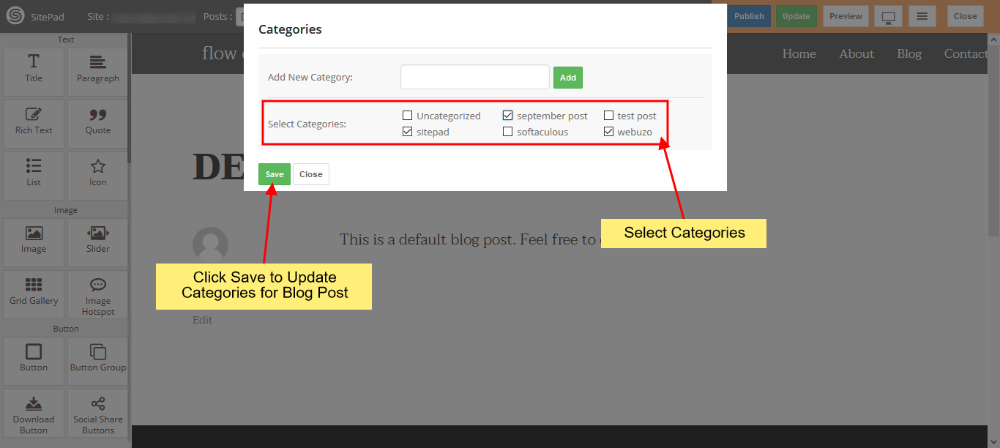
A dialog box will appear in which you can add a New Category as shown in the image below or you can select from different Categories already added.
After selecting which Categories you want to assign to your post then click on Save to update the categories for the Post as shown in the image below.
PREVIEW CHANGES
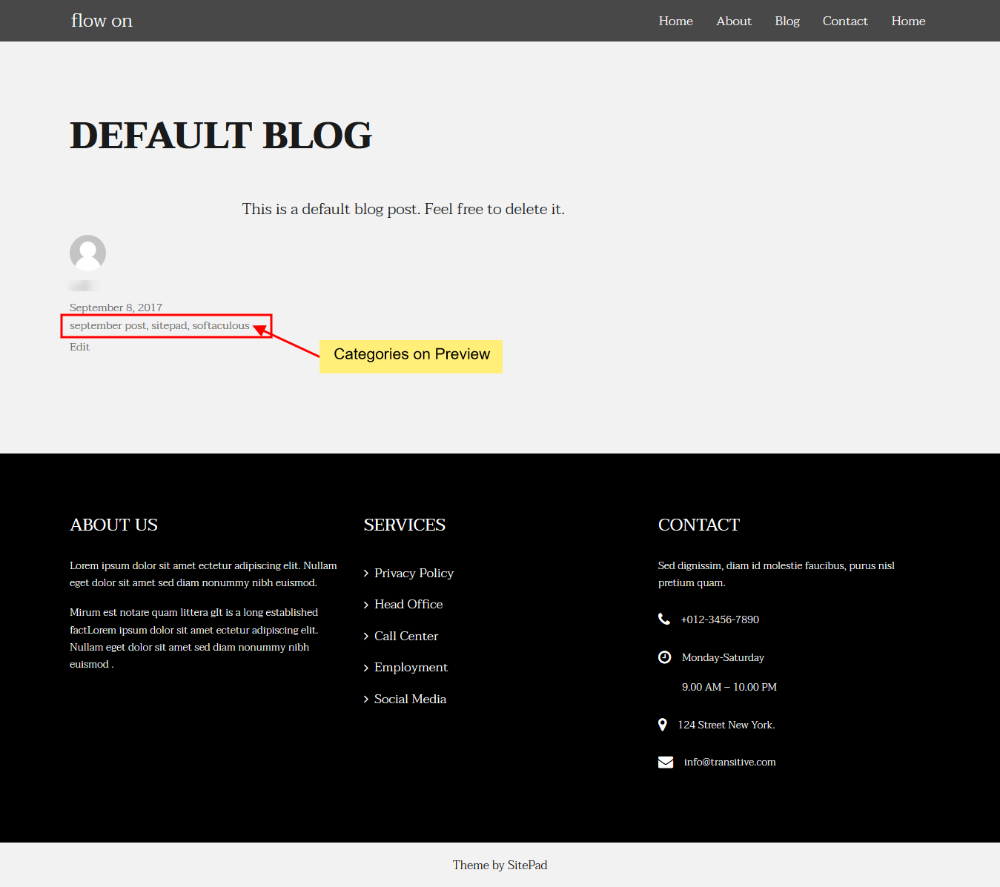
After assigning categories to the post, on preview, your post would look like the image given below:
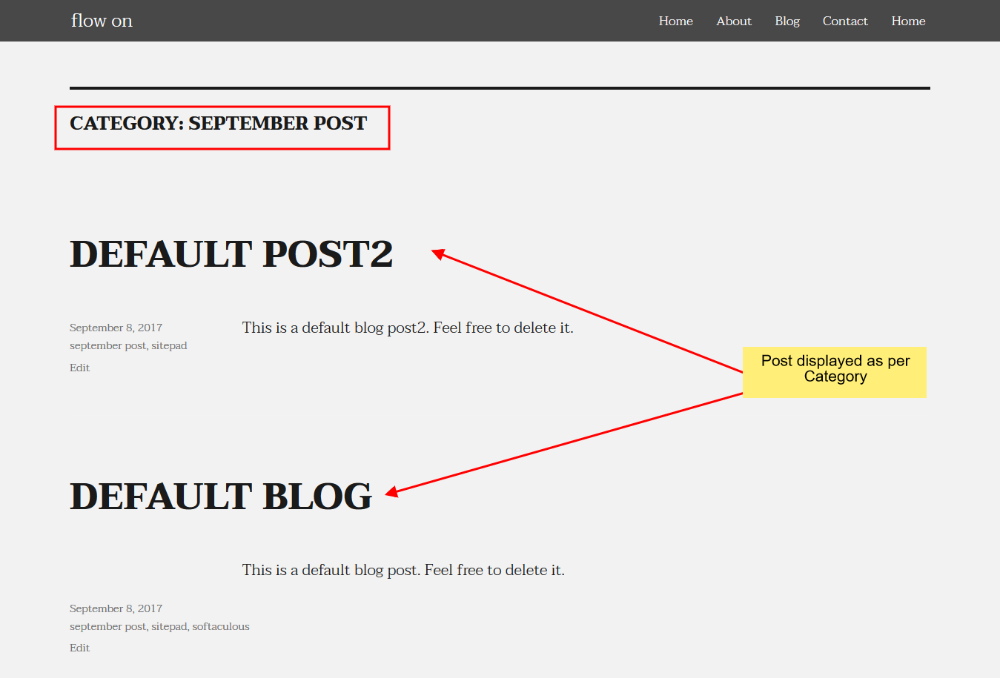
Also if you assign a single category to more than one post and when you click on that category name it will show all the blog post assigned to that category as shown in the image below:
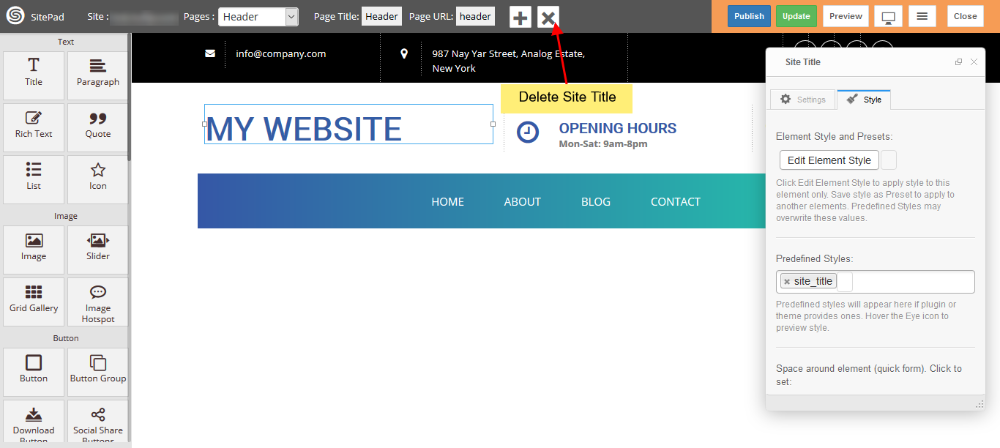
How to Edit Custom Site Title
This documentation will guide you on How to Insert Site Title for Pages.
GO TO EDITOR
When on SitePad Website Builder Dashboard. Hover on Pages option given on the left sidebar and then click on All Pages. Once on all Pages Click on Edit Icon of Any Page.
You will be redirected to Editor.
SELECT SEO OPTION
On SitePad Editor hover on more menu on the navigation bar. When you hover on more menu three buttons will be drop down i.e Reset Page, SEO Options and Custom HTML.
Click on SEO Option.

INSERT SITE TITLE
On clicking SEO Option you will see a dialog box will appear. Insert Site Title for any Page using drop down menu.
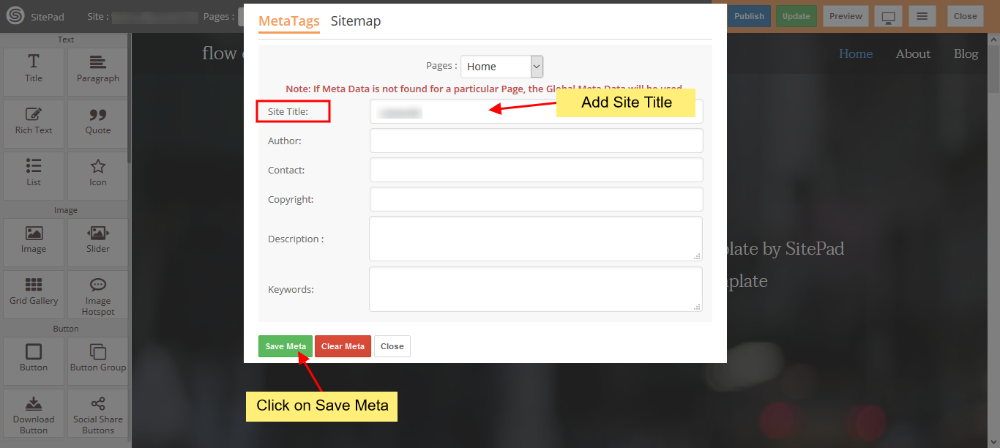
Once you have made the changes then click on Save Meta to save the Site Title.
CLEAR META DETAILS
To Clear Site Title of the current page click on Clear Meta. Site Title will be reset to none.

How to Add CSS using Custom HTML
This documentation will guide you on How to Insert CSS using Custom HTML code.
GO TO EDITOR
When on SitePad Website Builder Dashboard. Hover on Pages option given on the left sidebar and then click on All Pages. Once on all Pages Click on Edit Icon of Any Page.
You will be redirected to Editor.
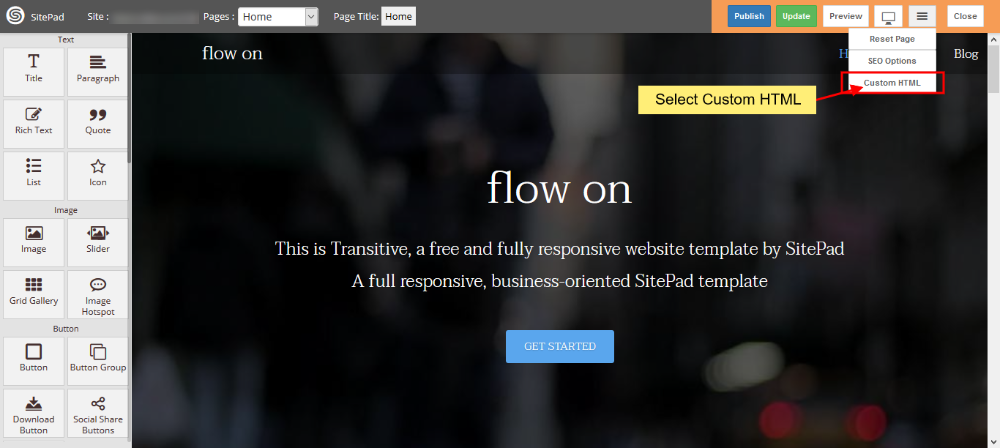
SELECT CUSTOM HTML
On SitePad Editor hover on more menu on the navigation bar. When you hover on more menu three buttons will be drop down i.e Reset Page, SEO Options and Custom HTML.
Click on Custom HTML.
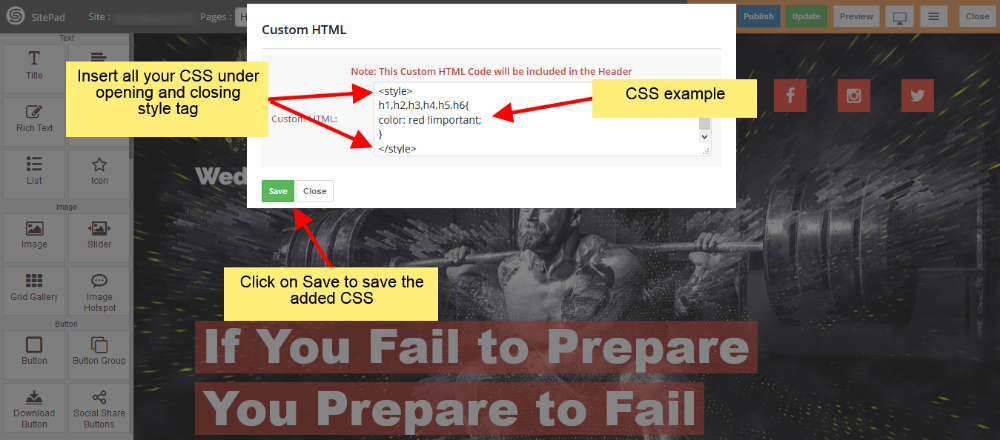
INSERT CSS IN CUSTOM HTML
On clicking Custom HTML you will see a dialog box will appear. Insert all your CSS under style tag as shown in image below.
How to Insert Custom HTML
This documentation will guide you on How to Insert Custom HTML code.
GO TO EDITOR
When on SitePad Website Builder Dashboard. Hover on Pages option given on the left sidebar and then click on All Pages. Once on all Pages Click on Edit Icon of Any Page.
You will be redirected to Editor.
SELECT CUSTOM HTML
On SitePad Editor hover on more menu on the navigation bar. When you hover on more menu three buttons will be drop down i.e Reset Page, SEO Options and Custom HTML.
Click on Custom HTML.
INSERT CUSTOM HTML FOR HEADER
On clicking Custom HTML you will see a dialog box will appear. Insert Custom HTML code for Header in the given textarea.

Once you have made the changes then click on Save to save the Custom HTML.
How to Reset Pages, Blogs or Site
This guide will show you how to Reset Pages, Reset Blogs and Reset Site.
RESET
When you are on SitePad Editor you will see Reset Button. Click on the Reset Button.

Then you will find three option. Choose an appropriate option.
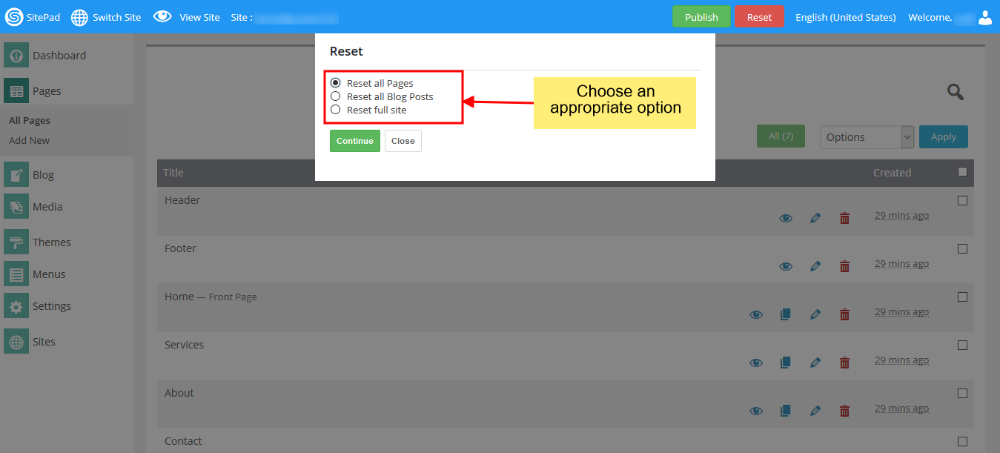
Note:
1. Reset all Pages – This will Reset only Pages.
2. Reset all Blog Posts – This will Reset only Blog Pages.
3. Reset full site – This will Reset full site (after reset you will need to start making the website from scratch).
Once you select the option then click on Continue Button. Then you will see a confirmation box.
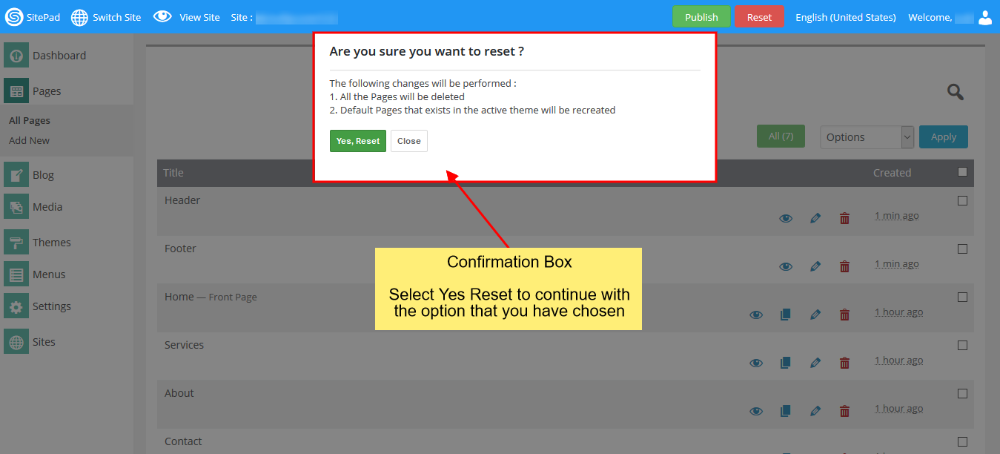
When you click on Yes, Reset Button it will process ahead with the option that you have just confirmed.
Once Reset is done it will reload the page.
Note: On Full Reset you will be redirected to Themes where you will need to select the new theme.
How to Change Language
You can change the SitePad Editor Language in two ways (second one is easier).
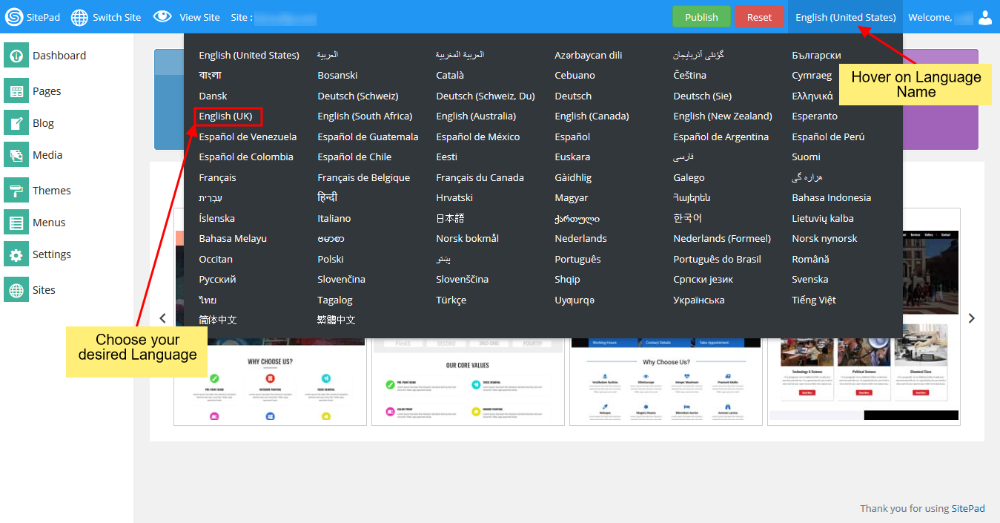
FROM NAVIGATION BAR
You can change language from the Navigation bar. i.e On Top Navigation bar where you see the selected language name being displayed you can hover on the name. This will open a drop down list of available languages you can select your desired language. Check out the example below.
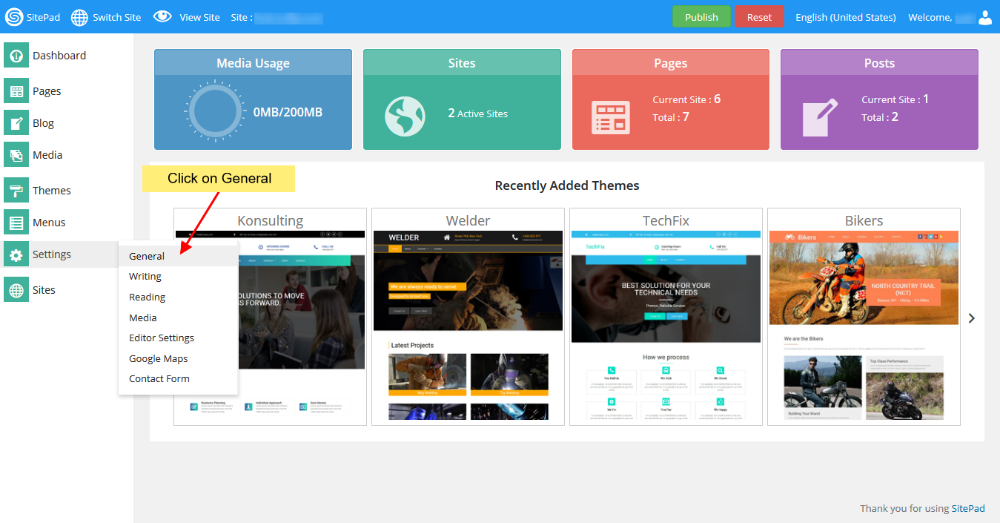
FROM SETTINGS PAGE
When you are on SitePad Editor dashboard. Hover on Settings and then click on General.
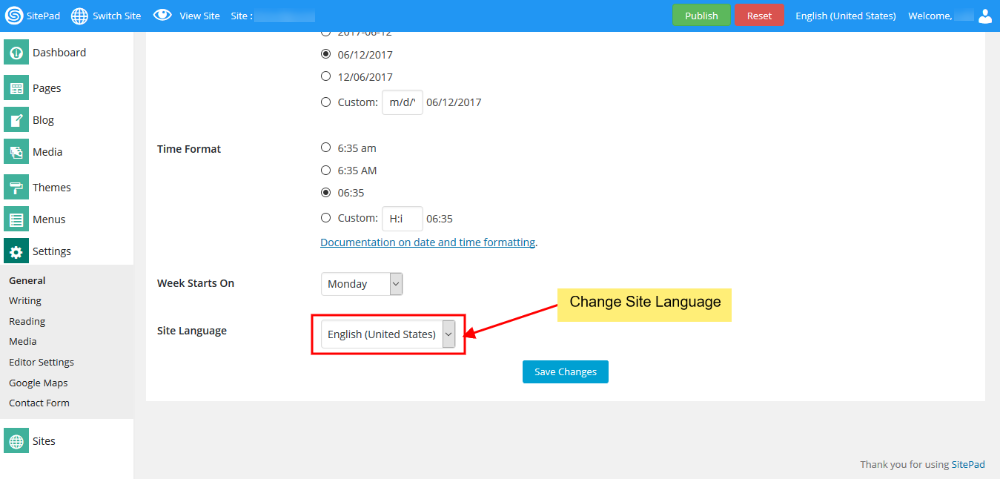
Once on General Settings page you will see the option Site Language as shown in the image below. You can select your desired language from the drop down list.
How to Clone a Site
This guide will show you how to Clone a Site.
CLONE A SITE
Click the Sites to display all the site that you have created from SitePad Dashboard.
Once you see all Sites. Click on the Clone Icon of the site that you want to clone or you can click on Clone Site as shown in the image below.
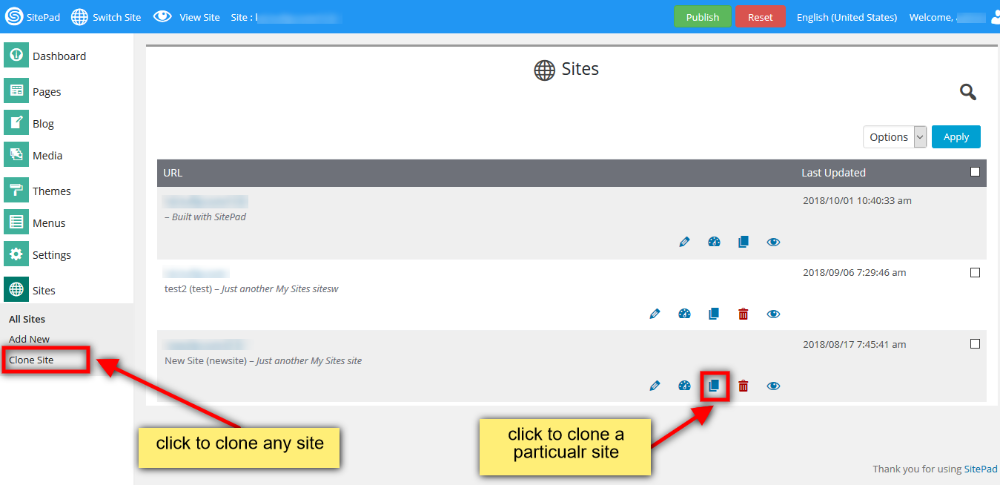
When you click on Clone Icon you will see all the options regarding the cloning.
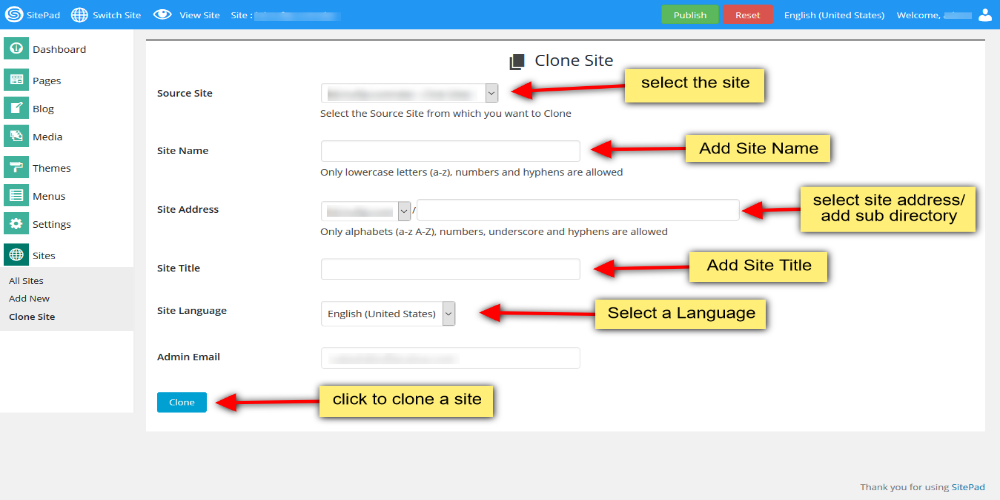
Select the site from source site dropdown list and Add New Site Name for website. Then enter the New Site Address (select from your domains) and then add new directory. Next you need to Enter Site Title. You can also change the language of your clone site and select it to your native language.
Once the website is cloned Successfully you will see the success message asking you to Visit Dashboard of the clone site or Edit newly created clone site.
How to Clone a Page
This guide will show you how to Clone a Page.
CLONE A PAGE
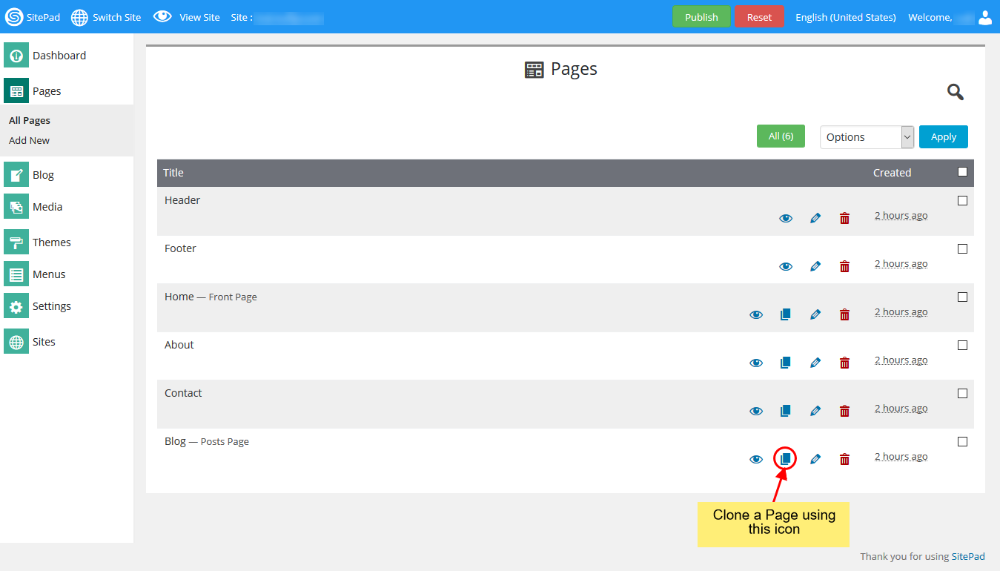
When you hover on Pages and Click on All Pages
Once you see all Pages. Click on the Clone Icon of the page you want to clone as shown in the image below.
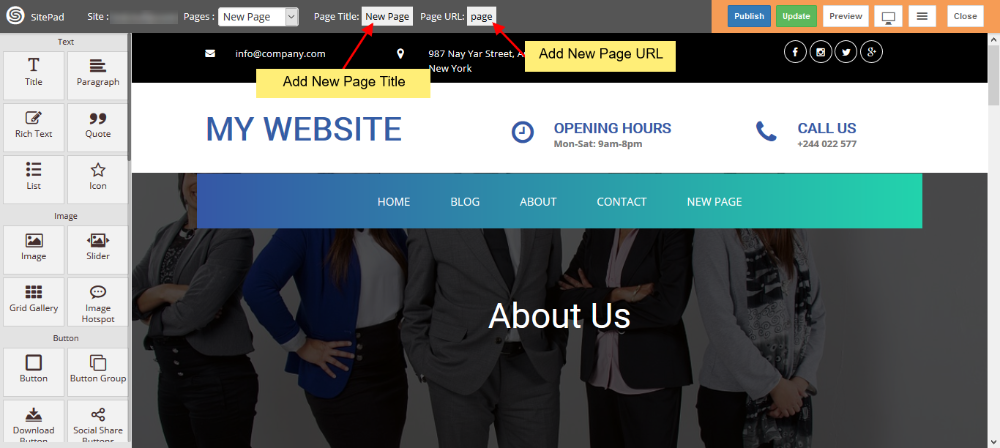
After you click on Clone Icon you will be redirected to SitePad Editor of the newly clone page. You can provide the URL and Page Title and then click on Update and then edit the newly cloned page as per your requirement.
How to Create Menu
When the first Theme is selected it automatically populates the Menu but if you want to Edit or Create Menu you can follow this guide.
- Hover on Themes tab in the left sidebar and when you see Menus option click on it as shown in the image below. Please Note : The menu name should be Header Menu.
- Select the Pages that you want to show on your Header Menu after Selection click on Add Menu.
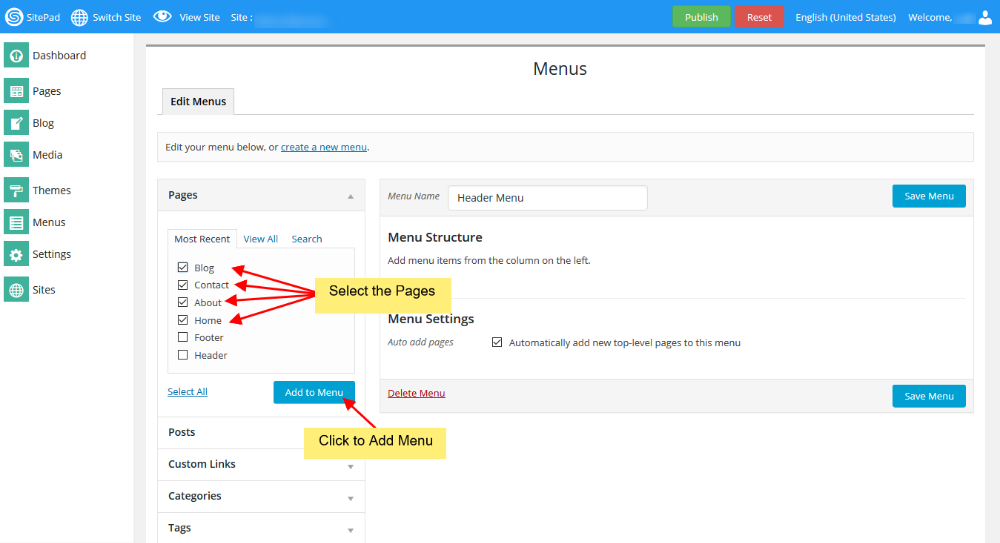
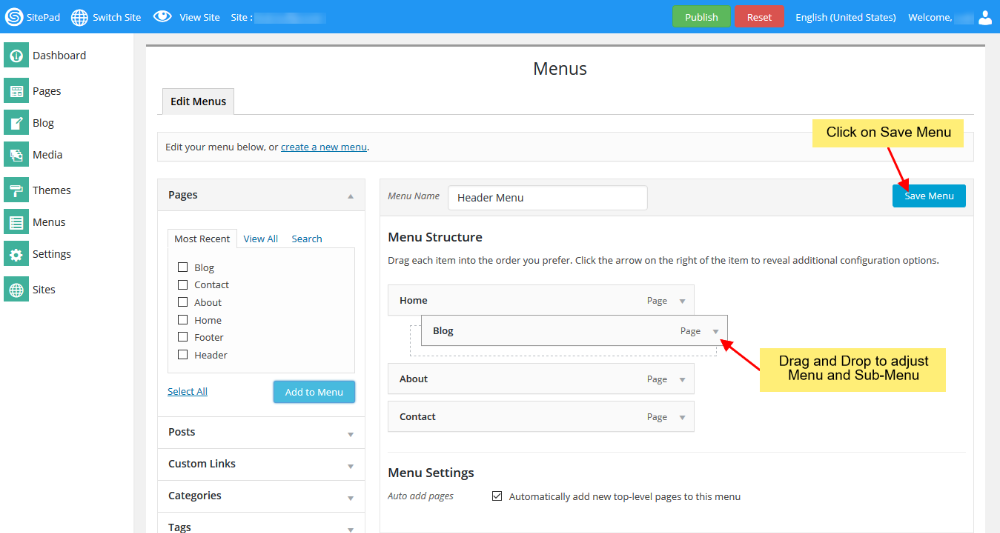
- Adjust the Menu and Sub Menu by using Drag & Drop once done Click on Save Menu.
- If you want to remove any page from Menu you can do this by following below steps once done Click on Save Menu.
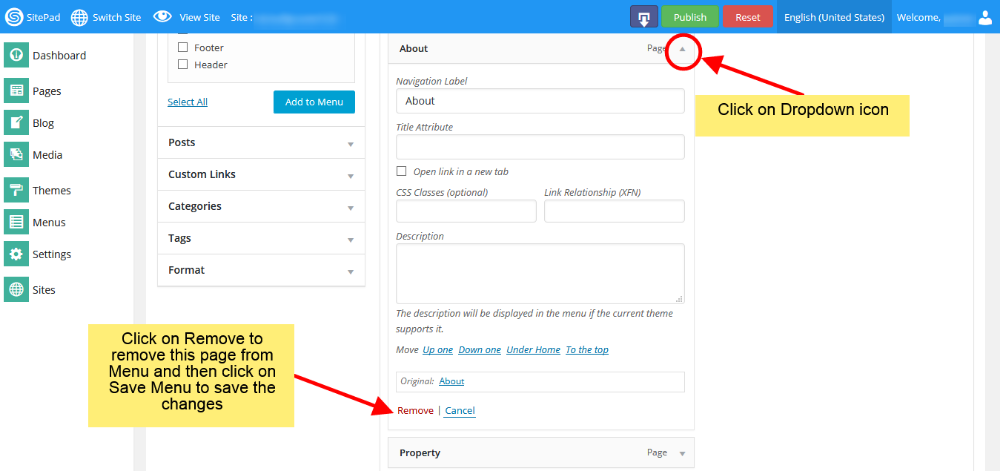
That’s it your done.
How to Add Add Site Title and Tagline
This documentation will show you how to add Site Title and Tagline to your website.
GO TO SETTINGS AND CLICK GENERAL
When you are on SitePad Website Builder dashboard. Hover on Settings tab in left menu and then click on General.
Once on General Settings page you will see editable options like Site Title, Tagline, Date Format, TimeZone, Time Format, Week Start On etc.
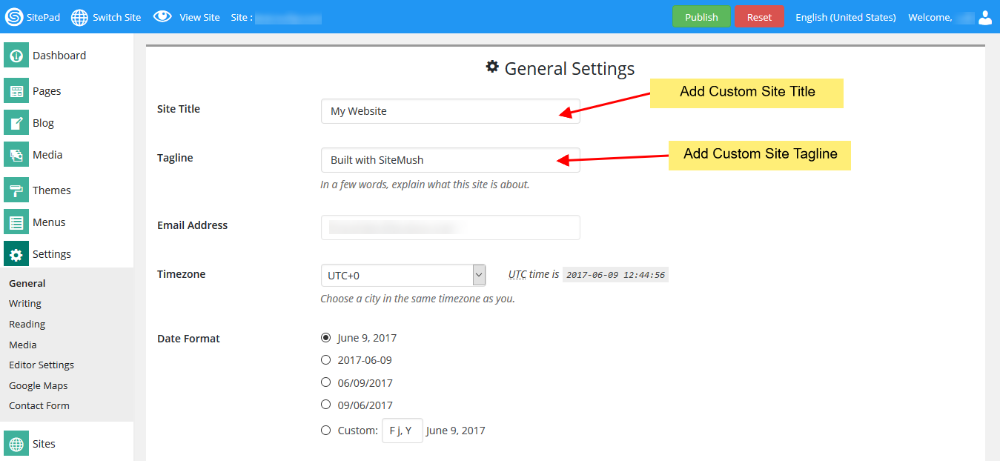
Enter the Site Title and Tagline for your website once you add it. Click on Save Changes button.
How to Add Custom Logo
This guide will show you how to Add a Custom Logo.
GO TO PAGES AND EDIT HEADER
When you are on SitePad Website Builder dashboard. You will see Pages option on Sidebar Navigation Menu. Hover on Pages and Click on All Pages
Once you see all Pages. Click on the Edit Icon of the Header Page shown like in the image below.

ADDING CUSTOM LOGO
You will be redirected to SitePad Editor for Header. When you are in SitePad Editor if you want to add just the logo you will need to remove Site Title as shown in the below image and if you want the logo as well as text you do not need to remove the Site Title.
Now drag and drop Images Widget to a new column in the same row with menu as shown in the image below.

After you drop the Image Widget. You will see a dialog box with naming Insert Media shown in the image below.
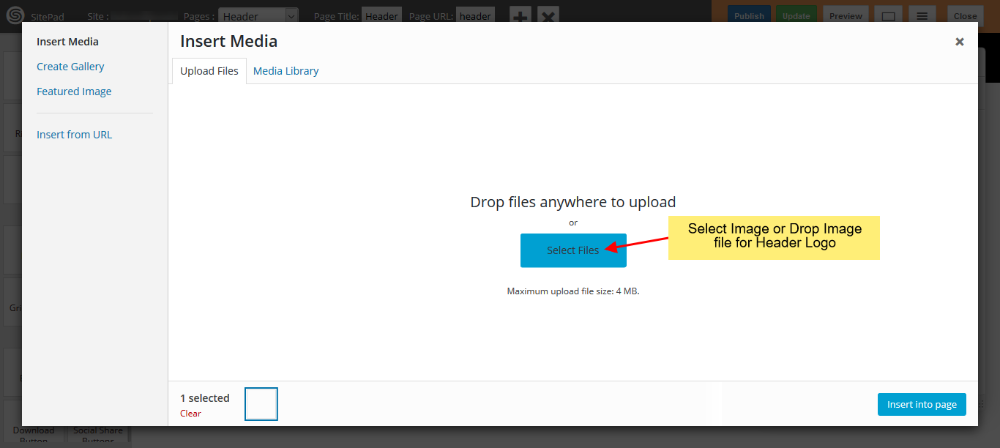
You can select the logo file or drop the file in the dialog box.
Once you upload the file Click on Insert into Page. Once the image is inserted you can adjust your logo column as per your menu.
Once Finished you can click on Update to Save if you want to edit other page.
How to Add New Blog
This guide is to help you add new Blog Post.
LOGIN IN TO CONTROL PANEL
Firstly Login to your Control Panel (e.g. cPanel’s url will be https://domain.com:2083) and login with your details. There click on the SitePad Icon or Link.
You will be redirected to SitePad Website Builder.
ADD NEW BLOG POST
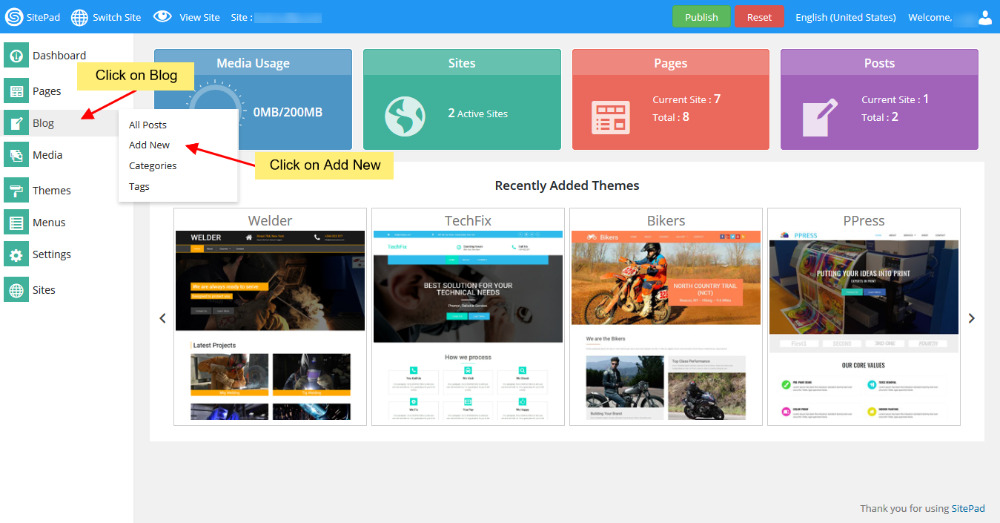
Once you are on SitePad Website Builder dashboard. You will see Blog option on Sidebar Navigation Menu.
Click on Blog and then click on Add New.
After you click on Add New it will redirect you to SitePad Website Editor.
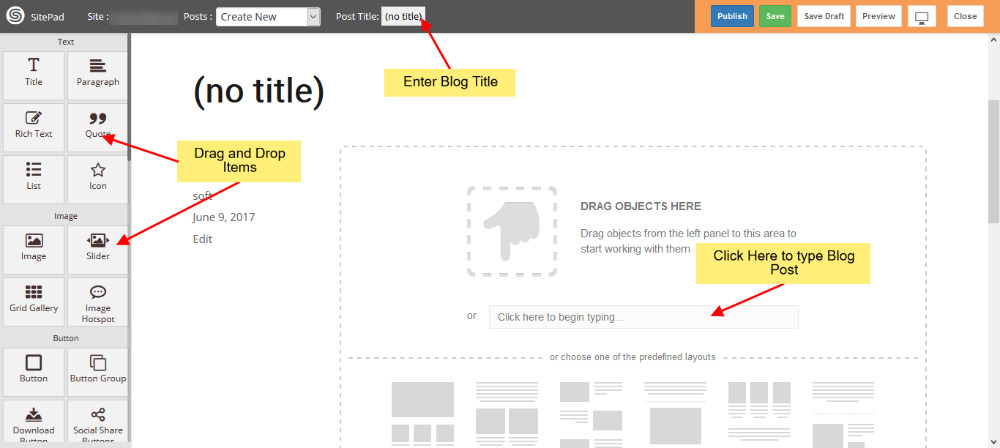
Enter the Blog Title then drag and drop items in your blog or you can even write a Blog Post by clicking on the textarea provided.
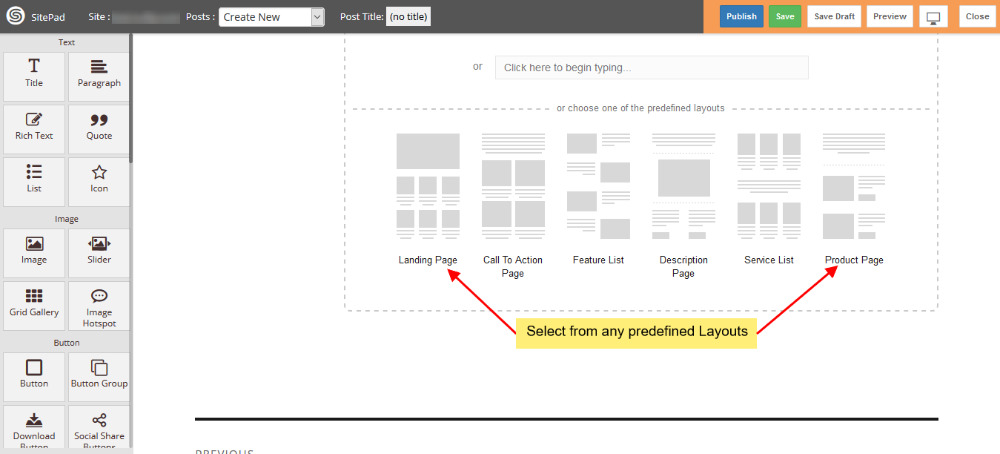
Also you can pick a predefined layout that we offer.
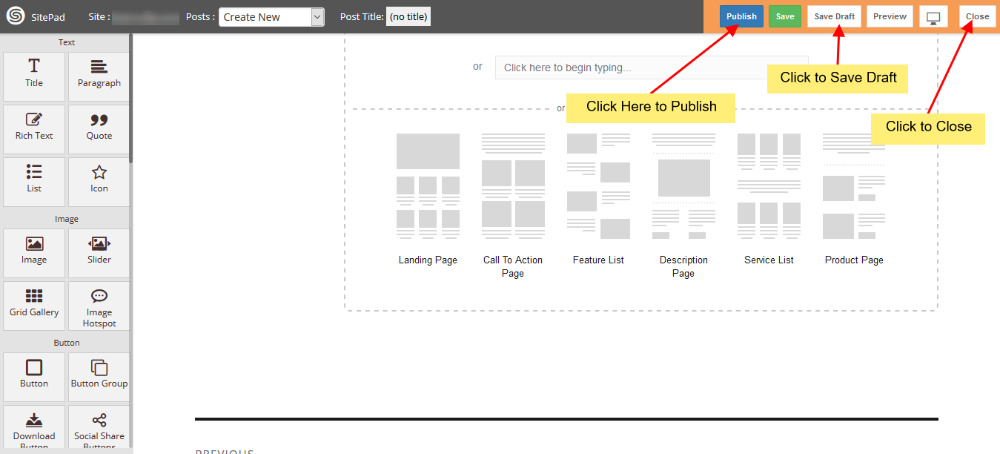
PUBLISH
After editing the blog post Click on Publish button to publish your blog post.
How to Add New Page
This guide will help you to Add New Page.
LOGIN IN TO CONTROL PANEL
Firstly Login to your Control Panel (e.g. cPanel’s url will be https://domain.com:2083) and login with your details. There click on the SitePad Icon or Link.
You will be redirected to Website Builder.
ADD NEW PAGE
Once you are on Website Builder dashboard. You will see Pages option on Sidebar Navigation M
Click on Pages to Add new pages or Edit pages for your website.
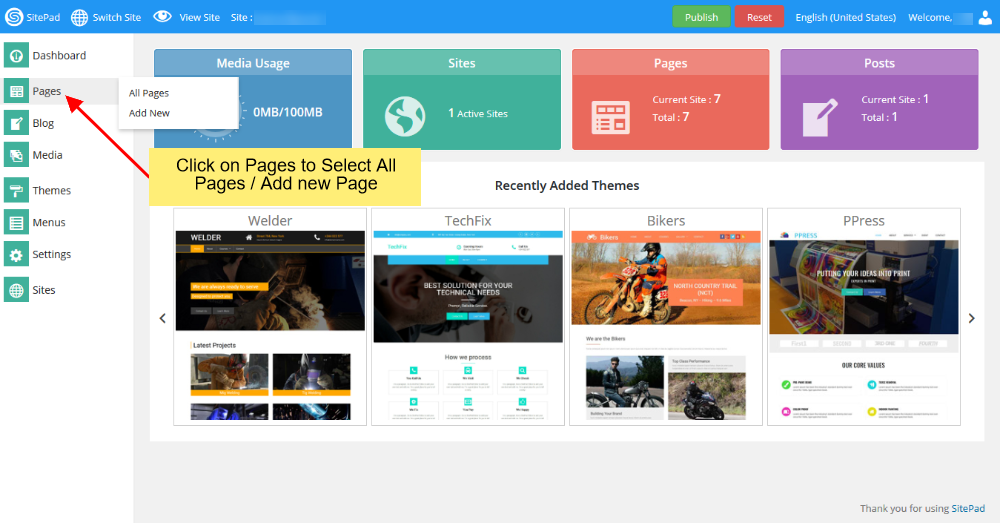
You can click on either option i.e Add Page or Click on Pages option to Select All Pages. When you select All Pages you can see certain options such as Edit Page, Delete Page, View Page etc.
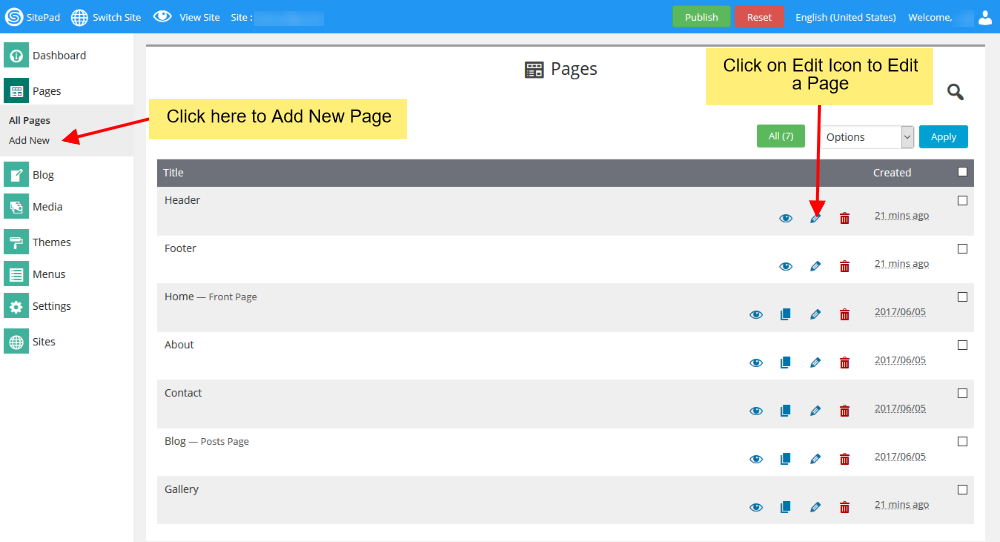
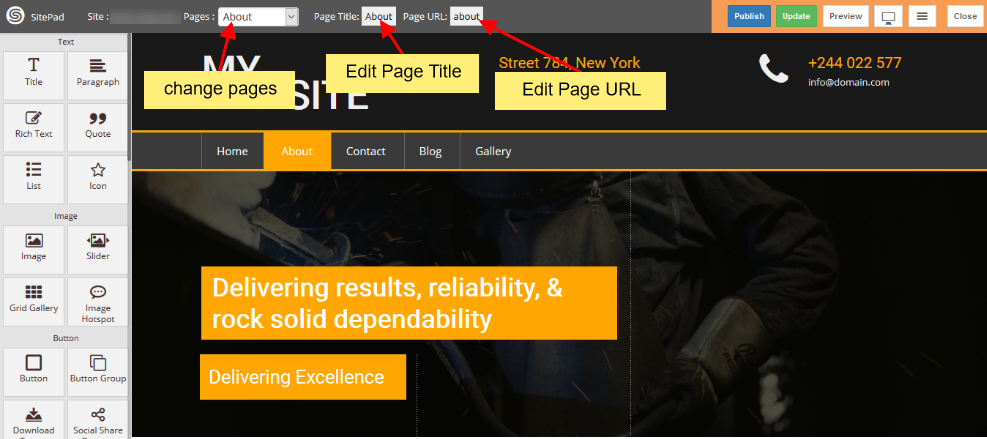
If you Select to Add New Page/Edit Page option. Then you will be redirected to Edit Page where you can Edit Page. If you select to Add new Page the page title will be New Page and Page url will be Page. You can change these both to your desire Page name and URL. By default the new page gets Added on the Menu Bar once you update the Menu Name changes to that of the Page Title.
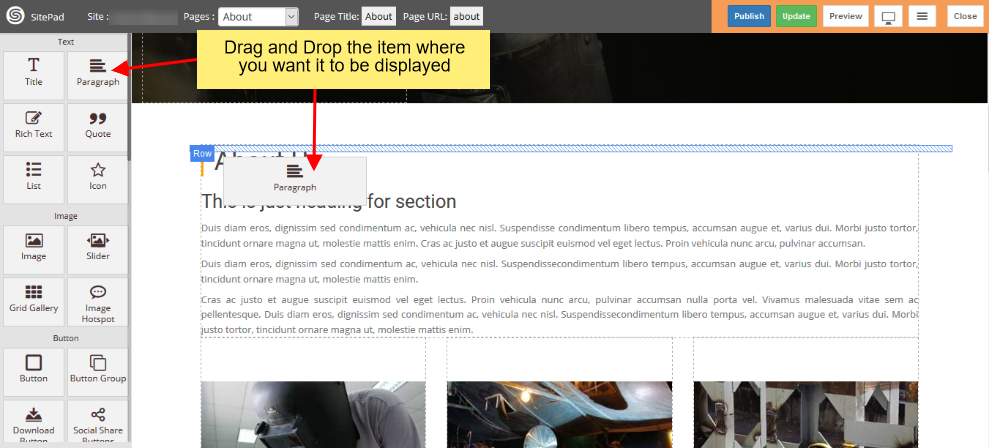
You can also drag and drop different Widgets where ever you want the to see the elements. There are many different Widgets like Title, Paragraph, Slider, Service Box, Rich Text, Images, Videos, etc.
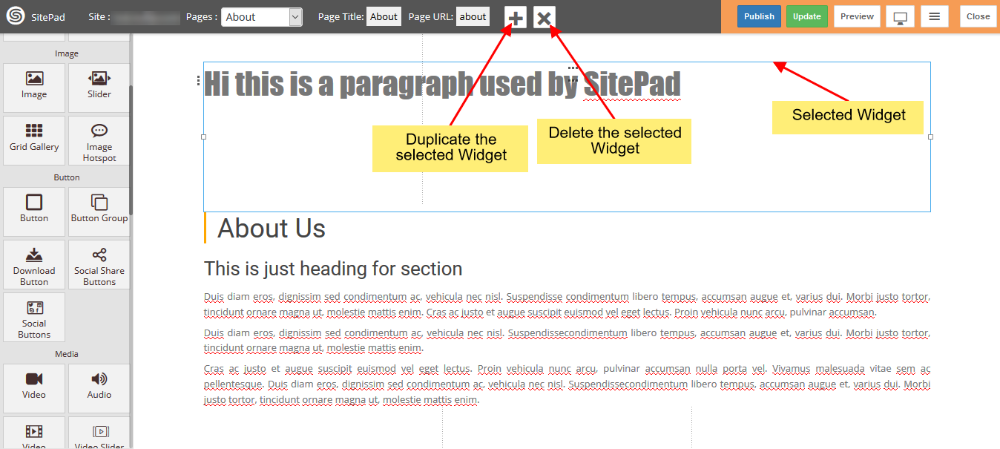
When the item is dropped on a particular position to Edit you will be able to find Action bar, Advance Option to Customize etc. for different types of Widgets.
Action Bar for Title
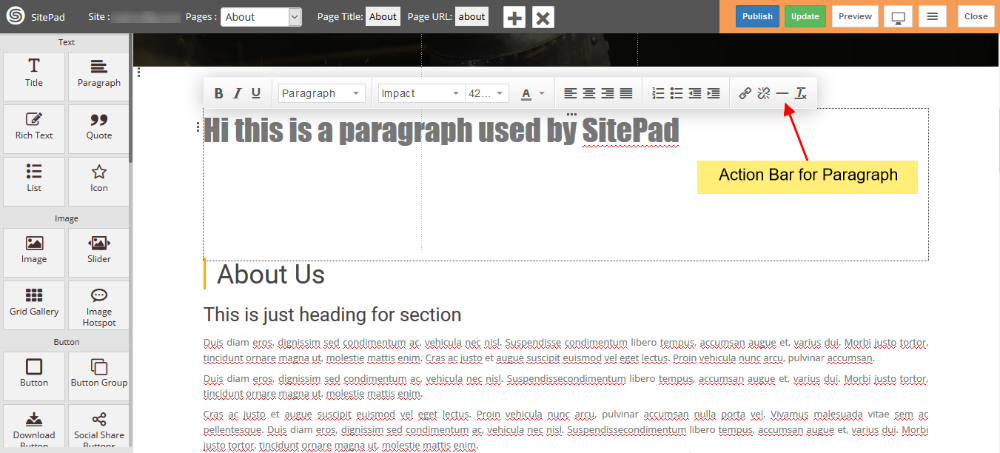
Advanced Option to Customize the Widget

You can select from different range of 40+ Widgets.
Duplicate a Widget or Delete a Widgets
PUBLISH
After you Finish Editing your work you can Publish your Website or you can update it and later on Publish it.
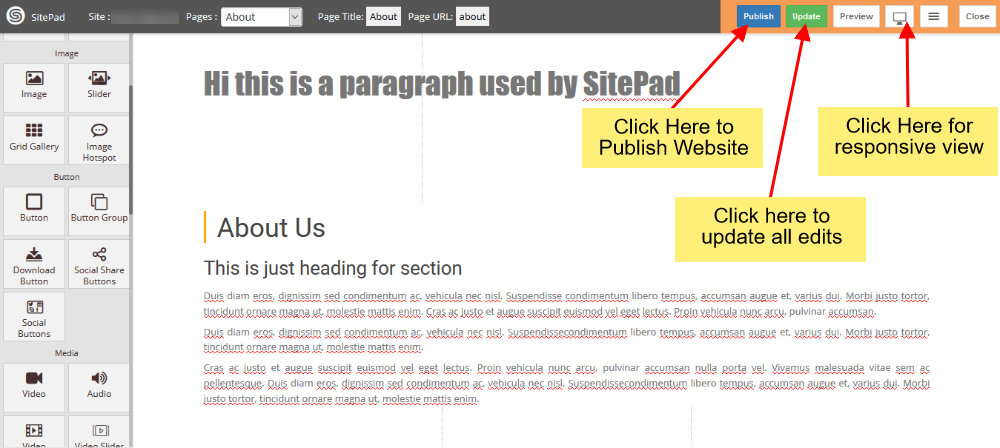
You can find these Finishing Option on the upper right corner of the editor.
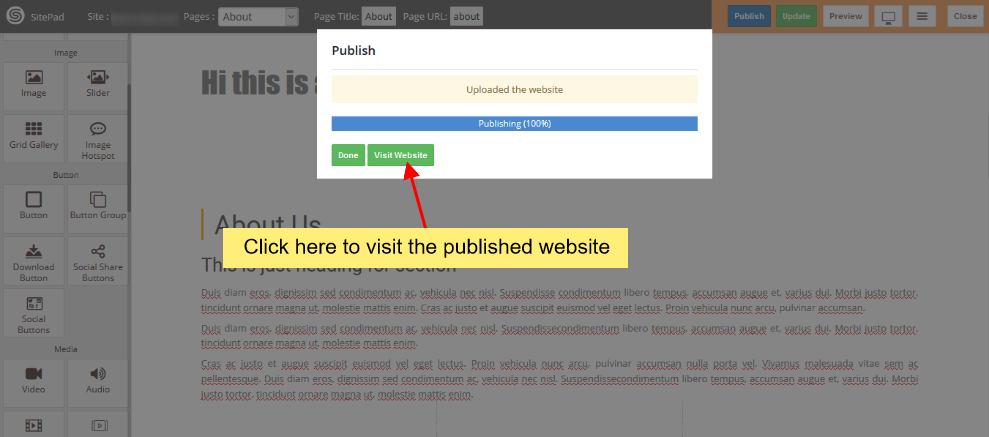
After you click on Publish button you will see progress bar. Once the progress bar is complete you will find visit website button you can check the website you Published.
Add New Site
This guide will show you how to Add New Site.
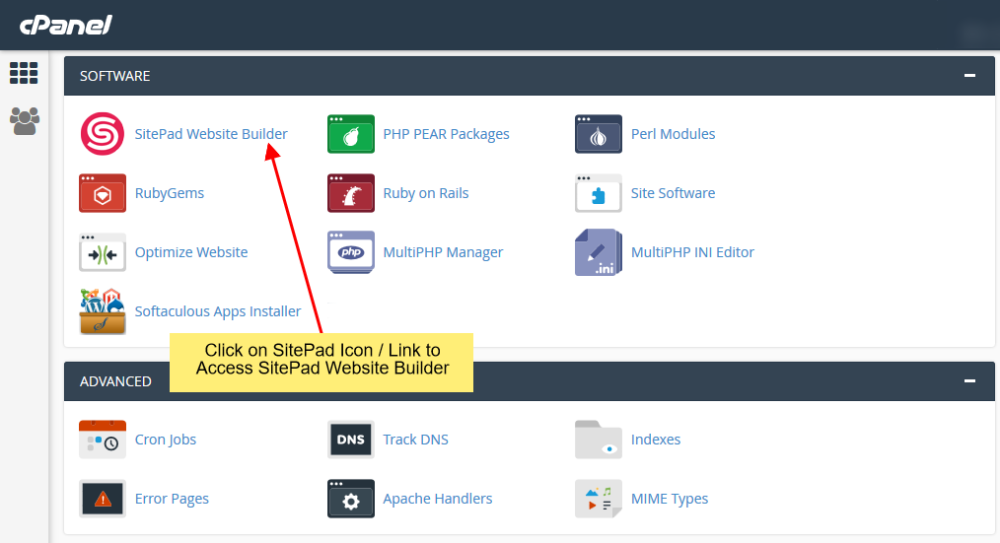
LOGIN IN TO CONTROL PANEL
Firstly Login to your Control Panel (e.g. cPanel’s url will be https://domain.com:2083) and login with your details. There click on the SitePad Icon or Link.
You will be redirected to Website Builder.
ADD NEW SITE
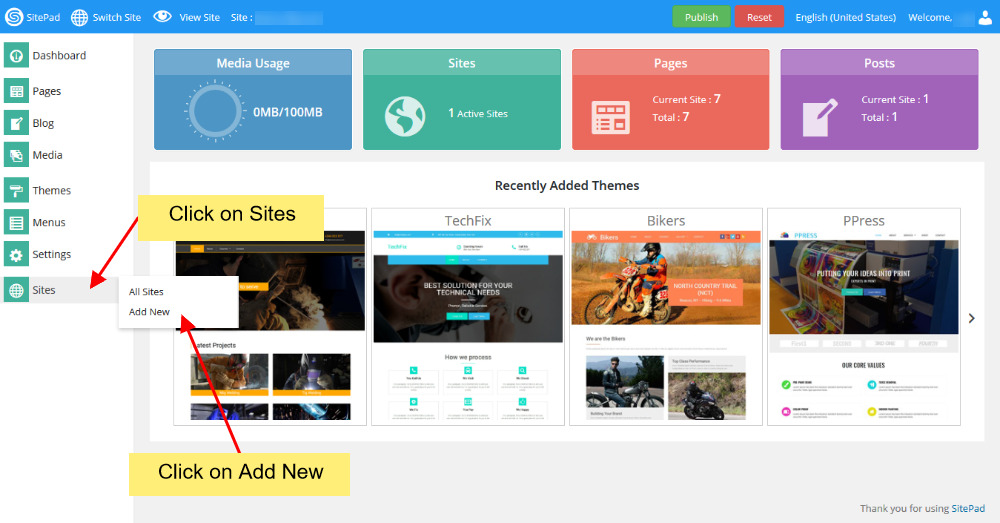
Once you are on SitePad Website Builder dashboard. You will see Sites option on Sidebar Navigation Menu.
Click on Sites and then Click on Add New Site.
Now you will see all the options regarding adding new sites.
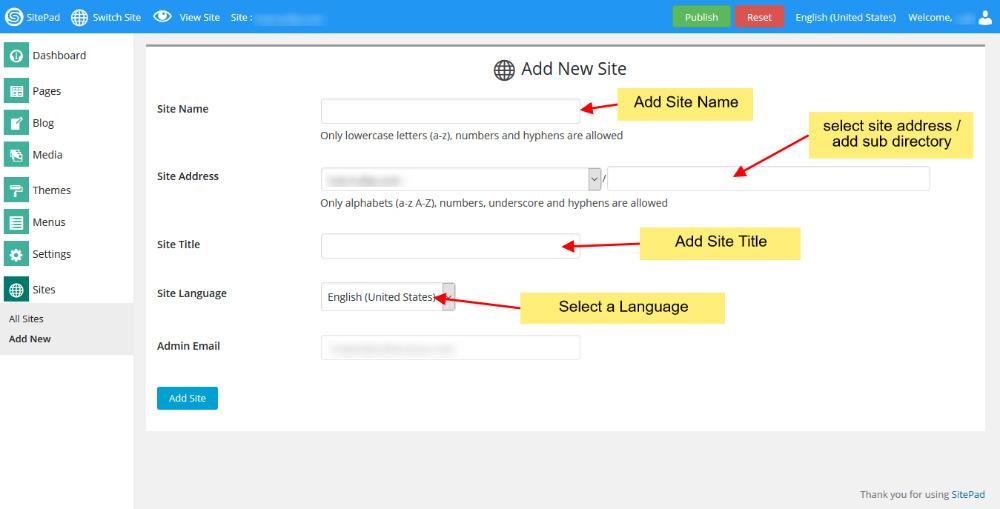
Add New Site Name for website to be shown on switch site. Then enter the New Site Address (select from your domains) and then add new directory. Next you need to Enter Site Title. You can also change the language of your new site and select it to your native language. Also if you want you can also add new admin email.
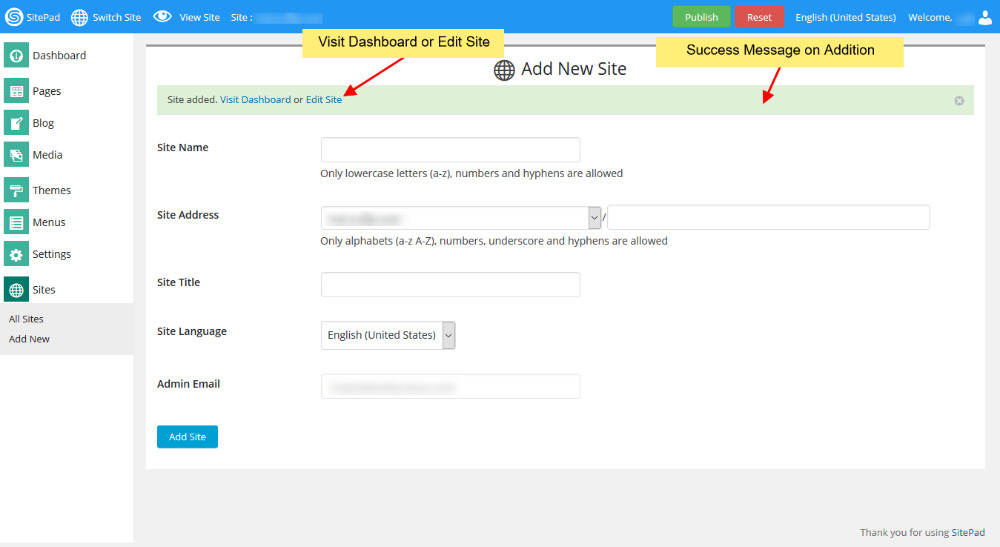
Once the website is added Successfully you will see the success message asking you to visit Dashboard of the new site or Edit newly created Site.
How to Create Website
This guide will help you how to Create a Website using SitePad Website builder.
LOGIN IN TO CONTROL PANEL
Firstly Login to your Control Panel (e.g. cPanel’s url will be https://domain.com:2083) and login with your details. There click on the SitePad Icon or Link.
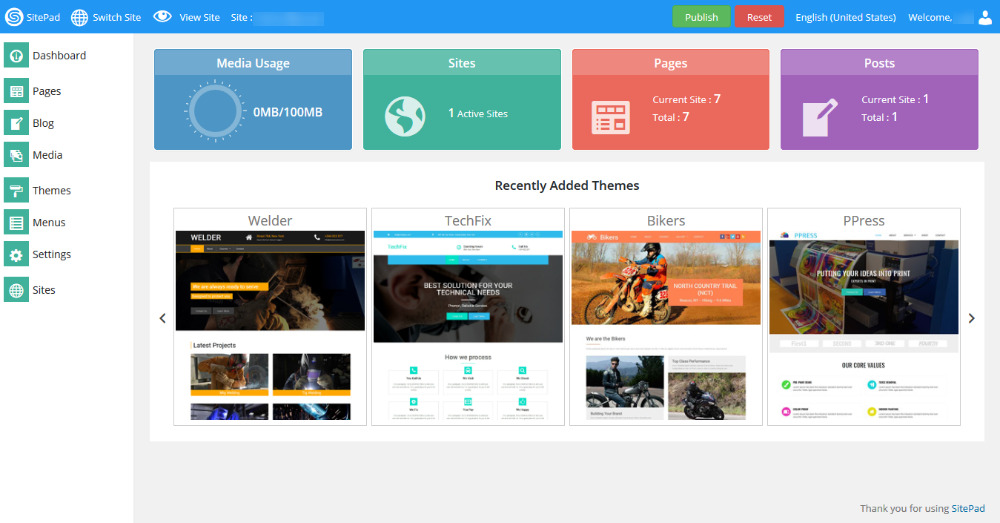
You will be redirected to SitePad Website Builder.
SELECT A THEME
Once you are redirected to SitePad. You will need to select a Theme for your website
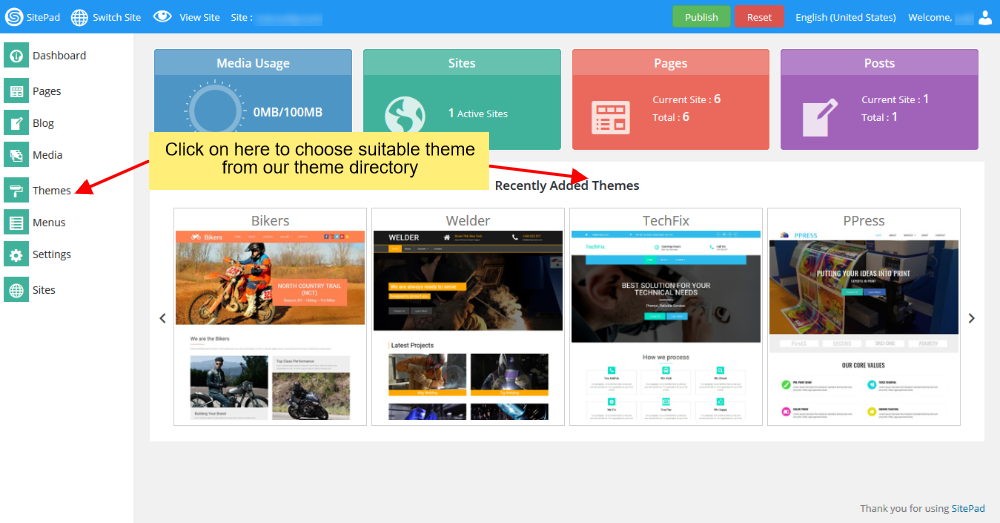
You can click on either option and you will be redirect to our Theme directory where you will need to select/choose a theme for your website. You can also search for a Theme through Theme Search Option. Checkout Theme details. Once you find a theme suitable for your website you can click on Activate button to Set the theme as a default theme for your Website Editing.
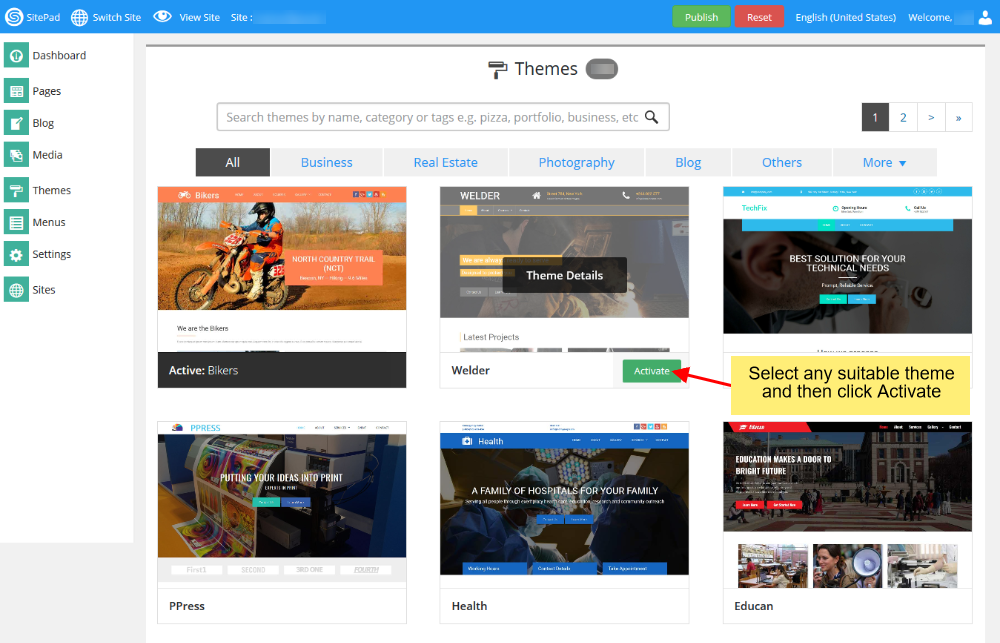
When theme is Activated. You can checkout for a preview of this Theme.
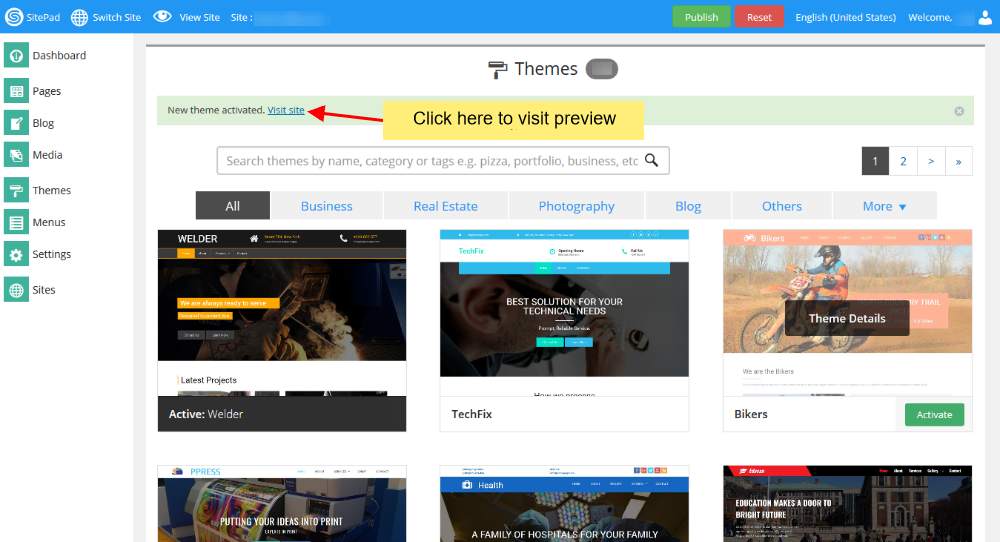
Click on Visit Site to Preview.
ADDING/EDITING PAGES
You can now Add new pages or Edit pages for your website.
You can click on either option i.e Add Page or Click on Pages option to Select All Pages. When you select All Pages you can see certain options such as Edit Page, Delete Page, View Page etc.
**Note: Do not delete Header and Footer page
If you Select to Add New Page/Edit Page option. Then you will be redirected to Edit Page where you can Edit Page. If you select to Add new Page the page title will be New Page and Page url will be Page. You can change these both to your desire Page name and URL. By default the new page gets Added on the Menu Bar once you update the Menu Name changes to that of the Page Title.
You can also drag and drop different Widgets where ever you want the to see the elements. There are many different Widgets like Title, Paragraph, Slider, Service Box, Rich Text, Images, Videos, etc
When the item is dropped on a particular position to Edit you will be able to find Action bar, Advance Option to Customize etc. for different types of Widgets.
PUBLISH
After you Finish Editing your work you can Publish your Website or you can update it and later on Publish it.
After you click on Publish button you will see progress bar. Once the progress bar is complete you will find visit website button you can check the website you Published.
Miscellaneous
How to Add Cookie Consent
This guide will help you with How to Add Cookie Consent to your website.
LOGIN IN TO CONTROL PANEL
Firstly Login to your Control Panel (e.g. cPanel’s URL will be https://domain.com:2083) and log in with your details. There click on the SitePad Icon or Link.
You will be redirected to SitePad Website Builder.
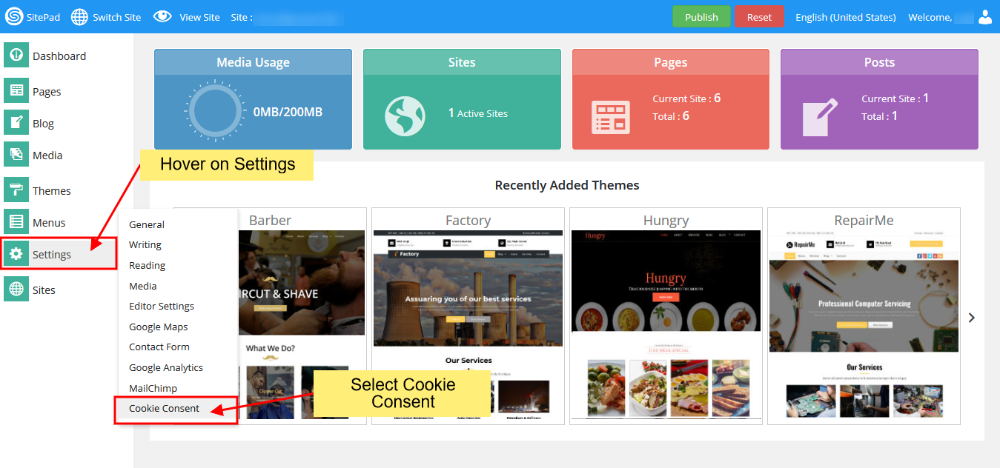
SELECT COOKIE CONSENT OPTION
Once you are redirected to SitePad Dashboard Hover your mouse on Settings which will show submenu list, select Cookie Consent from the given list.
TURN ON COOKIE CONSENT
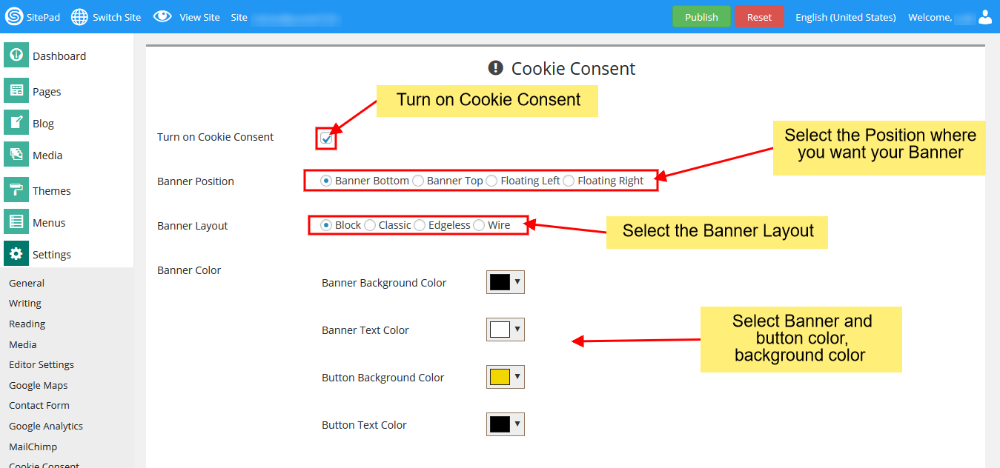
-
- Select Banner Position
- Select Banner Layout
- Select Banner Color where you can set Banner and Button color.
-
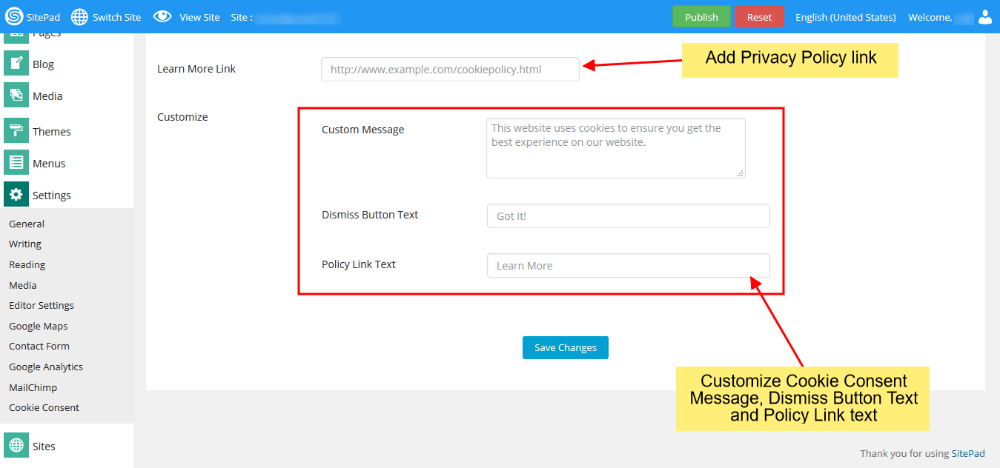
- Add your own Privacy Policy link.
- Customize the banner with your own Cookie Consent Message, Dismiss Button Text and Policy Link Text.
Once you’ve finished customizing you need to click on Save.
Changes can be viewed on the Preview website. Once you’ve finalized the changes then click on Publish
How to Add Email Template
This guide helps when you are using more than one Contact Form in your Website.
CONTACT FORM
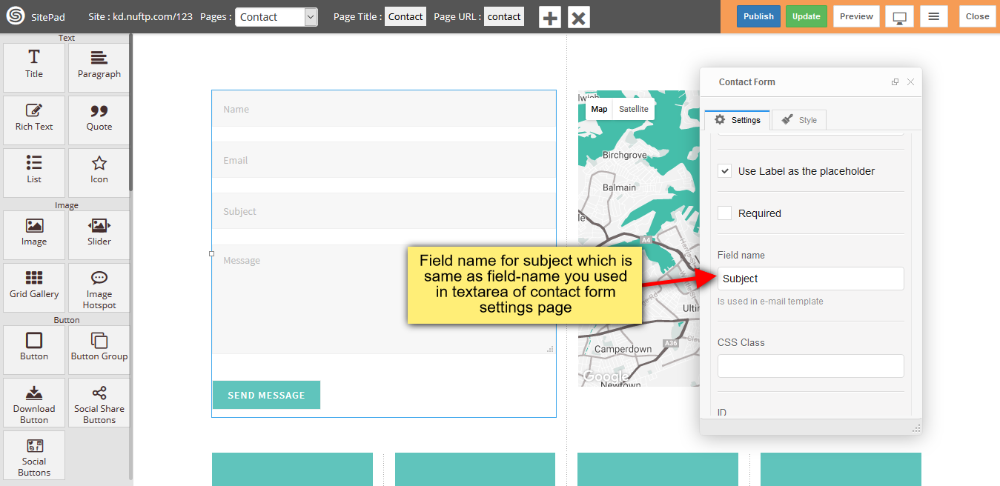
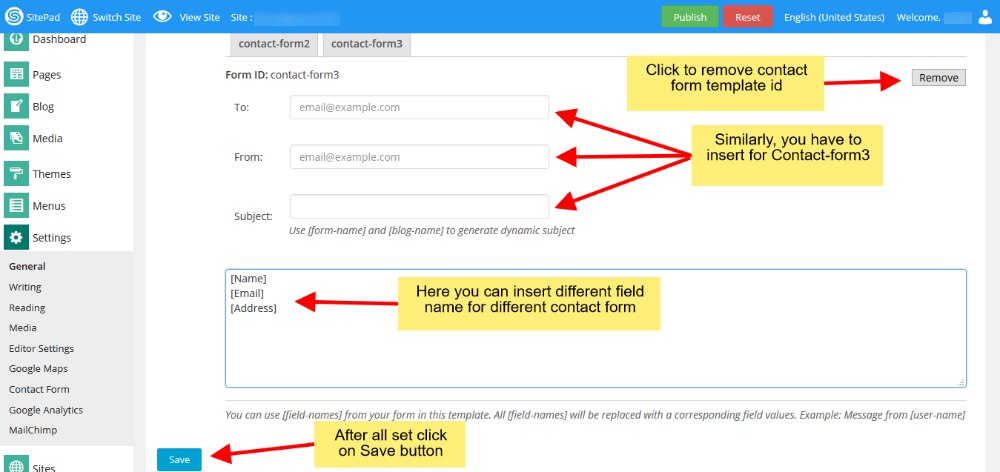
- Insert Field-Name , this Field-Name you will use in contact-form-id Textarea box of contact settings page.
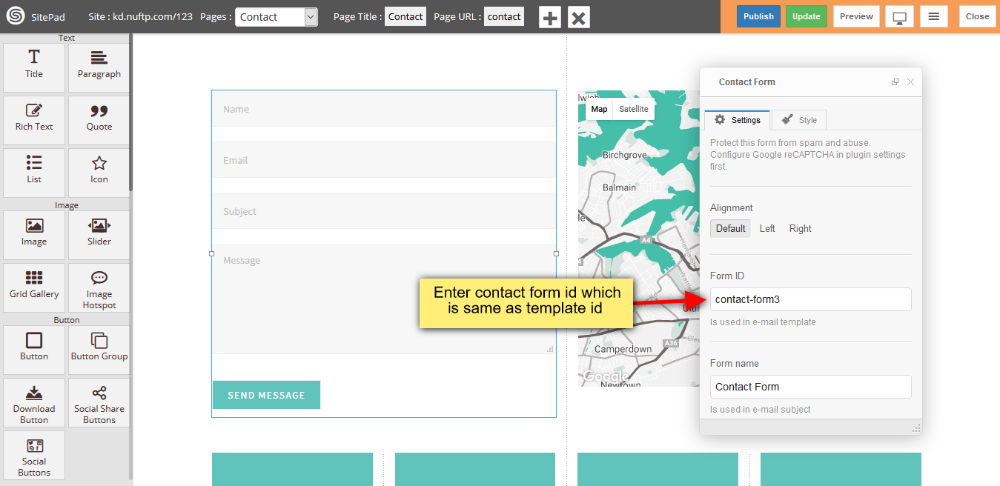
- Insert Form Id , this Form Id you will use in contact-form-id Textbox box of contact settings page.
CONTACT SETTINGS PAGE
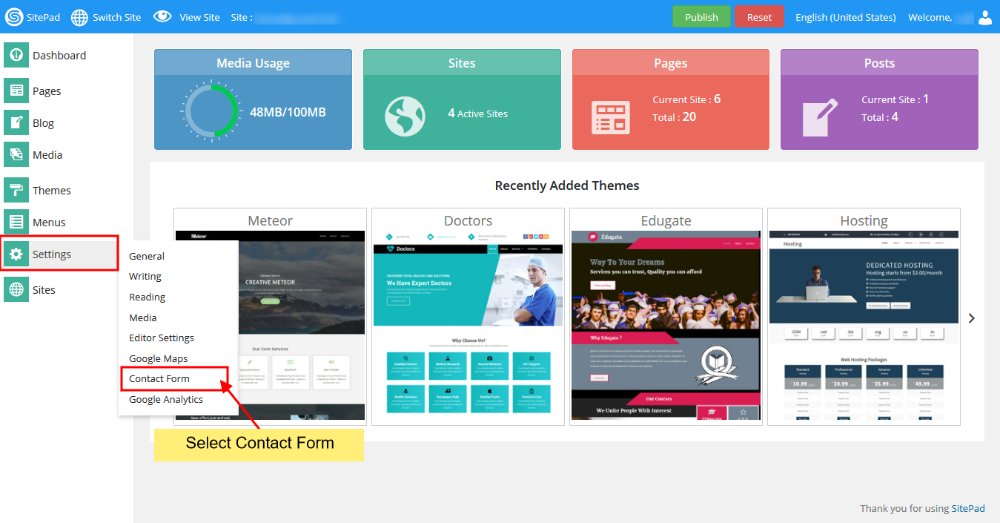
- Go to SitePad Settings Menu in that click on Contact Form submenu. You can see the image shown below.
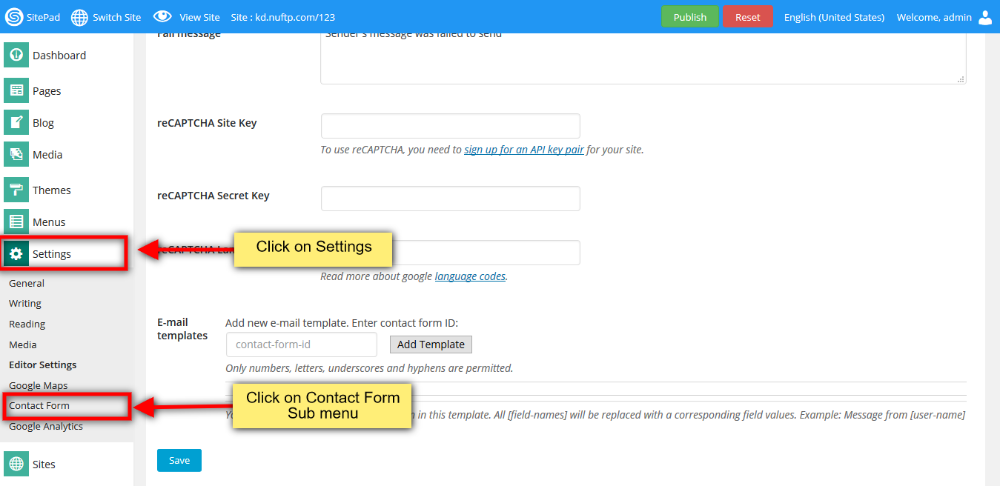
- Now insert contact-form id which you inserted in contact form when you designed. And click on Add Template button.

- When you click on Add Template button and click on Save button then you will see image as shown below.
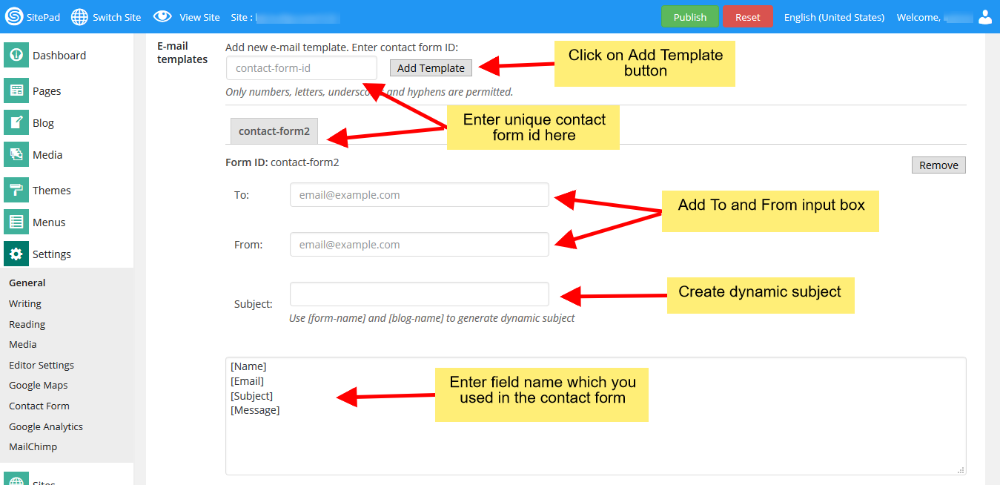
- Enter Email address in To and From input box to a particular user for sending the details of a particular form. Textarea box you can see, in that you insert your Field-Name along with square bracket one-by-one. Click Remove button for removing the contact-form-id along-with all the details such as To, From, Subject and fieldname Textarea box. After all changes, click on Save button.
How to Configure SMTP/PHP Mail
How to Configure Contact Form with SMTP/PHP Mail
This tutorial will show you How to Configure your Contact Form Setting to allow SMTP/PHP Mail to send Email from Contact Form.
SELECT CONTACT FORM SETTING
PHP Mail function uses your localhost to send Email from Contact Form while SMTP Mail function uses a Server to send Email from your Contact Form. You can configure the Contact Form Settings at SitePad Dashboard > Settings > Contact Form.
PHP MAIL
- PHP Mail is selected as a default option.
- You will need to add the same Email-Id in To and From, enter multiple email address with comma-separated if you want to send multiple recipients.
- You can add enter the format in Subject if you need Dynamic Subject.
- You can change Success/Fail Message.
- You can add reCAPTCHA if you want to avoid spam from your Contact Form.

Click on Save Button once you fill the Setting.
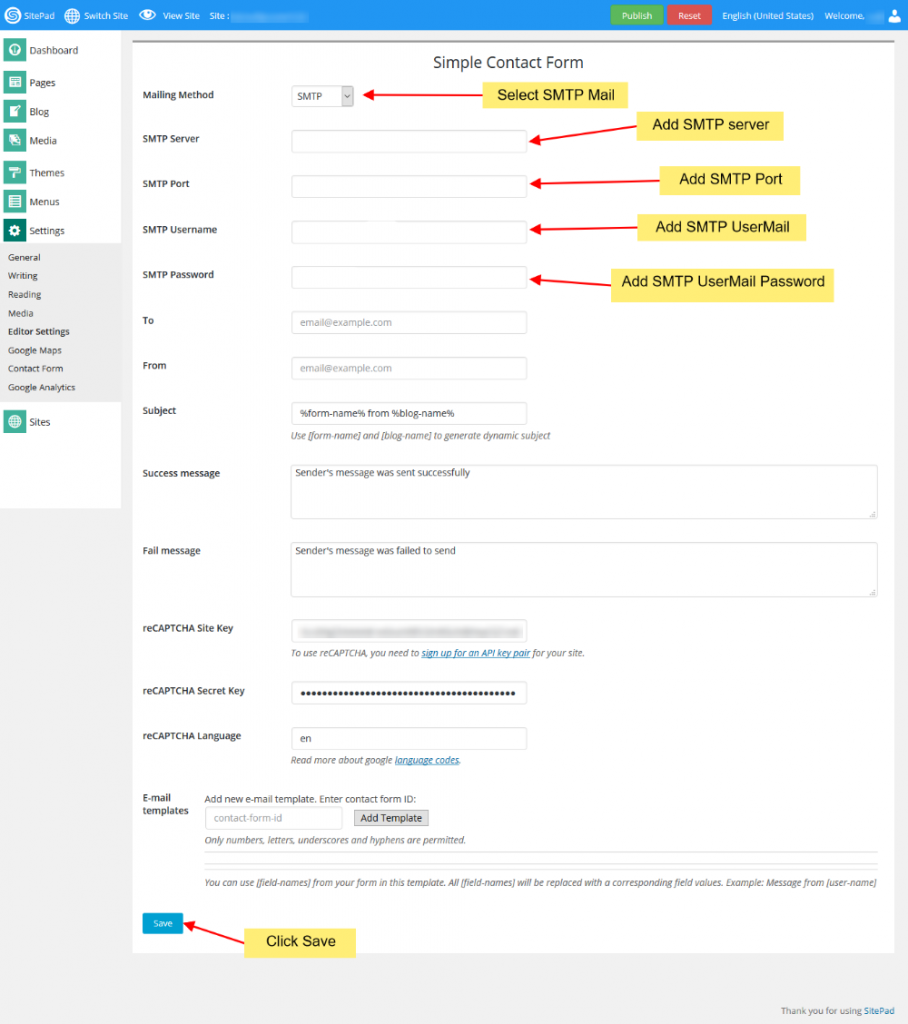
SMTP MAIL
To Configure SMTP Mail you will need a Gmail/Yahoo/Hotmail account or you can use your Webmail account with all the SMTP settings provided by your Host in your control panel.
You will need to select the SMTP Mail from the drop-down list in Mailing Method.
- Add SMTP Server (in-case you are using secure server port then please add ssl:// before the server domain i.e ssl://domain.com).
- Add SMTP Port
- Add SMTP Username (i.e Email Id)
- Add SMTP Password (i.e Email Id Password)
- You can also configure settings same as mentioned above in PHP Mail i.e change Subject, change Success/Fail Message, Add reCAPTCHA to avoid spam.
How to Publish the Site
Once you have done with your Theme Editing and want to Publish your Site you can follow this guide.
- Go to your Dashboard and click on Publish button present at the Top of Dashboard as shown in the image below.
Note: It is not necessary to always go to Dashboard for Publishing your Site. You can click on Publish button anywhere inside your Dashboard or Page Editor and follow below steps.

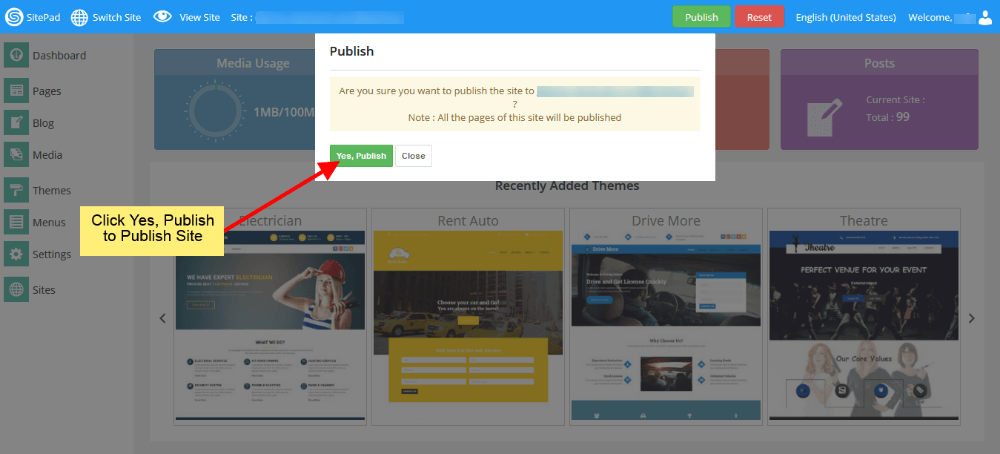
- Step 1 will popup the Confirmation Window as shown in image below. Press Yes, Publish button to publish your site and if you want to stop process then press Close button as shown in image below.
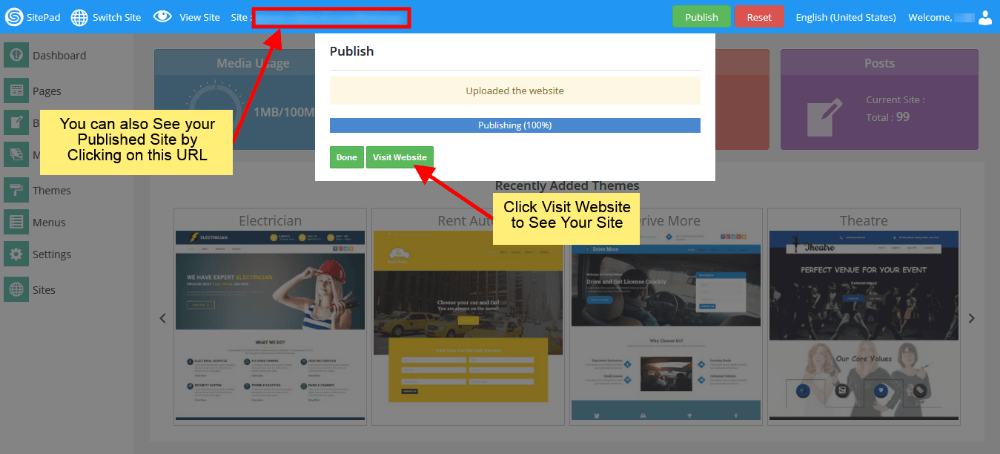
- Then Wait for the Process to Complete.

- After the completion of process you will see the window as shown in image below. Click on Visit website button to see your Published Site.
Note: You can also View your Published website by Clicking on Site URL as shown in image below.
How to Add SiteMap
This documentation will guide you on How to Add SiteMap for a Page
GO TO EDITOR
When on SitePad Website Builder Dashboard. Hover on Pages option given on the left sidebar and then click on All Pages. Once on all Pages Click on Edit Icon of Any Page.
You will be redirected to Editor.
SELECT SITEMAP OPTION
On SitePad Editor hover on more menu on the navigation bar. When you hover on more menu three buttons will be drop down i.e Reset Page, SEO Options and Custom HTML.
Click on SEO Options.

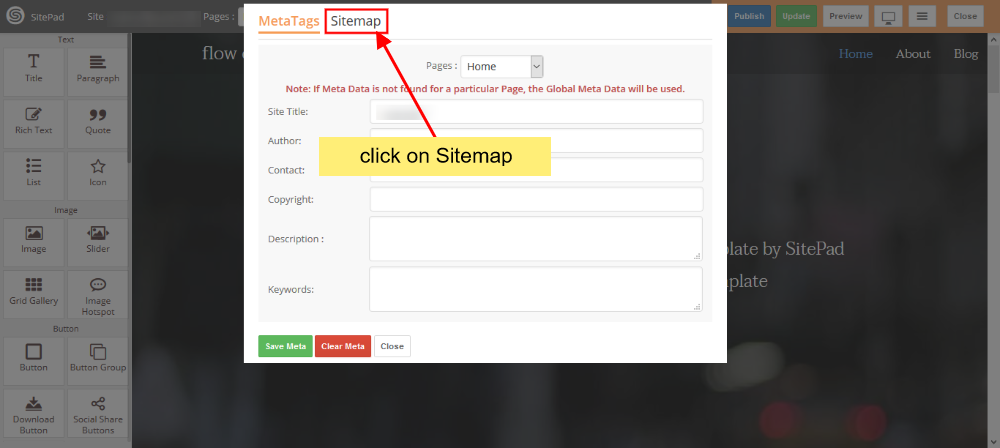
On clicking SEO Options you will see a dialog box will appear. In the dialog box click on SiteMap to load SiteMap options.
EDIT SITEMAP OPTION
Once you are on SiteMap Detail Section select Enable SiteMap then you can choose any of the following option from Manage SiteMap Settings: Automaically / Manually
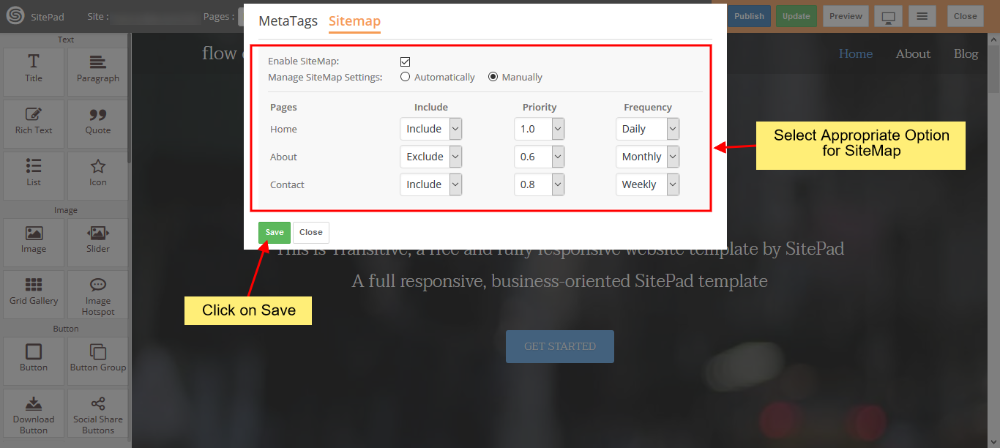
Once you have made your desired changes then click on Save to save SiteMap Settings for your page.
How to Add reCAPTCHA
This documentation will help you setup reCAPTCHA for contact form
LOGIN TO GMAIL ACCOUNT TO REGISTER RECAPTCHA
You need to login to your Gmail account. Then follow the given link to register Google reCAPTCHA
You will need to Register a New Site as shown in the image below.
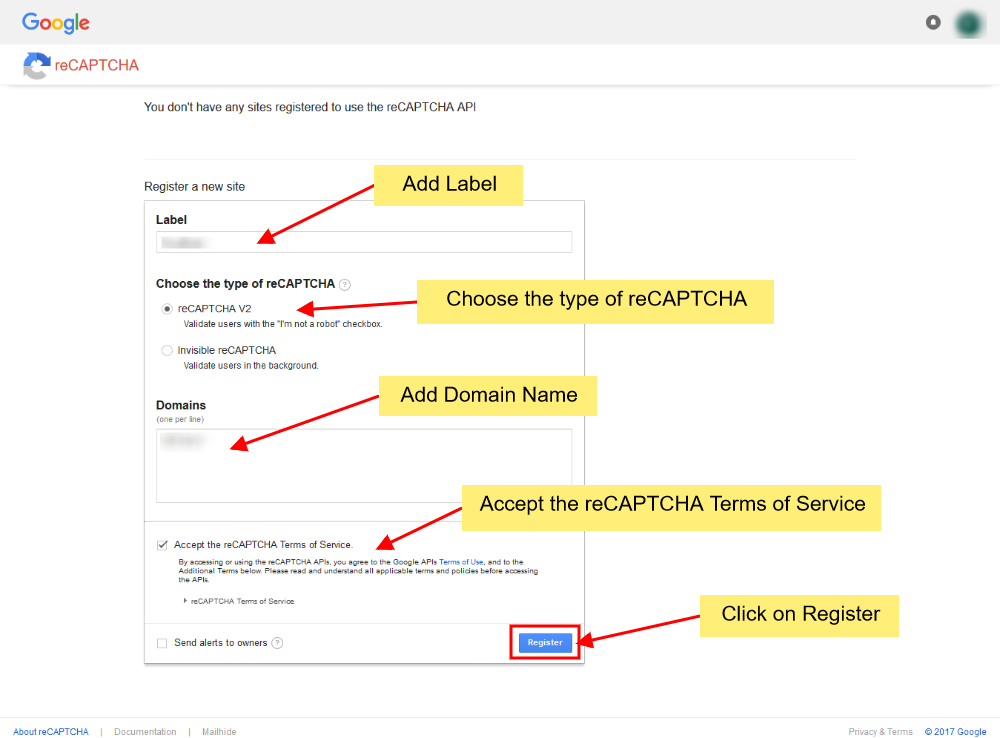
You will need to Add Label, Choose the type of reCAPTCHA, Add a Domain Name and then Accept the reCAPTCHA terms of service.
Once done then Click on Register.
Once you register the Site you will be redirected to the page with Site Key and Secret Key as shown in the image below.
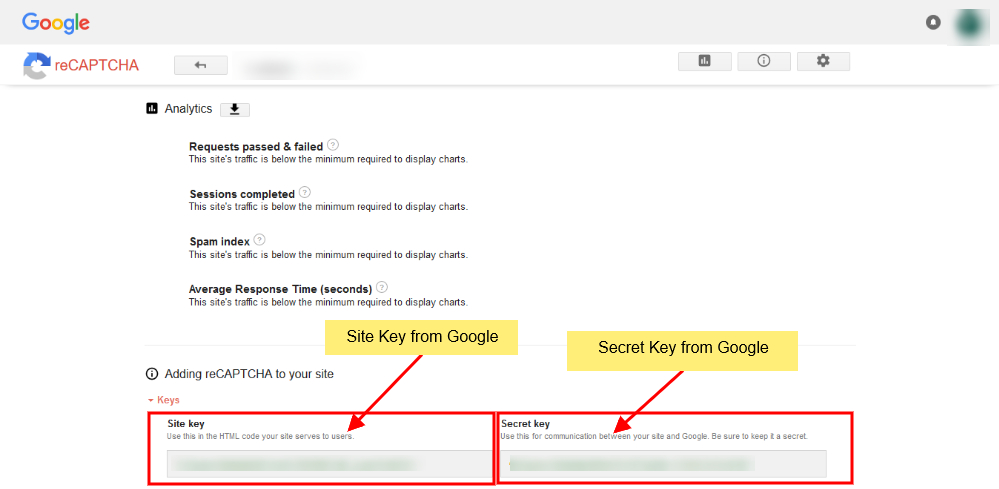
Take a Copy of both the keys.
LOGIN IN TO CONTROL PANEL
Now Login to your Control Panel (e.g. cPanel’s url will be https://domain.com:2083) and login with your details. Then click on the SitePad Icon or Link.
You will be redirected to SitePad Website Builder
CLICK ON CONTACT FORM
After being redirected to SitePad Website Editor Hover on Settings on the left Sidebar you will see option for Contact Form. Click on Contact Form as shown in the image below.

On Contact Form Setting Page you will see input box for reCAPTCHA Site Key and reCAPTCHA Secret Key as shown in the image below.
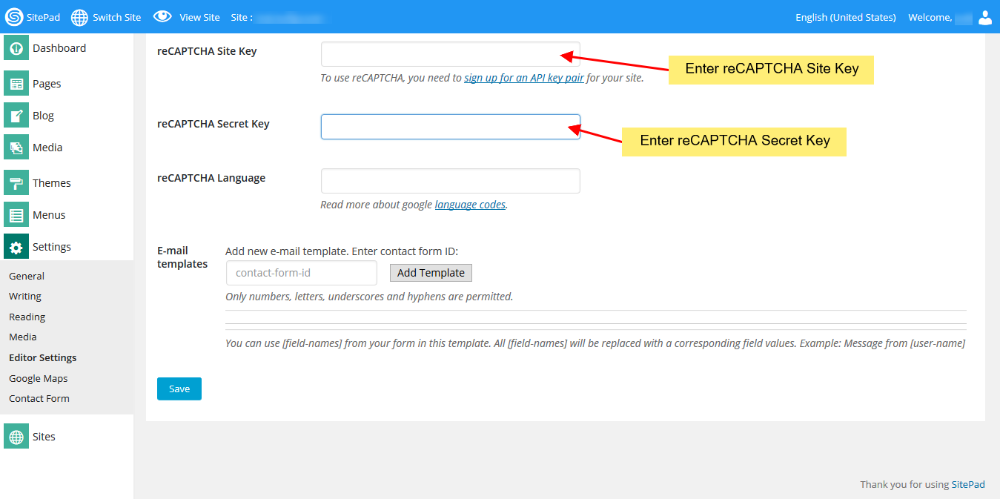
Fill in the site key and secret key from the Google reCAPTCHA registration page. Once done click on Save.
The reCAPTCHA that you added will be registered and now you can use reCAPTCHA for contact form.
How to Add Meta Tags
GO TO EDITOR
When on SitePad Website Builder Dashboard. Hover on Pages option given on the left sidebar and then click on All Pages. Once on all Pages Click on Edit Icon of Any Page.
You will be redirected to Editor.
ADD META
On SitePad Editor hover on more menu on the navigation bar. When you hover on more menu two buttons will be drop down i.e Reset Page and SEO Options.
Click on SEO Options.
ADD META DETAILS
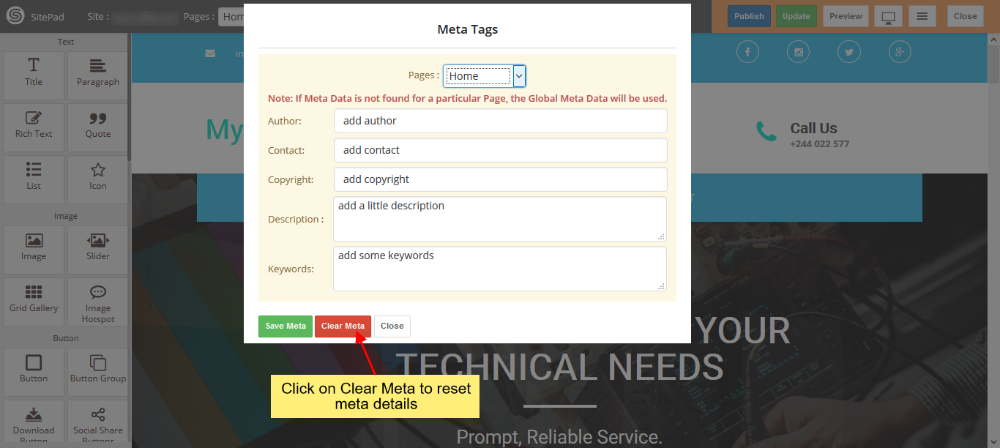
On clicking SEO Options you will see a dialog box will appear. In the dialog box add all the meta details for the page.
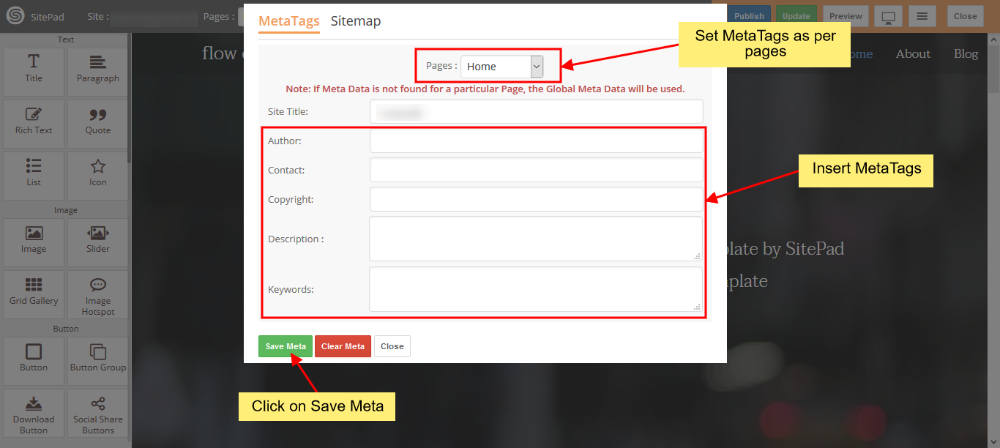
You can add Meta Tags for every page just by selecting Page from the drop down. After adding meta details click on Save Meta to update the meta details for the page.
CLEAR META DETAILS
To Clear Meta Details of the current page click on Clear Meta. All the Meta Details for that page will be cleared. For Global Meta you will need to select Global Meta and then click Clear Meta.
How to add Google Map API Keys
When on SitePad Website Builder Dashboard. Hover on Settings option given on the left sidebar and then click on Google Maps as shown in image below.
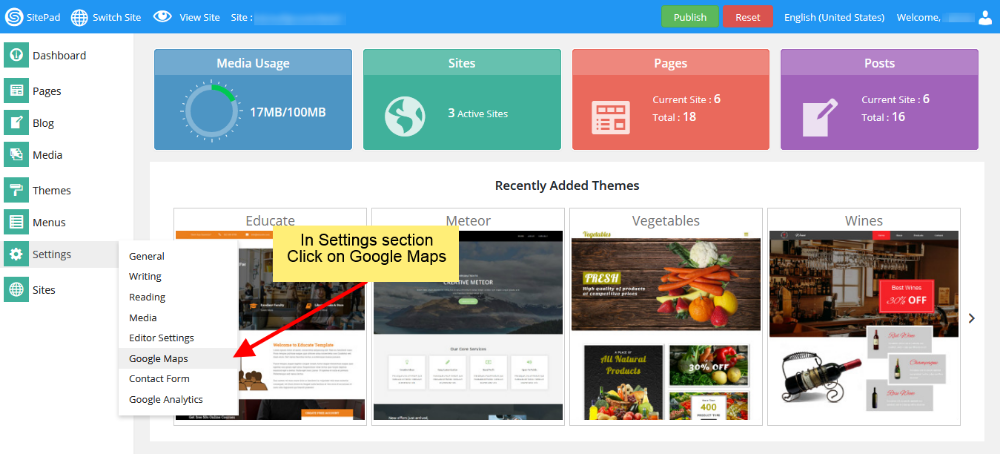
You will be redirected to Google Maps Settings page.
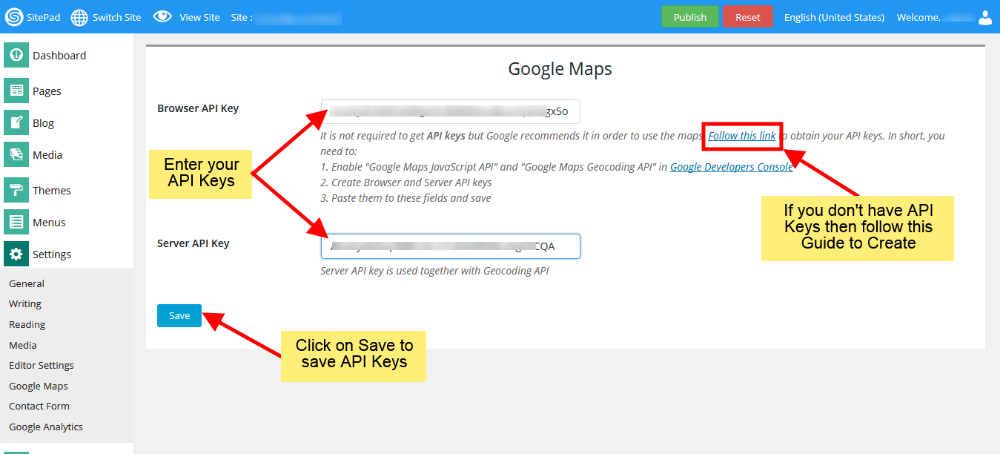
ADD API KEYS
On Google Maps Settings page add your Browser API Key and Server API Key as shown in image. Or if you don’t have API Keys then just click on Follow this link and follow guidelines to create new API Keys.
How to Add MailChimp Code
This documentation will guide you on How to Add MailChimp code in SidePad.
GO TO MAILCHIMP SETTINGS
Go to SitePad Website Builder Dashboard. Hover on Settings option given on the left sidebar and then click on MailChimp option as shown in image below. You will be redirected on MailChimp Page.
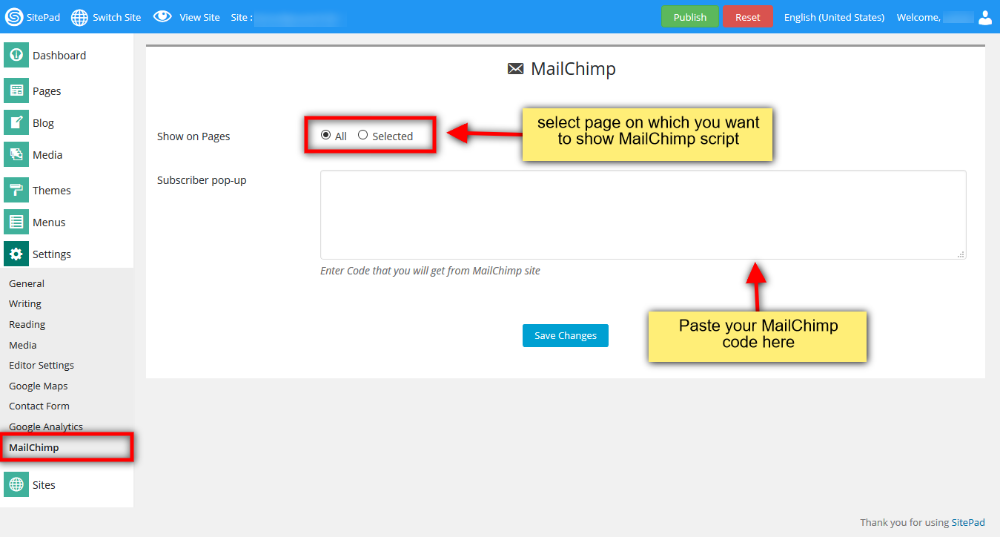
When you select All option, paste MailChimp code in text area box and click on Save Changes button. It will show you MailChimp script output on all pages.
SCRIPT OUTPUT ON SELECTED PAGE
If you want to show MailChimp script output on a particular page then click on Selected option, Choose particular page from dropdown and add mailchimp code in a textarea box, click on Save Changes button.

How to Switch Site
Note: To Switch Site you need at-least two sites to be in your SitePad Builder
If you have a Single Site and have not added any other Site and want to Add New Site then you can follow the documentation mentioned: Add New Site
SWITCH SITE
To Switch from Current Site to any other Site that you want to work on again. All you need to do is hover on Switch Site on Navigation Bar.
You will find the list of all the Sites that you have added. Now Click on the Site you wanted to work again and then click on Dashboard like shown in the image below.
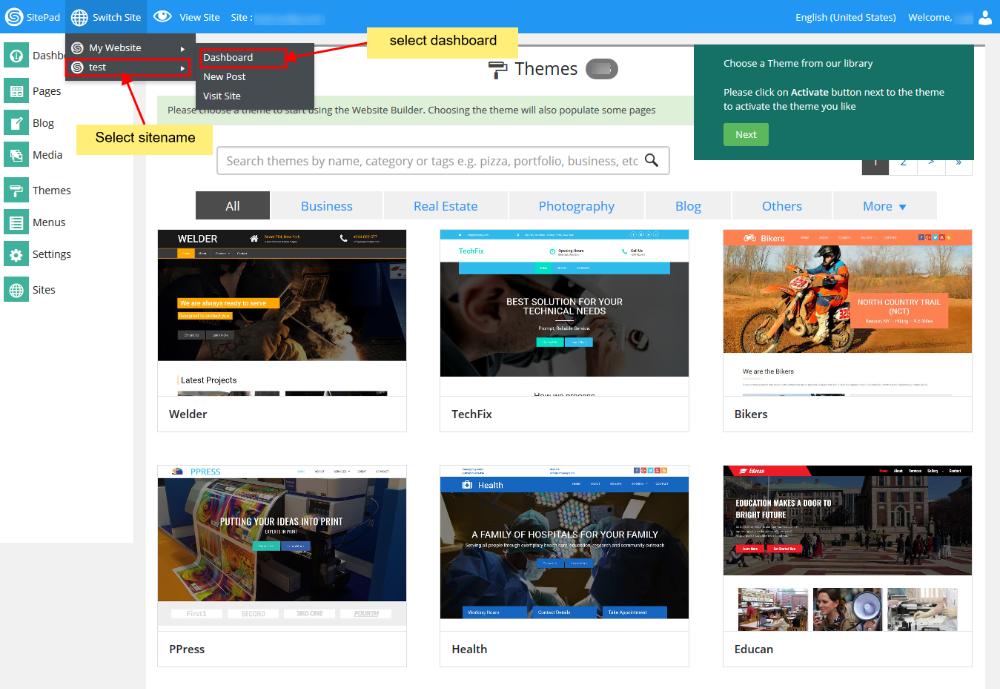
Also remember the Site that was created by SitePad when you logged in first time will always be on top of the Switch Site.
How to Add Google Analytics Account
Google Analytics is a web analytics service offered by Google that tracks and reports website traffic.
For this, you will need tracking ID which can be found after creating an account at Google Analytics
You can check out the tutorial given by Google Analytic Team on Getting Started with Analytics
LOGIN IN TO CONTROL PANEL
Firstly Login to your Control Panel (e.g. cPanel’s URL will be https://domain.com:2083) and log in with your details. There click on the SitePad Icon or Link.
You will be redirected to SitePad Website Builder.
GO TO GOOGLE ANALYTICS
Once you are redirected to SitePad. You will need to hover on Settings and then select Google Analytics.
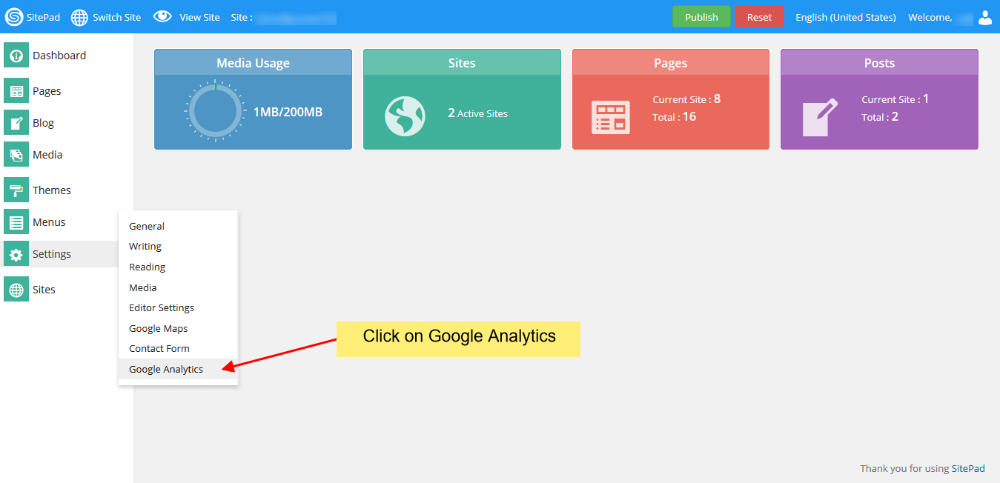
You will be redirected to Google Analytics setting page. There you will need to enter the tracking ID provided by Google Analytics after adding your account.
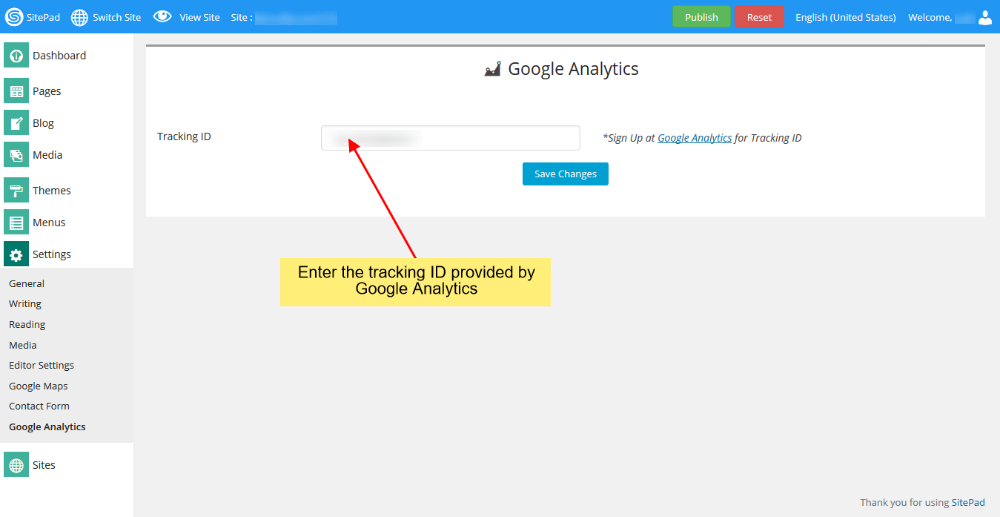
After entering all the details as mentioned above click on Save Button to save changes that you’ve made.
After this when you edit your Site and Publish it. You will be able to track your website traffic from Google Analytics.
You can check out the documentation given by Google Team on How to Check Your Web Stats
What Is the Website Builder Assistant
SitePad Assistant is a tool which helps you navigate SitePad Editor.
HOW TO USE SITEPAD ASSISTANT
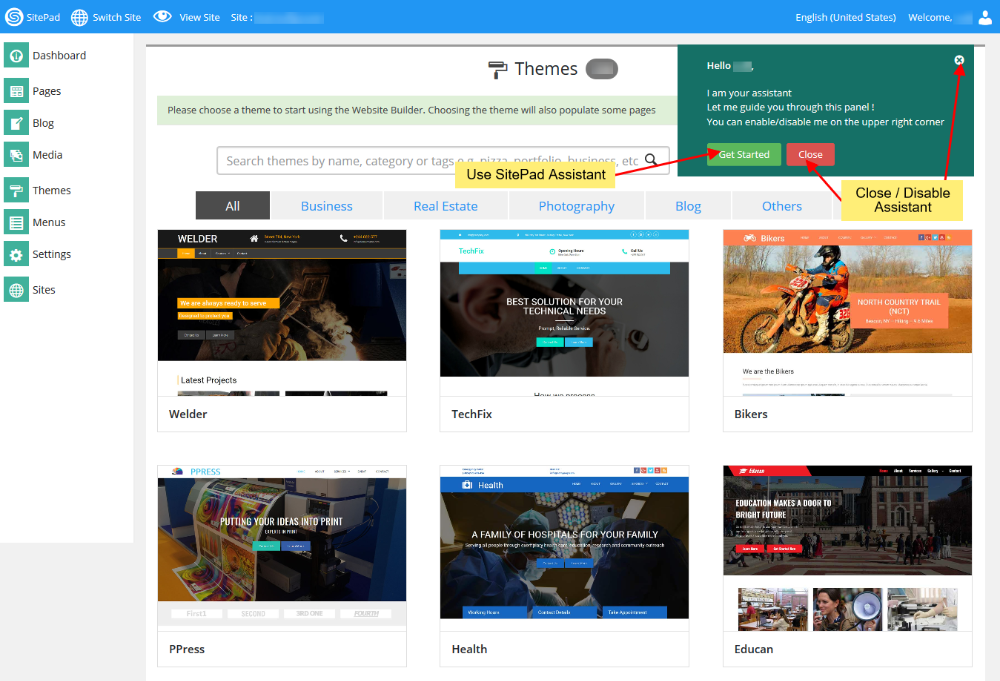
When you login for the first time SitePad Website Builder will enable the Assistant by default.
You need to Click on Get Started to navigate SitePad Editor. If you want to Disable the Assistant you just need to click on Close or X as shown in the Image below:
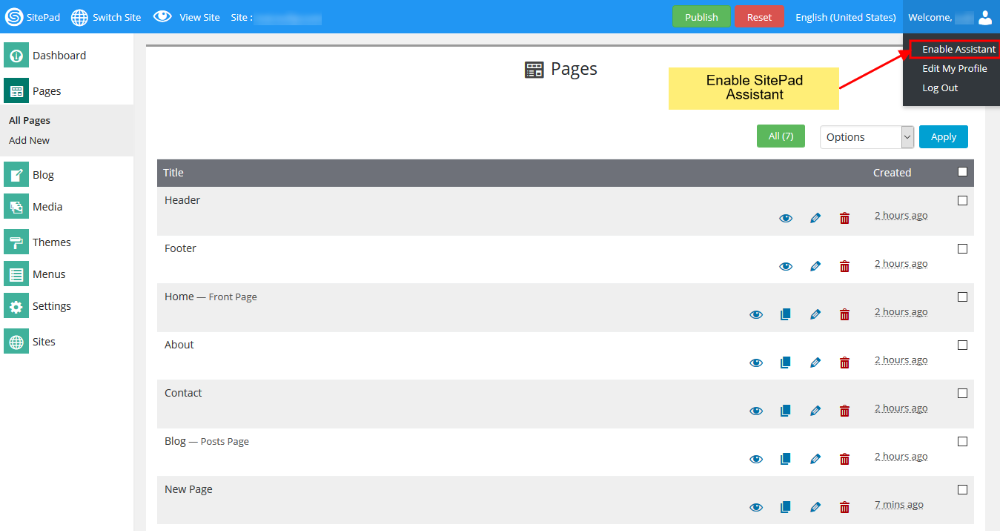
ENABLE ASSISTANT
You can always Enable it back again by hovering on Welcome, {username} on the Navigation Bar. You will see a Drop Down List which mentions Enable Assistant.
Click on the button and SitePad Assistant will be enabled for you.
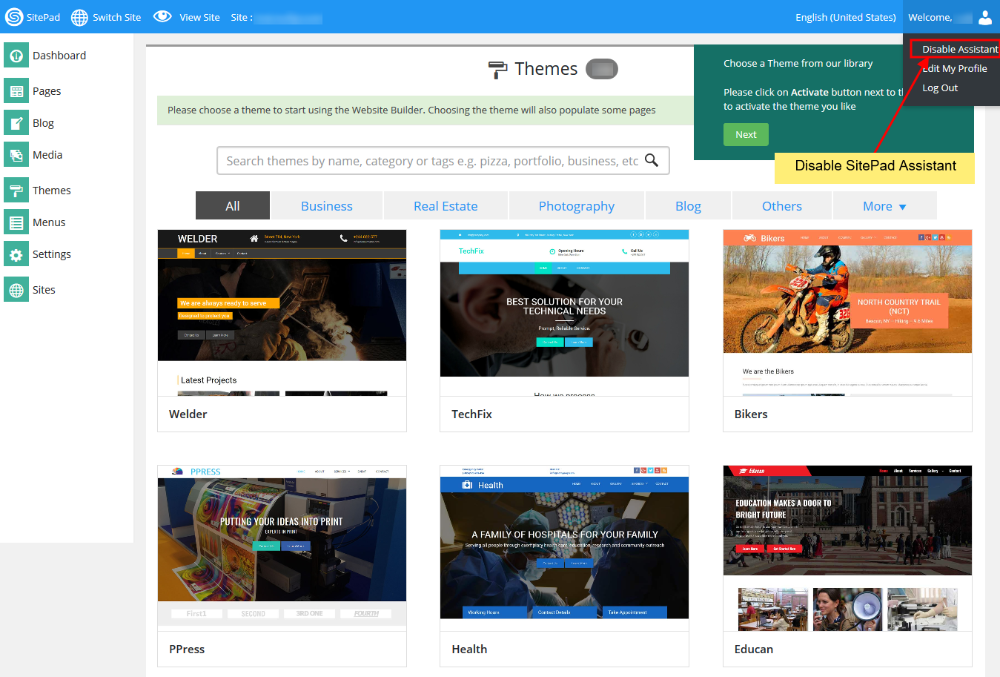
DISABLE ASSISTANT
To Disable the Assistant you need to follow the same procedure that you followed to Enable the Assistant. But instead of Enable button you will see Disable Assistant button.
Click on the button and SitePad Assistant will be disabled for you.
Widgets
Comments
This Guide will Help you to Add Comment Widget to your pages/blog post.
Note: Currently, Disqus is supported by SitePad. We will add more to Comments option soon.
Note: You can add Disqus comments on your blog post as well as a page. You just need to drag the Comments widget on all the pages where you want to add the comments option.
DRAG COMMENTS WIDGET
When inside the SitePad Editor Drag and Drop the Comments widget. As shown in the Image Below.

Once you have dragged and drop the Comments Widget you will need to Add Disqus short-name. ex: shortname.disqus.com or just the short-name. In-case if you do not have a Disqus account you can create one here.
Note: You will need to configure Disqus following the steps on their create site page, before using the short-name in SitePad.
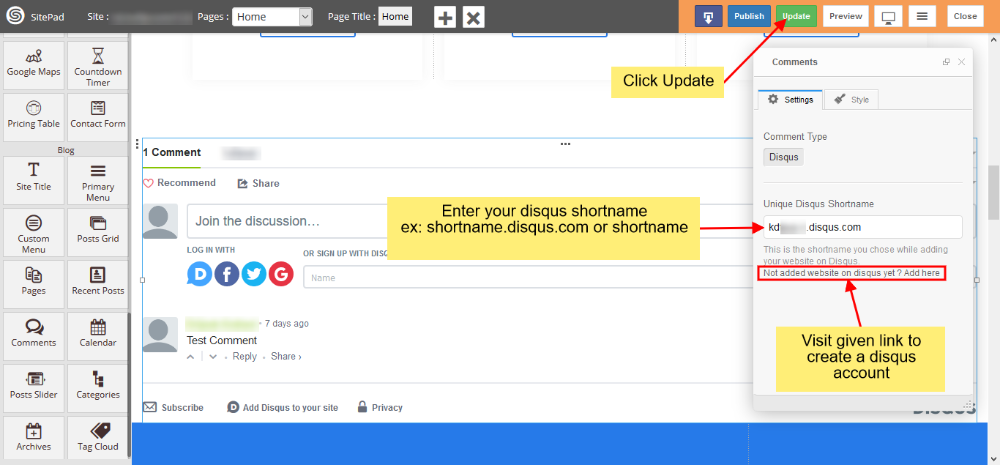
Once you have added your Disqus short-name on your page in SitePad editor click on Update button to save the changes.
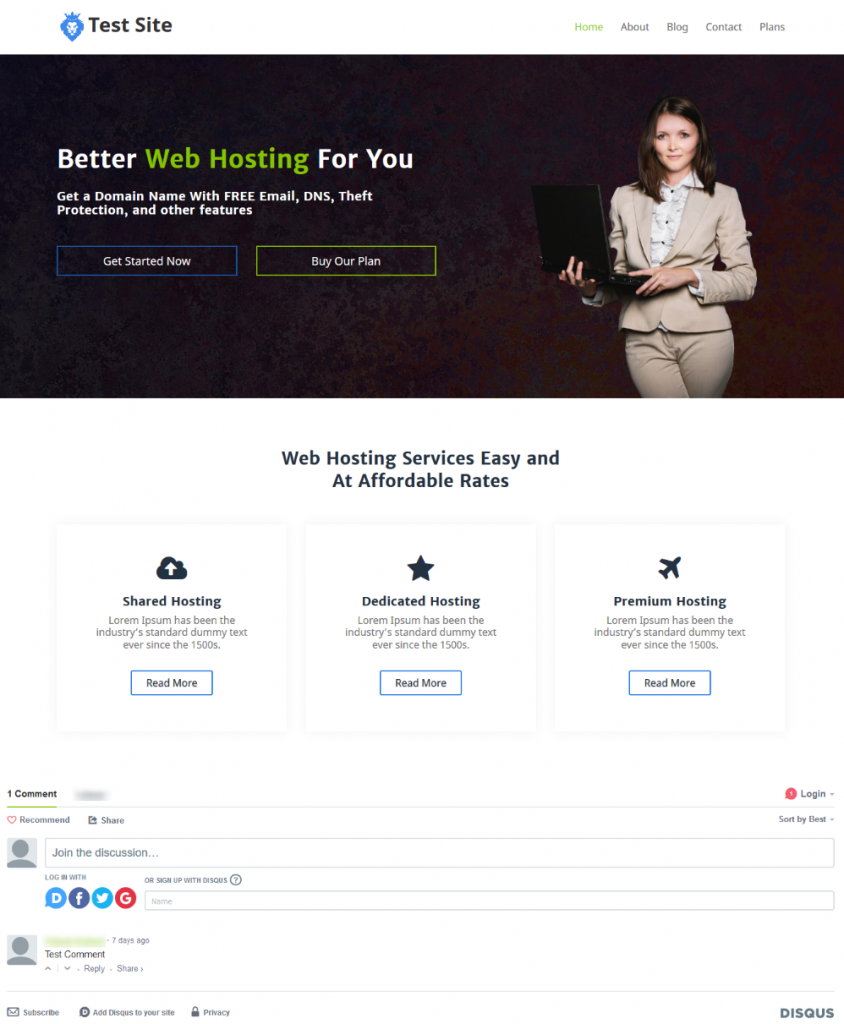
PREVIEW AFTER PUBLISH
You can check the comments on your site after Publishing your site.
Countdown
This Guide will Help you to customize Countdown Timer Widget Settings and Style.
Note: Widget gives you Default Style provided by theme, you can customize as per your needs using this guide.
DRAG & DROP COUNTDOWN TIMER WIDGET
When you Drag and Drop Countdown Timer Widget in a Page, You will see the image shown like below.
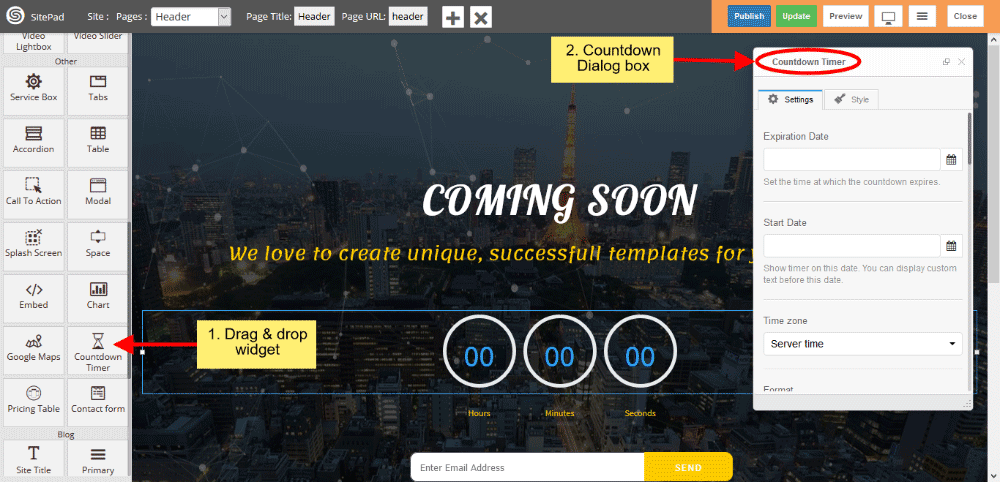
COUNTDOWN TIMER SETTINGS
- Set Expiration Date by clicking on Icon Calendar as per your needs, set the time at which the countdown expires and Set Start Date by clicking on Icon Calendar also.
- Select the time zone from select option either user’s Local machine or Server time.

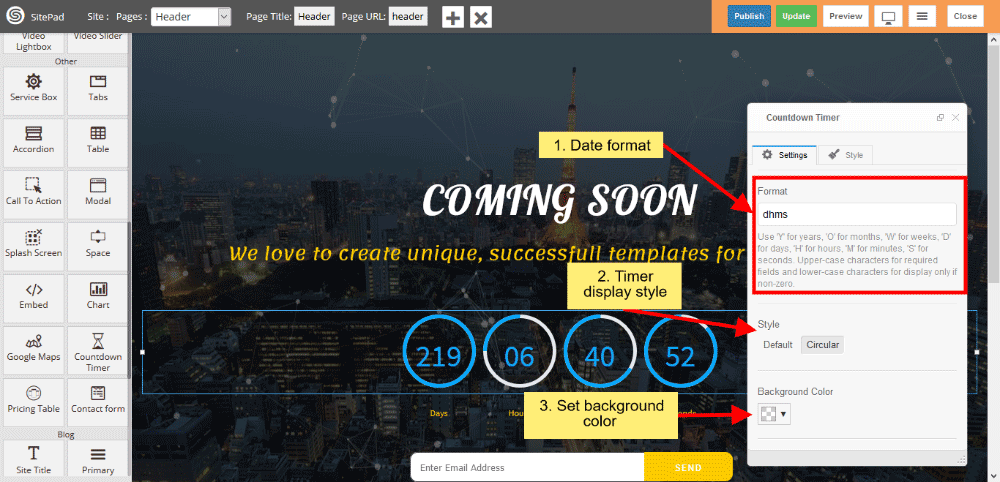
- Write the Date format for displaying the Timer.
- Style gives Timer Style such as Default and Circular, by default Circular is enabled.
- Set the background color for timer blocks.
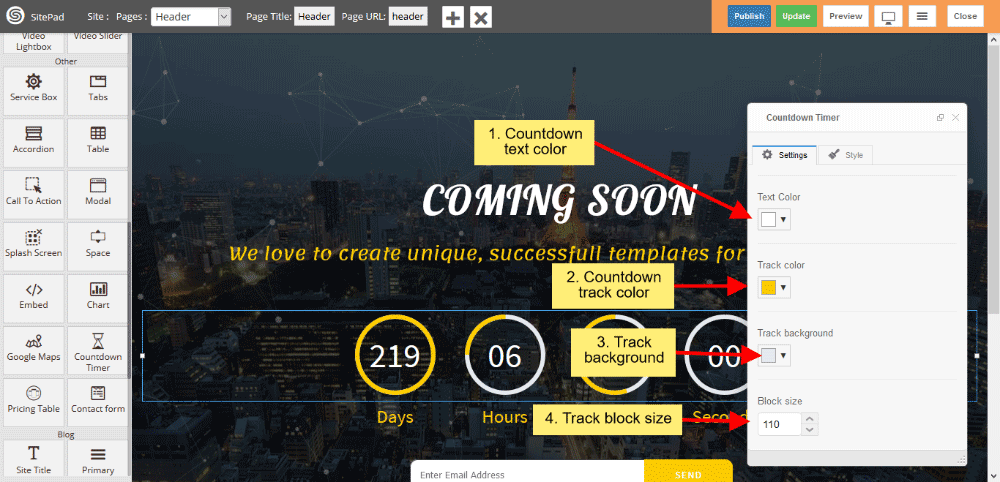
- Give the color of the Text, Track and Track Background.
- Set the Track block size.
- Change the Track width, Digit size and Text size by dragging Icon horizontally.
- Spacing gives space between the Block.
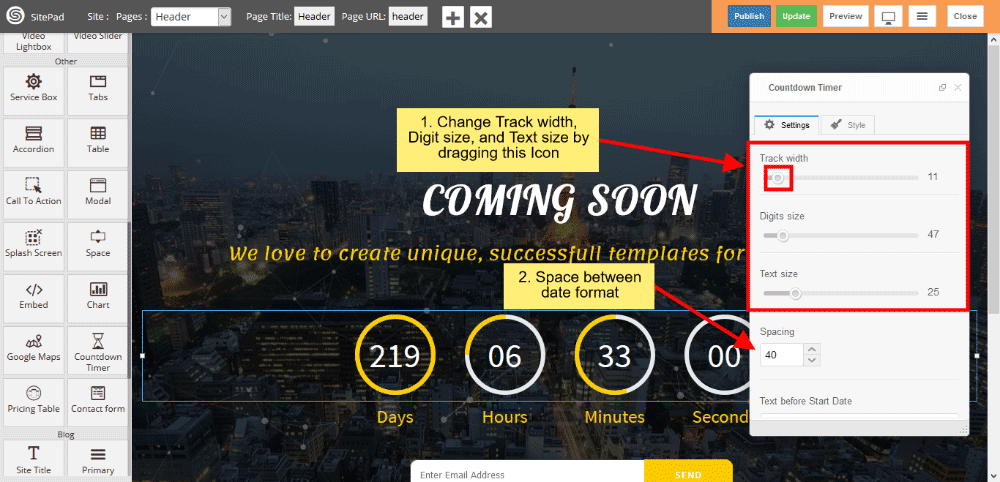
- You can give Text before starting the date.
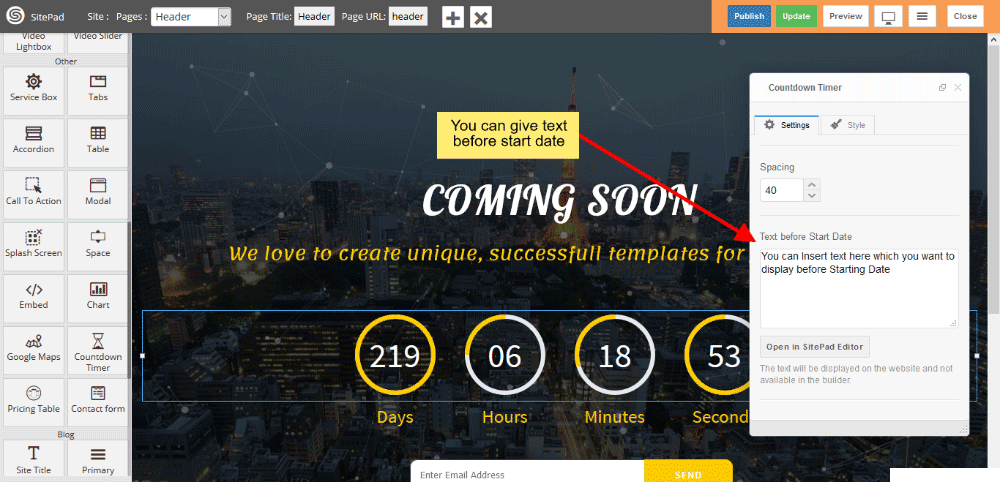
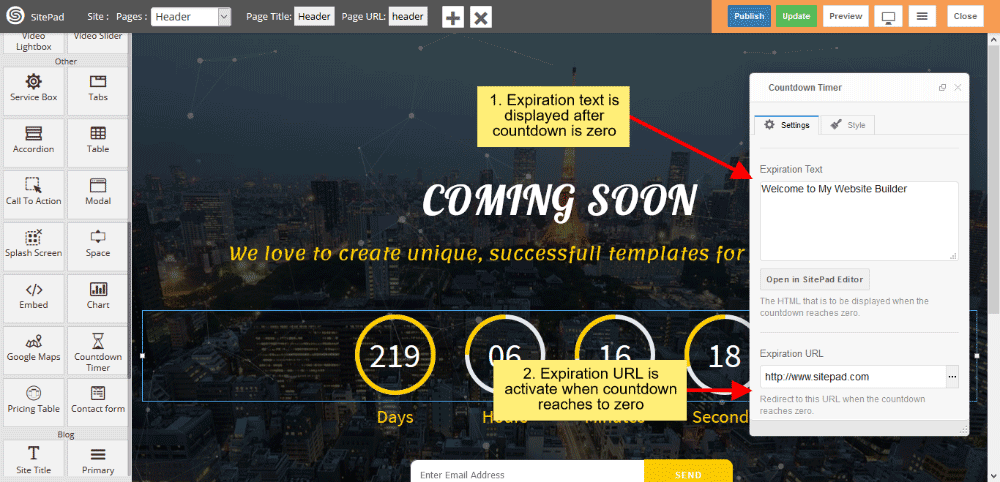
- Expiration Text is displayed when the countdown reaches to zero.
- Expiration Link is activate when the countdown reaches to zero.
Grid gallery
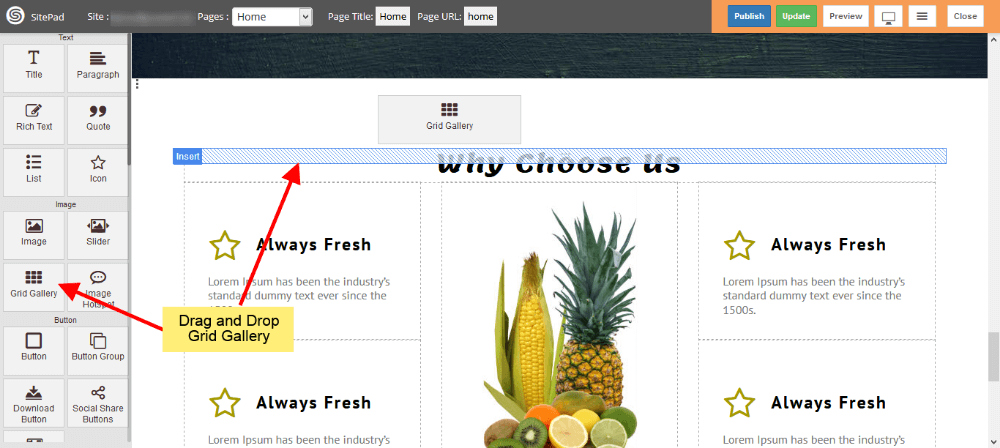
This Guide will help you to add Grid Gallery.
DRAG AND DROP
- Drag and Drop Grid Gallery from left side Widget Panel as shown in image below.
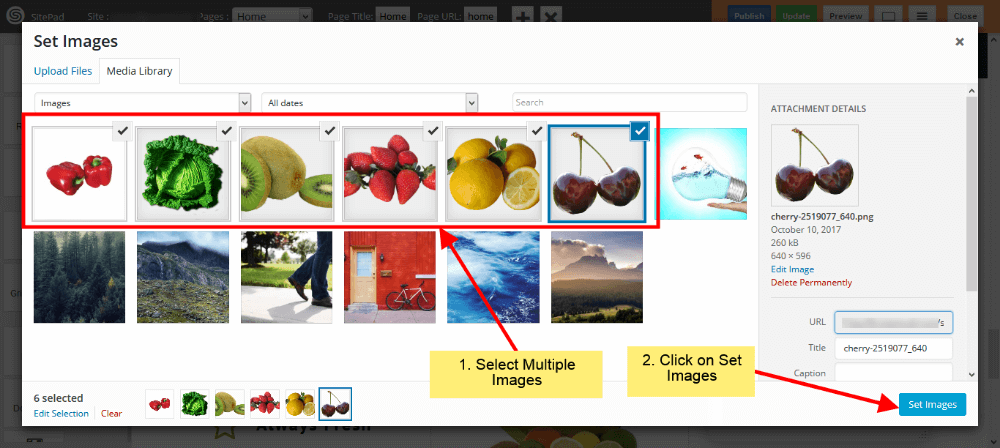
SELECT IMAGES
- Select images from Media Library as shown in below image.
- You can upload images by Clicking on Upload Files.
GRID GALLERY SETTINGS
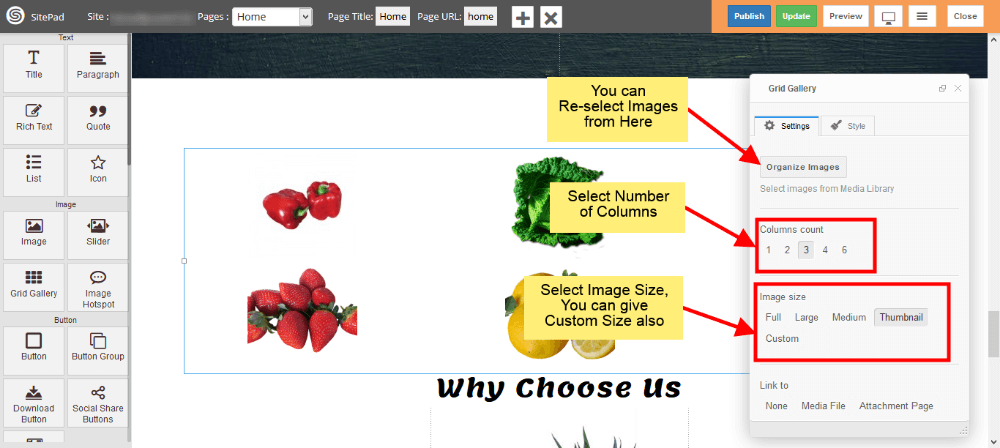
- If you want to Change, Delete or Add images you can do that from Organize Images.
- Now select Column count for Images.
- Select Image size from options or Select Custom option to add custom size for Images.
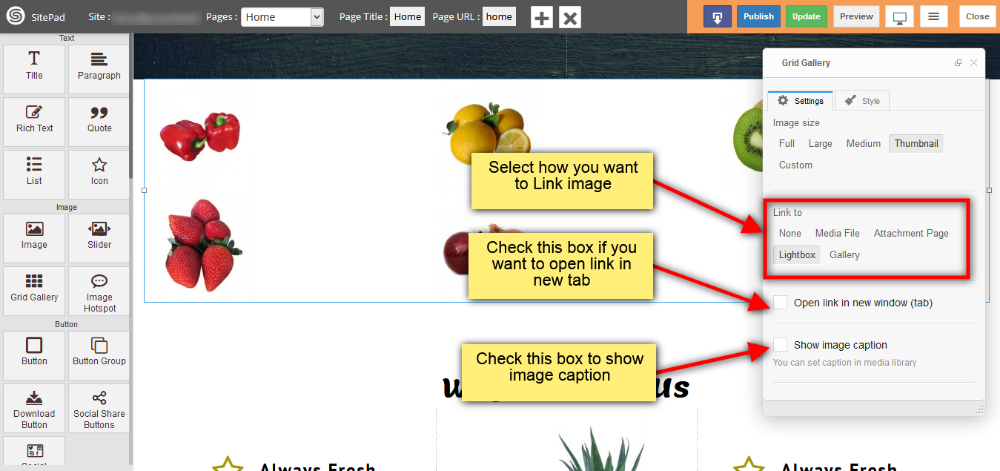
- Now select Link for your Images.
- If you want open that Link in New Tab then check Open link in new window(tab).
- To show image caption below image just check Show image caption.
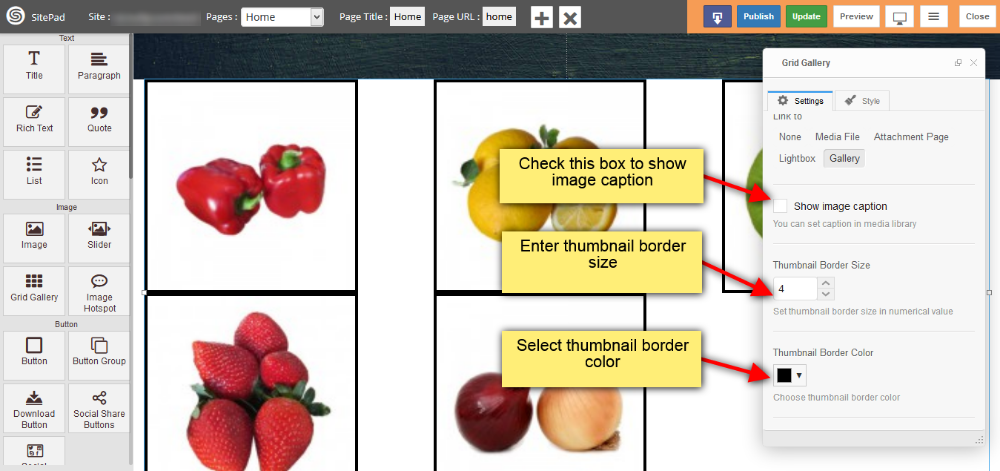
GALLERY OPTION IN GRID GALLERY
This option is available in link to section. By selecting this option your images will pop up when you click on it. You can add following properties for Gallery image.
- You can add image thumbnail Border Size and Color as shown in image below.
- Also you can add spacing around image thumbnail, set pop up gallery image Border size and color as shown in image below.
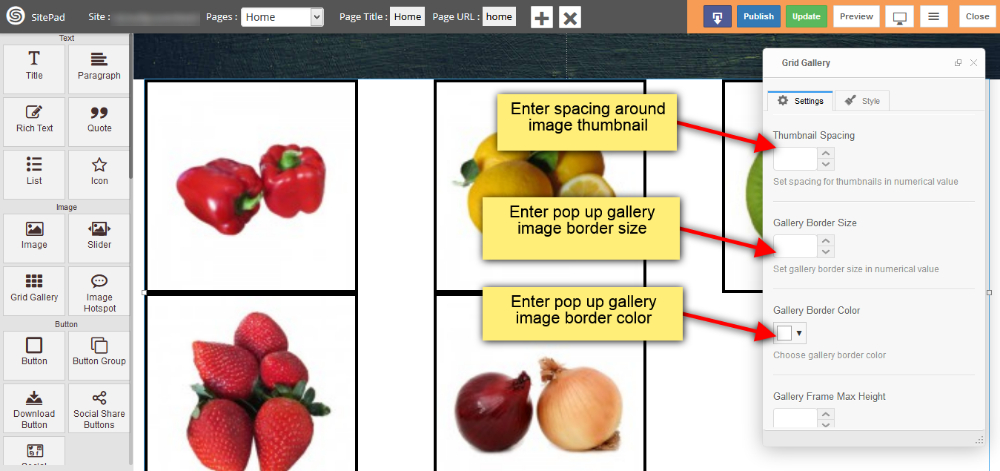
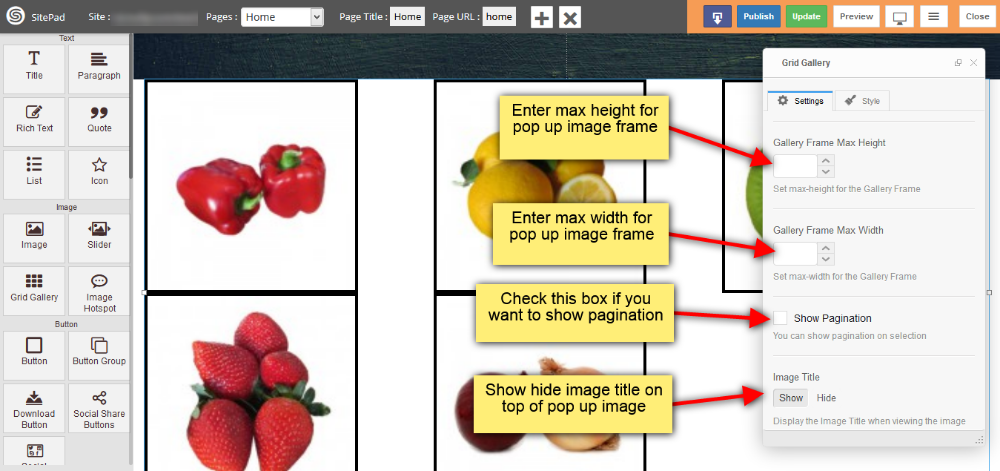
- You can set max height and max width for your pop up image frame
- Check Show Pagination box if you want to show pagination
- Provide the visibility for image title as shown in image below.
- When you click on gallery image on your webpage the pop up will appear as shown in image below.
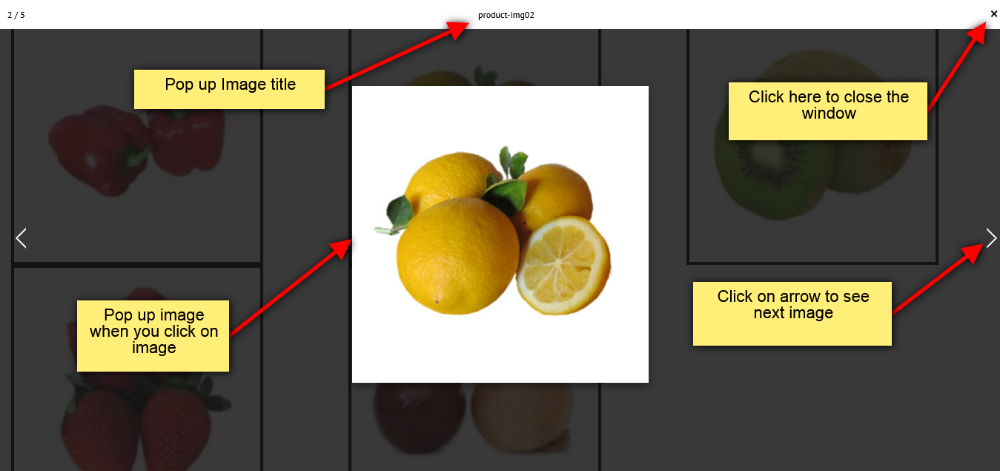
- When you click on gallery image on your webpage the pop up will appear as shown in image below.
Image
This Guide will help you to add Image.
DRAG AND DROP IMAGE
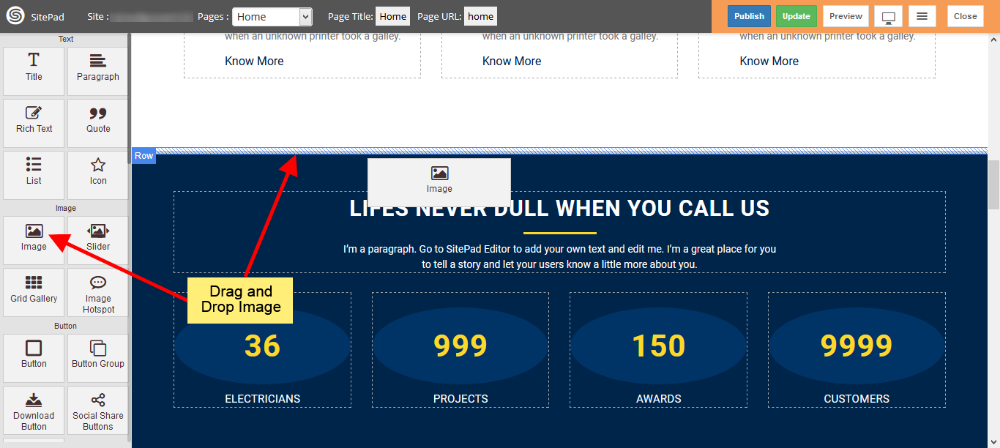
- Drag and Drop Image from left side Widget panel as shown in image below.
INSERT MEDIA
- When you Drag and Drop Image it will open Insert Media window as shown in image below.
- Here you can select image from Media Library or you can upload Image by clicking on Upload Files.
- You can also give URL of Image by clicking on Insert From URL as shown in image below.
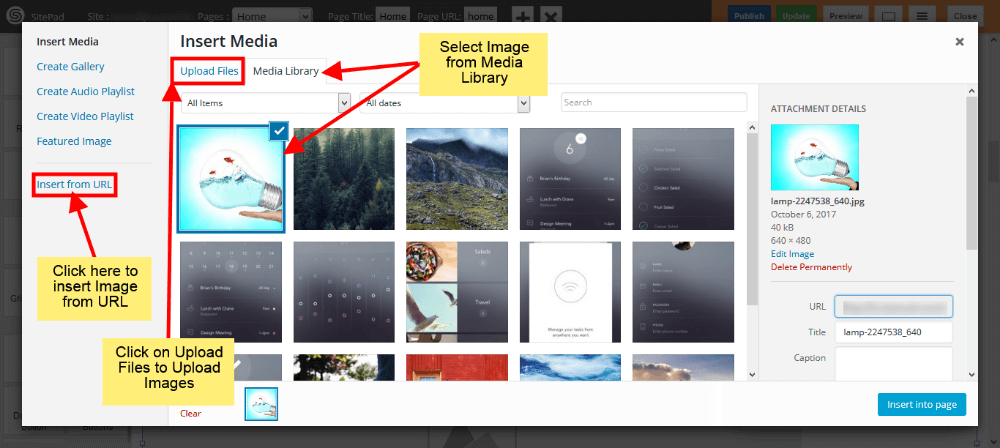
IMAGE SIZE
- Once you have selected image you can see Dialog Box for Image.
- Here you can Select or Replace Image if you want as shown in image below.
- Select Image size from different options, you can also give Custom size, for that you need to select Custom option and then enter Width and Height(eg. 100×100).
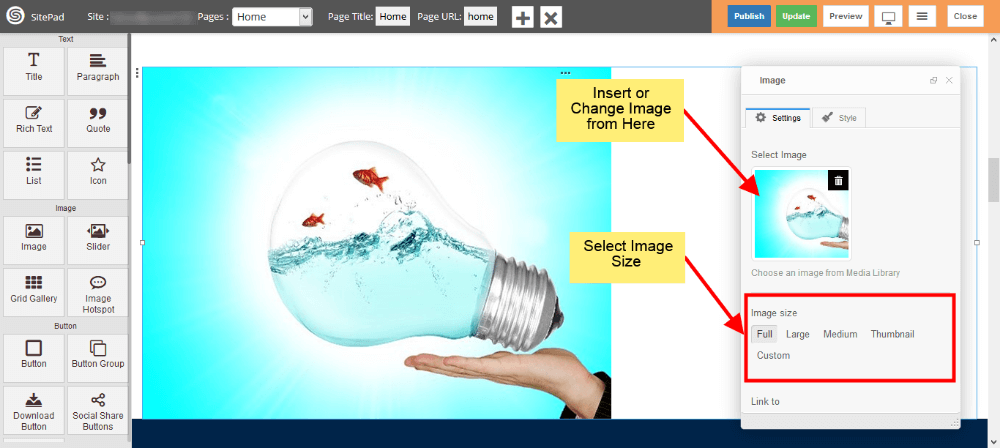
IMAGE LINK
- Now select how you want to link your image by using Custom URL , Media File or Lightbox.
- Give link if you select Custom URL or Media File in Link to section. If Don’t want to attach image with link then leave it as blank.
- If you want to open link in New Tab then Check the box shown in image below.
- If you want to Show Image Caption then check Show Image Caption box.
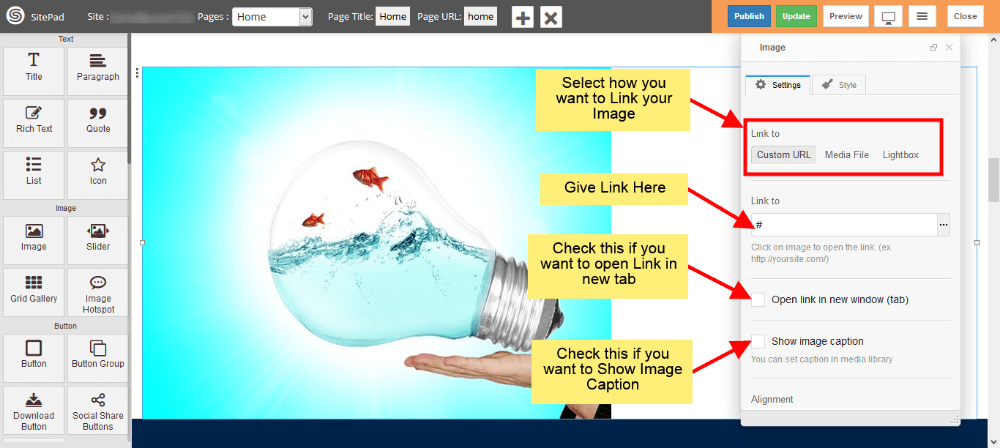
IMAGE ALIGNMENT
- Select Alignment for image as shown in image below.
- If you want overlay over image then check the Overlay Hover Effect box. This effect will show up when Hover on image in website.
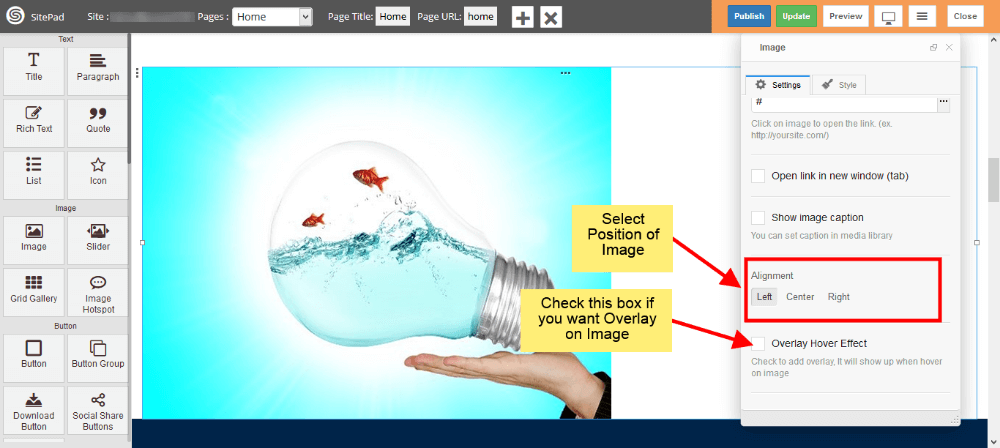
IMAGE OVERLAY
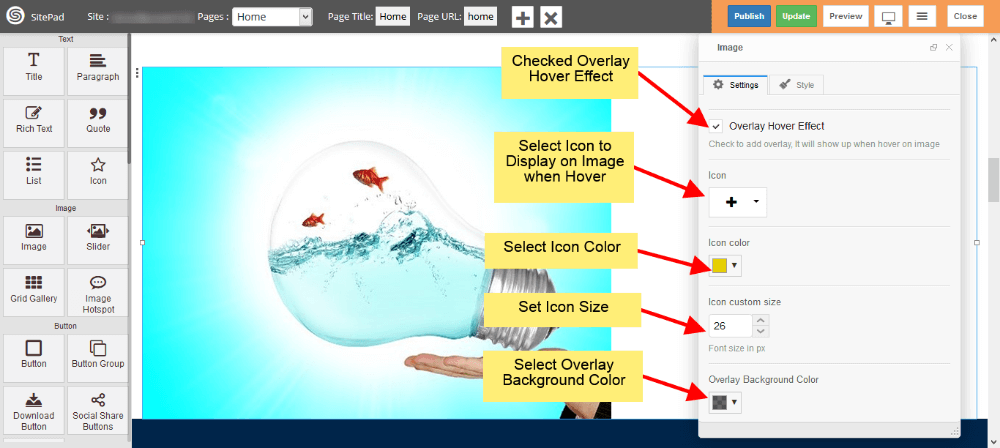
- If you want to add overlay over image then first check Overlay Hover Effect Box as shown in image below.
- Now select Icon to display over image.
- Select Color and Size for that Icon.
- And in the end select Background color for Overlay as shown in image below.
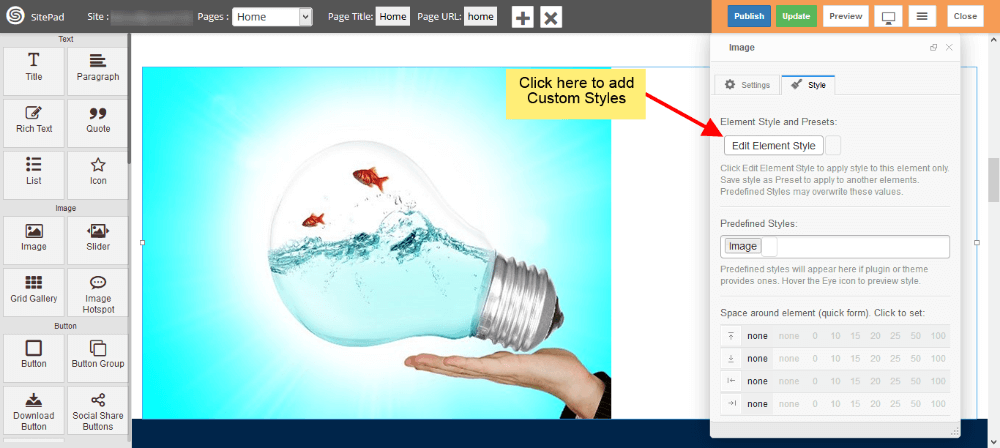
CUSTOM STYLE
- You can add your Custom style by clicking on Edit Element Style as shown in image below.
Call To Action
This Guide will Help you to edit Call to Action Widget Settings and Style.
DRAG & DROP CALL TO ACTION WIDGET
When you Drag and Drop Call to Action Widget in a Page, You will see the image shown like below.
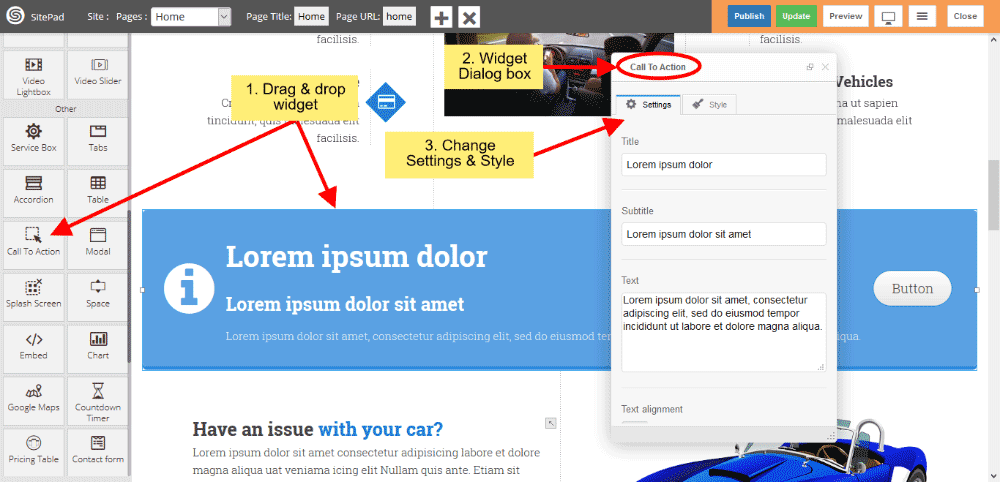
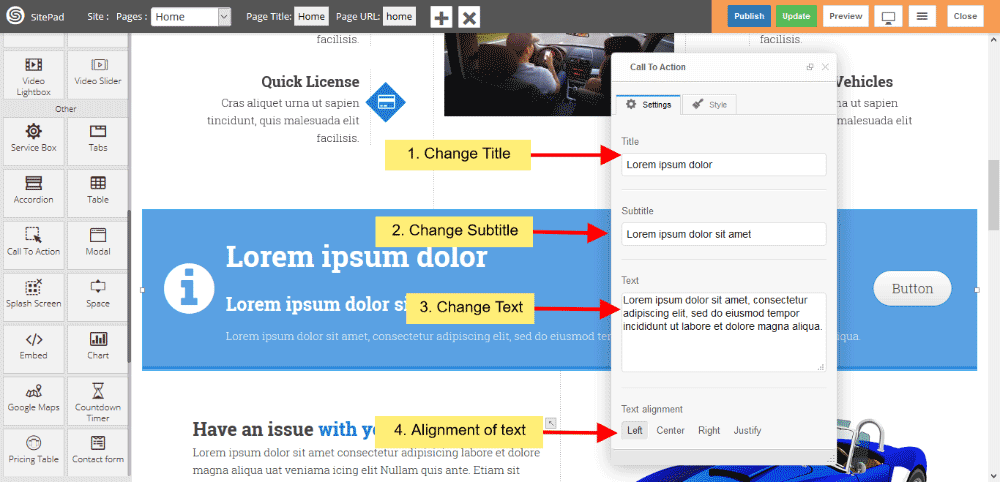
CALL TO ACTION TEXT
- You can change or customize your Title, Subtitle and Text.
- Text alignment gives you alignment of text.
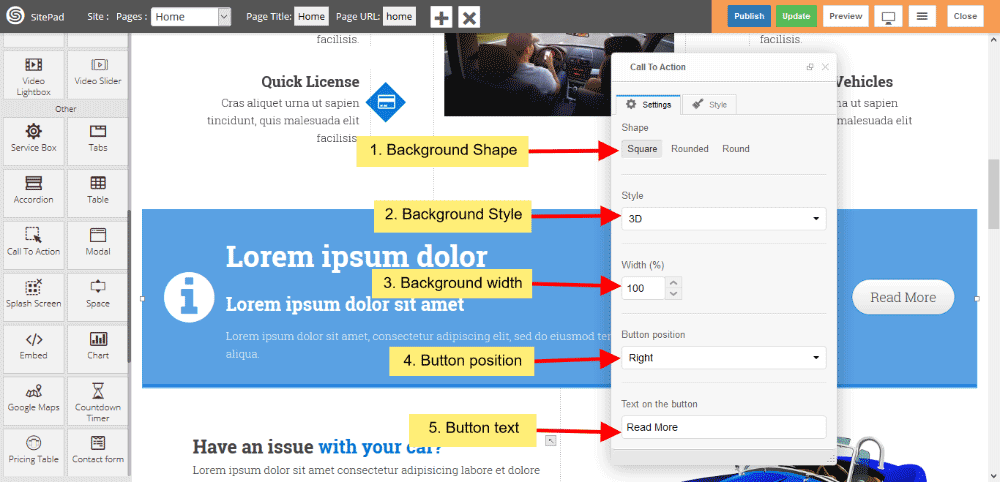
CALL TO ACTION BACKGROUND
- You can change Background shape, Background predefined style or custom style.
- You can change total width of background also.
- You also changed button position in background shape and text of the button.
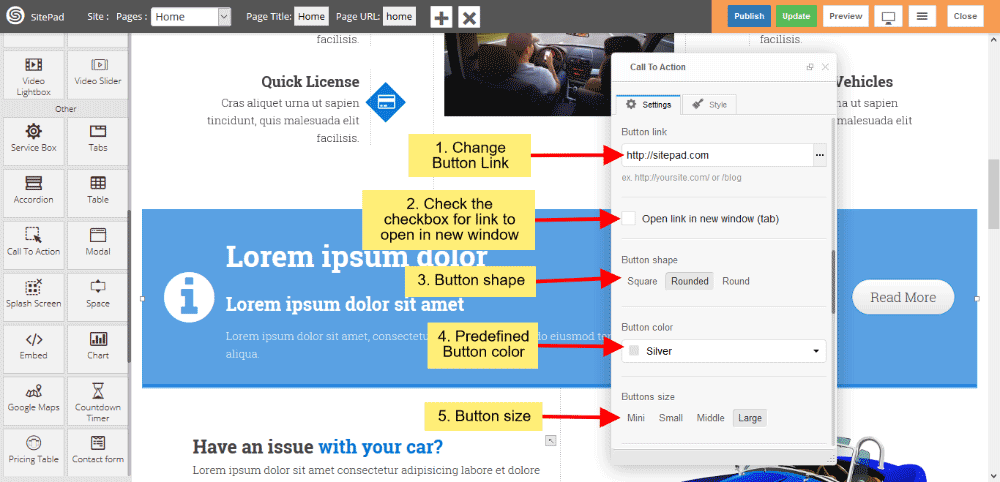
CALL TO ACTION BUTTON
- You can also give button link, and if you want that link open in new window, then click on checkbox.
- Button shape gives shape of button and choose predefined button color from dropdown list.
- Button size gives predefined Button size.
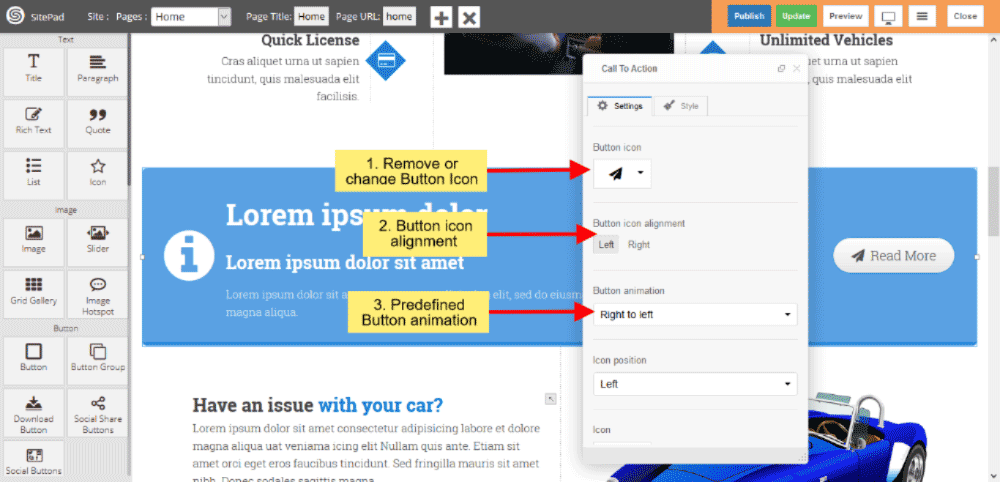
CALL TO ACTION BUTTON ICON
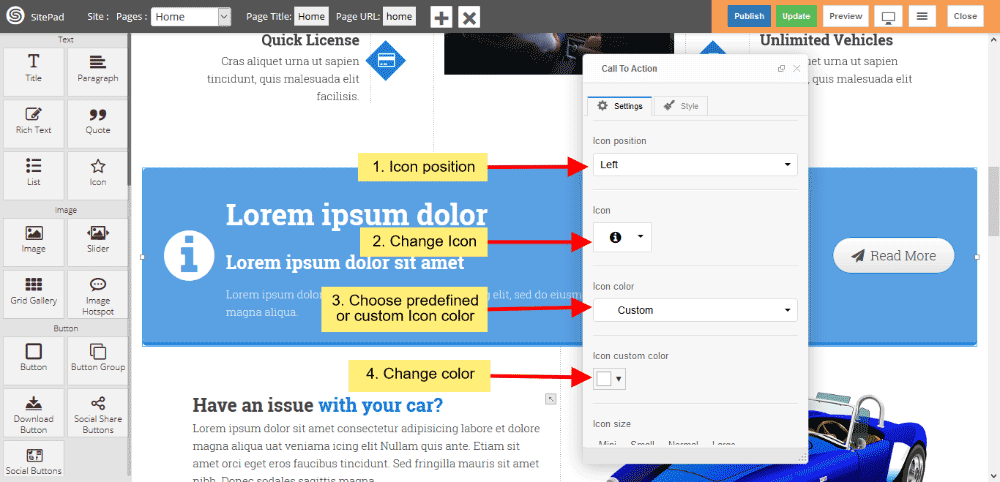
CALL TO ACTION ICON
- You can also change Icon position from dropdown list.
- Change Icon as per your choise from dropdown list.
- Change predefined Icon color and custom color, If you choose custom color then you can change custom color.
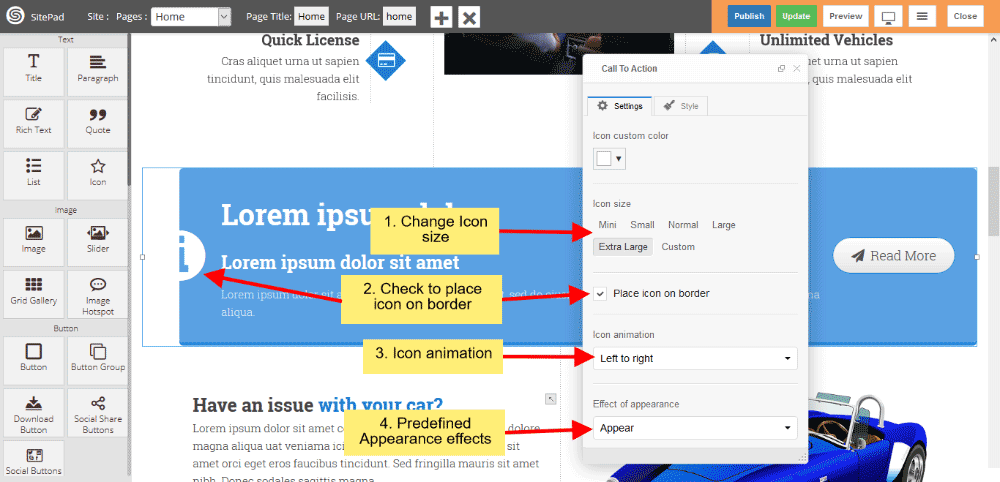
- Icon size gives you to change predefined size or custom size.
- If you want’s to place half Icon on border then click on checkbox.
- Icon animation provides to change animation style when page loads.
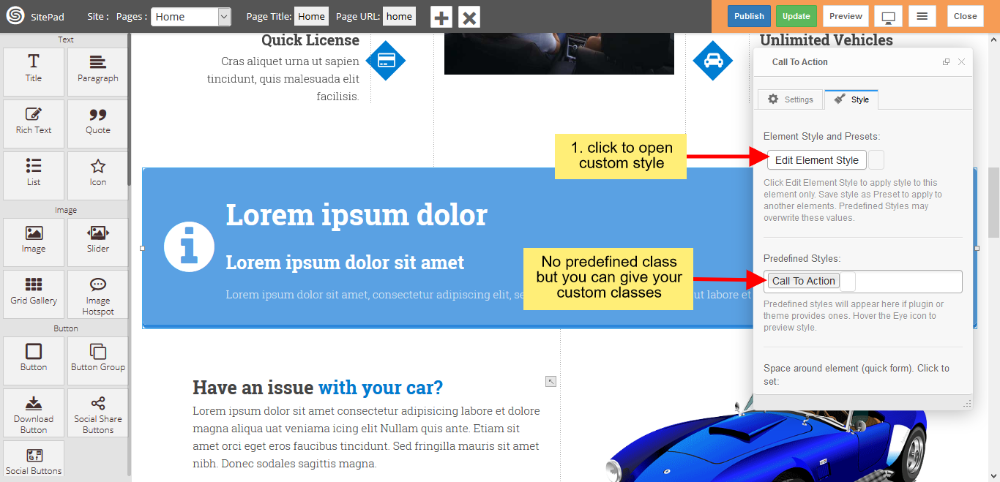
CALL TO ACTION STYLE
Style gives 2 types of style 1) Edit Element style and 2) Predefined style
- Edit Element style gives custom style in that you can change custom background color, text color, margin, border-radius etc.
- There is no predefined style but you can give your classes to define your custom style.
Service Box
This Guide will help you to add Service Box.
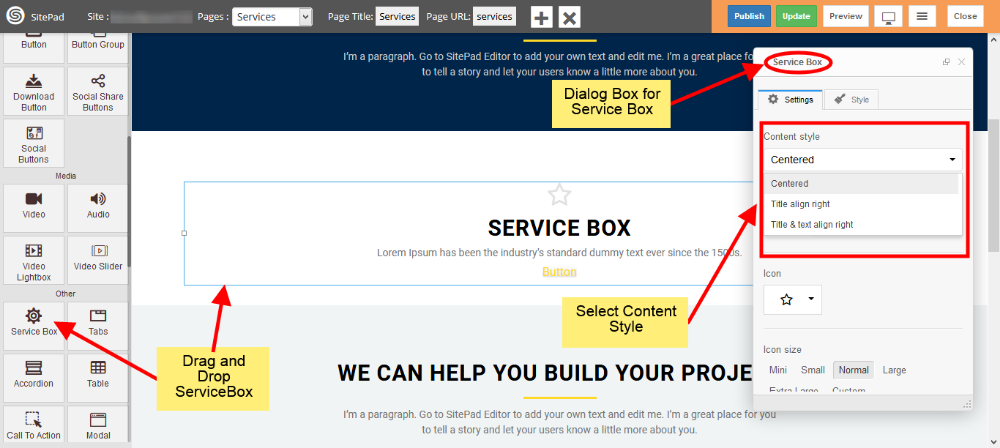
DRAG AND DROP SERVICE BOX
- Drag and Drop Service Box from left side widget panel as shown in image below.
- Now in Dialog Box of Service Box you can Customize Service Box.
- Select Content Style of your Service Box as shown in image below.
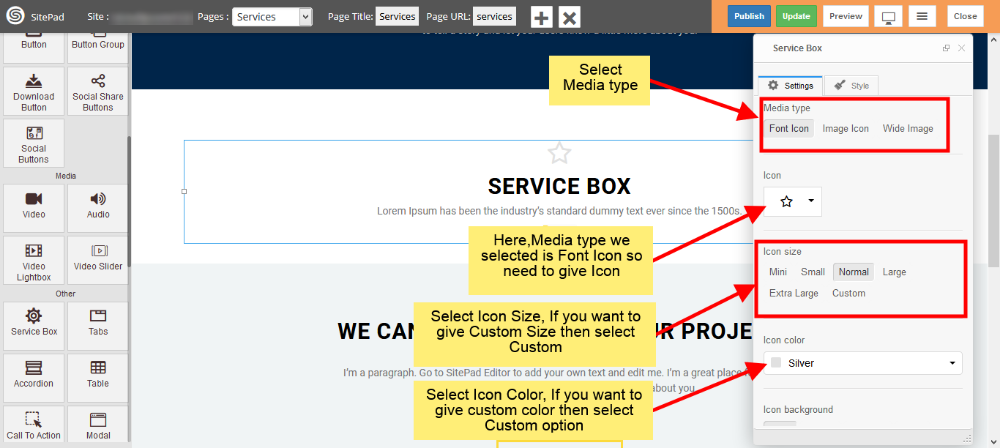
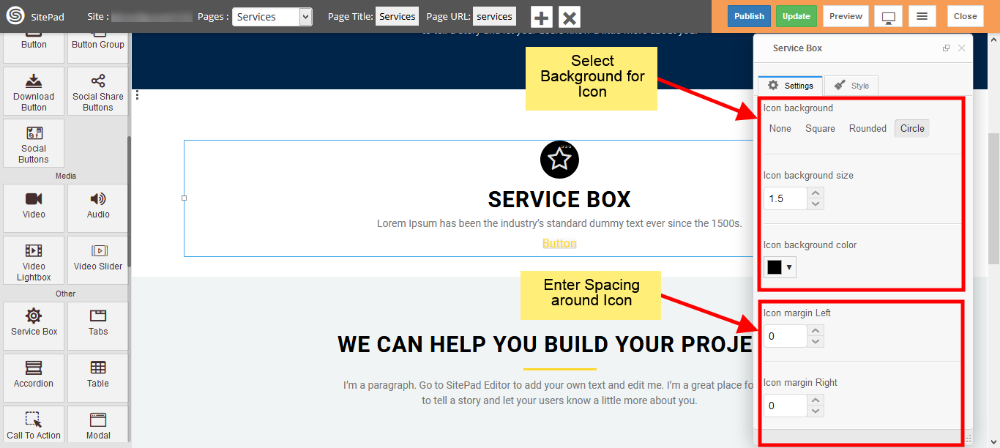
SERVICE BOX MEDIA TYPE
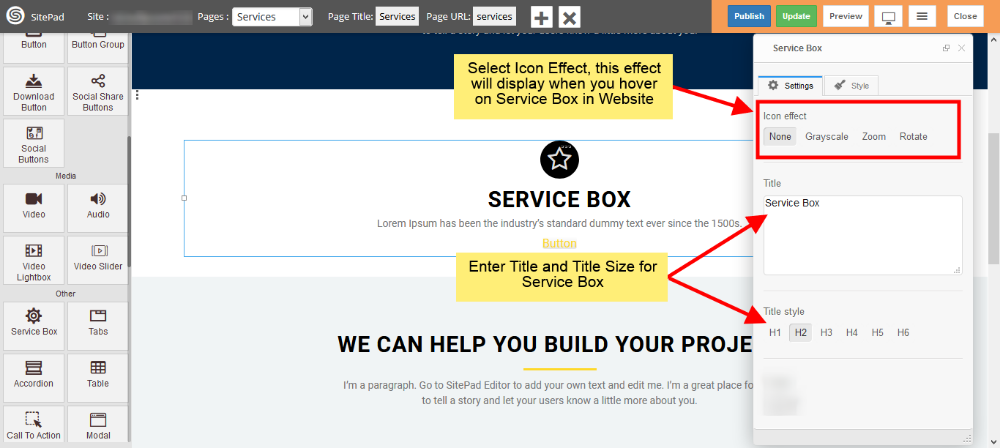
- Select Media type you want to display in your Service Box. We have selected Font Icon.
- As we selected Font Icon we need to Provide Icon as shown in image below. You need to provide image if you select Image Icon or Wide Image.
- Also provide some different properties for your media type like Color, Size etc as shown in image.
SERVICE BOX CONTENT
- Enter Service Box Title and give Size for Title as shown in image below.
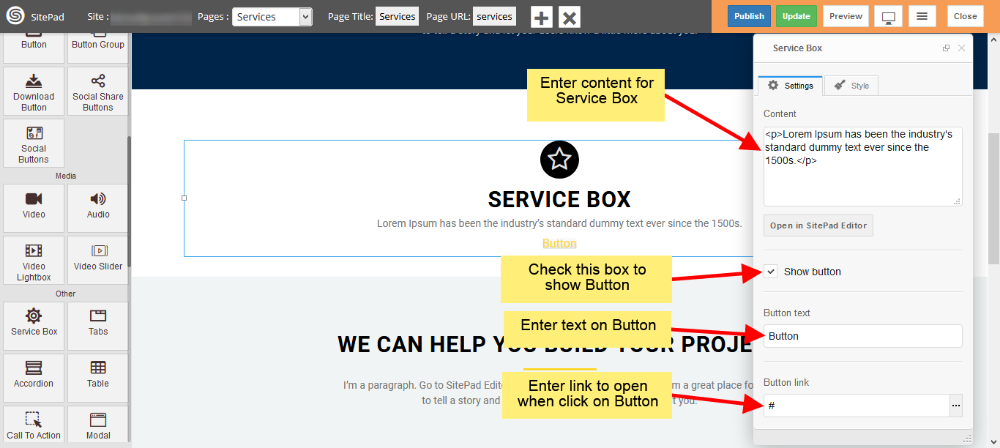
- Enter content of your Service Box in Content section.
BUTTON
- Check the Show Button box to show Button in your Service Box as shown in image below.
- Next enter text to Display on Button and Link if you want go to other page on Button Click.
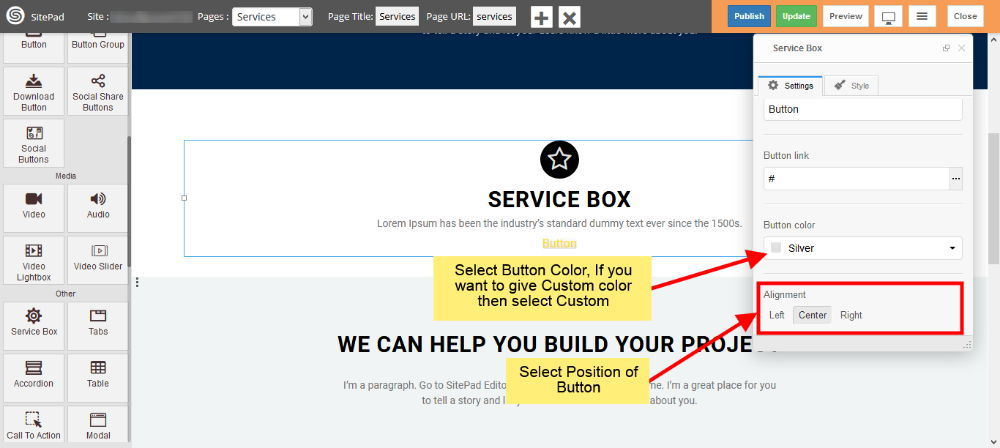
- Select Button color from Predefined options or you can give Custom color by selecting Custom as shown in image below.
- Select position for Button inside Service Box from Alignment section.
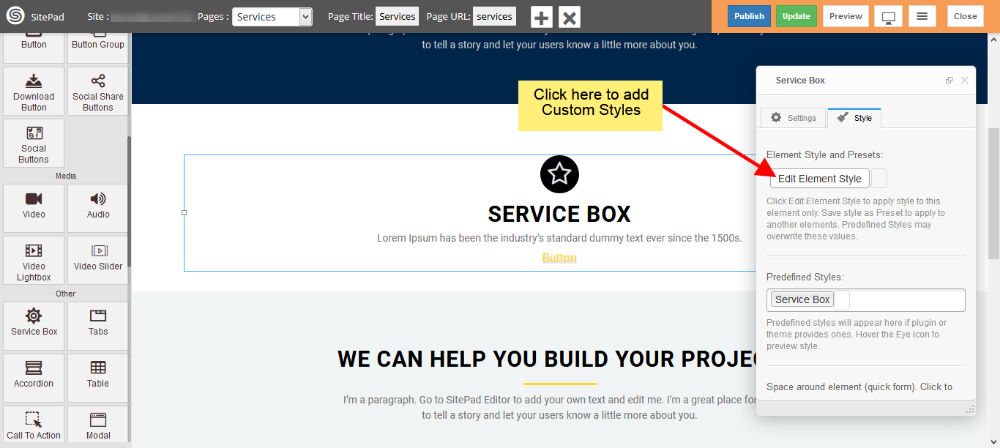
CUSTOM STYLE
- Click on Edit Element Style to add Custom styles as shown in image below.
Modal
This Guide will help you to add Modal.
DRAG AND DROP MODAL
- Drag and Drop Modal from left side Widget Panel as shown in image below.
- Now in Dialog box of Modal you can change Modal content and Customize Modal.
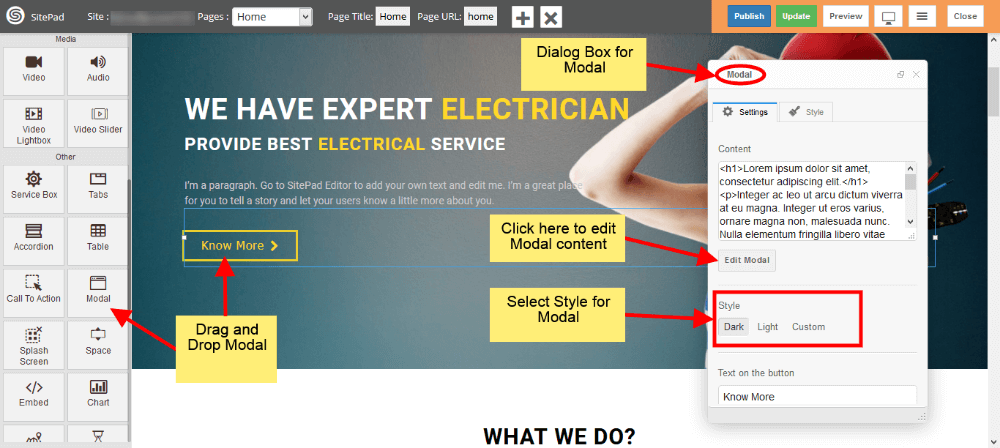
CUSTOMIZE MODAL
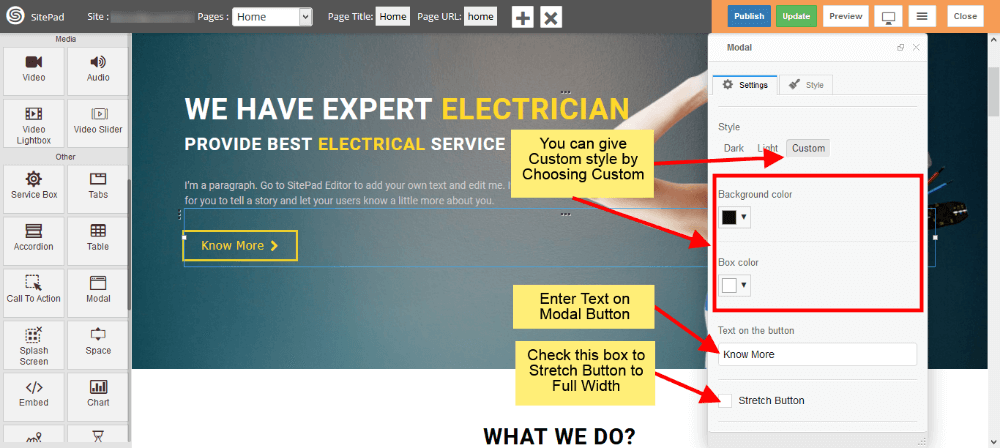
- To give ‘Custom styling to Modal just select Custom from Style as shown in image below.
- Once you select the Custom you will able to edit Background color and Box color as shown in image below.
- Now enter Text on Button to see it on your Modal Button.
- If you want Button to have Full Width then just check the Stretch box shown in image below.
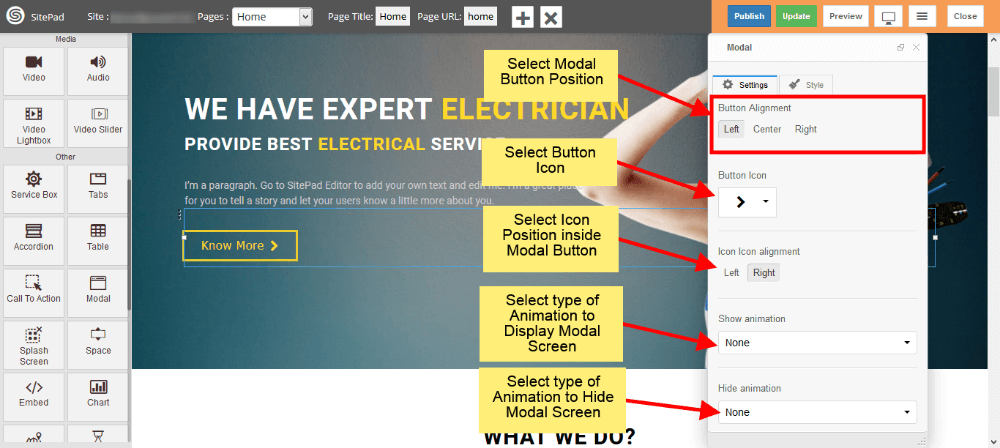
- Now select Position for Modal Button. There are 3 options Left, Center, Right just select one of them.
- Select Icon to display in Modal Button or if you don’t want icon then you can give it as Blank.
- If you select Icon then you need to give Position for Icon. By default it is Left but you can change it to Right also.
- Now select type of Animation to Arrive the modal screen on website and same for Hide also as shown in image below.
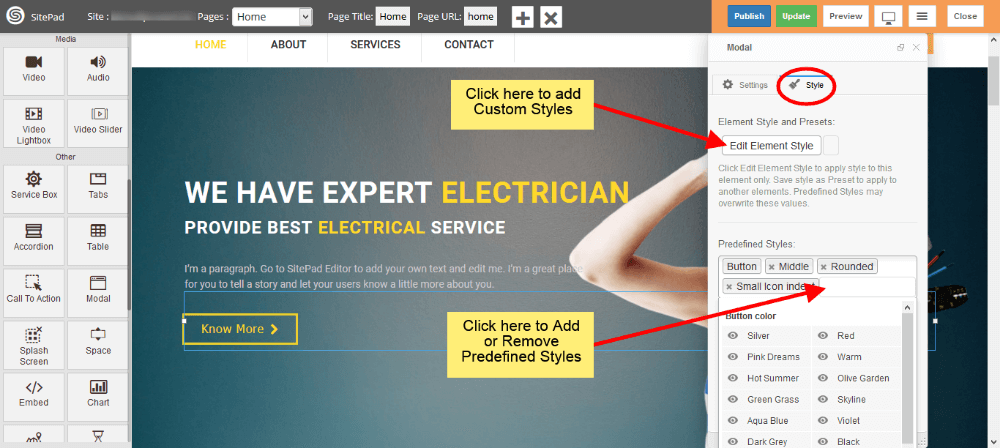
CUSTOM STYLES
- You can select Predefined style by clicking on Predefined Styles as shown in image below.
- You can also give custom styles by clicking on Edit Element Style as shown in image below.
MODEL SCREEN VIEW
- When you Click on Model Button it will Display screen like in image below.

Embed
This Guide will Help you to edit Embed Widget Settings and Style.
Note: Widget gives you Default Style provided by theme, you can customize as per your needs using this guide.
DRAG & DROP EMBED WIDGET
When you Drag and Drop Embed Widget in a Page, You will see the image like below.
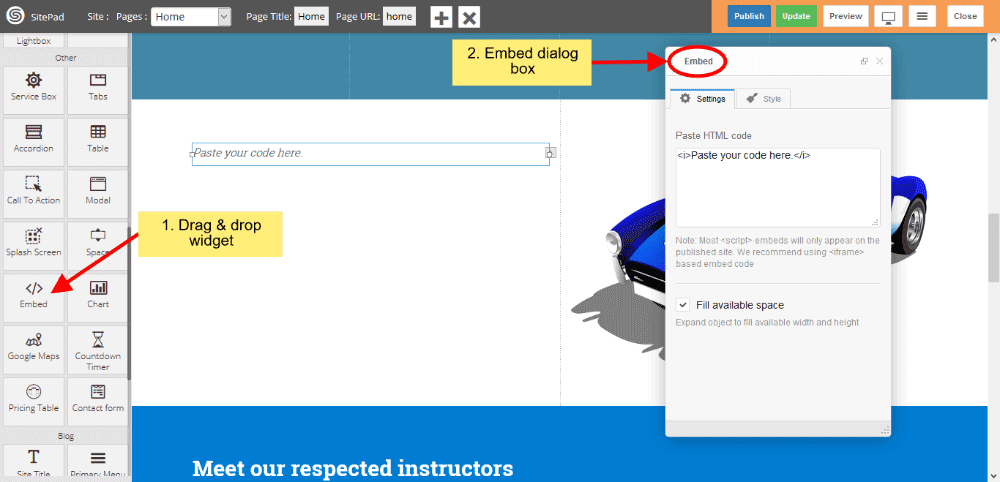
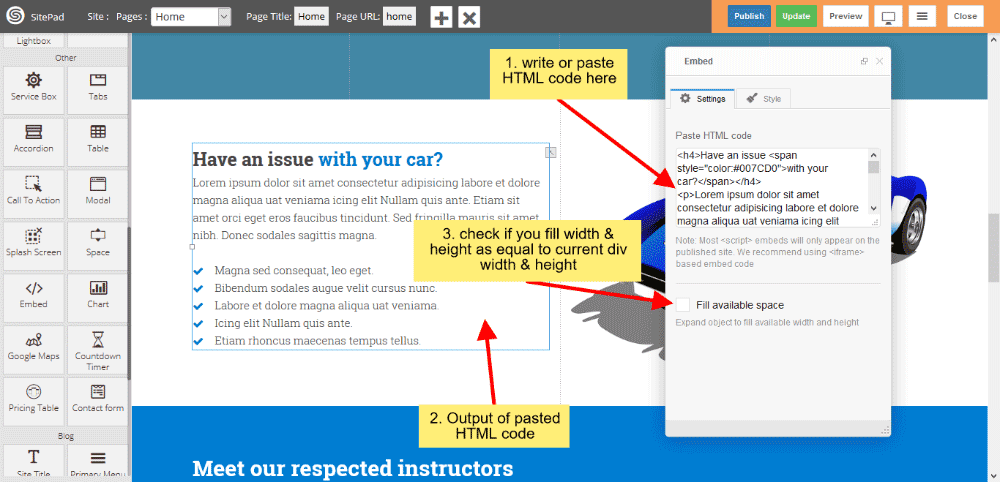
EMBED SETTINGS
- Write or paste HTML code in textarea box and you can give style also.
- Check the checkbox if you want’s full-width and height available in current div of a page.
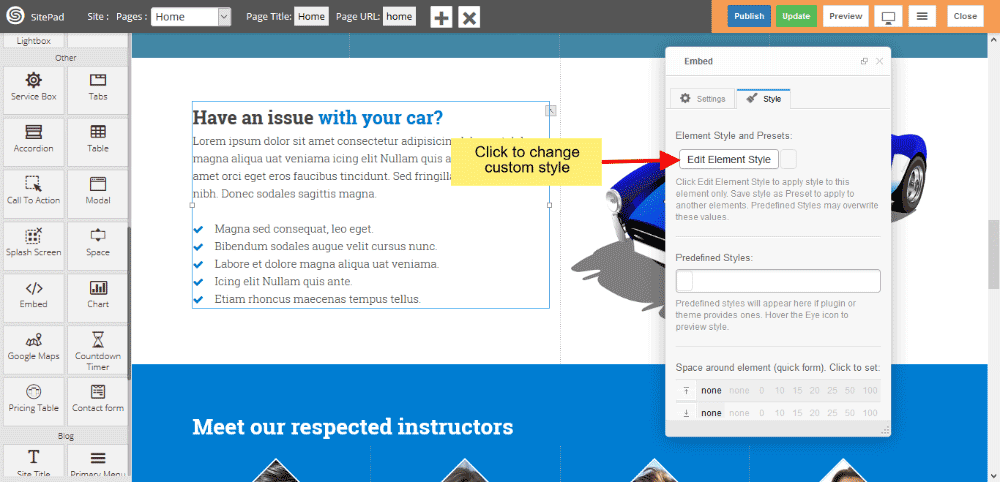
EMBED STYLE
- Edit Element style gives custom style in that you can change custom background color, text color, margin, border-radius etc.
- There is No Predefined style.
- You can also give your classes to define your custom style.
Pricing table
When the first Theme is selected it automatically gives the Predefined Style for Pricing Table but if you want to Customize Menu you can follow this guide.
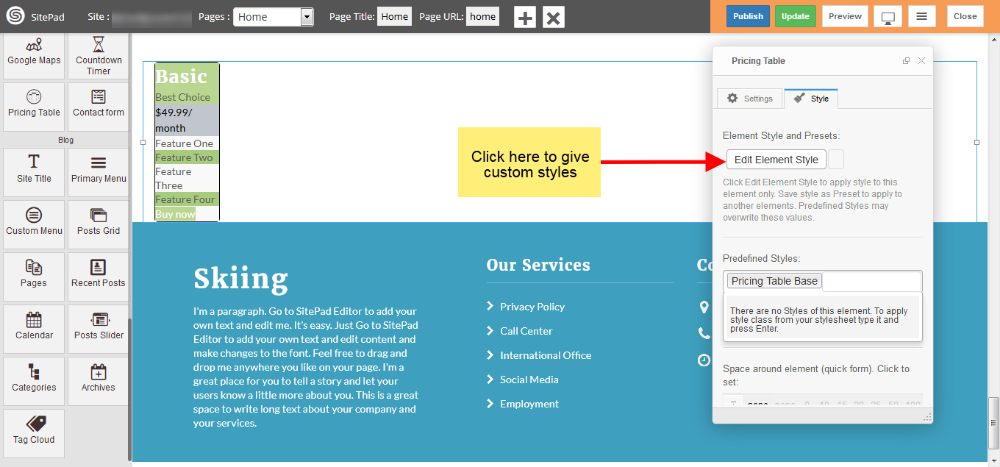
- Drag and Drop Pricing Table from left side widget section. So this action will pop up Dialog Box for Pricing Table as shown in image below.
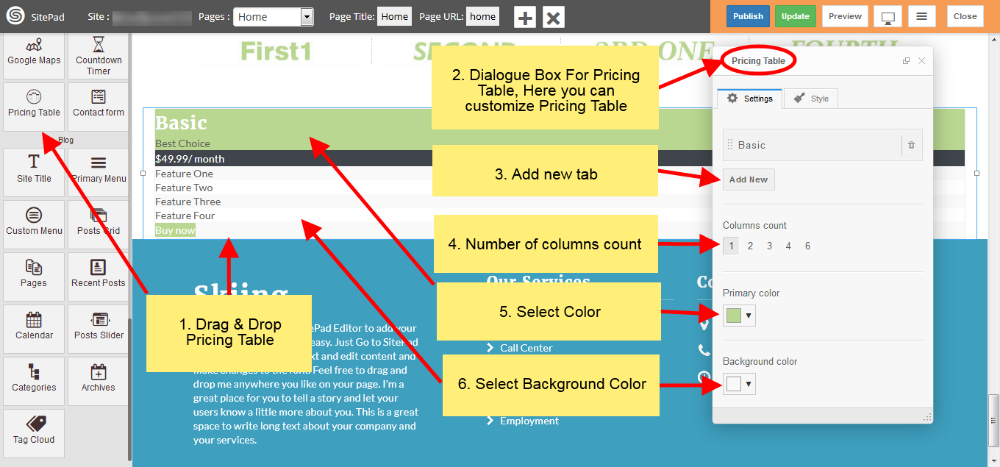
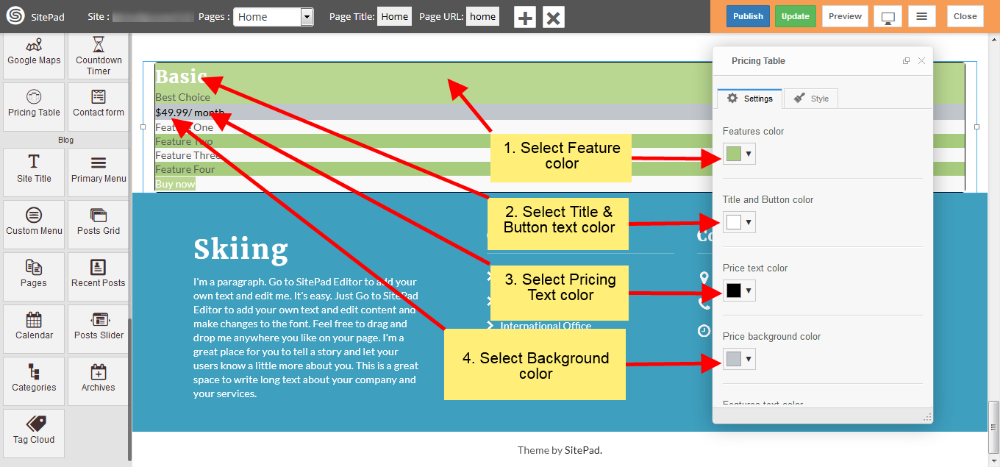
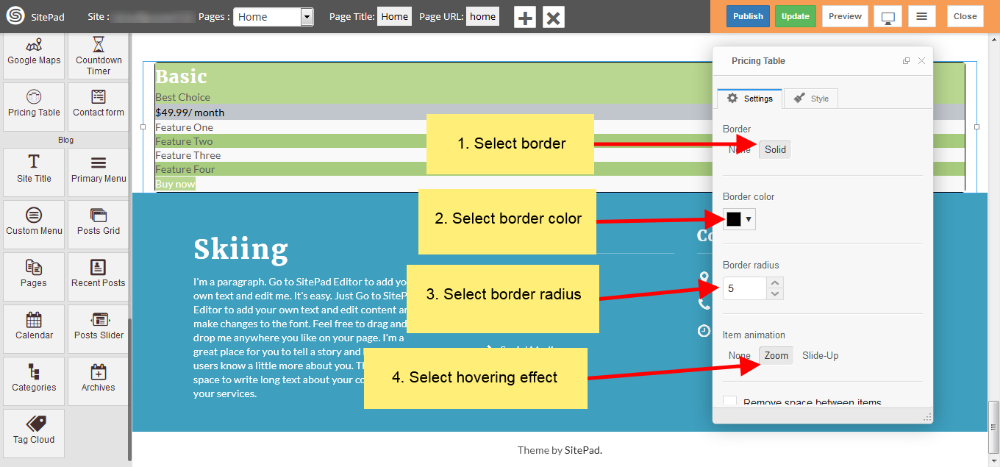
- Select Colors for Pricing Table pricing rows and border and select animation effect as per your needs as shown in images below.
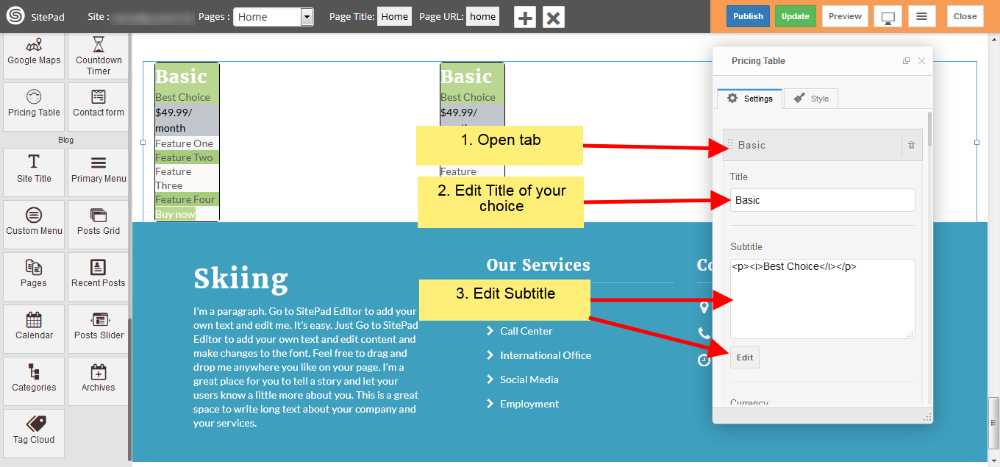
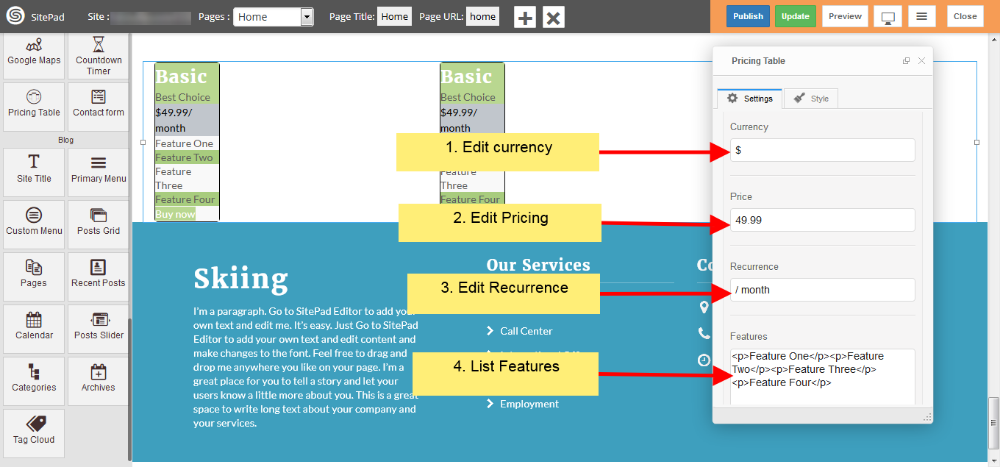
- Now in Settings section of Dialog Box you have different option to Customize Pricing Table and edit text accordingly of particular row as shown in images below.
- Now in Styles section of Dialog Box you can edit element style as shown in image below.
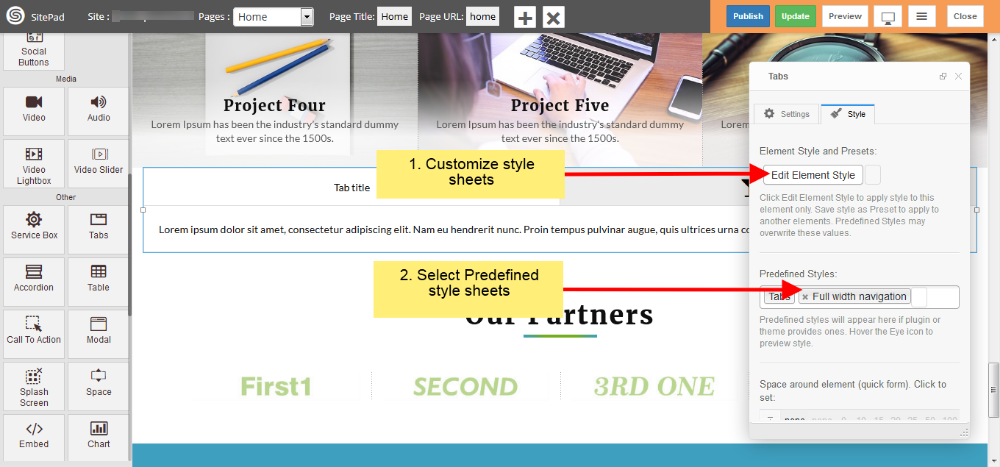
Tabs
When the first Theme is selected it automatically gives the Predefined Style for Tabs but if you want to Customize Tabs you can follow this guide.
- Drag and Drop Tabs from left side widget section then a Dialogue Box will pop up by this action for Tabs as shown in image below .
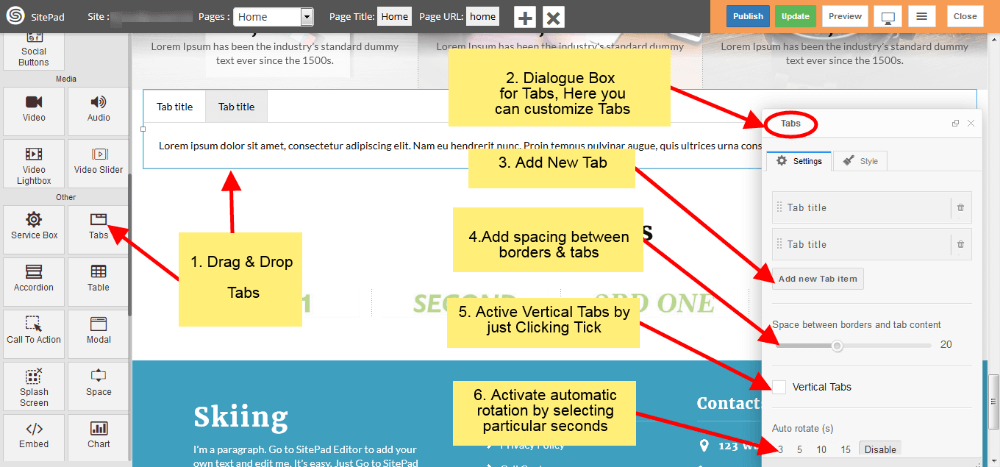
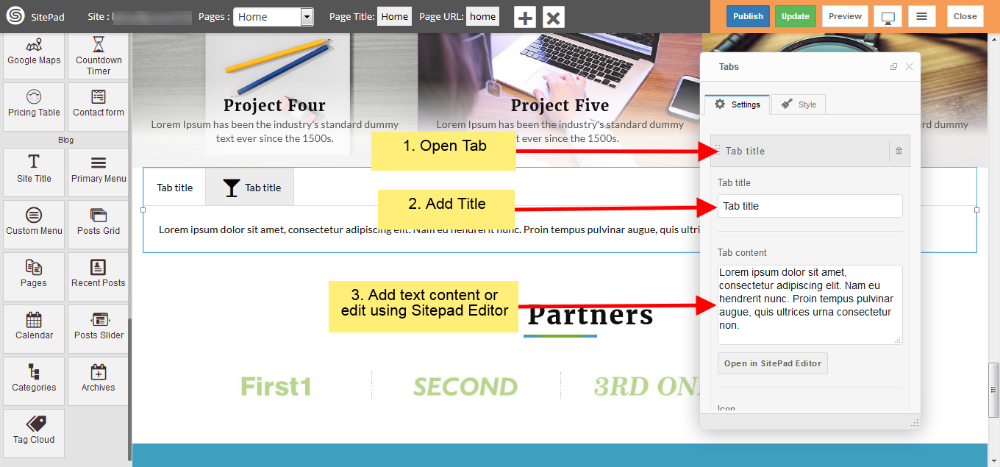
- Now in Settings section of Dialog Box you can open Tab and add text of your own as shown in image below.
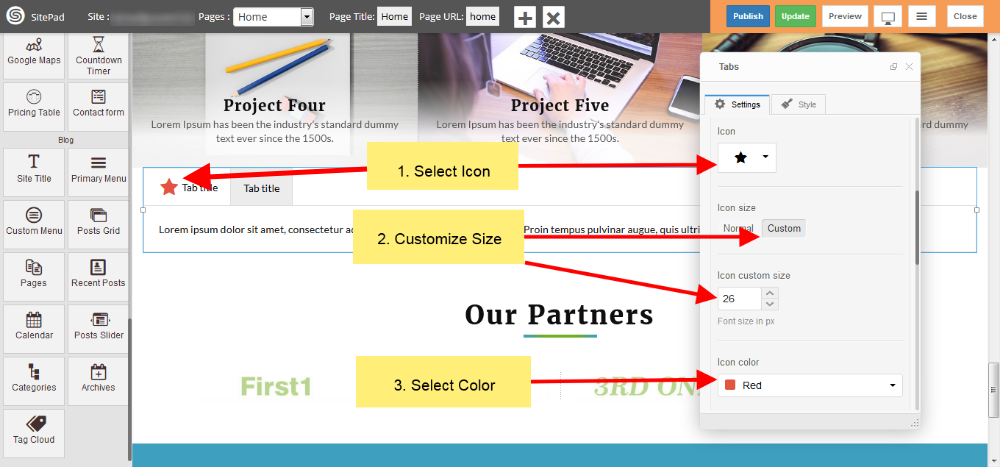
- In Settings section of Dialogue Box you can also select icons and customize as shown in figure below.
- Now in Style section of Dialog Box you can give Custom Style and also use Predefined Styles as shown in image below.
Accordion
This Guide will Help you to edit Accordion Widget Settings and Style.
Note: Widget gives you Default Style provided by theme, you can customize as per your needs using this guide.
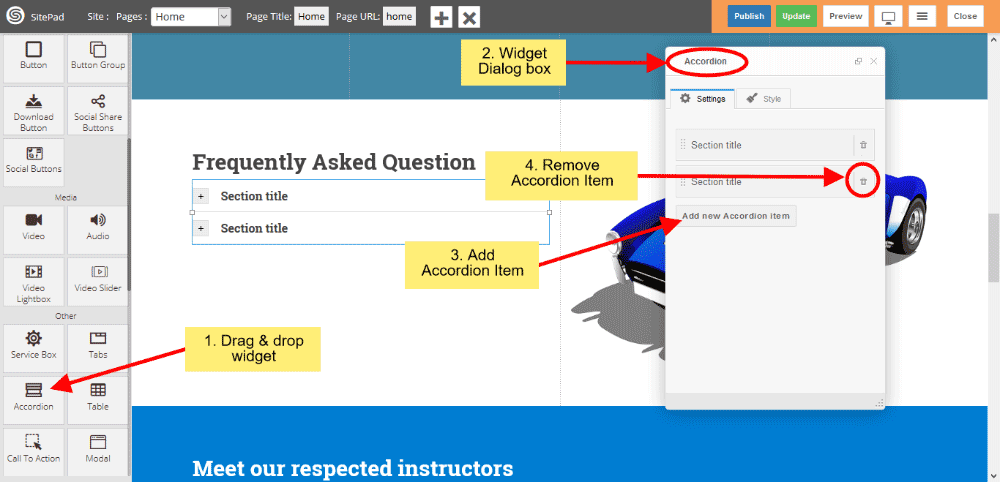
DRAG & DROP ACCORDION WIDGET
When you Drag and Drop Accordion Widget in a Page, You will see the image like below.
- Click on Add new Accordion item button to add new Accordion Item.
- If you want to Remove Accordion item then click on delete icon present on Accordion Item section.
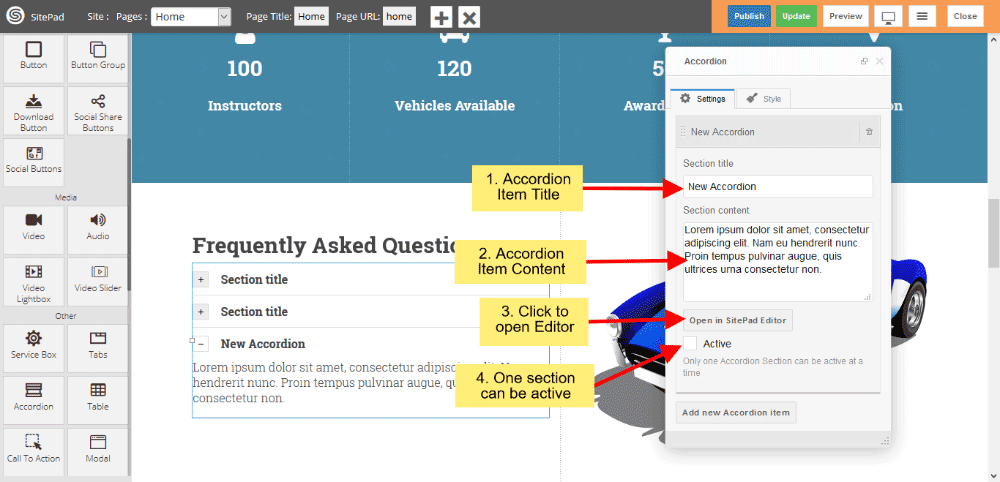
ACCORDION ITEM SETTINGS
- Section Title in that you can insert your Accordion Item title.
- Section Content gives you to insert your Item content.
- Or you can click on Open in SitePad Editor button to insert item content.
- Click on Active checkbox to active that particular item.
Note: Only one item can be active.
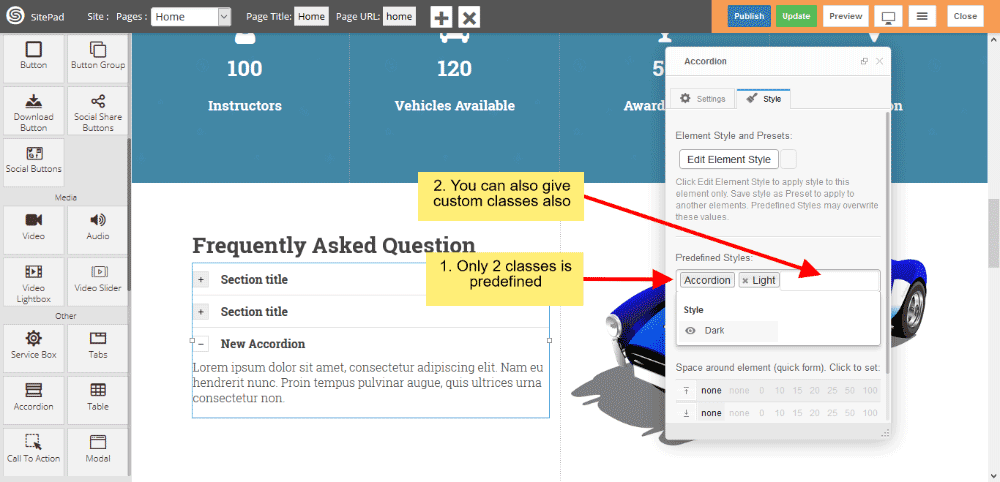
ACCORDION STYLE
Style gives 2 types of style 1) Edit Element style and 2) Predefined style
- Edit Element style gives custom style in that you can change custom background color, text color, margin, border-radius etc.
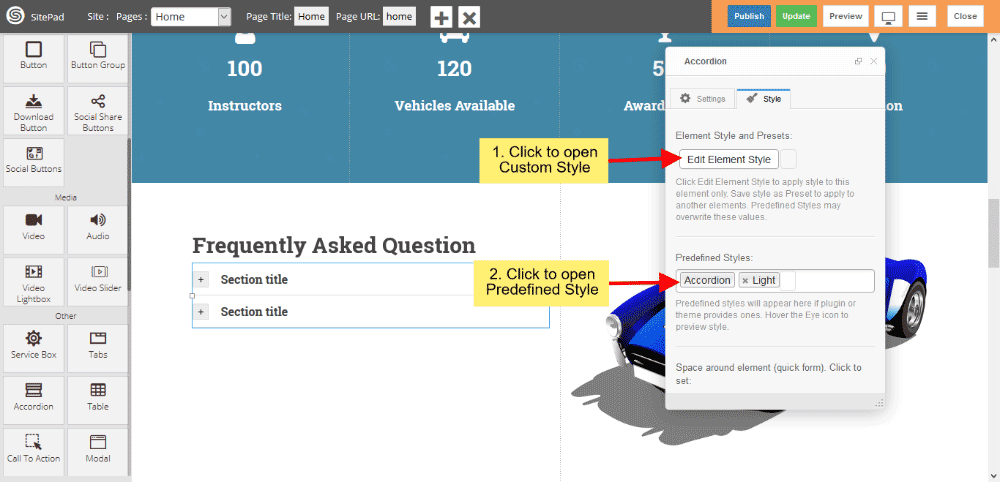
- Predefined style gives you classes of Accordion such as Light and Dark.
- You can also give your classes to define your style.
Splash Screen
This Guide will help you to add Splash Screen.
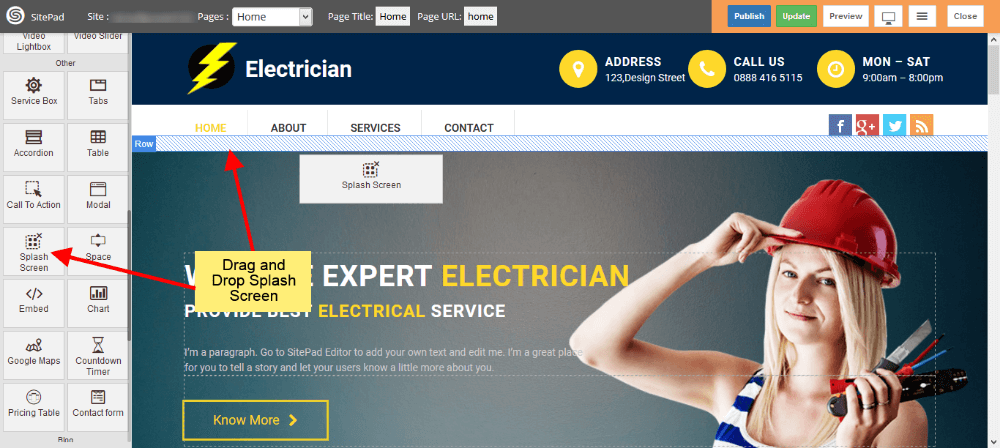
DRAG AND DROP SPLASH SCREEN
- Drag and Drop Splash Screen from left side Widget Panel at your desired portion of page.
- When your website window reach that portion, At that time Splash Screen will get Displayed.
- Here we have Dragged it at the Start of Page, so it will get Displayed when we load Page in Website.
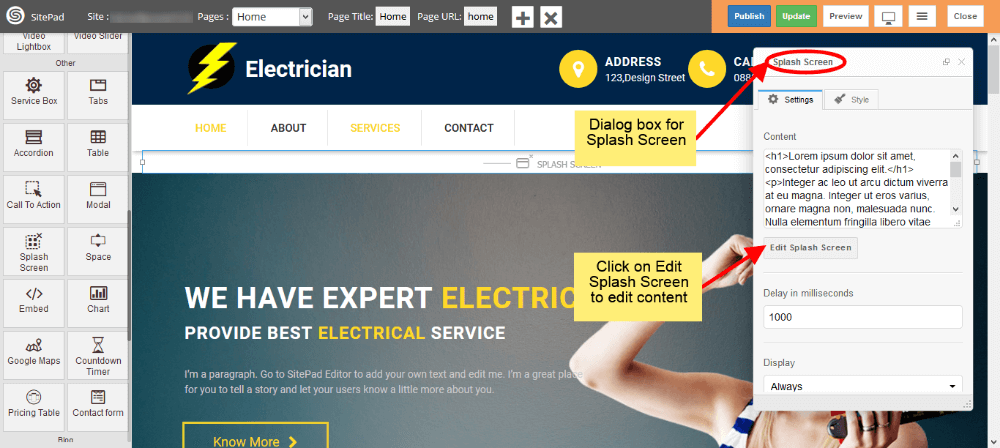
EDIT CONTENT
- When you Drag and Drop Splash Screen it will open Dialog Box for it.
- Now in Dialog Box you can edit content by clicking on Edit Splash Screen as shown in image below.
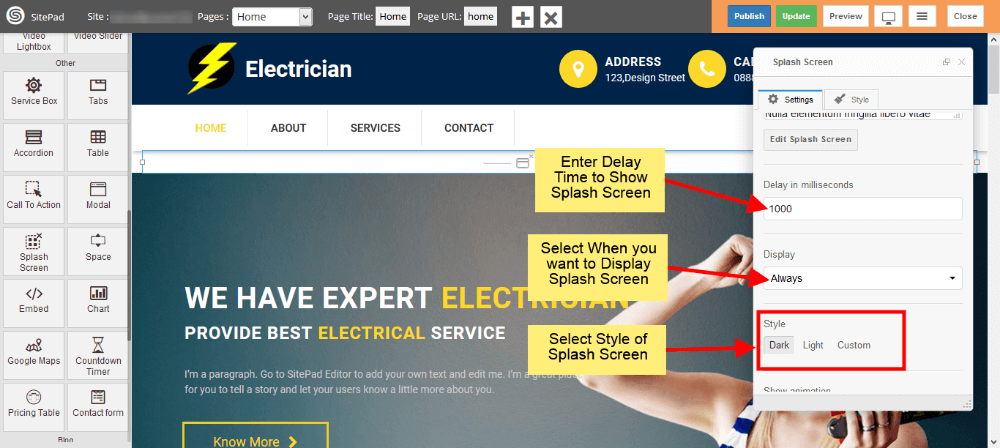
DELAY TIME AND DISPLAY
- Delay time will delay the Arrival of Splash Screen with that much time.
- Select when you want to display Splash Screen from Display options.
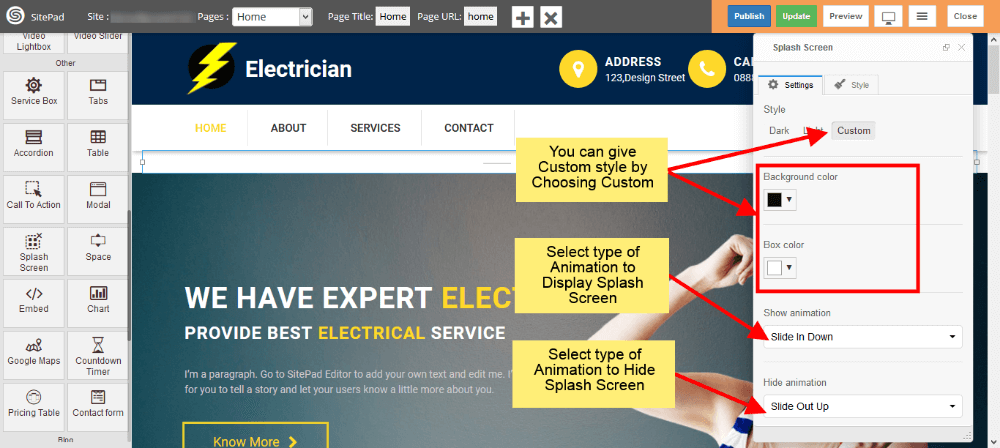
- Select style of Splash Screen. If you want to give your custom style then select Custom.
STYLE AND ANIMATION
- You can add your custom style by selecting Custom as shown image below.
- There is another way to give custom styles which is given in later steps.
- Now select type of Animation to Arrive the Splash Screen on your page. Same to Hide the Splash Screen.
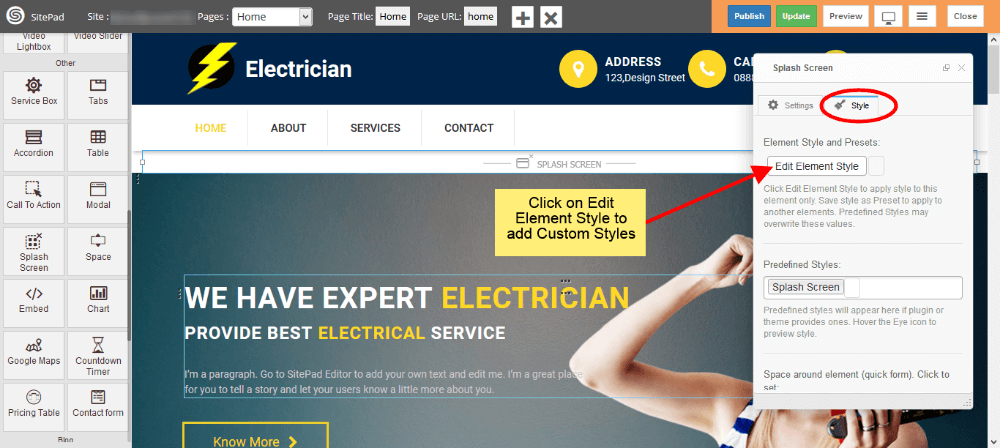
CUSTOM STYLES
- This is the second way to give custom style to Splash Screen.
- Just click on Edit Element Style to add custom styles.
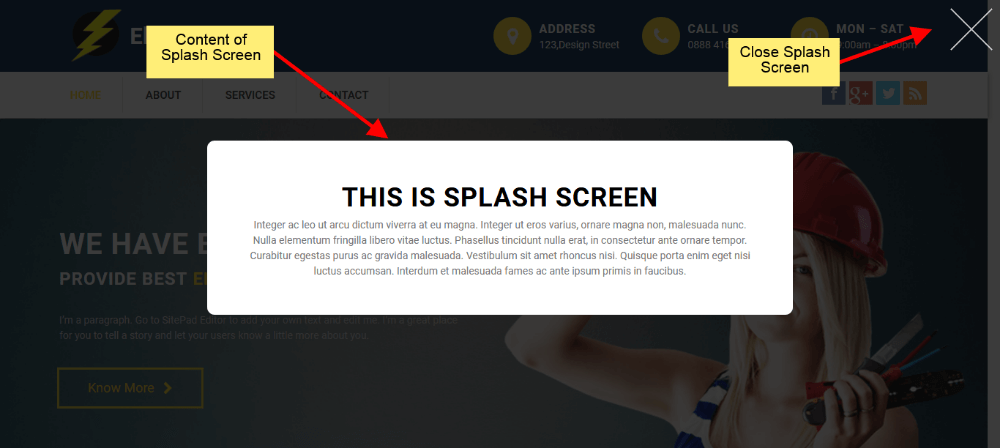
SPLASH SCREEN VIEW
- Splash Screen will look like as shown in image below in your website.
Download Button
This Guide will Help you to edit Button Widget Settings and Style.
DRAGDROP DOWNLOAD BUTTON WIDGET
When you Drag and Drop Download Button Widget in a Page, You will see the image like below.
Note: Widget gives you Default Style provided by theme, you can customize as per your needs using this guide.
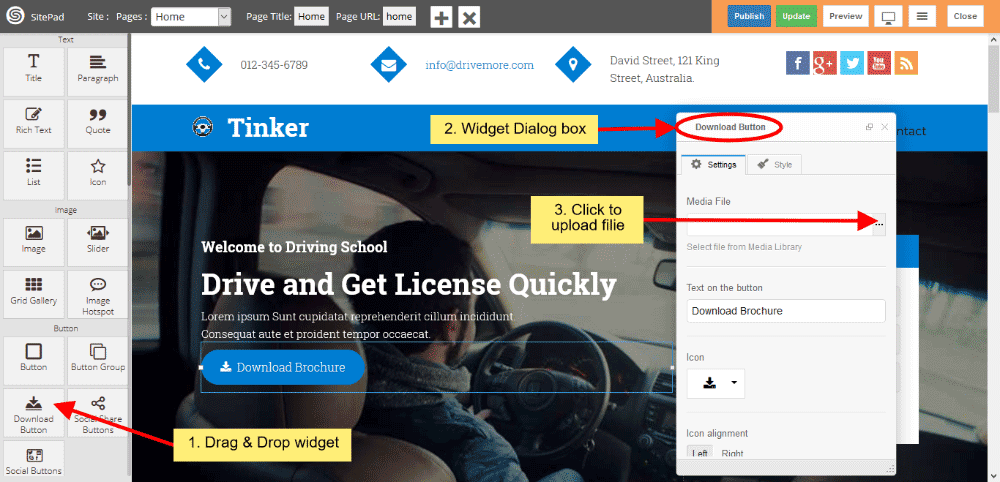
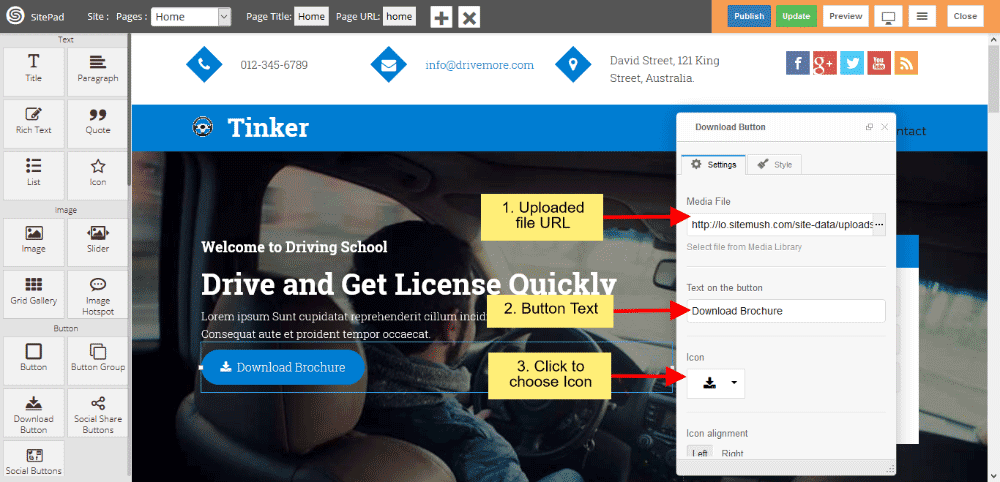
DOWNLOAD BUTTON SETTINGS
- Media File If you want to upload Files for downloading then you have to upload files by clicking on 3 horizontal dots and Insert Button text in button textbox.
- If you want to remove or change font Icon then click on Icon List and choose Icon from them.
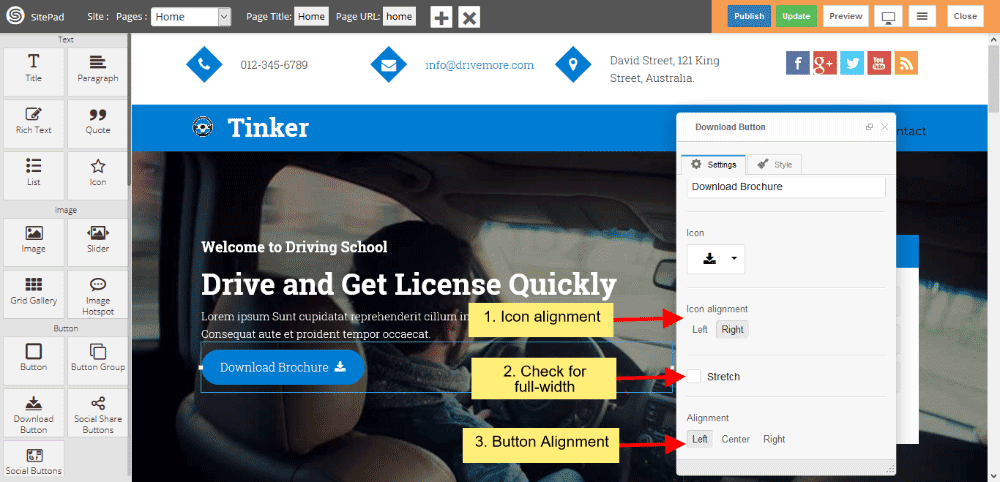
- Icon alignment gives you alignment of Icon such as Left or Right.
- If you want the Button in full width style then check the checkbox of Stretch, and Alignment Settings gives you Button Alignment.
DOWNLOAD BUTTON STYLE
Style gives 2 types of style 1) Edit Element style and 2) Predefined style
- Edit Element style gives custom style in that you can change custom background color, text color, margin, border-radius etc.
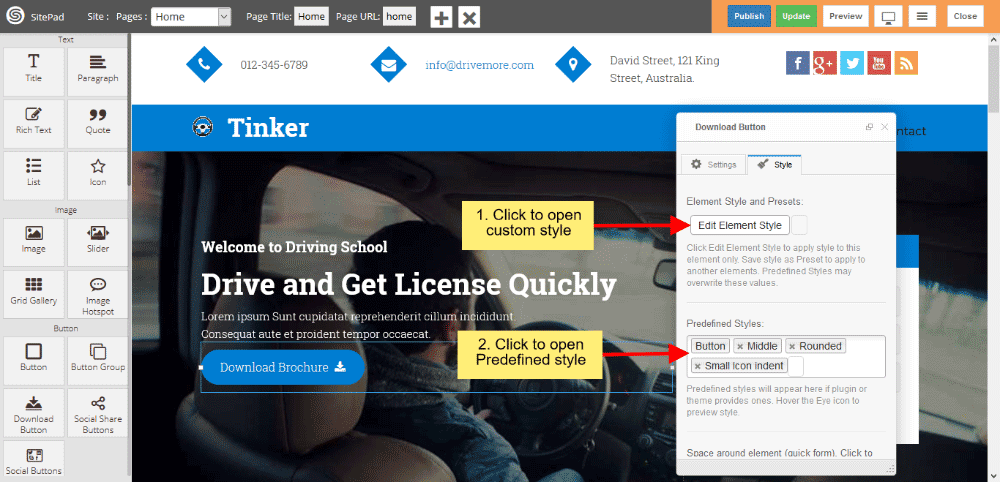
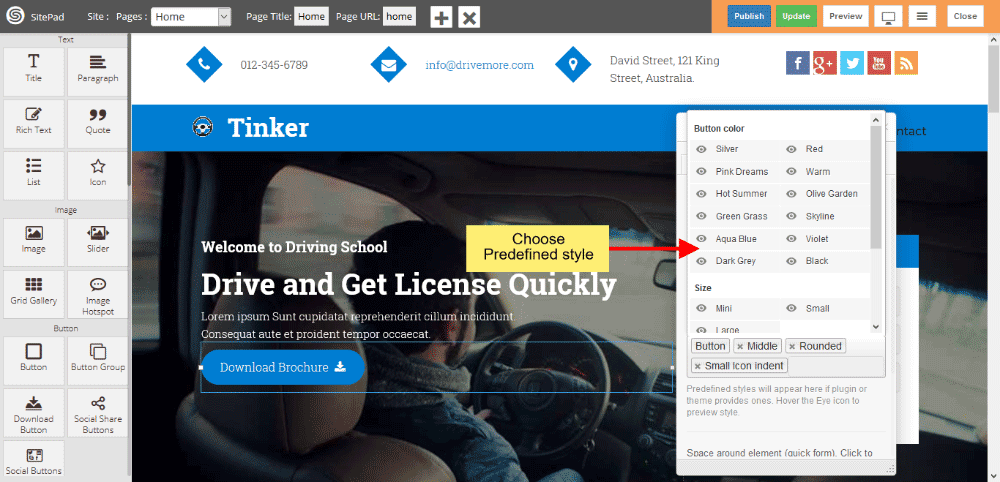
- Predefined style gives you classes of various predefined button for Background and Text color. And Size gives you various types of Button Size.
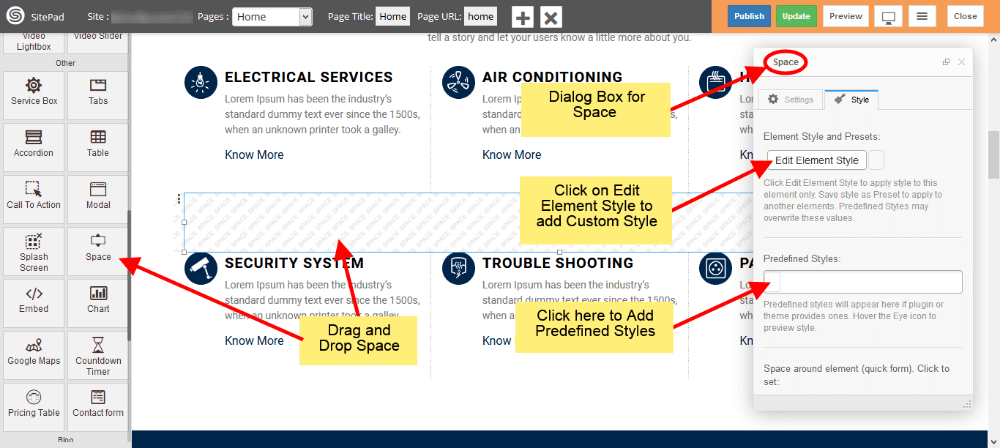
Space
This Guide will help you to add Space Widget.
DRAG AND DROP SPACE WIDGET
- Drag and Drop Space Widget from left side Widget Panel as shown in image below.
- Now in Dialog box of Space widget you can select Predefined Styles and you can also add custom styles by clicking on Edit Element Style as shown in image below.
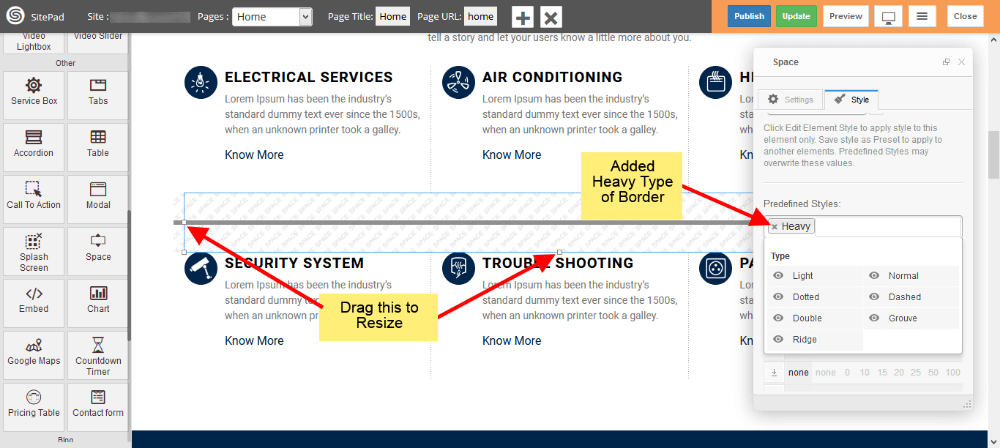
PREDEFINED STYLES
- You can add Border in middle of Space area as shown in image below, We have selected Heavy.
- Select type of border you want from different options.
- You can resize the Height and Width of Space by Dragging as shown in image.
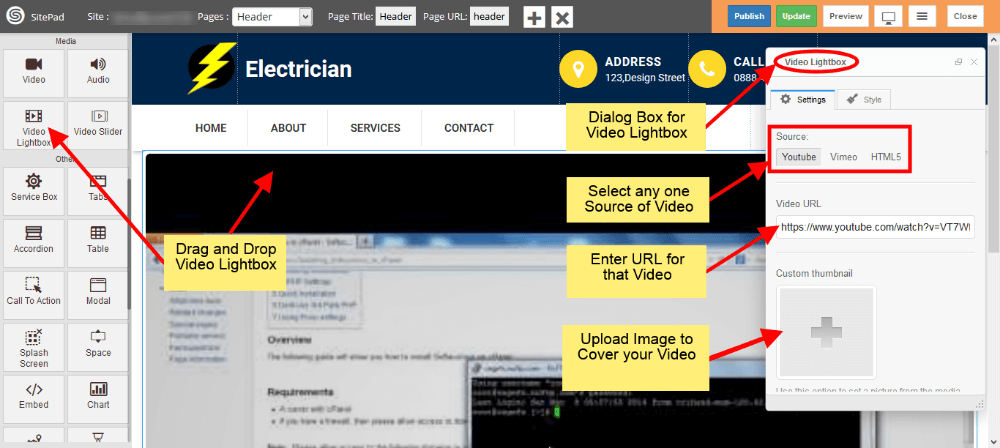
Video Lightbox
This Guide will help you to add Video Lightbox.
YOUTUBE SOURCE
- Drag and Drop Video Lightbox from left side Widget Panel.
- Now in Dialog box of Video Lightbox select Youtube from source section as shown in image below.
- After that enter Youtube Video URL.
- Select Cover Image if you need any.
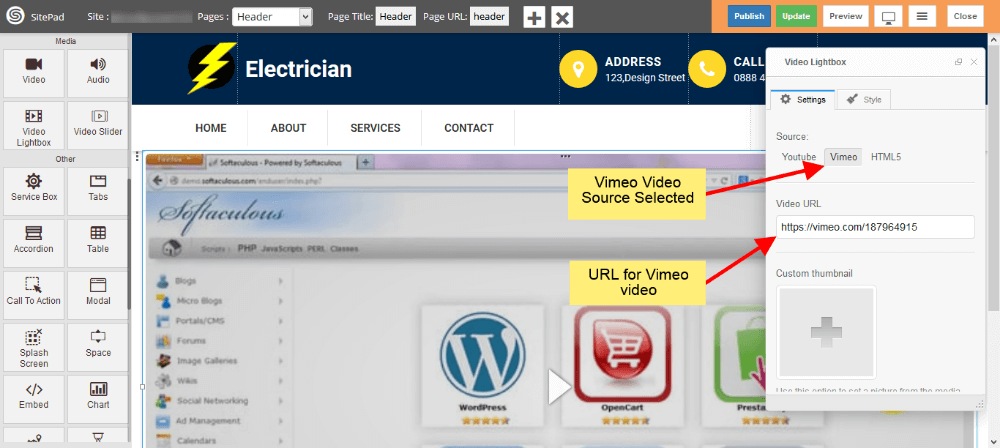
VIMEO SOURCE
- Select Vimeo from source section as shown in image below.
- After that enter Vimeo Video URL.
- Select Cover Image if you need any.
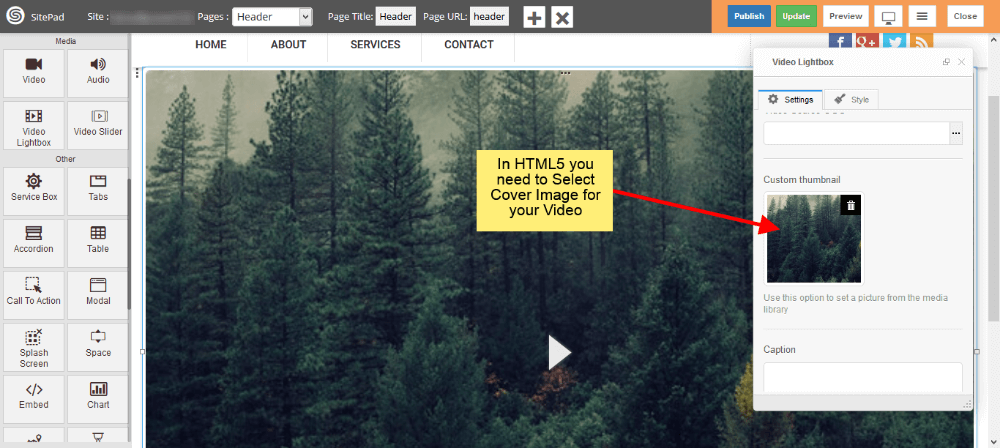
HTML5 SOURCE
- Select HTML5 from source section as shown in image below.
- After that upload Video in any one format by clicking on Three Vertical dots as shown in image below.
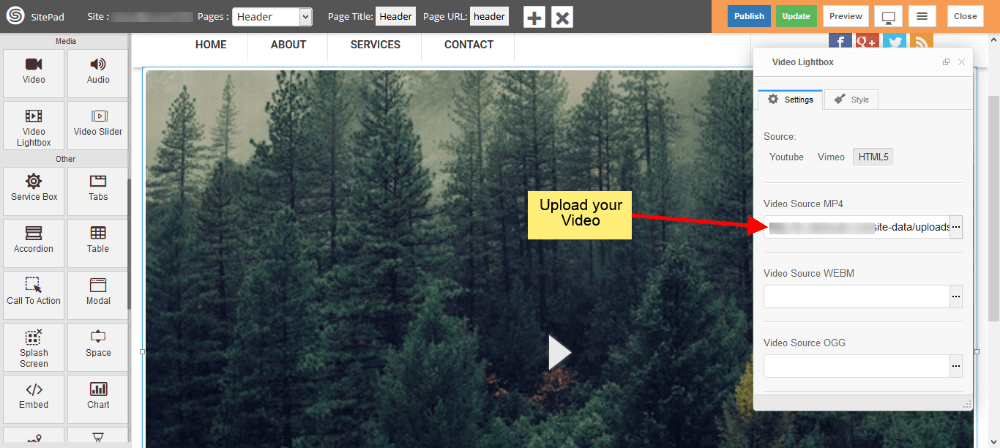
Note: In HTML5 Source you need to select Cover image for your video as shown in image below.
Google Maps
This Guide will Help you to customize Google Map Widget Settings and Style.
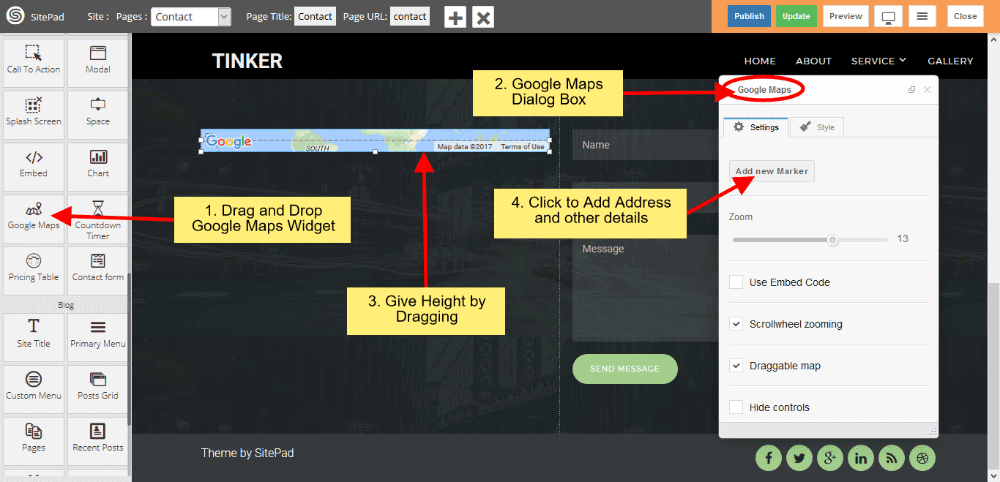
DRAG GOOGLE MAP WIDGET
When you Drag and Drop Google Map Widget in a Page. You will see the image like below.
Note: Widget gives you Default Style provided by theme, you can customize as per your needs using this guide.
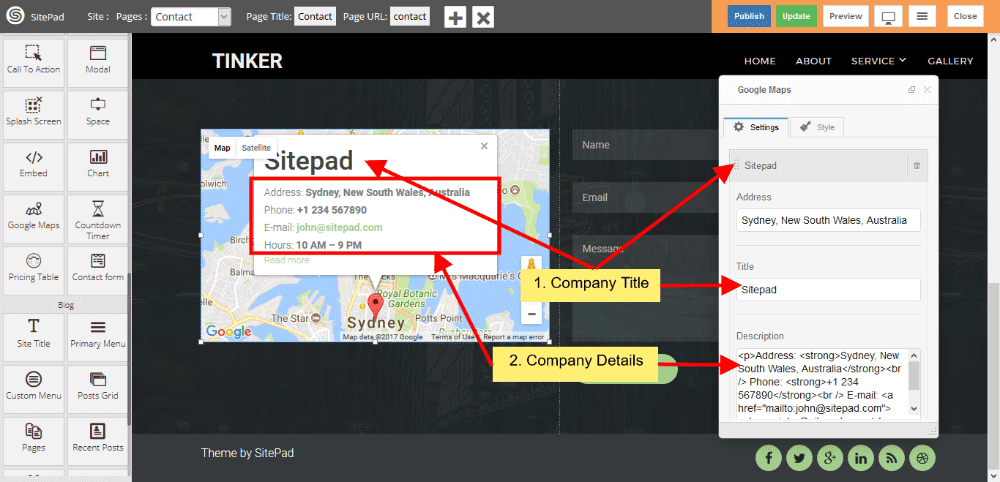
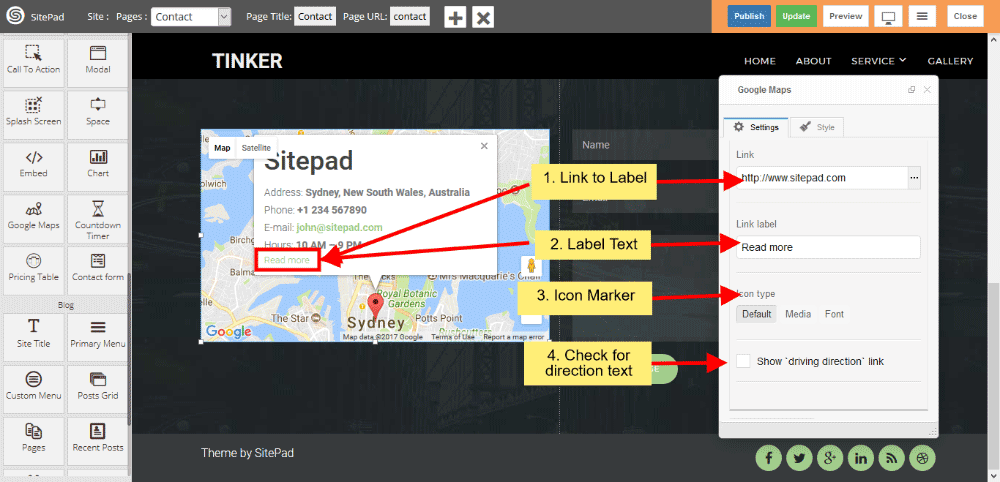
COMPANY DETAILS
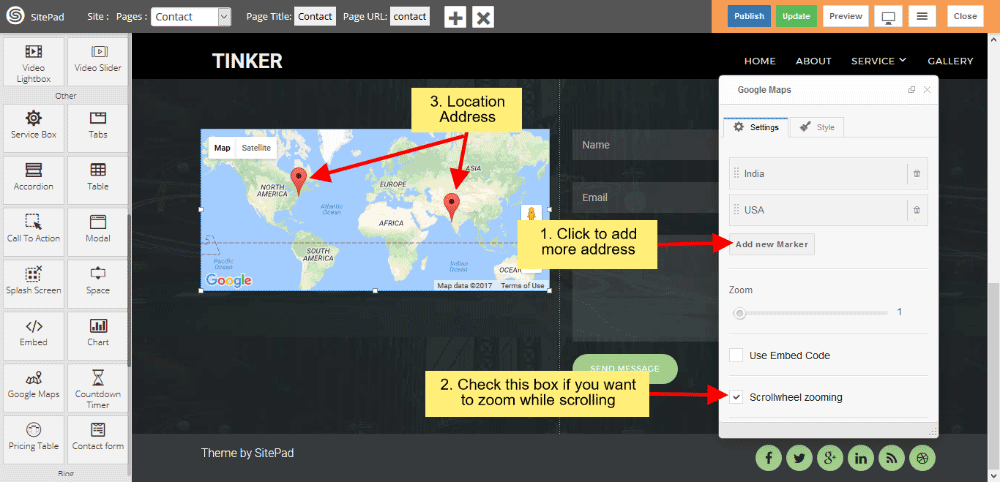
- When you click Add new Marker, you can able to customize Company Details such as Title, Address and other information.
- You can add Link Text to company details for other information and that text give Link also. If you want to change Icon then select Icon type, ‘Default is enabled when you drag and drop the widget.
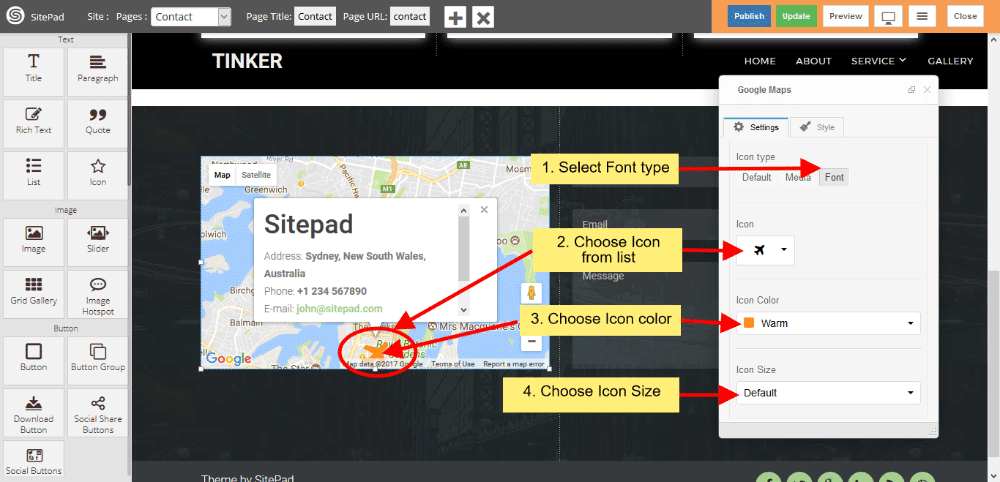
- When Darg and Drop the widget Default is enabled, If you want to give Image instead of Icon for marker, then select image. And select Icon Type for giving the styling of Icon. Choose Icon from the list, choose Icon color and give font size for selecting the Icon size.
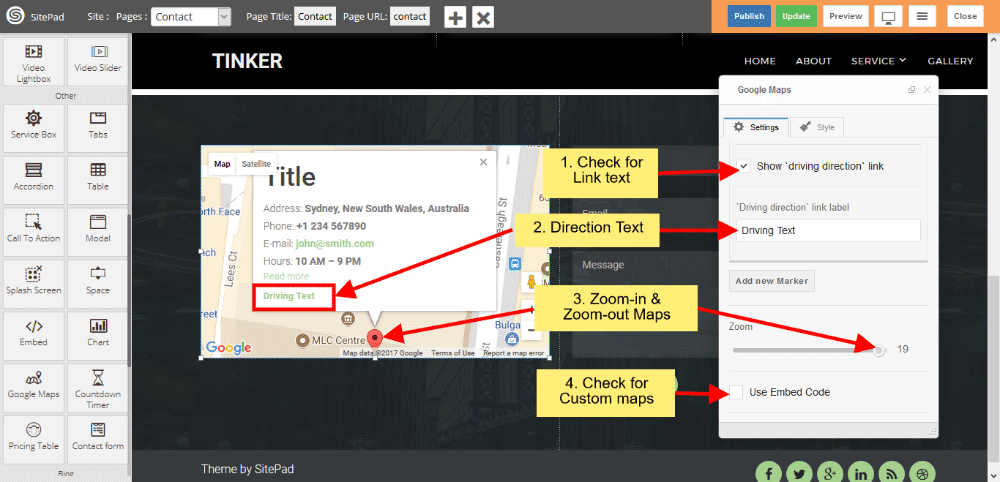
- Click checkbox for giving the Driving Direction Text and Link. You can zoom-in and zoom-out map with the help of Zoom control. Click on checkbox to give Embed Code for Google Map.
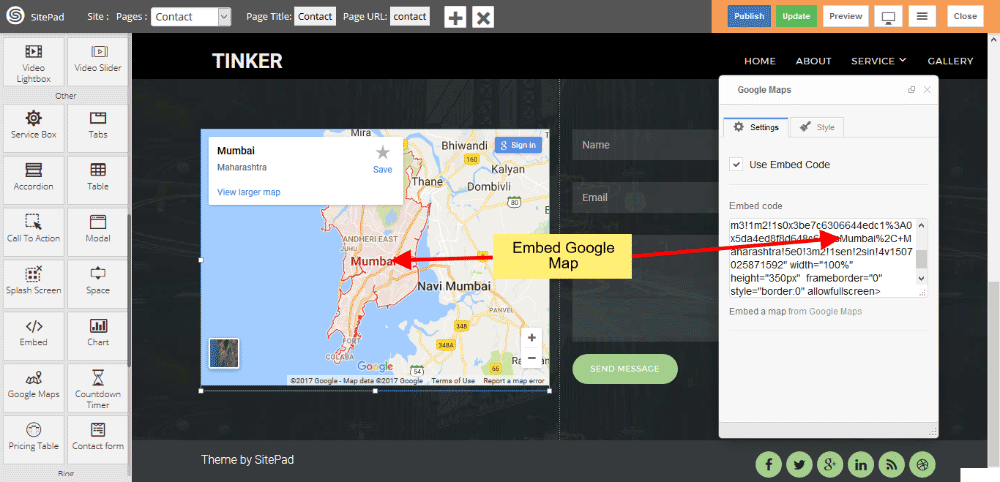
EMBED GOOGLE MAP
Click on checkbox to use Google Embed code from Google Map, paste that Iframe code in Embed code area.
MULTIPLE LOCATION
Click on Add new Marker to give address details and other information, For giving multiple location click on Add new Marker. Scroll Zooming check this checkbox for zooming while scrolling.
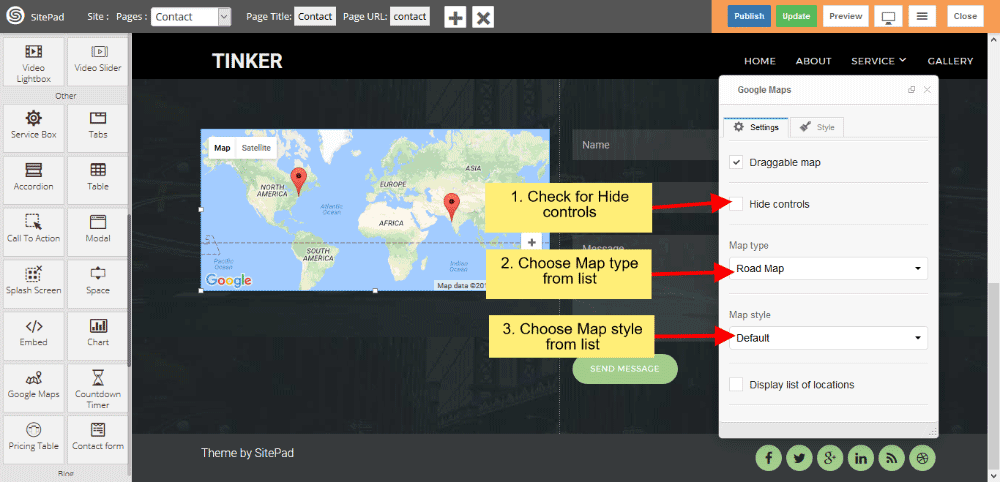
MAP TYPE AND MAP STYLE
Select predefined Map type from dropdown list, and select predefined Map style from dropdown list.
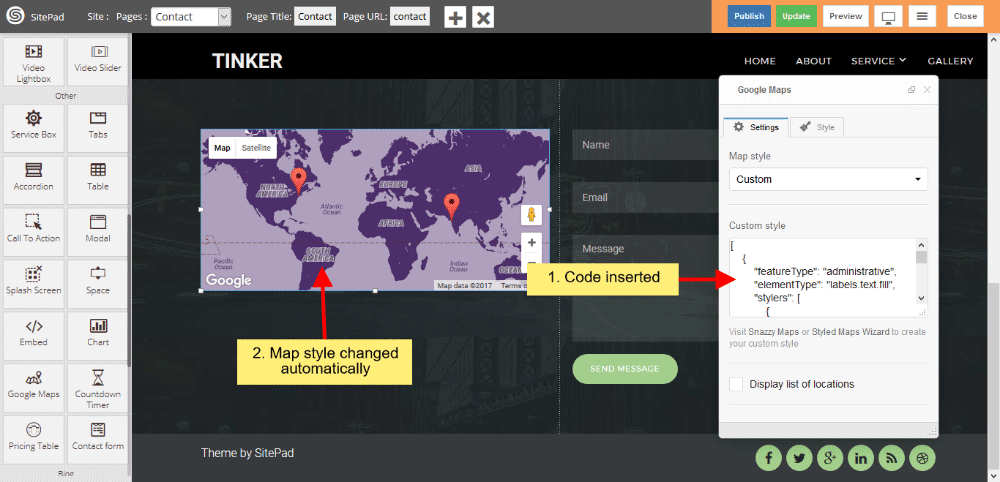
MAP CUSTOM STYLES
- Select Custom in Map style to give custom style for Map. Click on Snazzy Maps to give custom style for Google Map.
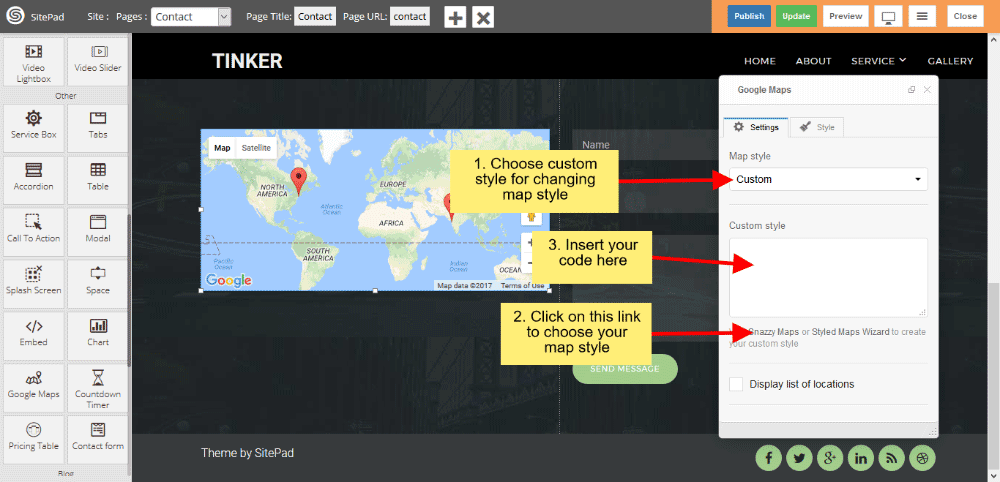
- Paste custom code in Custom Style textarea.
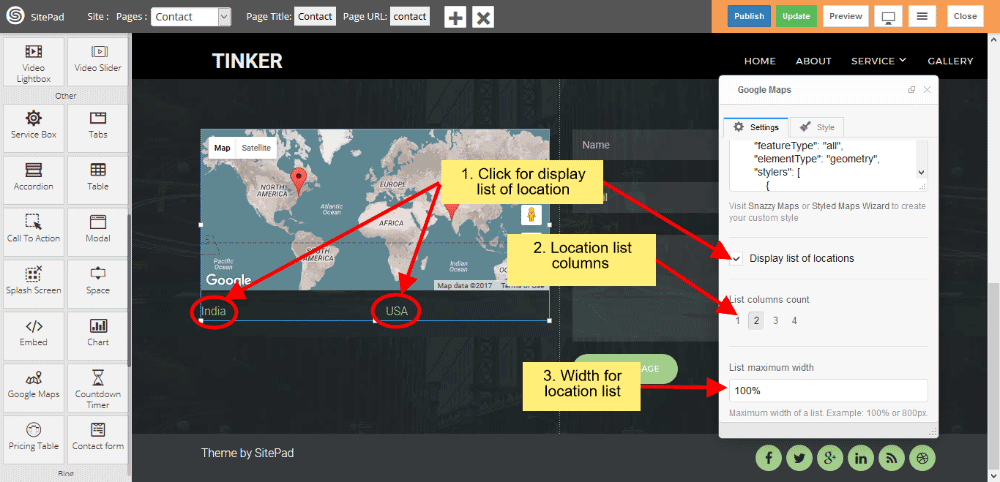
LOCATION LIST
Click on checkbox for displaying Location List. List column count gives column count for displaying location list in selected particular column. List maximum width gives total width for displaying Location list.
Social buttons
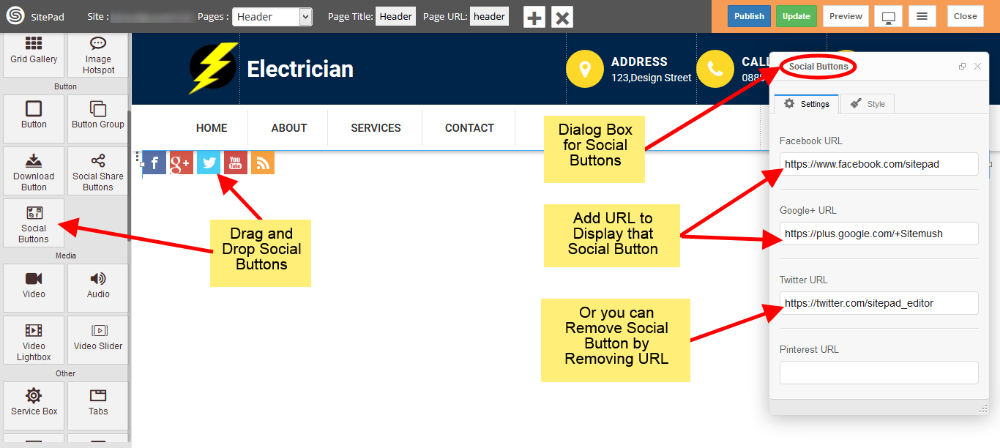
This Guide will help you to Customize Social Buttons.
- Drag and Drop Social Buttons from left side Widget panel. Now in the Settings section of Social Buttons Dialog box enter URL for Social Buttons to display them or remove URL to remove button as shown in image below.
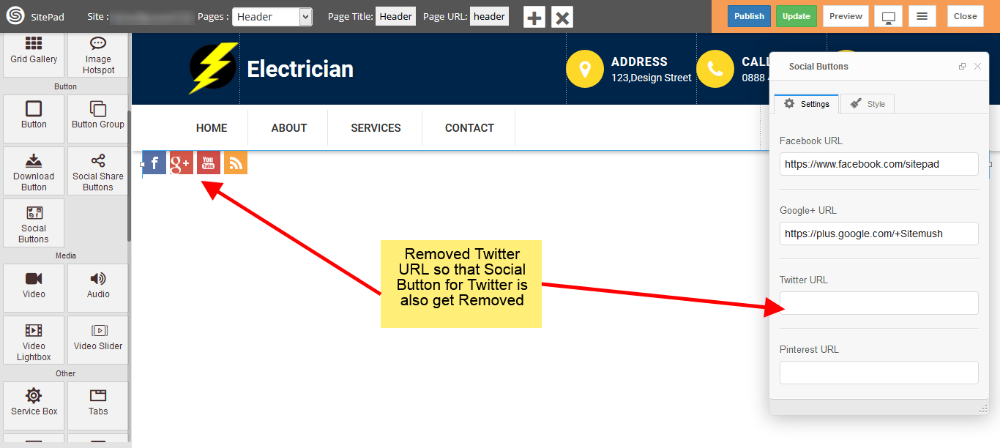
- Here we removed Twitter URL so that Social Button for Twitter is also get removed.
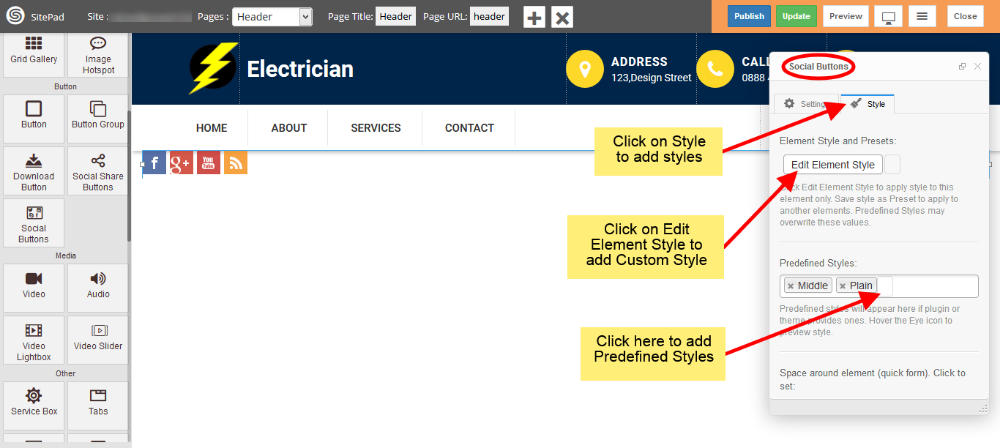
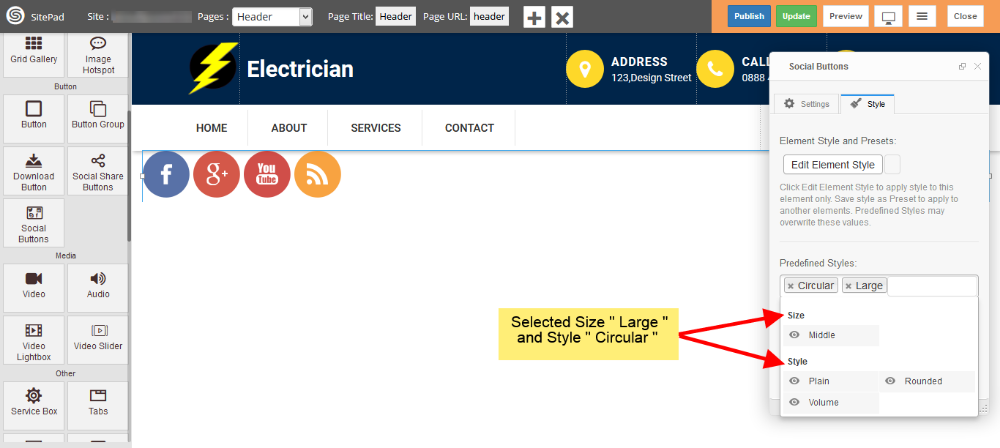
- Now click on Style to add styling for Social Buttons. Click on Edit Element Style to add Custom Style and click in Predefined Styles to add Predefined styles as shown in image below.
Note: Please not that Background Color for Social Buttons is Predefined so you will not able to change that.
-
Now see in image below we have selected Size Large and Style is Circular so styling for Social Buttons have Changed.
Contact Form
This guide will help you to Customize Contact Form.
-
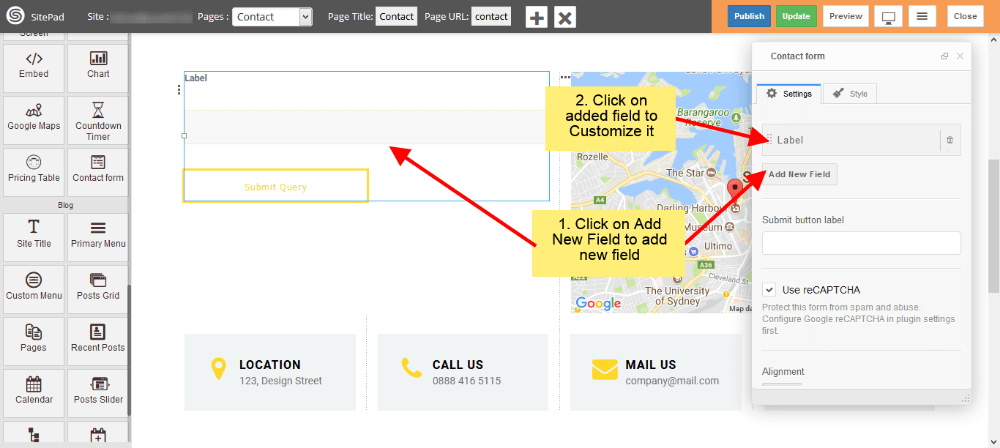
- Drag and Drop Contact Form from left side Widget Panel or simply click on it if already present in page to open Dialog Box. Now in Dialog Box Click on Add New Field to add new input field to your Form. Enter Button label and check use reCAPTCHA box if you want to use it as shown image below. If you don’t know how to setup reCAPTCHA then follow this guide. Setup reCAPTCHA for Contact Form

- Drag and Drop Contact Form from left side Widget Panel or simply click on it if already present in page to open Dialog Box. Now in Dialog Box Click on Add New Field to add new input field to your Form. Enter Button label and check use reCAPTCHA box if you want to use it as shown image below. If you don’t know how to setup reCAPTCHA then follow this guide. Setup reCAPTCHA for Contact Form
-
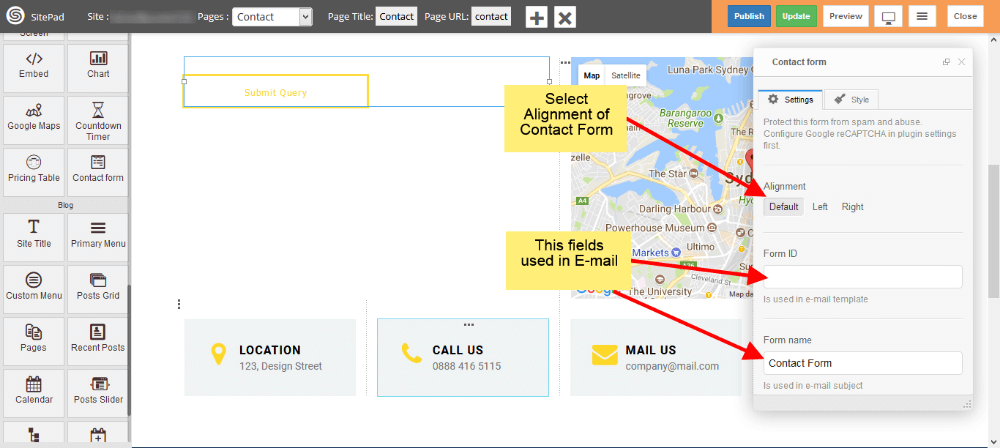
- Now select Alignment for your Contact Form as per requirements. Form ID and Form Name this fields is used in E-mail template.
- To add new fields just click on Add New Field. To customize newly added field just click on that particular field as shown in image below.
- Now select Alignment for your Contact Form as per requirements. Form ID and Form Name this fields is used in E-mail template.
-
- Now add Label for input field and select Type of that field. We have different input types like Text for names or surnames, E-mail for e-mail, Text area for messages etc.
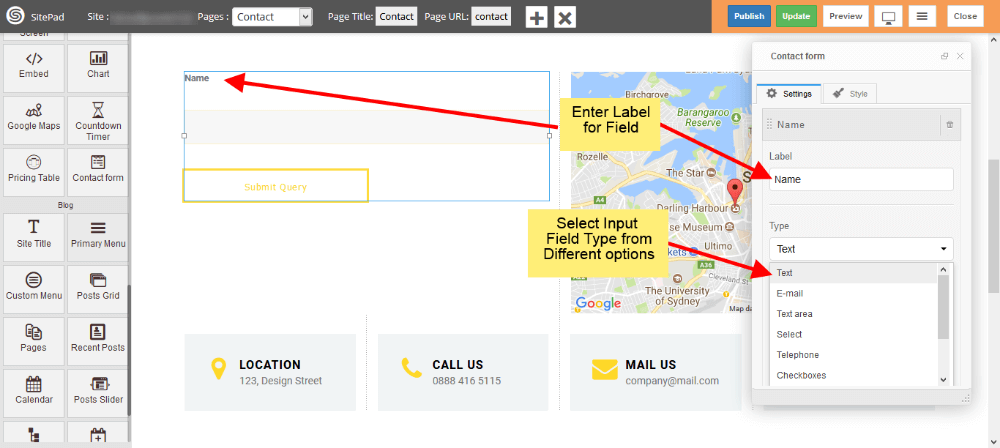
- Now add Label for input field and select Type of that field. We have different input types like Text for names or surnames, E-mail for e-mail, Text area for messages etc.
-
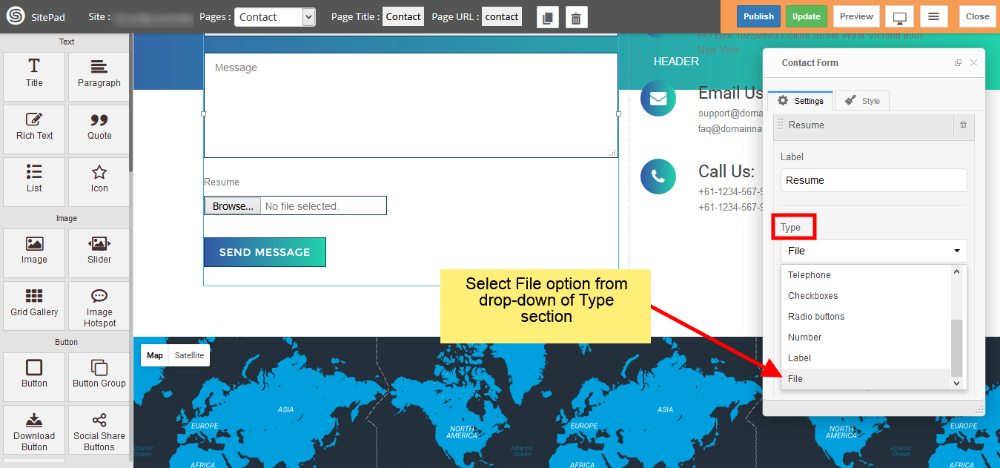
- To add the file upload option in contact form, Please select File form Type section dropdown as shown in figure.
- To add the file upload option in contact form, Please select File form Type section dropdown as shown in figure.
-
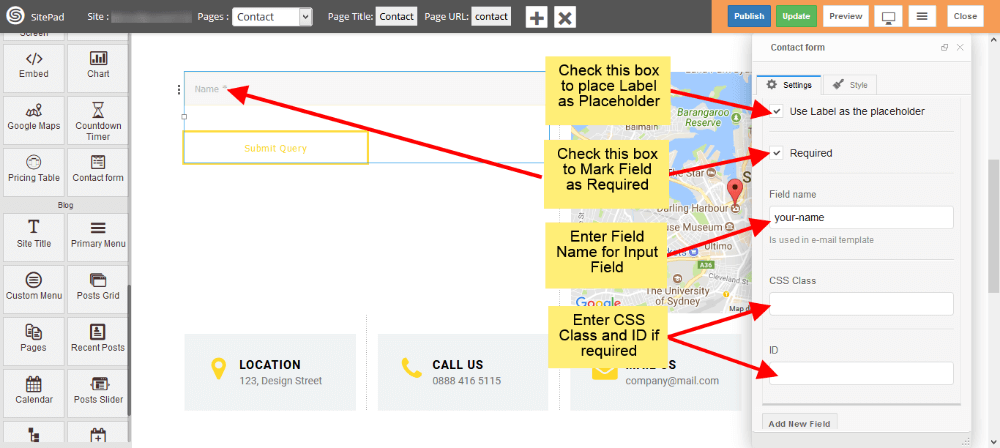
- Check Use Label as Placeholder box to place your label as a Placeholder. If you want any field as a required field then check Required box. Enter CSS class and ID if you need them.
- Check Use Label as Placeholder box to place your label as a Placeholder. If you want any field as a required field then check Required box. Enter CSS class and ID if you need them.
-
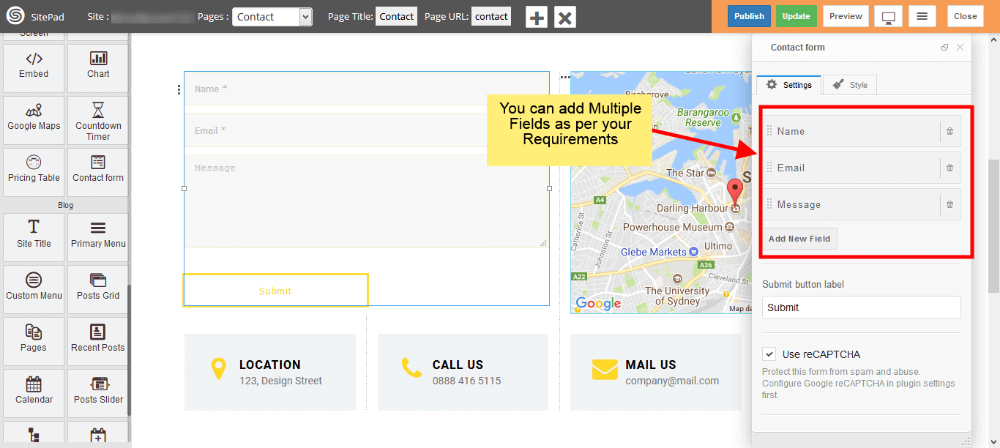
- You can add multiple input fields into your Contact Form as shown image below.
- You can add multiple input fields into your Contact Form as shown image below.
-
- You can set Reply To as shown in the image below.

- You can set Reply To as shown in the image below.
- You can add Custom Style for Contact Form by following below image steps.

Chart
This Guide will Help you to edit Chart Widget Settings and Style.
DRAG CHART WIDGET
When you Drag and Drop Chart Widget in a Page. You will see the image like below.
Note: Widget gives you Default Style provided by theme, you can customize as per your needs using this guide.

CHART TITLE AND TYPE
You can enter Chart Title and select Chart Type according to your needs. Various predefined chart type is available such as Column chart, Bar chart, Area chart, Histogram, Line chart etc. Column chart is enabled when you drag and drop the widget.
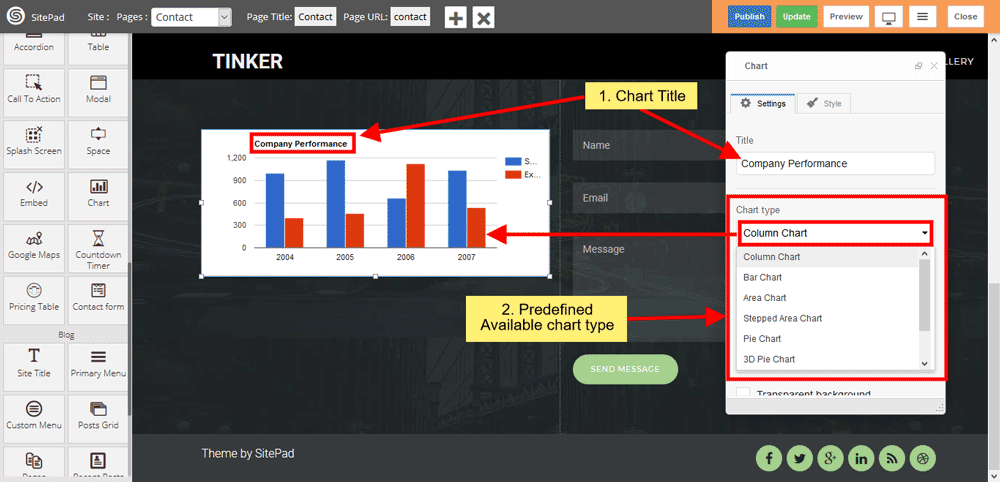
CHART COLOR
You can customize chart color according to your needs, click on checkbox to remove chart background.
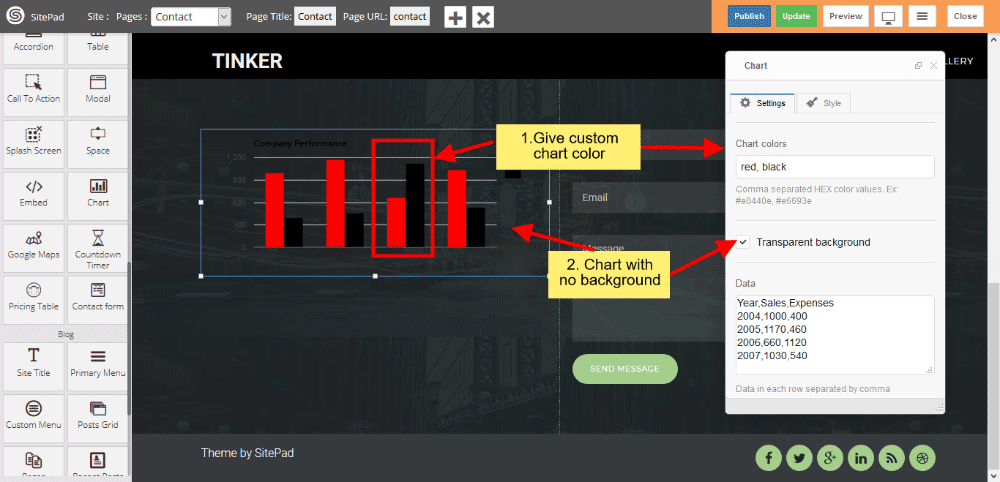
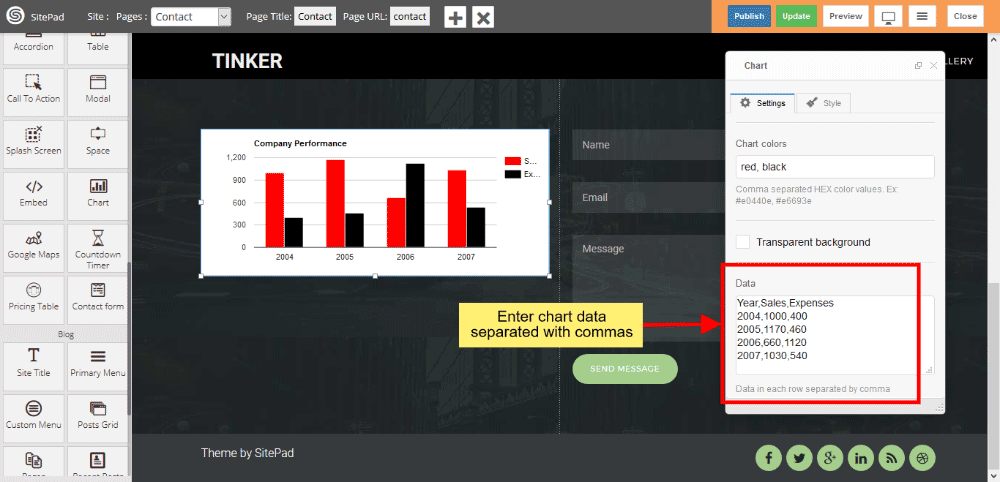
CHART DATA
Enter chart data in Data Textarea box, Insert column-wise data separated with commas.
List
This Guide will Help you to edit List Widget Settings and Style.
DRAG LIST WIDGET
When you Drag and Drop List Widget in a Page. You will see the image like below.
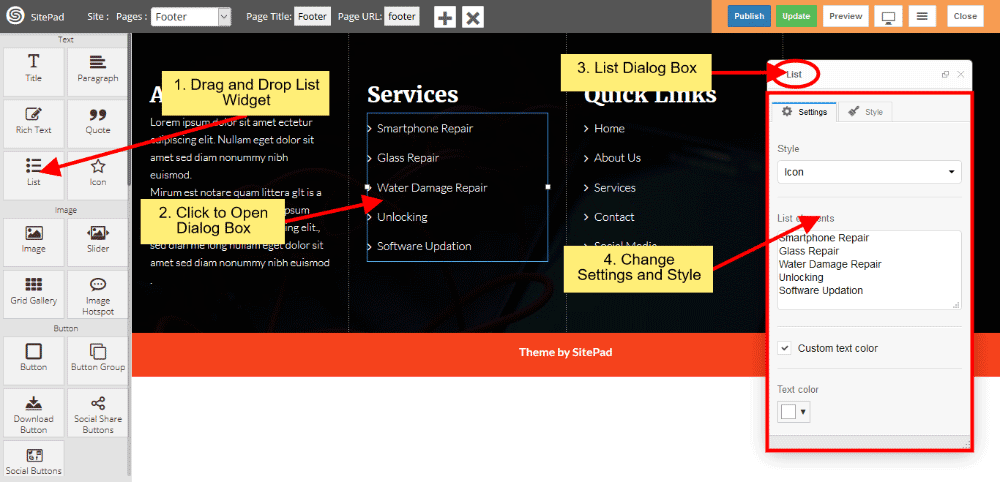
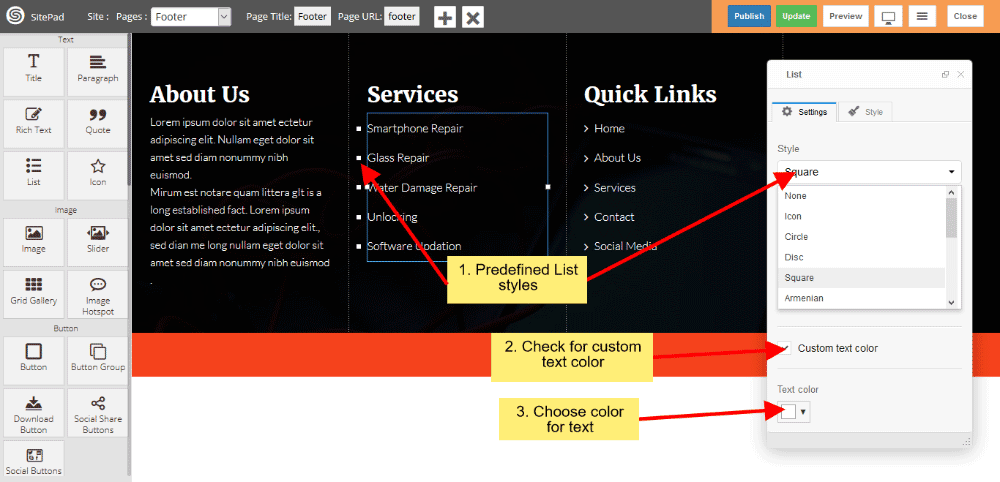
PREDEFINED LIST STYLE
When you Open Dialog Box, you can be able to customize List Style according to your choice. There are various list style such as Icon, Circle, Disc, Square, Armenian, Georgian, None etc.
If you want to change text color then click on checkbox and change text color.
ICON STYLES
If you choose Icon from List style then you can change Icon from Icon List. And you can also customize icon text color, for that purpose you have to click on checkbox then change Icon color which suits for your needs.
![]()
Primary Menu
When the first Theme is selected it automatically gives the Predefined Style for Menu but if you want to Customize Menu you can follow this guide.
- Drag and Drop Primary Menu from left side widget section or Select Primary Menu section in Header page if already present. So this action will pop up Dialog Box for Primary Menu as shown in image below.
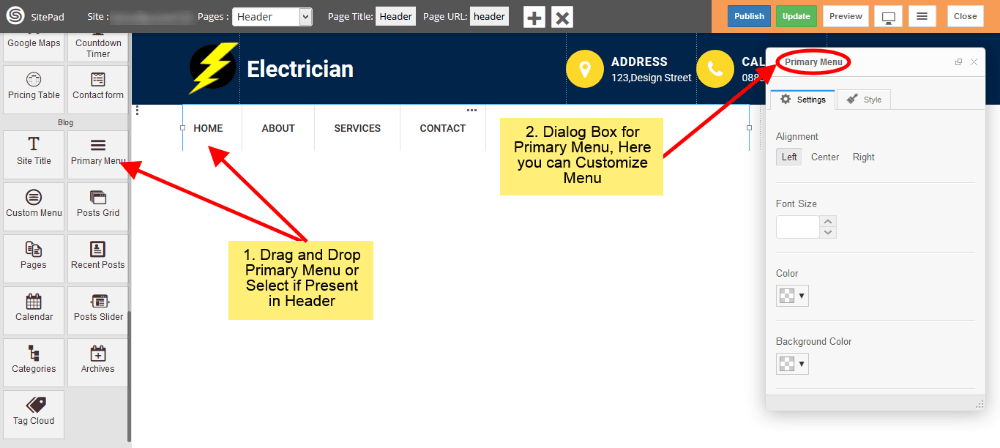
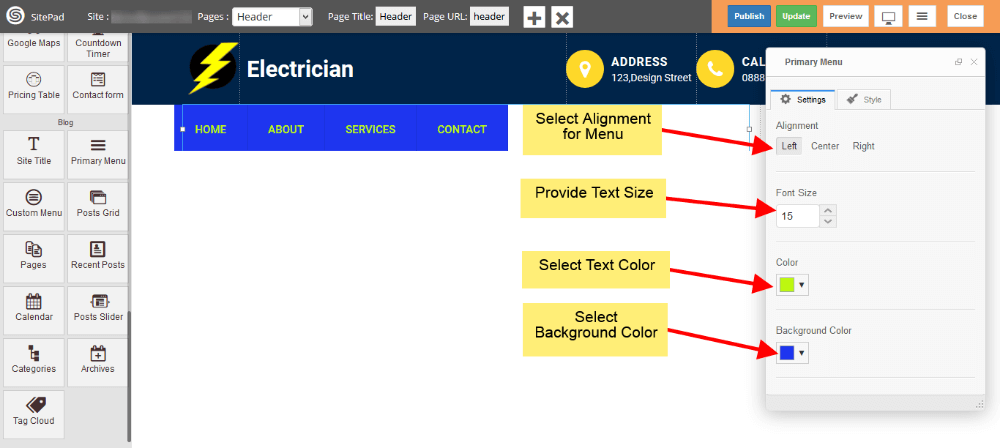
- Now in Settings section of Dialog Box you have different option to Customize menu like Text Color, Background Color, Text Size etc. Just fill that as per your needs as shown in image below.
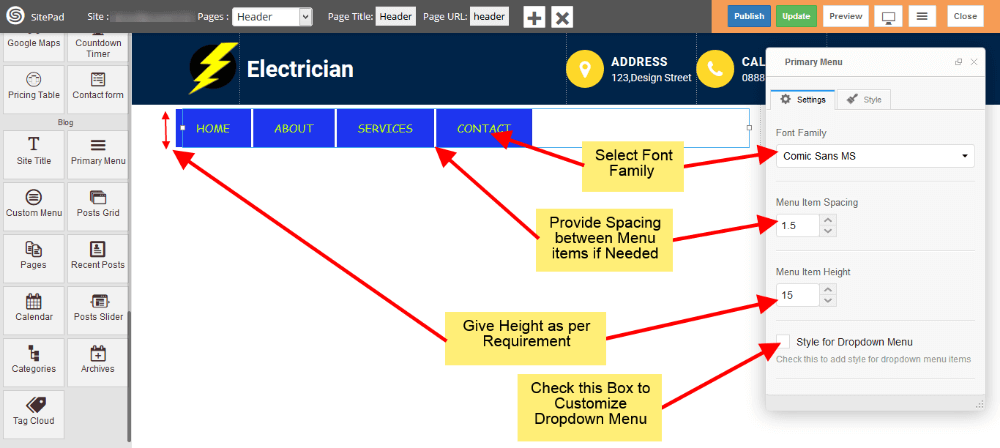
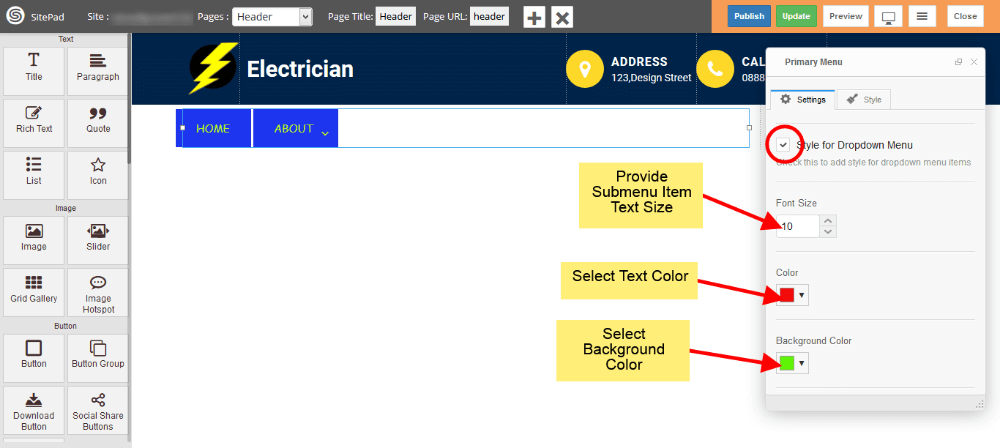
- Last option in below image is for styling the Sub Menu Items, if you want to do that just check it.
- Now select Color, Background Color, Text Size for Sub-Menu as shown in image below.
Above Sub-Menu style will look like this.
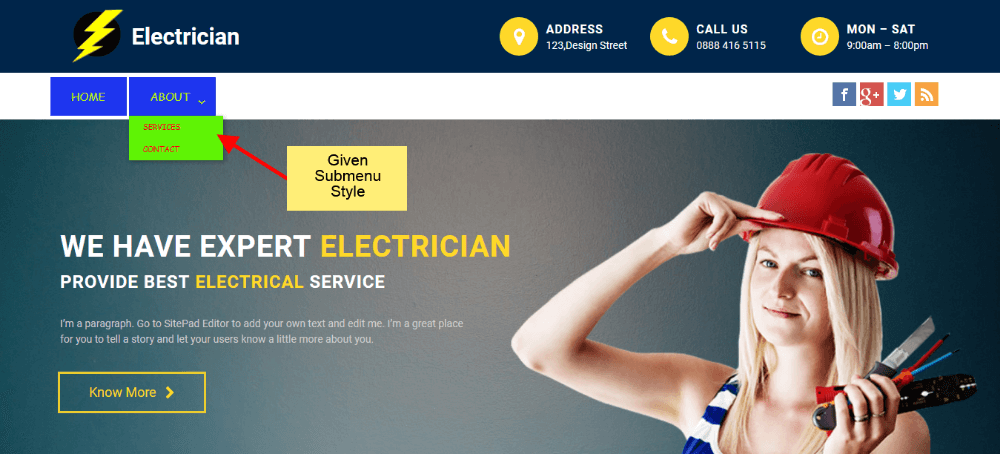
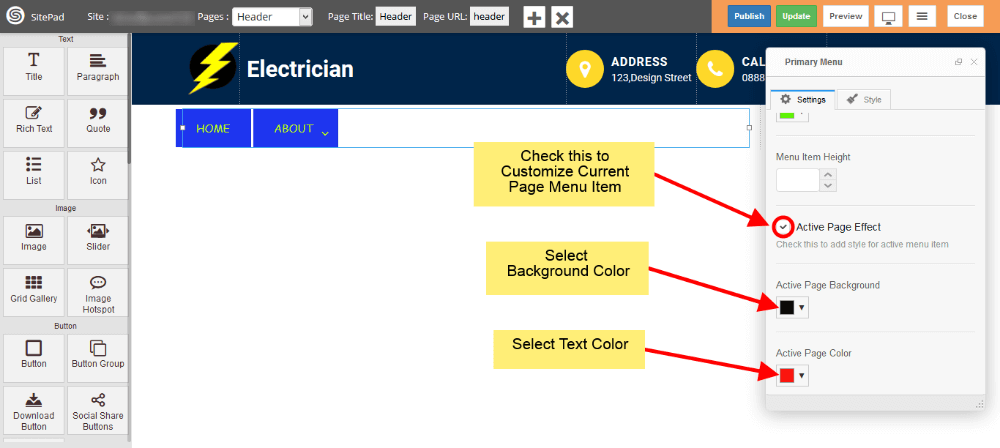
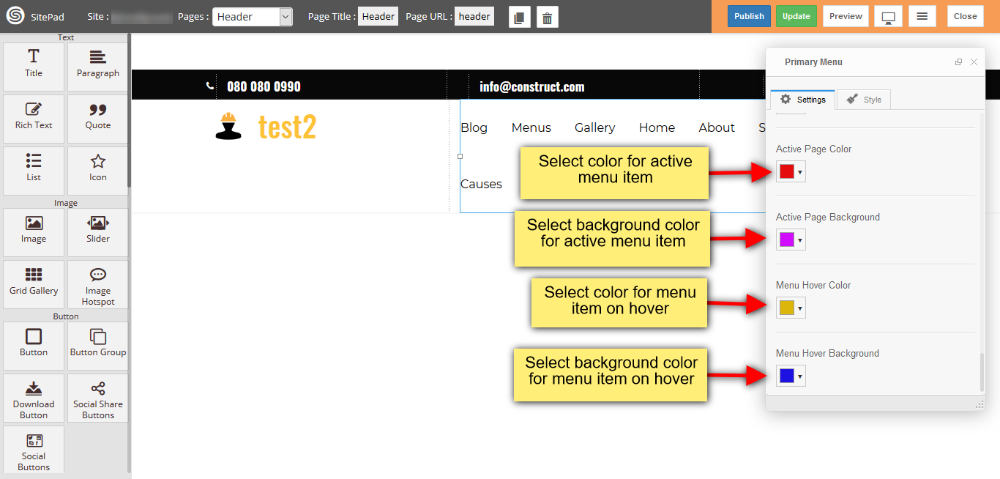
- If you want to add custom style for Active page Menu Item then just check the Active Page Effect box and provide Color, Background Color for Active Page Menu Item as shown in image below.
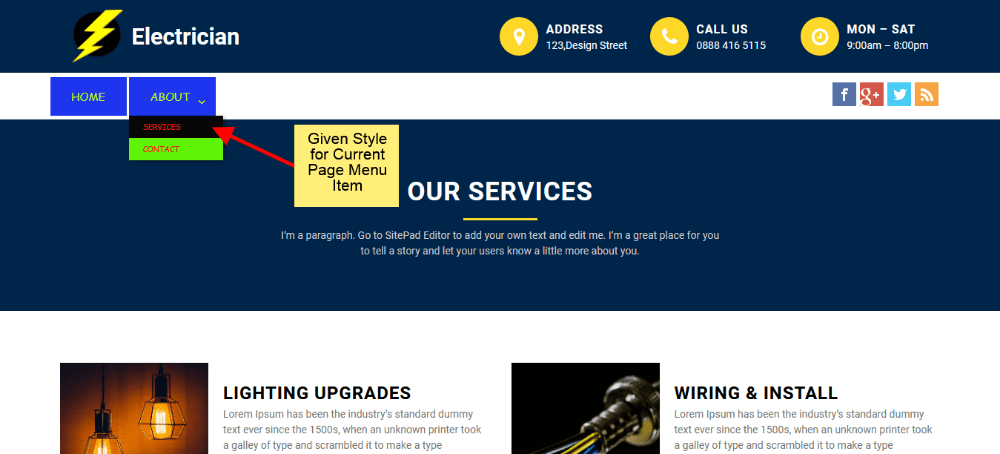
Above Active Page Menu Item style will look like this.
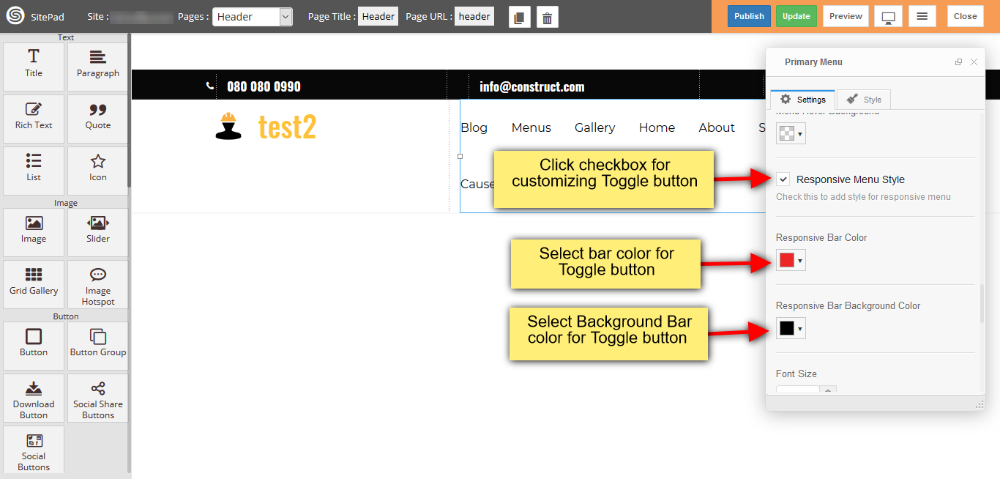
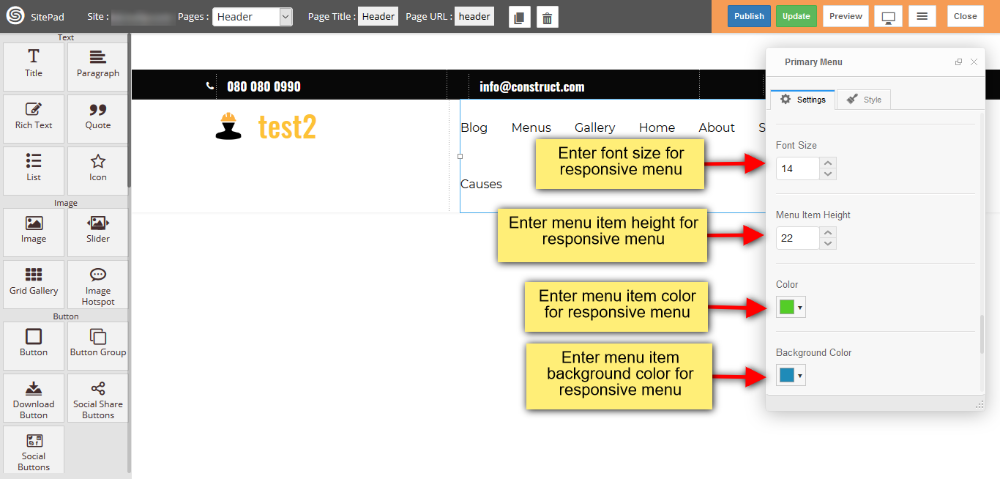
- If you want to add custom style for Toggle Button then just click on the checkbox of Responsive Menu Style and provide Bar Color, Bar Background Color for Toggle button as shown in image below.
- And also you can add custom font size, Menu Item height, color and background color for menu item as shown in image below.
- You can also customize active menu item such as color and background color, and you can also select color and background color for menu item on mouse hover as shown in image below.
Audio
This Guide will help you to add Audio
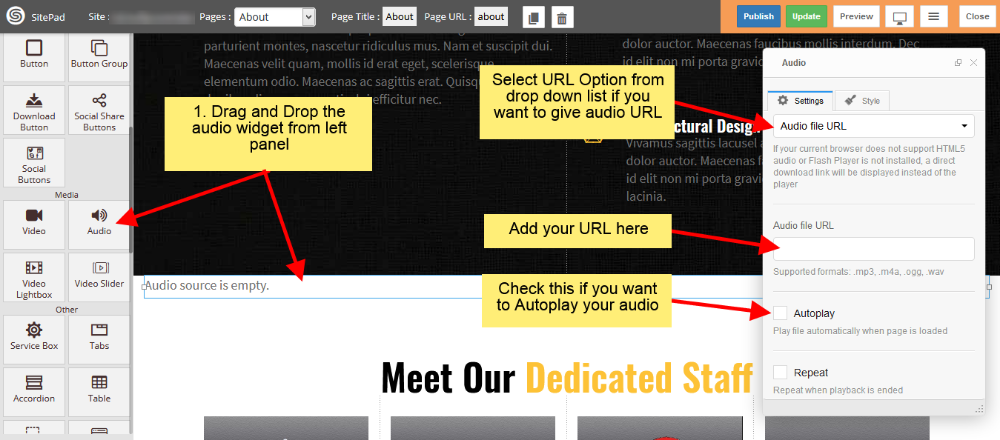
AUDIO USING URL
- Drag and Drop Audio from left side Widget Panel.
- Now in Dialog box of Audio select Audio file URL to give URL of audio file.
- After that enter Audio URL in Audio file URL section as shown in image below.
- Check the Autoplay box if you want to Autoplay your audio when page is loaded.
- Check the Repeat box if you want to Repeat your audio when it gets finished.
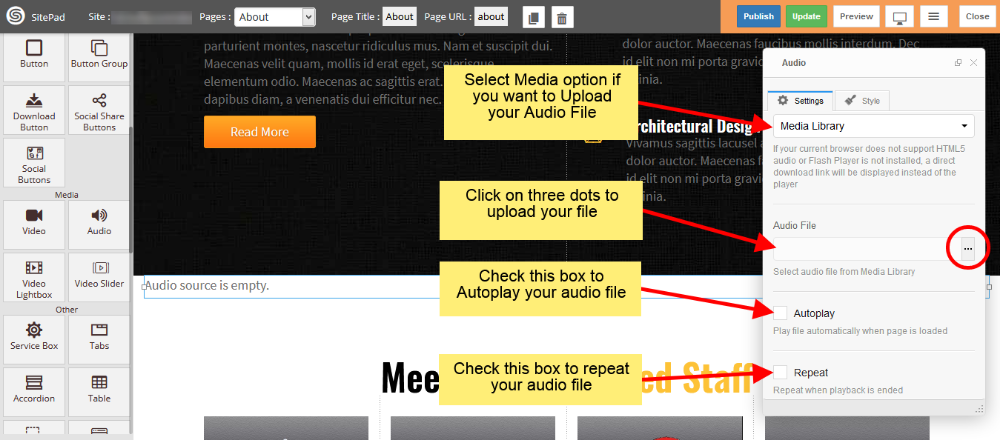
AUDIO USING MEDIA
- Drag and Drop Audio from left side Widget Panel.
- Now in Dialog box of Audio select Media Library to Upload the audio file.
- After that click on three dots to upload your audio file as shown in image below.
- Check the Autoplay box if you want to Autoplay your audio when page is loaded.
- Check the Repeat box if you want to Repeat your audio when it gets finished.
Icon
This Guide will Help you to edit Icon Widget Settings and Style.
DRAG ICON WIDGET
When you Drag and Drop Icon Widget in a Page. You will see the image like below.
Note: Widget gives you Default Style provided by theme, you can customize as per your needs using this guide.
![]()
ICON WIDGET SETTINGS
When you Open Dialog Box, you can be able to customize Icon from the list and Icon Color also.
Icon Size gives you different predefined sizes of Icon, simply choose size from dropdown list and if you want to give custom size then choose custom link from dropdown list.
Icon Alignment gives you Alignment of Icon in a page.
![]()
EDIT BACKGROUND STYLES
You can edit Background Shape like Circle, Square, Rounded, Outline Circle, Outline Square, Outline Rounded and None.
Icon Background Size gives you space around the Icon, and background color gives you the Background Color.
Appearance Effect gives Animation like Top to bottom, Bottom to top, Left to right, Right to left, Appear and None also.
![]()
ICON CUSTOM LINK
Custom Link gives Link to Icon.
![]()