Miscellaneous
- How to Add Cookie Consent
- How to Add Email Template
- How to Configure SMTP/PHP Mail
- How to Publish the Site
- How to Add SiteMap
- How to Add reCAPTCHA
- How to Add Meta Tags
- How to add Google Map API Keys
- How to Add MailChimp Code
- How to Switch Site
- How to Add Google Analytics Account
- What Is the Website Builder Assistant
How to Add Cookie Consent
This guide will help you with How to Add Cookie Consent to your website.
LOGIN IN TO CONTROL PANEL
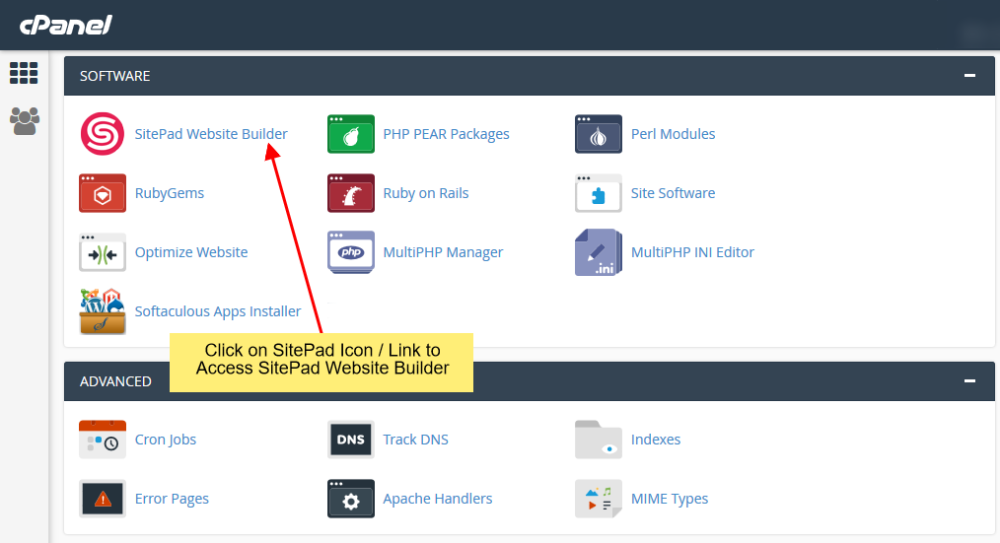
Firstly Login to your Control Panel (e.g. cPanel’s URL will be https://domain.com:2083) and log in with your details. There click on the SitePad Icon or Link.
You will be redirected to SitePad Website Builder.
SELECT COOKIE CONSENT OPTION
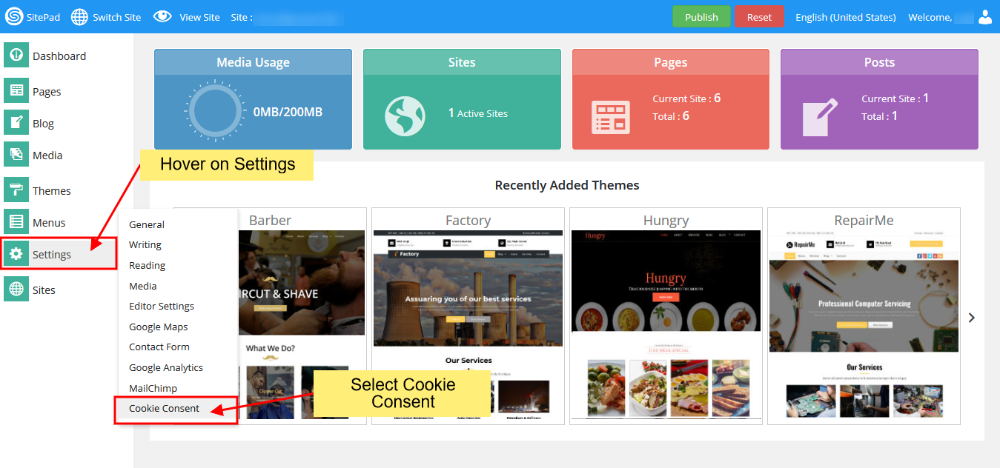
Once you are redirected to SitePad Dashboard Hover your mouse on Settings which will show submenu list, select Cookie Consent from the given list.
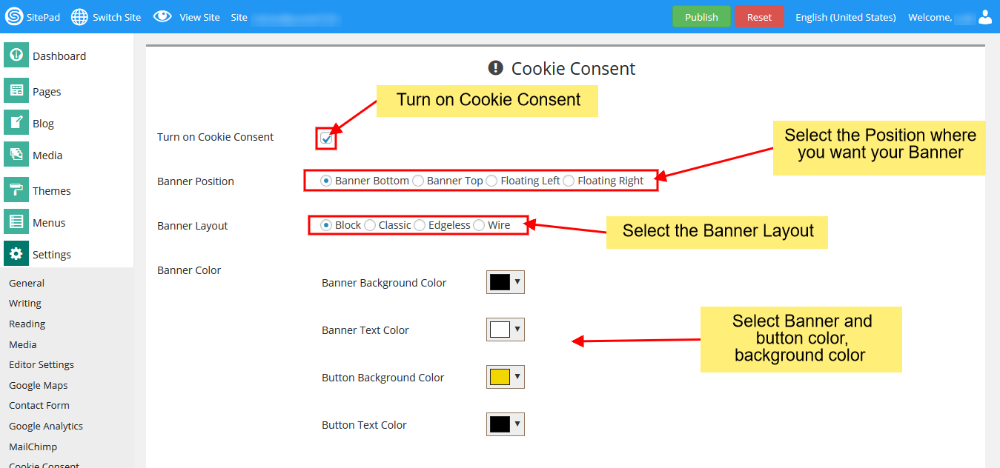
TURN ON COOKIE CONSENT
-
- Select Banner Position
- Select Banner Layout
- Select Banner Color where you can set Banner and Button color.
-
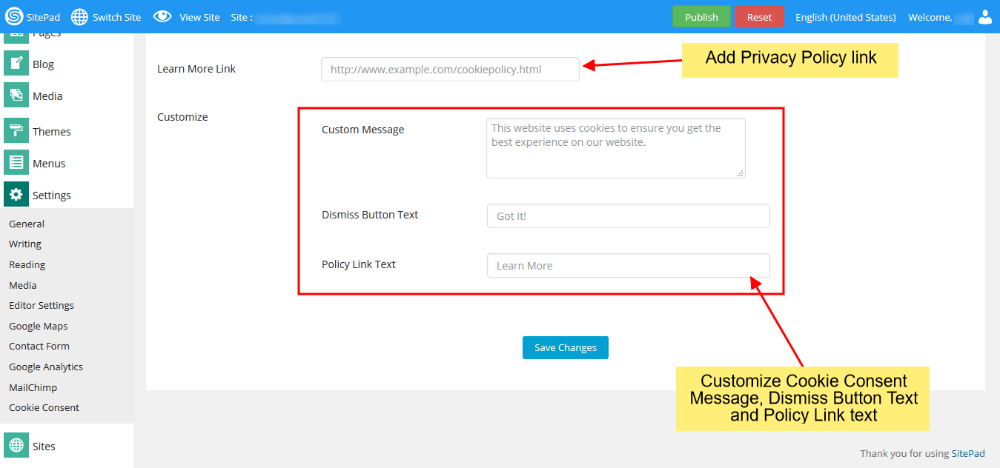
- Add your own Privacy Policy link.
- Customize the banner with your own Cookie Consent Message, Dismiss Button Text and Policy Link Text.
Once you’ve finished customizing you need to click on Save.
Changes can be viewed on the Preview website. Once you’ve finalized the changes then click on Publish
How to Add Email Template
This guide helps when you are using more than one Contact Form in your Website.
CONTACT FORM
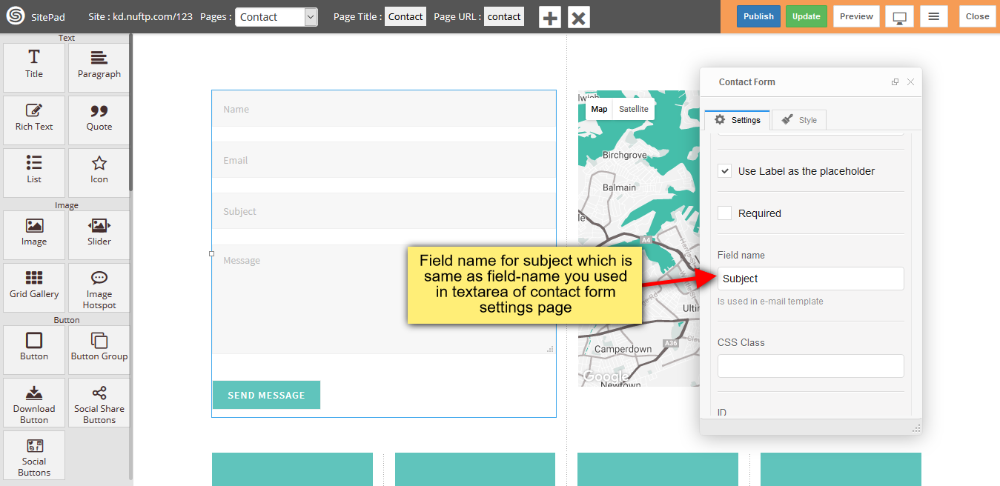
- Insert Field-Name , this Field-Name you will use in contact-form-id Textarea box of contact settings page.
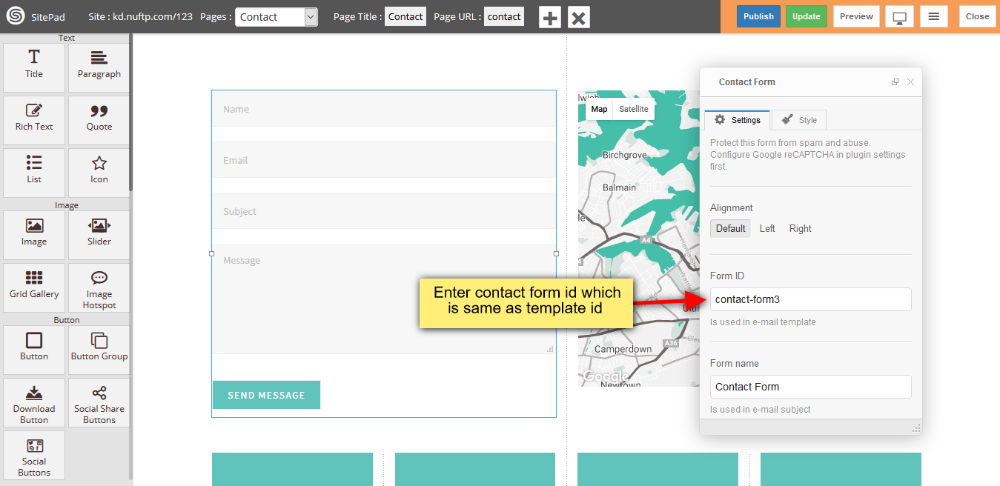
- Insert Form Id , this Form Id you will use in contact-form-id Textbox box of contact settings page.
CONTACT SETTINGS PAGE
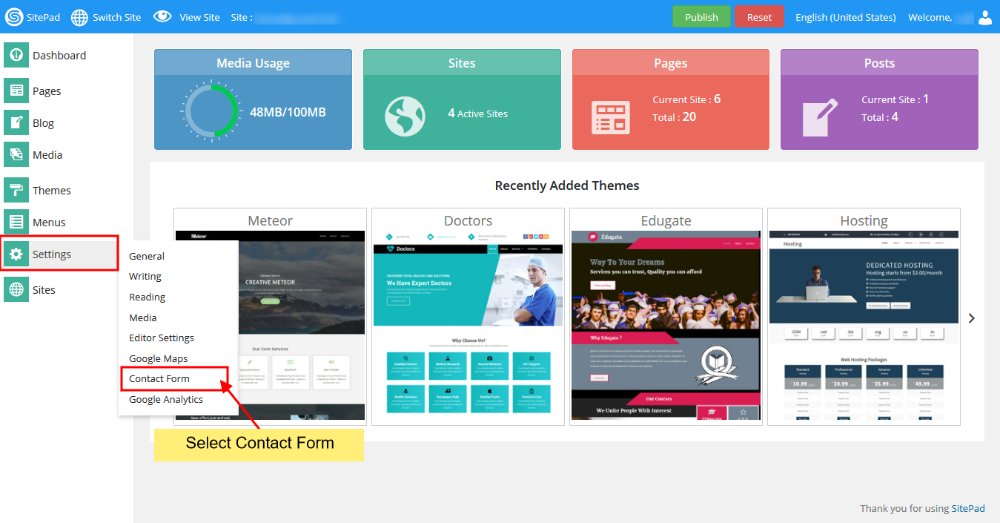
- Go to SitePad Settings Menu in that click on Contact Form submenu. You can see the image shown below.
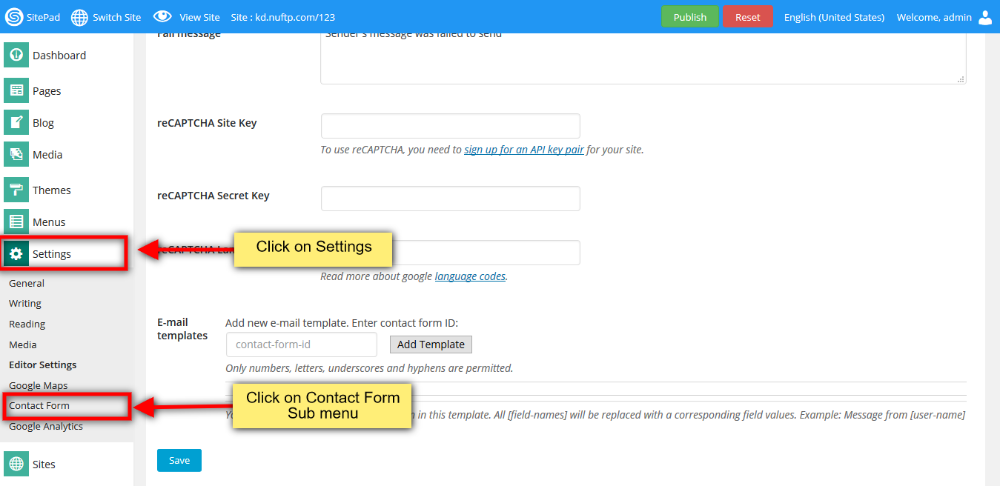
- Now insert contact-form id which you inserted in contact form when you designed. And click on Add Template button.

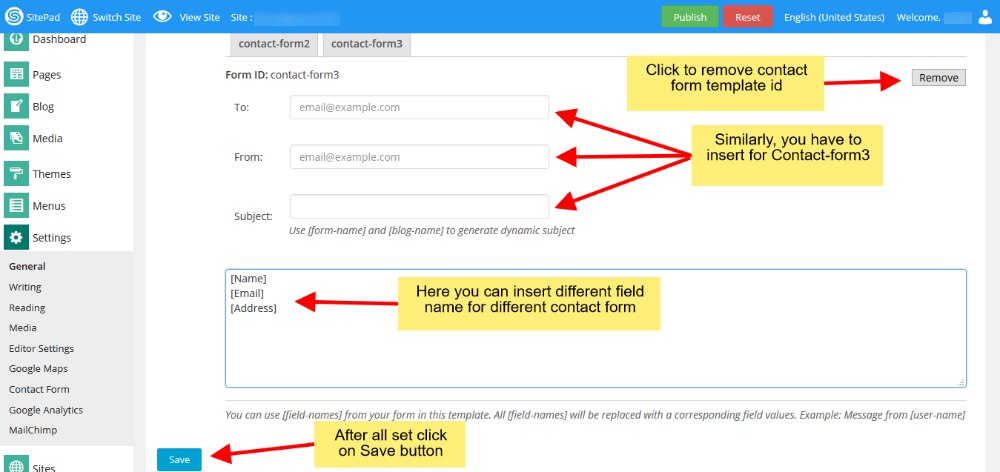
- When you click on Add Template button and click on Save button then you will see image as shown below.
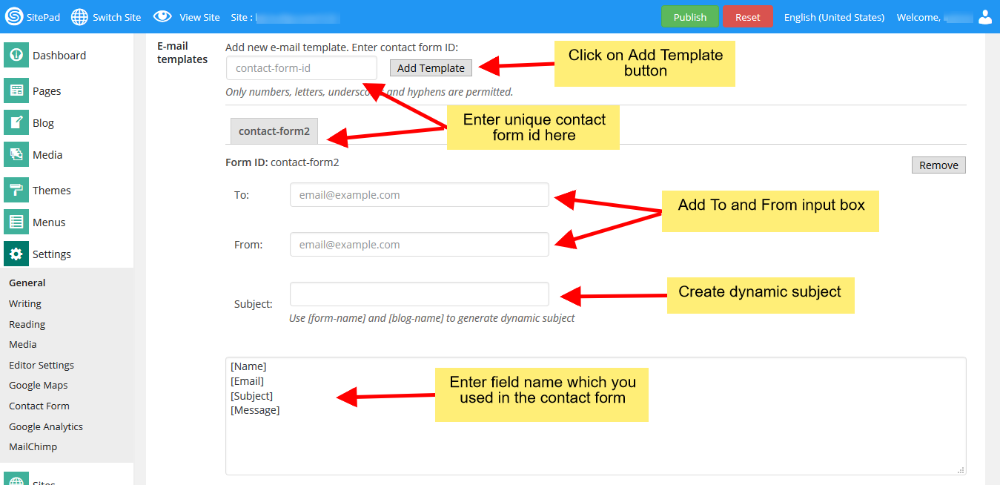
- Enter Email address in To and From input box to a particular user for sending the details of a particular form. Textarea box you can see, in that you insert your Field-Name along with square bracket one-by-one. Click Remove button for removing the contact-form-id along-with all the details such as To, From, Subject and fieldname Textarea box. After all changes, click on Save button.
How to Configure SMTP/PHP Mail
How to Configure Contact Form with SMTP/PHP Mail
This tutorial will show you How to Configure your Contact Form Setting to allow SMTP/PHP Mail to send Email from Contact Form.
SELECT CONTACT FORM SETTING
PHP Mail function uses your localhost to send Email from Contact Form while SMTP Mail function uses a Server to send Email from your Contact Form. You can configure the Contact Form Settings at SitePad Dashboard > Settings > Contact Form.
PHP MAIL
- PHP Mail is selected as a default option.
- You will need to add the same Email-Id in To and From, enter multiple email address with comma-separated if you want to send multiple recipients.
- You can add enter the format in Subject if you need Dynamic Subject.
- You can change Success/Fail Message.
- You can add reCAPTCHA if you want to avoid spam from your Contact Form.

Click on Save Button once you fill the Setting.
SMTP MAIL
To Configure SMTP Mail you will need a Gmail/Yahoo/Hotmail account or you can use your Webmail account with all the SMTP settings provided by your Host in your control panel.
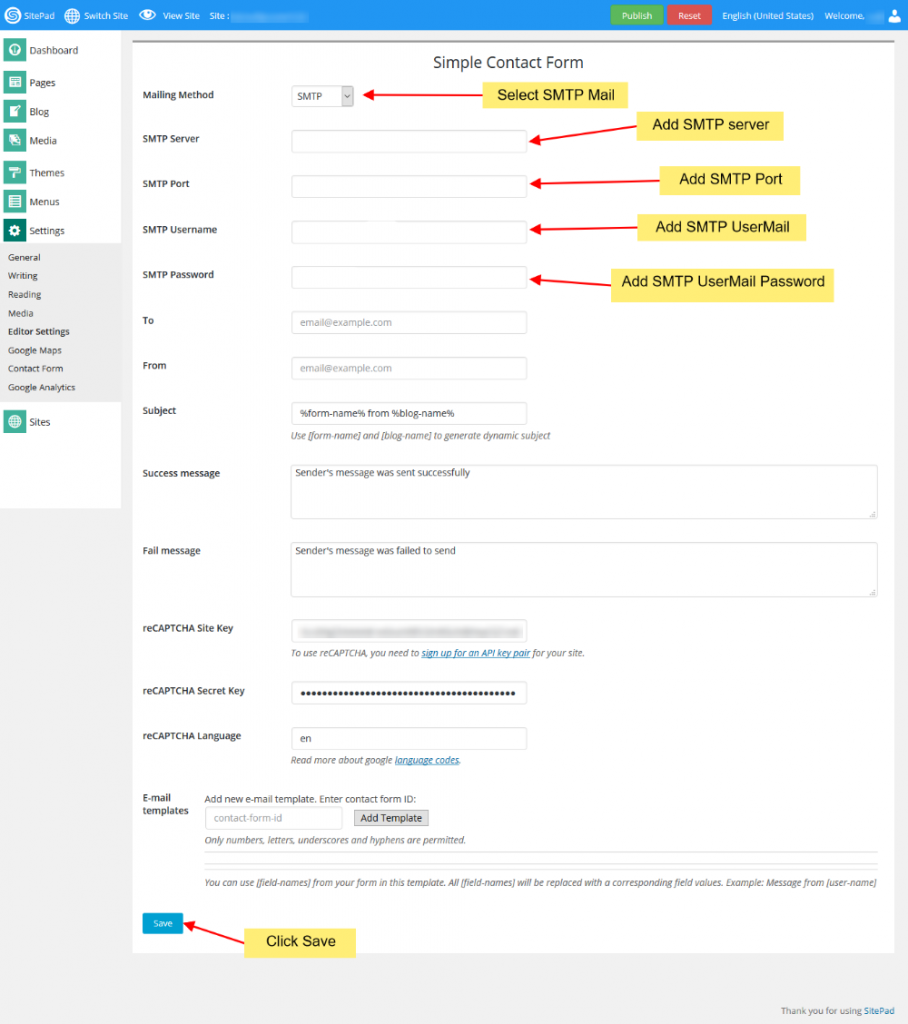
You will need to select the SMTP Mail from the drop-down list in Mailing Method.
- Add SMTP Server (in-case you are using secure server port then please add ssl:// before the server domain i.e ssl://domain.com).
- Add SMTP Port
- Add SMTP Username (i.e Email Id)
- Add SMTP Password (i.e Email Id Password)
- You can also configure settings same as mentioned above in PHP Mail i.e change Subject, change Success/Fail Message, Add reCAPTCHA to avoid spam.
How to Publish the Site
Once you have done with your Theme Editing and want to Publish your Site you can follow this guide.
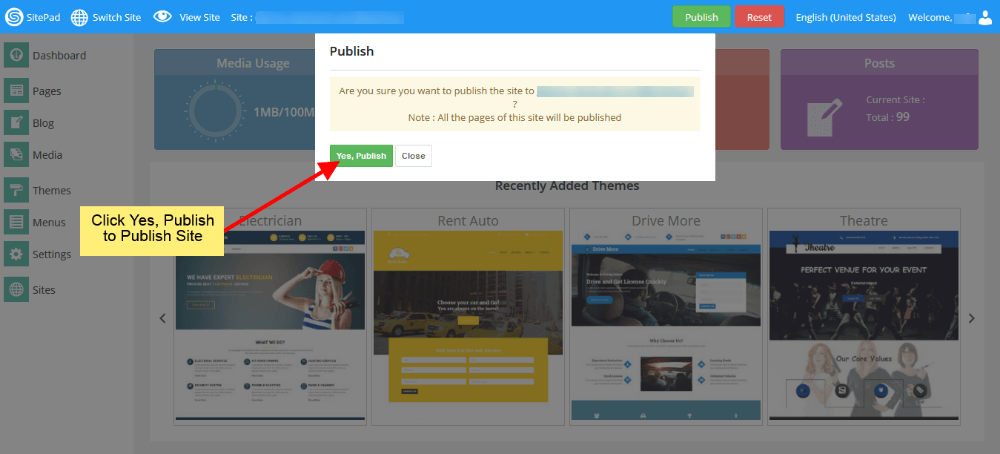
- Go to your Dashboard and click on Publish button present at the Top of Dashboard as shown in the image below.
Note: It is not necessary to always go to Dashboard for Publishing your Site. You can click on Publish button anywhere inside your Dashboard or Page Editor and follow below steps.

- Step 1 will popup the Confirmation Window as shown in image below. Press Yes, Publish button to publish your site and if you want to stop process then press Close button as shown in image below.
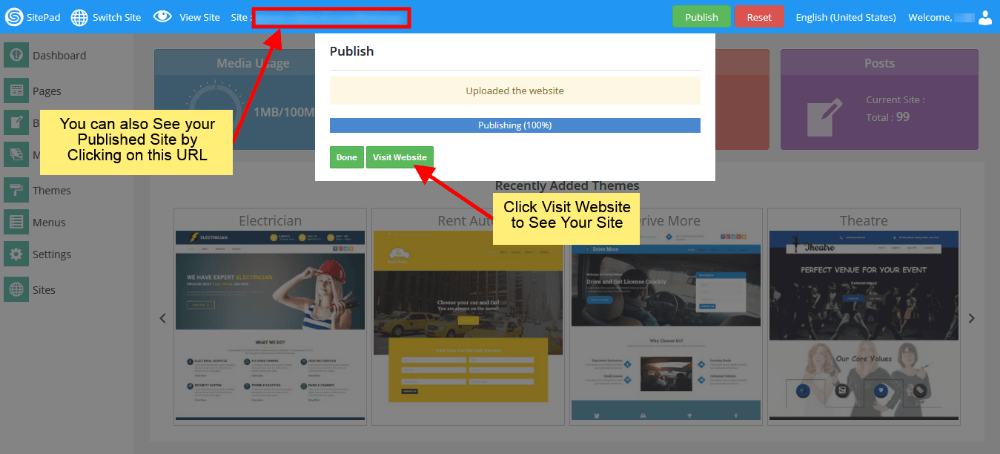
- Then Wait for the Process to Complete.

- After the completion of process you will see the window as shown in image below. Click on Visit website button to see your Published Site.
Note: You can also View your Published website by Clicking on Site URL as shown in image below.
How to Add SiteMap
This documentation will guide you on How to Add SiteMap for a Page
GO TO EDITOR
When on SitePad Website Builder Dashboard. Hover on Pages option given on the left sidebar and then click on All Pages. Once on all Pages Click on Edit Icon of Any Page.
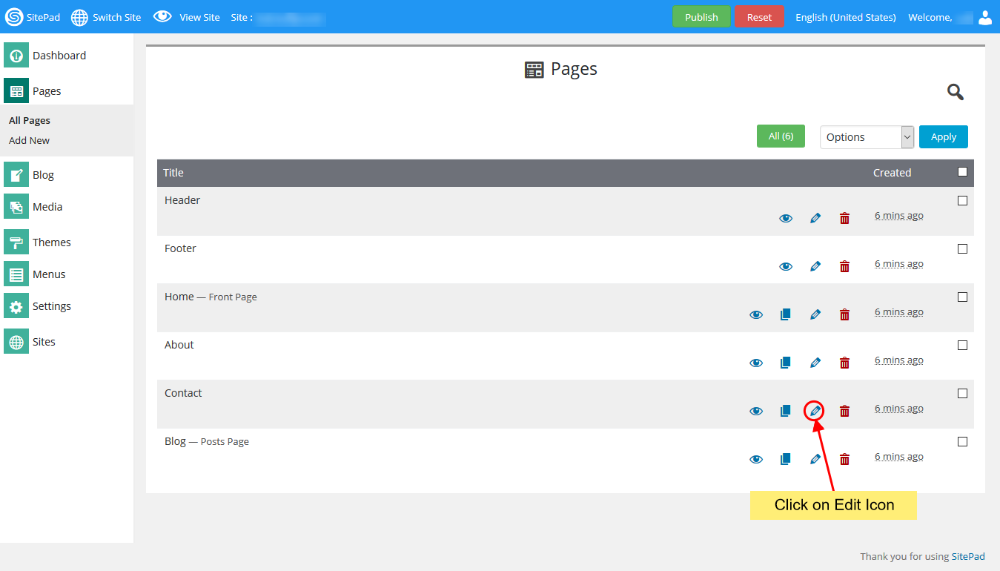
You will be redirected to Editor.
SELECT SITEMAP OPTION
On SitePad Editor hover on more menu on the navigation bar. When you hover on more menu three buttons will be drop down i.e Reset Page, SEO Options and Custom HTML.
Click on SEO Options.
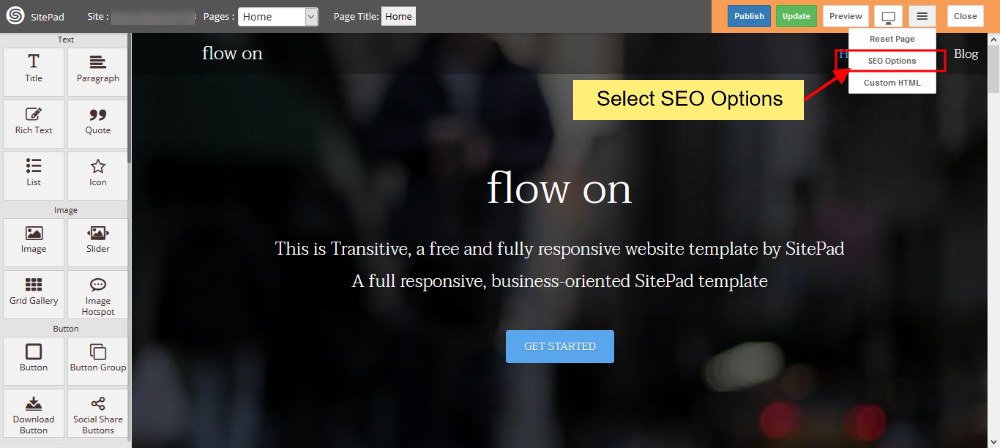
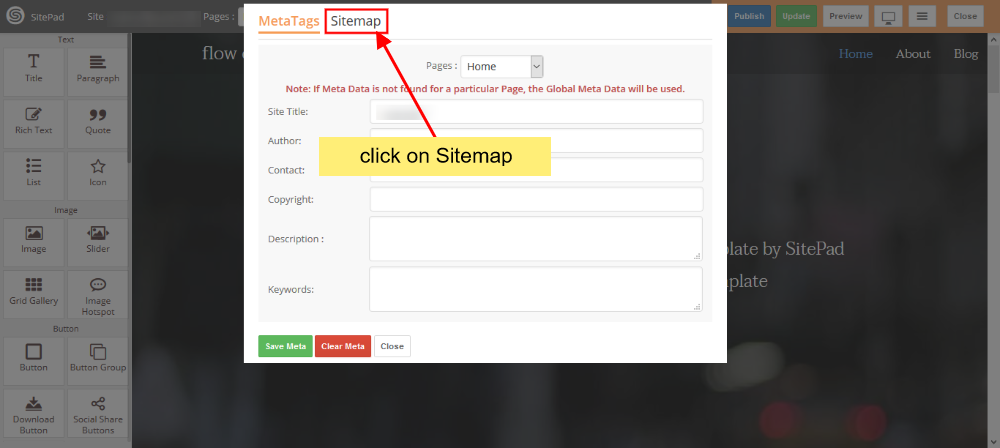
On clicking SEO Options you will see a dialog box will appear. In the dialog box click on SiteMap to load SiteMap options.
EDIT SITEMAP OPTION
Once you are on SiteMap Detail Section select Enable SiteMap then you can choose any of the following option from Manage SiteMap Settings: Automaically / Manually
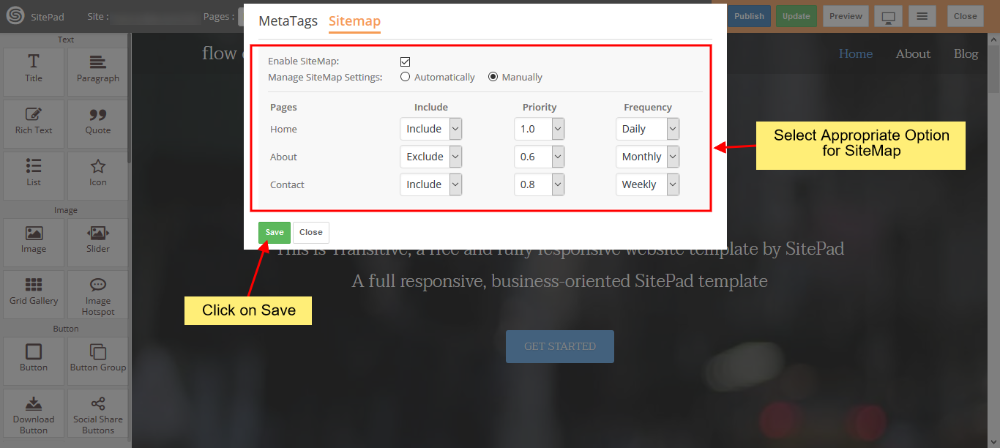
Once you have made your desired changes then click on Save to save SiteMap Settings for your page.
How to Add reCAPTCHA
This documentation will help you setup reCAPTCHA for contact form
LOGIN TO GMAIL ACCOUNT TO REGISTER RECAPTCHA
You need to login to your Gmail account. Then follow the given link to register Google reCAPTCHA
You will need to Register a New Site as shown in the image below.
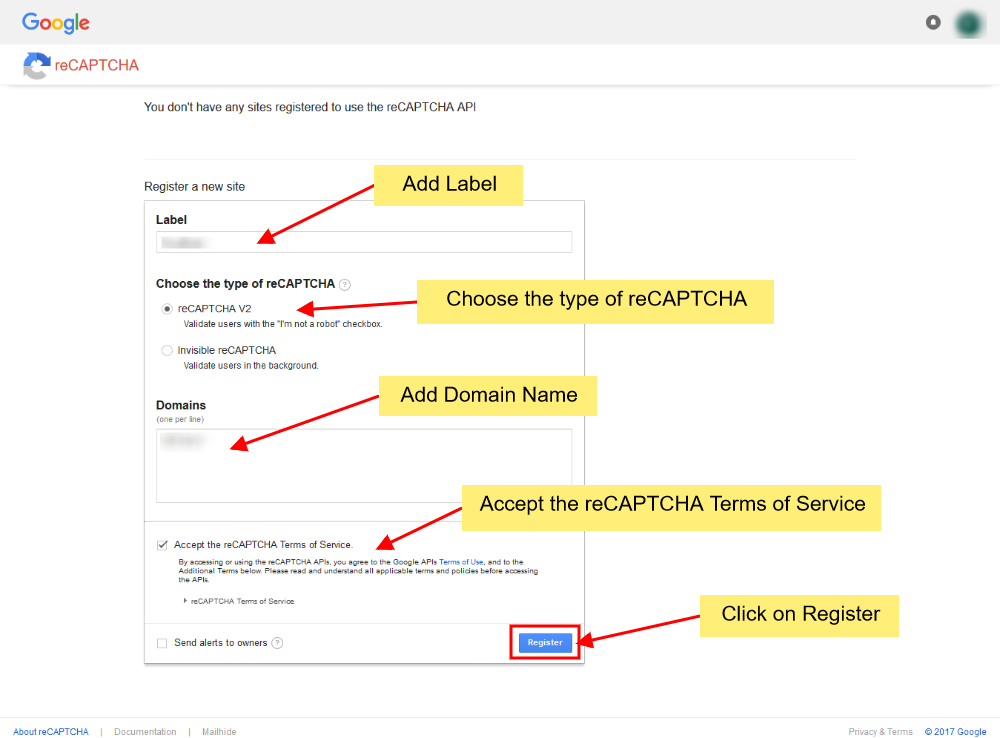
You will need to Add Label, Choose the type of reCAPTCHA, Add a Domain Name and then Accept the reCAPTCHA terms of service.
Once done then Click on Register.
Once you register the Site you will be redirected to the page with Site Key and Secret Key as shown in the image below.
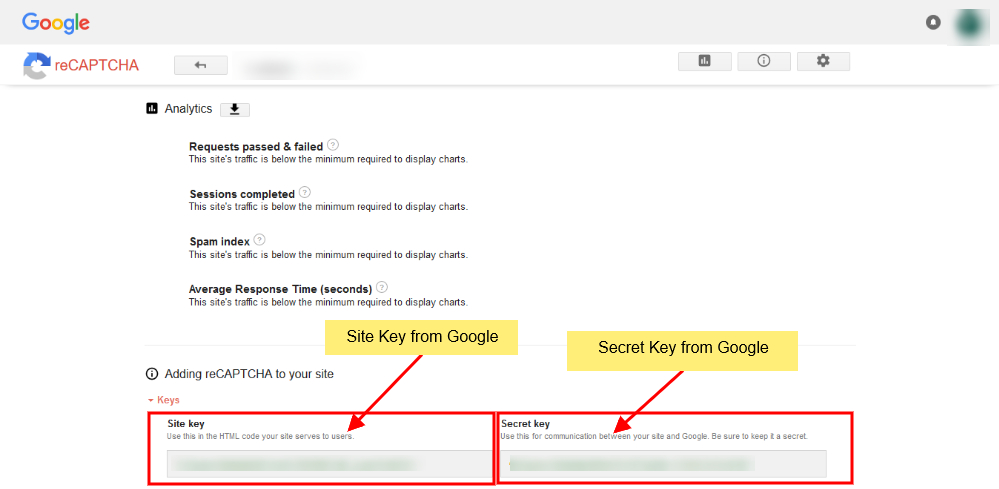
Take a Copy of both the keys.
LOGIN IN TO CONTROL PANEL
Now Login to your Control Panel (e.g. cPanel’s url will be https://domain.com:2083) and login with your details. Then click on the SitePad Icon or Link.
You will be redirected to SitePad Website Builder
CLICK ON CONTACT FORM
After being redirected to SitePad Website Editor Hover on Settings on the left Sidebar you will see option for Contact Form. Click on Contact Form as shown in the image below.

On Contact Form Setting Page you will see input box for reCAPTCHA Site Key and reCAPTCHA Secret Key as shown in the image below.
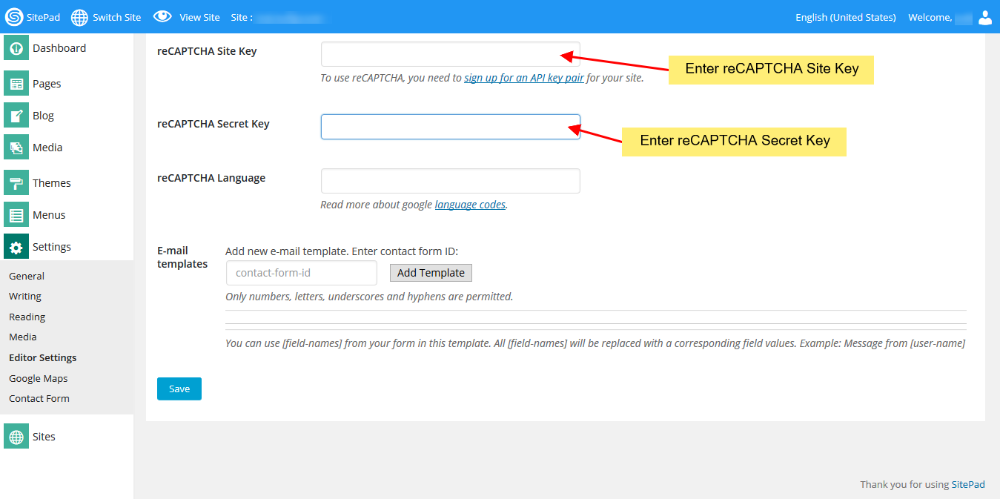
Fill in the site key and secret key from the Google reCAPTCHA registration page. Once done click on Save.
The reCAPTCHA that you added will be registered and now you can use reCAPTCHA for contact form.
How to Add Meta Tags
GO TO EDITOR
When on SitePad Website Builder Dashboard. Hover on Pages option given on the left sidebar and then click on All Pages. Once on all Pages Click on Edit Icon of Any Page.
You will be redirected to Editor.
ADD META
On SitePad Editor hover on more menu on the navigation bar. When you hover on more menu two buttons will be drop down i.e Reset Page and SEO Options.
Click on SEO Options.
ADD META DETAILS
On clicking SEO Options you will see a dialog box will appear. In the dialog box add all the meta details for the page.
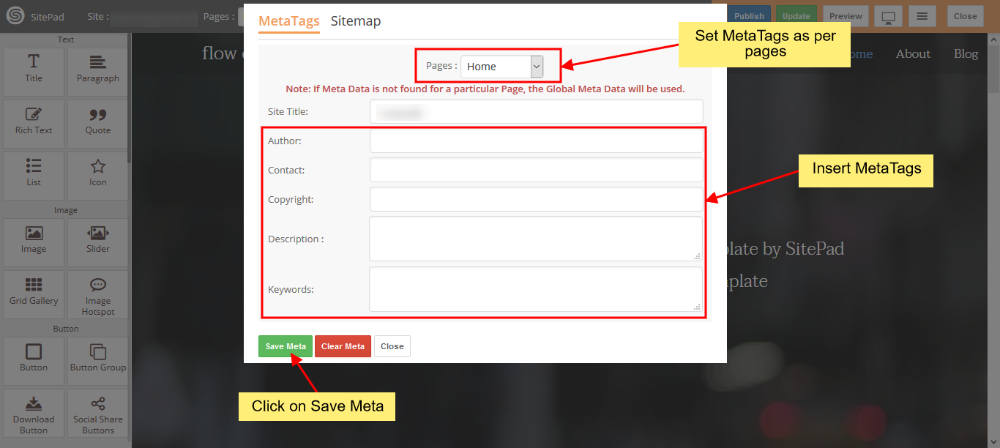
You can add Meta Tags for every page just by selecting Page from the drop down. After adding meta details click on Save Meta to update the meta details for the page.
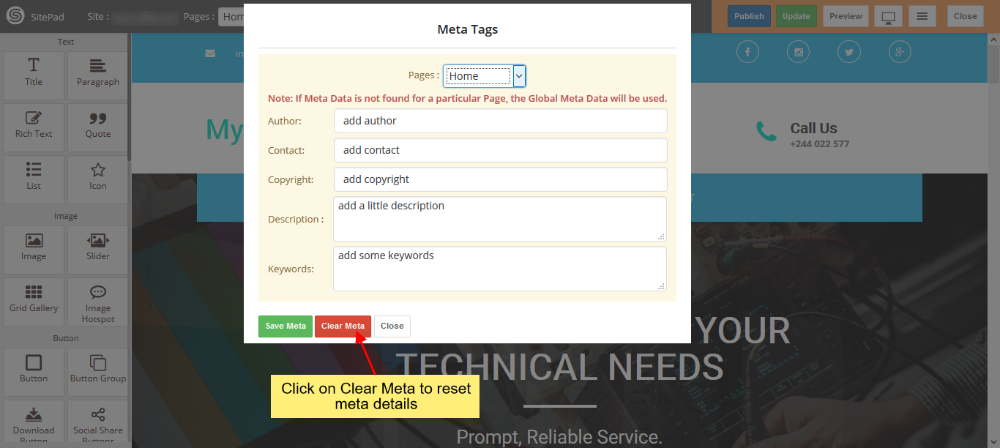
CLEAR META DETAILS
To Clear Meta Details of the current page click on Clear Meta. All the Meta Details for that page will be cleared. For Global Meta you will need to select Global Meta and then click Clear Meta.
How to add Google Map API Keys
When on SitePad Website Builder Dashboard. Hover on Settings option given on the left sidebar and then click on Google Maps as shown in image below.
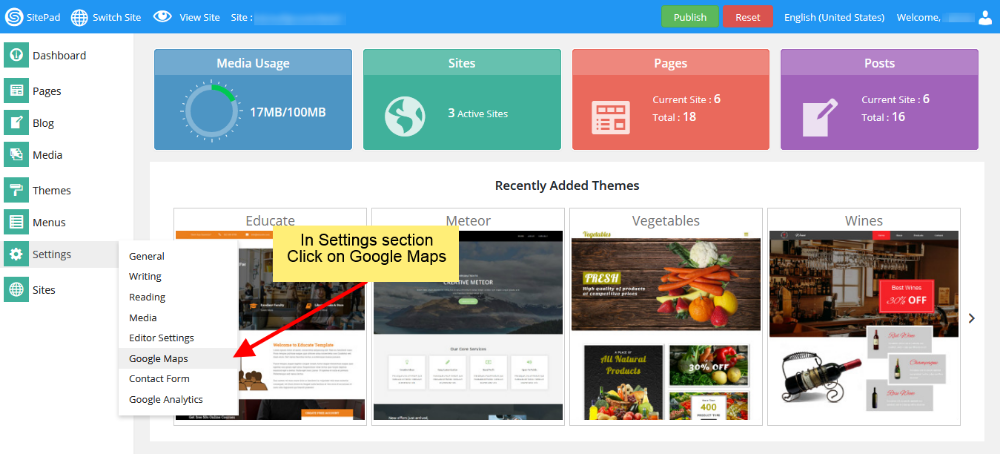
You will be redirected to Google Maps Settings page.
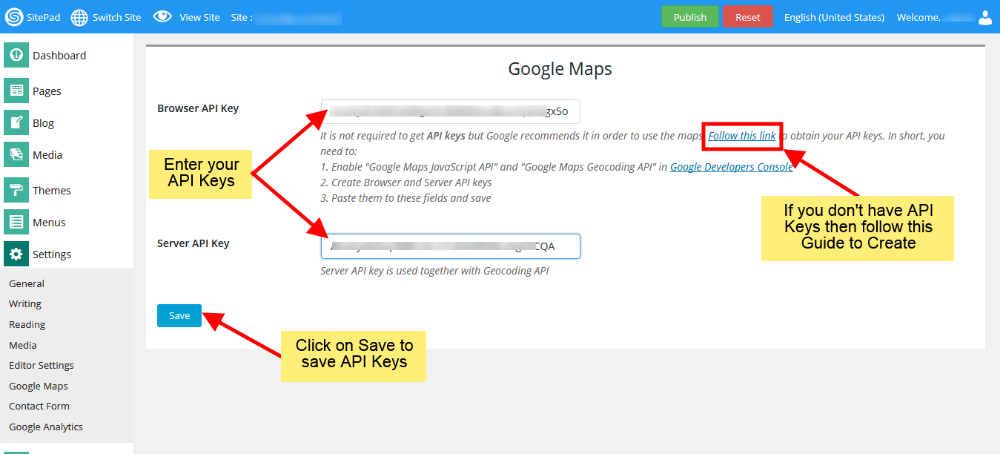
ADD API KEYS
On Google Maps Settings page add your Browser API Key and Server API Key as shown in image. Or if you don’t have API Keys then just click on Follow this link and follow guidelines to create new API Keys.
How to Add MailChimp Code
This documentation will guide you on How to Add MailChimp code in SidePad.
GO TO MAILCHIMP SETTINGS
Go to SitePad Website Builder Dashboard. Hover on Settings option given on the left sidebar and then click on MailChimp option as shown in image below. You will be redirected on MailChimp Page.
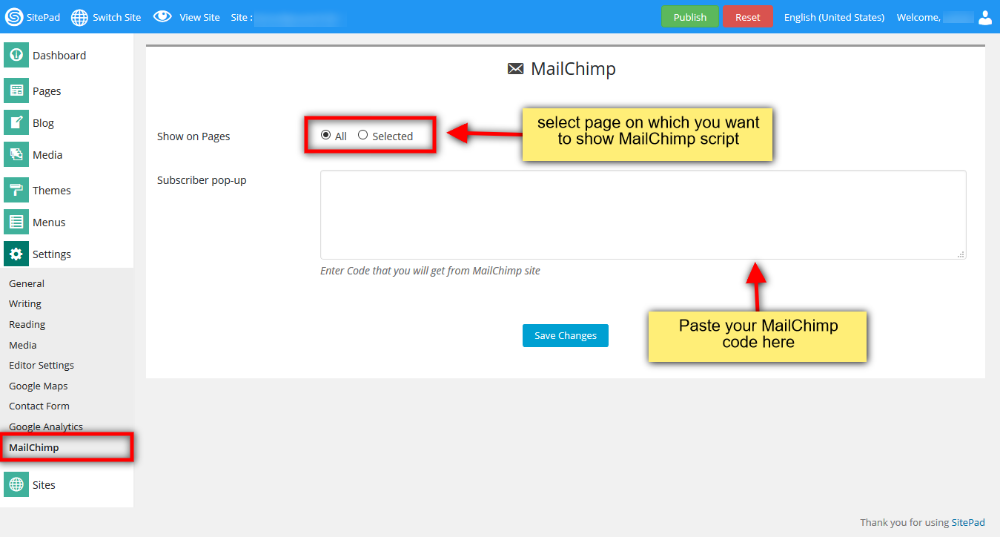
When you select All option, paste MailChimp code in text area box and click on Save Changes button. It will show you MailChimp script output on all pages.
SCRIPT OUTPUT ON SELECTED PAGE
If you want to show MailChimp script output on a particular page then click on Selected option, Choose particular page from dropdown and add mailchimp code in a textarea box, click on Save Changes button.

How to Switch Site
Note: To Switch Site you need at-least two sites to be in your SitePad Builder
If you have a Single Site and have not added any other Site and want to Add New Site then you can follow the documentation mentioned: Add New Site
SWITCH SITE
To Switch from Current Site to any other Site that you want to work on again. All you need to do is hover on Switch Site on Navigation Bar.
You will find the list of all the Sites that you have added. Now Click on the Site you wanted to work again and then click on Dashboard like shown in the image below.
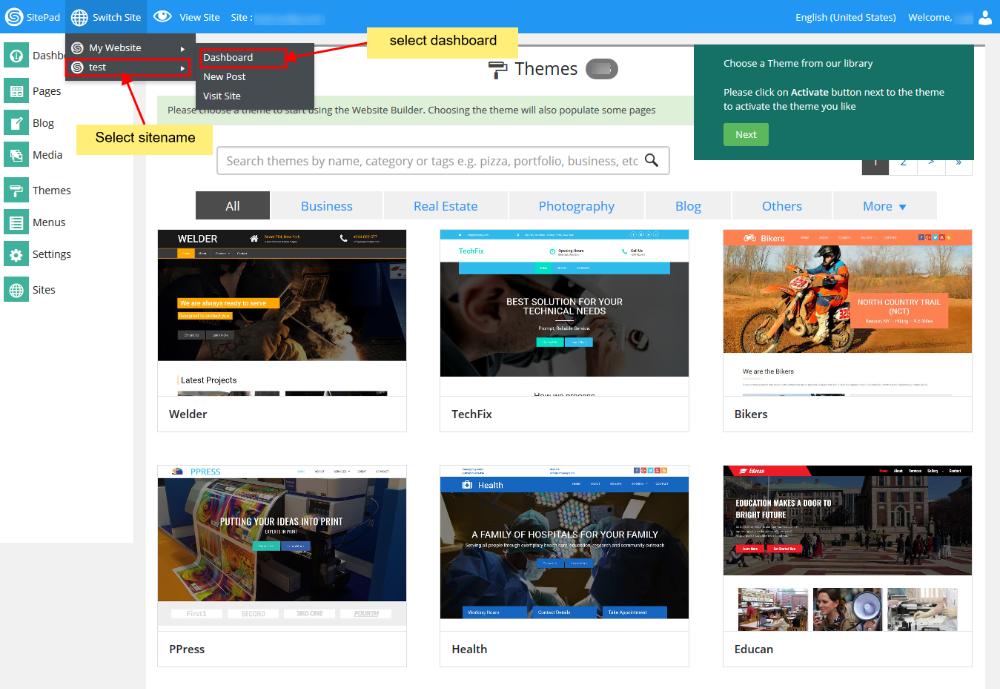
Also remember the Site that was created by SitePad when you logged in first time will always be on top of the Switch Site.
How to Add Google Analytics Account
Google Analytics is a web analytics service offered by Google that tracks and reports website traffic.
For this, you will need tracking ID which can be found after creating an account at Google Analytics
You can check out the tutorial given by Google Analytic Team on Getting Started with Analytics
LOGIN IN TO CONTROL PANEL
Firstly Login to your Control Panel (e.g. cPanel’s URL will be https://domain.com:2083) and log in with your details. There click on the SitePad Icon or Link.
You will be redirected to SitePad Website Builder.
GO TO GOOGLE ANALYTICS
Once you are redirected to SitePad. You will need to hover on Settings and then select Google Analytics.
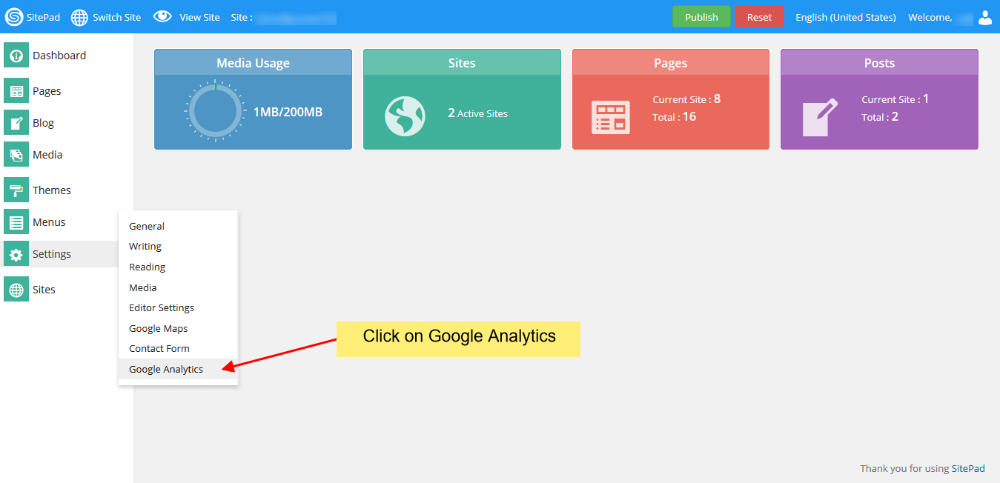
You will be redirected to Google Analytics setting page. There you will need to enter the tracking ID provided by Google Analytics after adding your account.
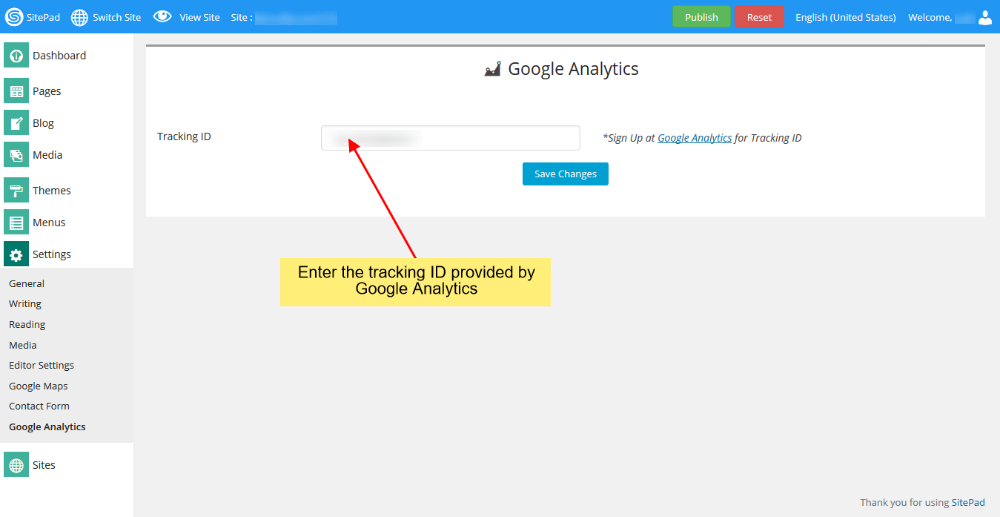
After entering all the details as mentioned above click on Save Button to save changes that you’ve made.
After this when you edit your Site and Publish it. You will be able to track your website traffic from Google Analytics.
You can check out the documentation given by Google Team on How to Check Your Web Stats
What Is the Website Builder Assistant
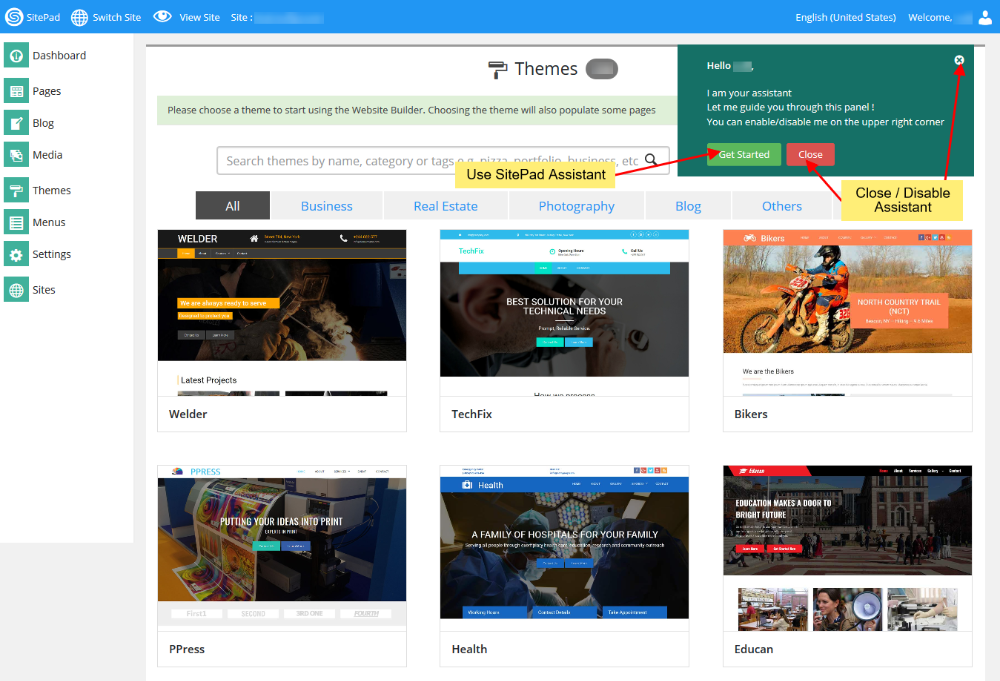
SitePad Assistant is a tool which helps you navigate SitePad Editor.
HOW TO USE SITEPAD ASSISTANT
When you login for the first time SitePad Website Builder will enable the Assistant by default.
You need to Click on Get Started to navigate SitePad Editor. If you want to Disable the Assistant you just need to click on Close or X as shown in the Image below:
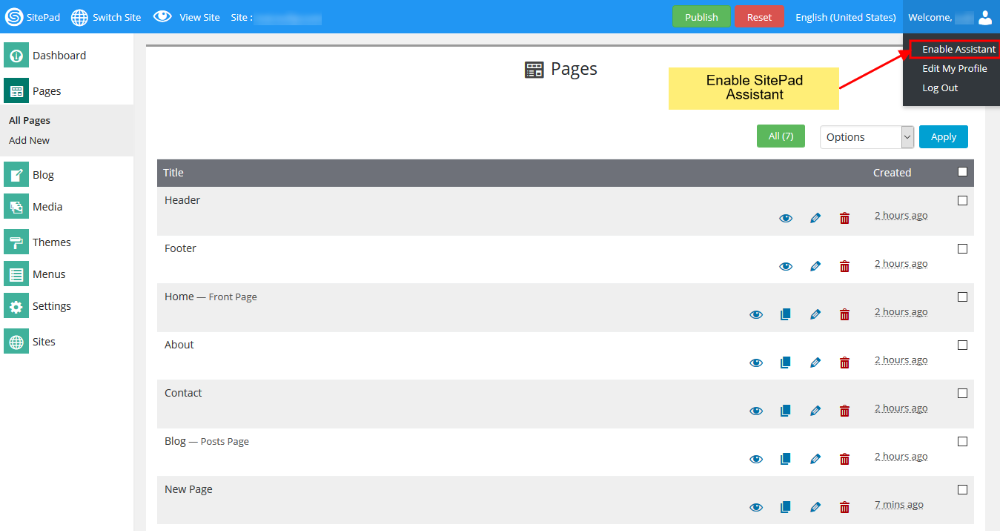
ENABLE ASSISTANT
You can always Enable it back again by hovering on Welcome, {username} on the Navigation Bar. You will see a Drop Down List which mentions Enable Assistant.
Click on the button and SitePad Assistant will be enabled for you.
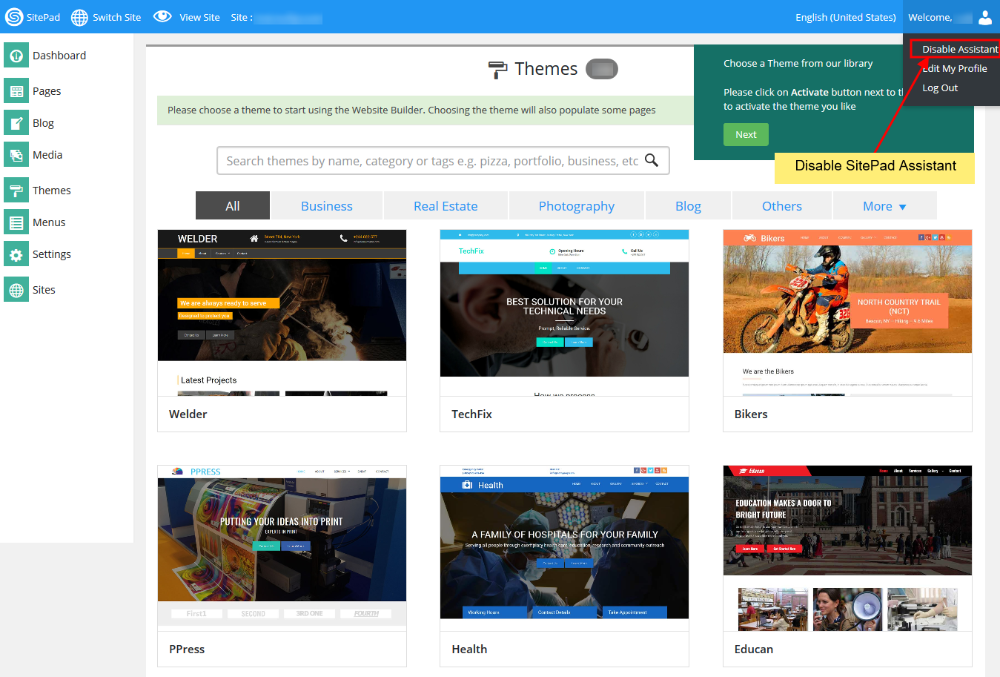
DISABLE ASSISTANT
To Disable the Assistant you need to follow the same procedure that you followed to Enable the Assistant. But instead of Enable button you will see Disable Assistant button.
Click on the button and SitePad Assistant will be disabled for you.