Customize Website
- How to Edit Button
- How to Download the Website
- Sites in multiple languages
- Password Protect Pages
- How to Add Custom links in Menu
- How to Add Unique ID
- How to Add Background to Section
- How to Edit Header and Footer
- How to Add Tags to Blog Post
- How to Add Categories to Blog Post
- How to Edit Custom Site Title
- How to Add CSS using Custom HTML
- How to Insert Custom HTML
- How to Reset Pages, Blogs or Site
- How to Change Language
- How to Clone a Site
- How to Clone a Page
- How to Create Menu
- How to Add Add Site Title and Tagline
- How to Add Custom Logo
- How to Add New Blog
- How to Add New Page
- Add New Site
- How to Create Website
How to Edit Button
This Guide will Help you to edit Button Widget Settings and Style.
BUTTON WIDGET SETTINGS
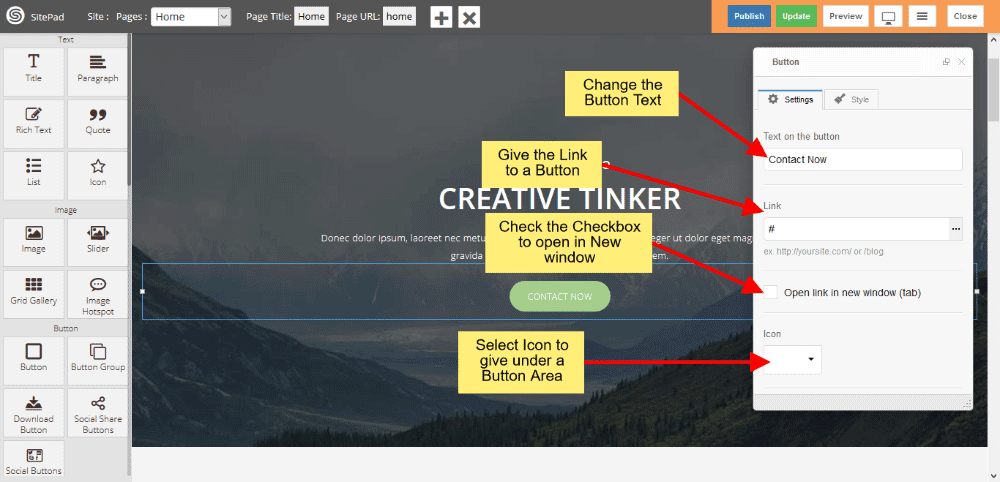
When you Drag and Drop Button Widget in SitePad Website Builder Dashboard. You will see Button Settings and Style in Button Widget. Go to Button Settings. You will see the image like below. You can change the Button Text and Button Link and after that one checkbox is there, if you check this checkbox you can open that link in another window.
If you want to display Icon under the Button then click the Icon, Choose particular Icon from a list.
If you want the Button in full width style then check the checkbox of Stretch, and Alignment Settings gives you Button Alignment.
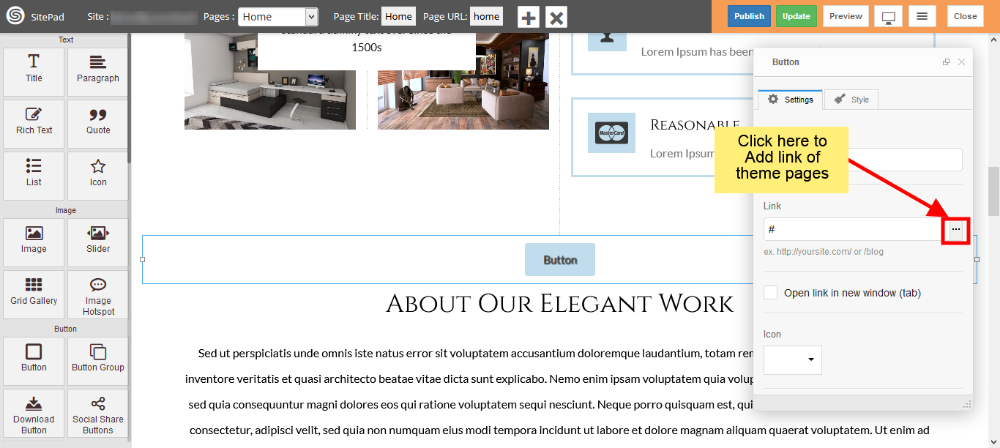
LINK BUTTON TO THEME PAGES
To link you Button to existing theme page just click on three dots of Link section as shown in image below.
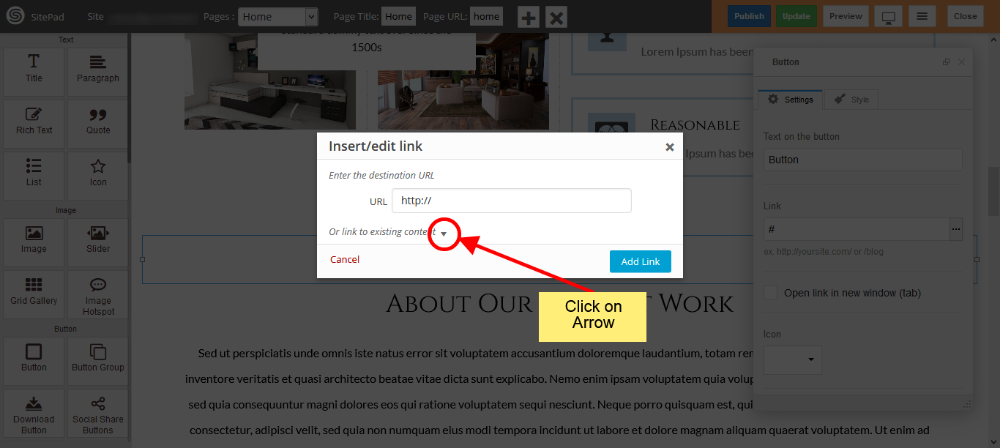
Now in popup box click on Arrow.
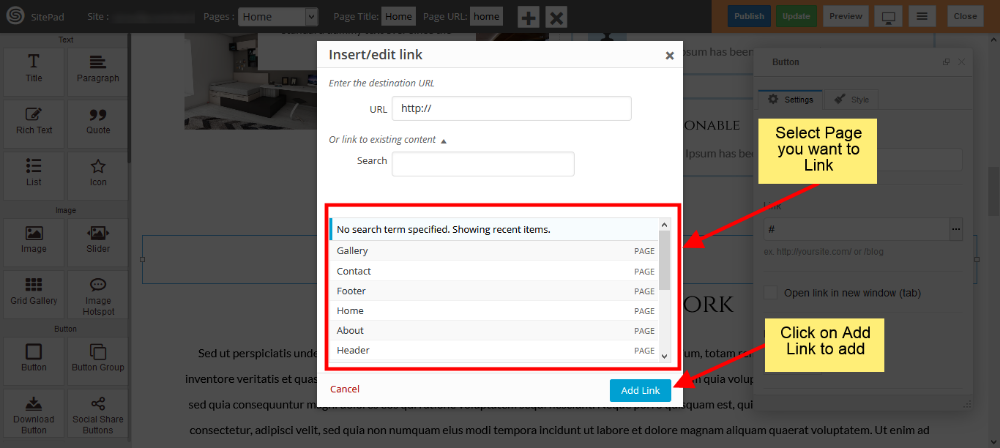
Select page which you want to link and in the end click on Add Link.
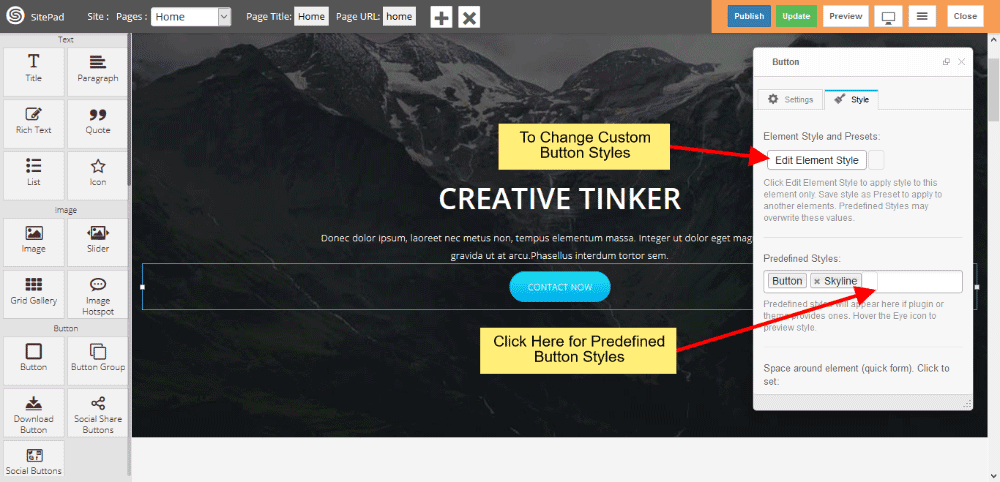
EDIT BUTTON ELEMENT STYLES AND PRESETS
If you want to change the Button Custom Styles like Background color, Text color etc. then click Edit Element Style.
For Predefined styles which comes in widget like Background color and Text color then you can click Predefined Styles.
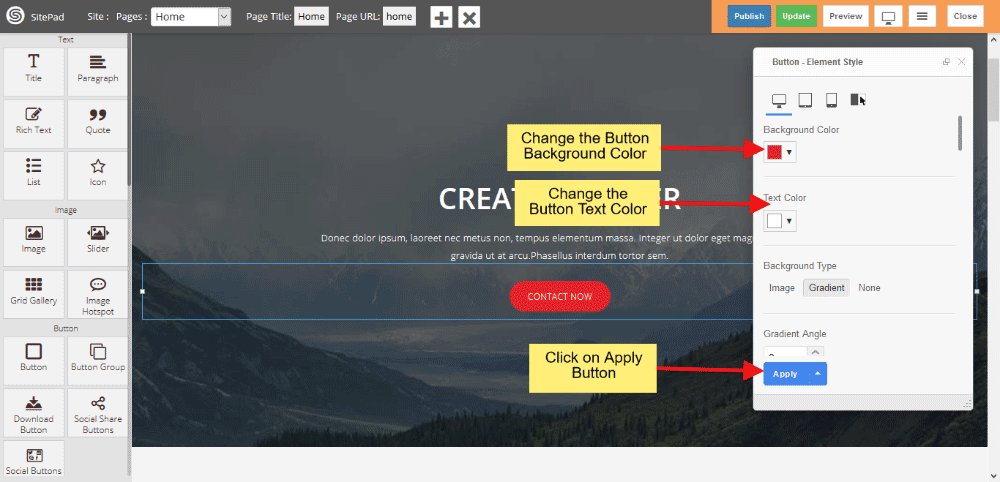
BUTTON CUSTOM STYLE
Button Custom Styles gives you to change Button Background color, Text color, Padding, Border-radius etc. When all are set then click on Apply button.
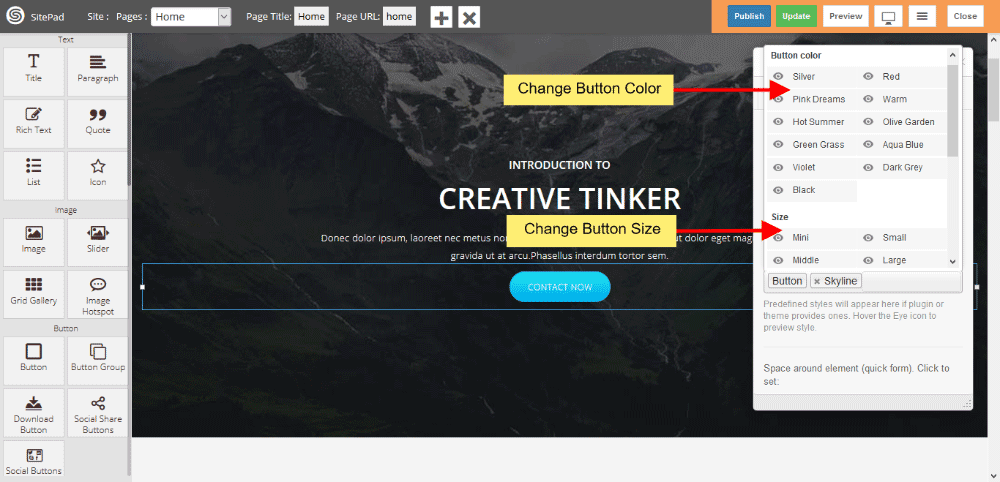
BUTTON PREDEFINED STYLE
Predefined style gives you clasees of various predefined button for Background and Text color. And Size gives you various types of Button Size.
How to Download the Website
In this tutorial, we will show you How to Download the Website.
Note: By default Download option is disabled, if you want to use the Download option you will need to contact your web host to enable the Allow Download Website setting from SitePad admin panel. The download option is not available in SitePad Free plan.
GO TO SITEPAD EDITOR
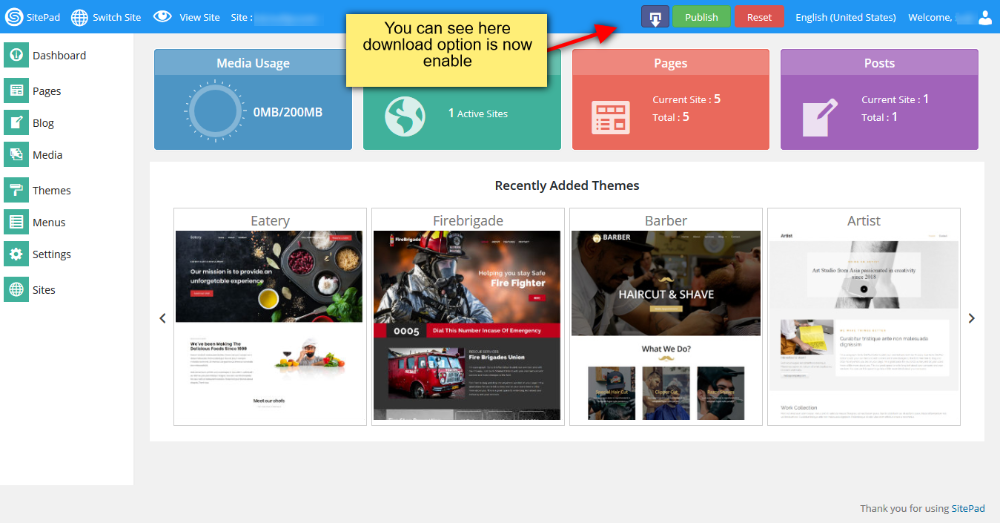
From your Control Panel click on SitePad Website Builder. You will be redirected to SitePad Editor Server.

Once you are redirected to the Editor Server you will see Download button in the top bar.
DOWNLOAD ZIP FILE
Click on Download Now button to download the website files in ZIP package.

Once the ZIP file is downloaded, upload that file on your server in your web directory e.g. public_html/ and unzip that file in same directory. You can use the File Manager feature in your control panel to upload the file.
That’s it ! Your site should now be accessible when you access your domain name in the browser.
Sites in multiple languages
This guide helps you how to make a site in multiple languages.
Make a full website with one language and clone that site so you have a full copy of your website and change the language strings with the other language string using the editor. For easily understanding, you can follow the below steps:
CLONE FULL SITE
For cloning the website go to the Dashboard -> Sites -> Clone Site or you can also do by clicking of Dashboard -> All Sites, click the button of cloning which sites you want to clone.
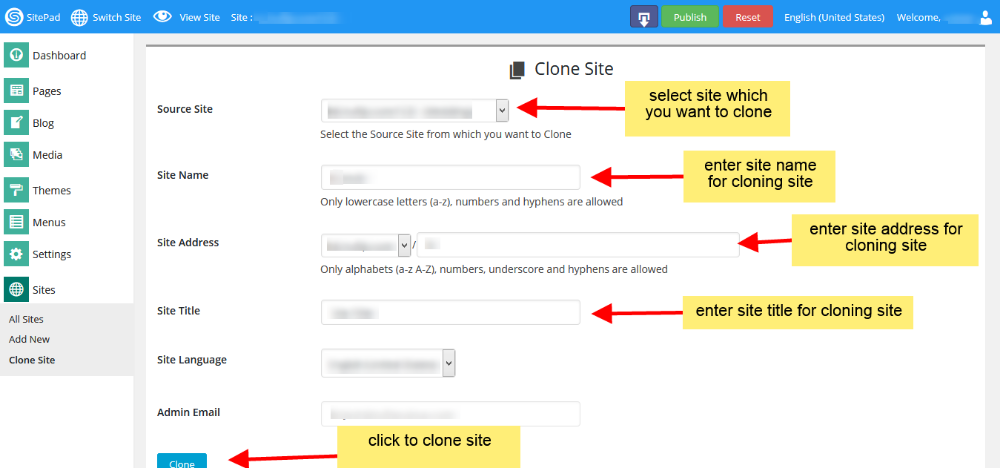
Select the source site which you want to clone from dropdown list. Enter site name which show in SitePad editor url, Select domain name and enter site address for your cloning site. This will be your site address for your cloned site after publish. And enter Site Titlefor the language which you want, after that click on Clone button for cloning the site.
After completing the cloning process it shows two links Visit Dashboard and Visit Site, click on Visit Dashboard link for editing the cloning site.
EDIT ON CLONE SITE
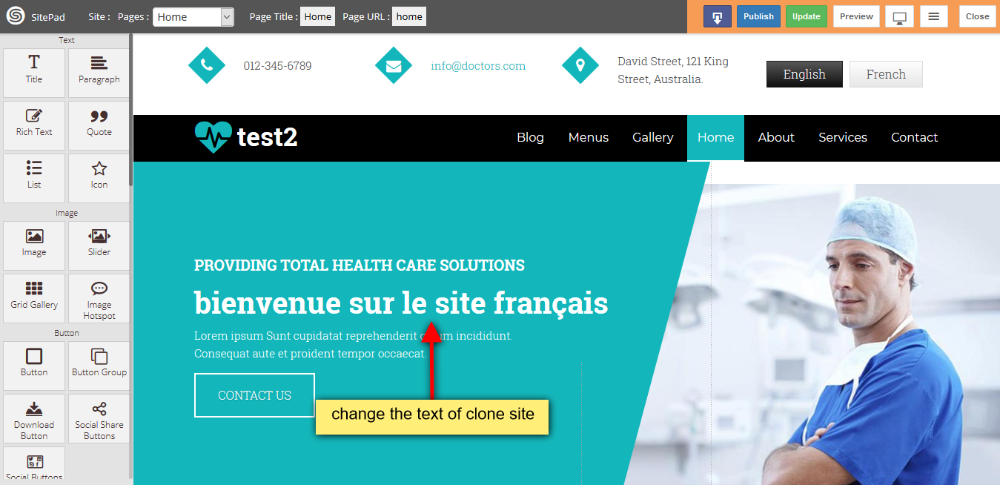
After cloning, click on Visit Dashboard link for editing the cloning site. You will get exact copy of site with same style and properties, and make changes on cloned site of French language.
ADD LINKS IN HEADER
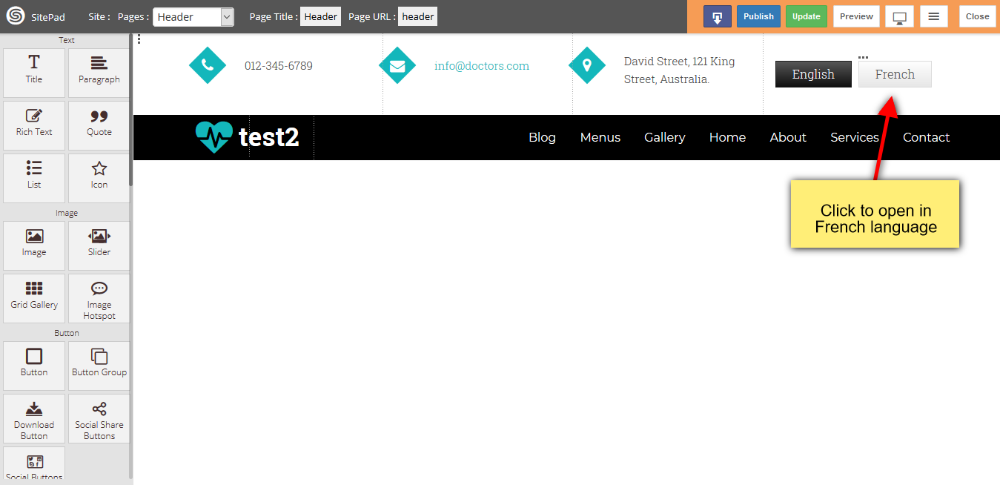
Suppose you have a domain www.example.com, this domain point to your English language and make button link for English and French languages in the header of both the sites, on clicking of their button it redirects to their languages and French domain is like this www.example.com/fr
PUBLISH BOTH SITES
When all changes are done then publish both the sites.
Password Protect Pages
This documentation will guide you on How to Password Protect your pages.
Note: Password Protection is supported only for Apache web server.
GO TO EDITOR
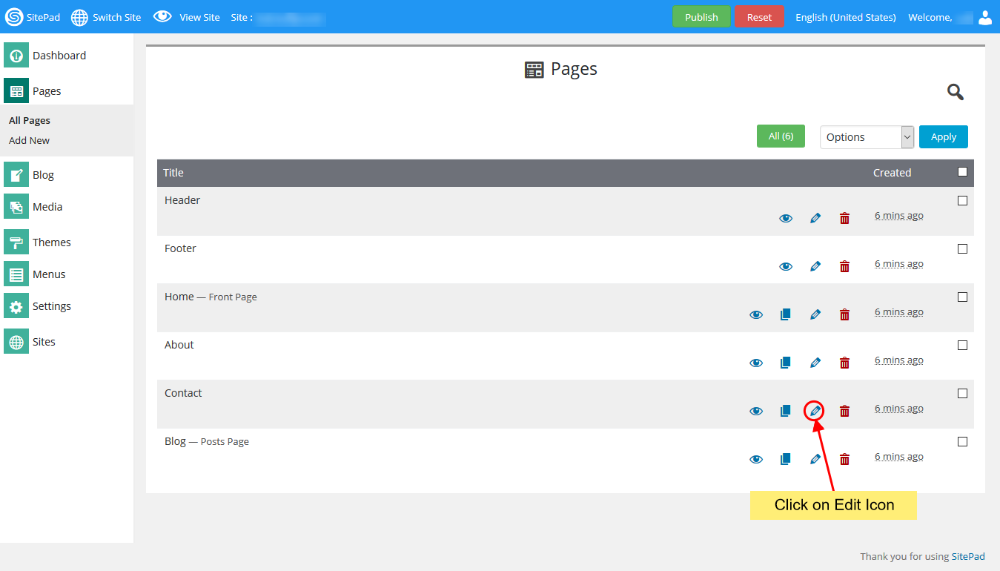
When on SitePad Website Builder Dashboard. Hover on Pages option given on the left sidebar and then click on All Pages. Once on all Pages Click on Edit Icon of Any Page.
You will be redirected to Editor.
SELECT PASSWORD PROTECT
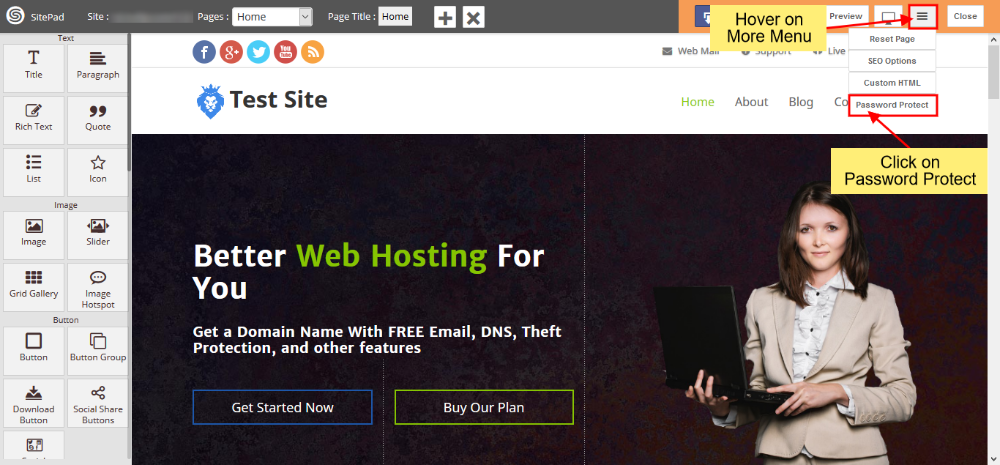
On SitePad Editor hover on more menu on the navigation bar. When you hover over more menu four buttons will be drop down i.e Reset Page, SEO Options, Custom HTML and Password Protect.
Click on Password Protect.
PASSWORD PROTECT PAGES
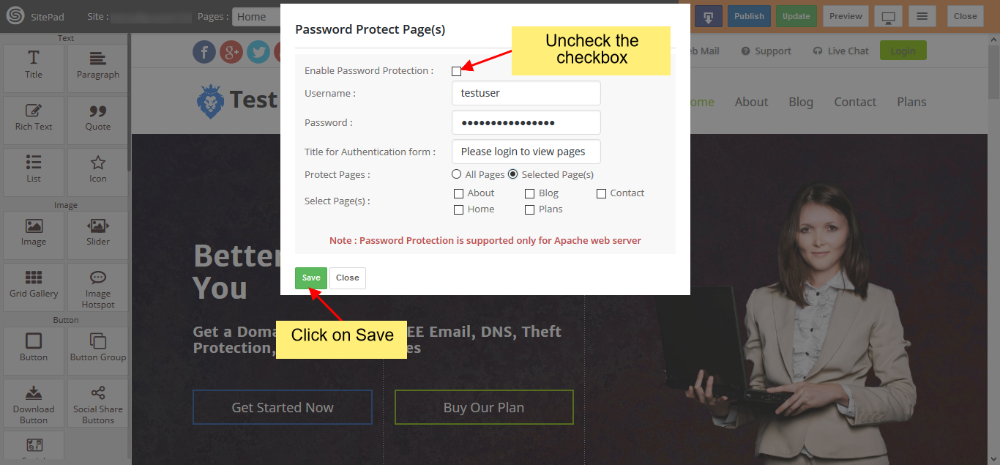
On clicking Password Protect you will see a dialog box will appear. Click on Enable Password Protection checkbox. Insert Username, Password and Title for Authentication. Then select the option from Protect Pages i.e All Pages or Selected Pages.

- On click of Enable Password Protection your password protection option will be enabled.
- Insert Username that you want. It will be asked when you Log-in to password-protected pages/site.
- Insert Password that you can remember. It will be asked when you Log-in to password-protected pages/site.
- Insert Title for Authentication. This will be shown on the Log-in a Dialog box.
- Select an option from Protect Pages i.e All Pages if you want to password protect the full site or if you want only Selected Pages then choose the given option.
- If Selected Pages option has been selected you will find Select Pages option through which you can select which page to password protect.
Once you have made the changes then click on Save to save the Password Protect Pages Option.
REMOVING PASSWORD PROTECTION
To Remove Password Protect Pages click on Password Protect option. Uncheck the Enable Password Protection checkbox. Click on Save.
How to Add Custom links in Menu
This guide will show you how to add custom links in Menu.
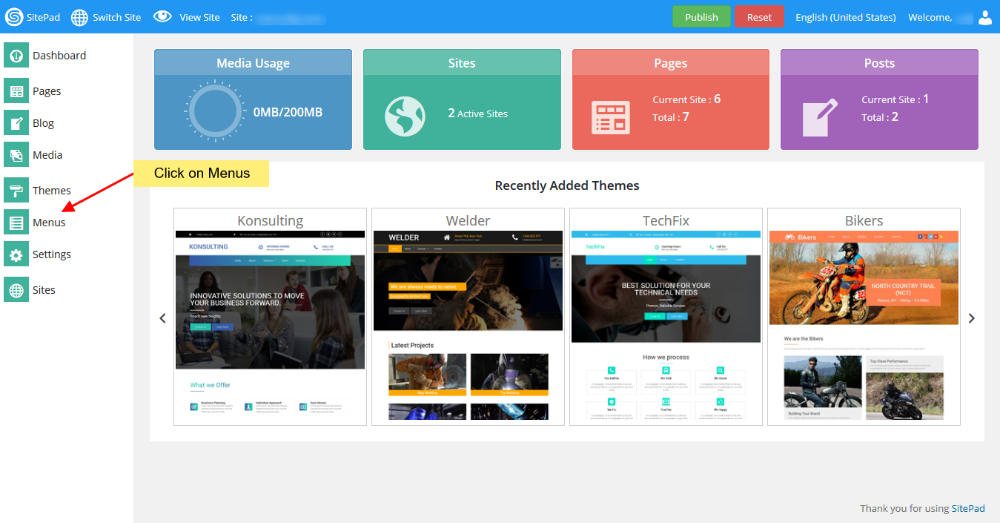
GO TO MENUS
First you will need to go to the Menus as shown in image below.
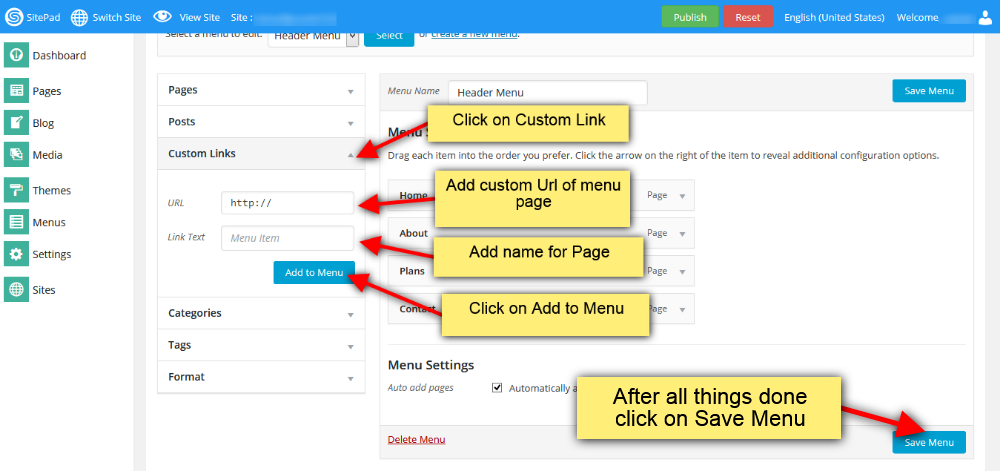
After all things done please click on Save Menu. This will add your custom link into menu.
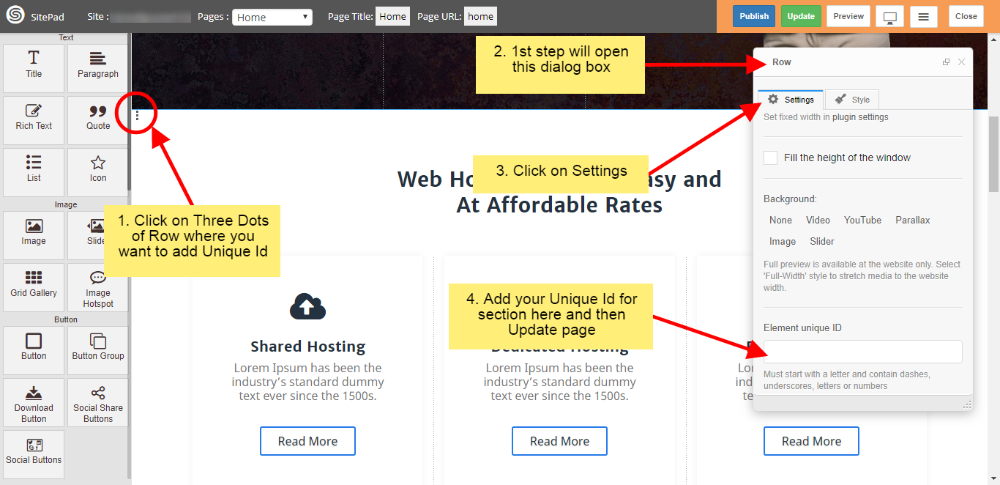
How to Add Unique ID
This guide will show you how to add Unique ID.
GO TO PAGE EDITOR
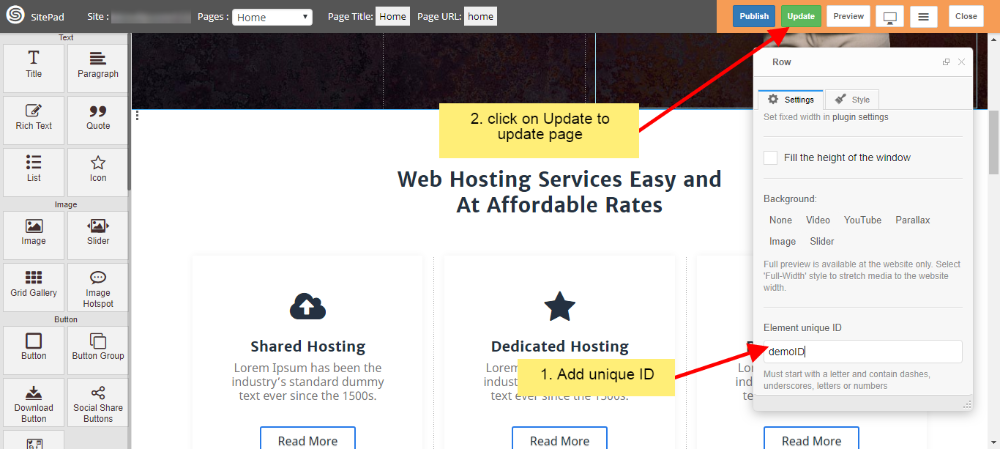
Go to the page editor and select the row where you want to add unique id as shown in below image. Then click on settings in dialog box and add id for that row in Element unique Id section.
After adding unique id please update the page as shown in image below.
How to Add Background to Section
This guide will help you to Add Background to Section.
There are two Different ways to do that.
USING ROW DIALOG BOX
1) Open Page you want to edit in editor. To do that Click on Edit icon present next to page name as shown image below.
2) Once you open Page in Editor follow steps below
- Select Row where you want to Add Background by Clicking on Three Vertical Dots as shown image below.
- Step i will pop up the Dialog Box for that Row.
- Now Click on Settings option in Dialog Box.
- Now Select the Type of Background you want to give for that Particular Row

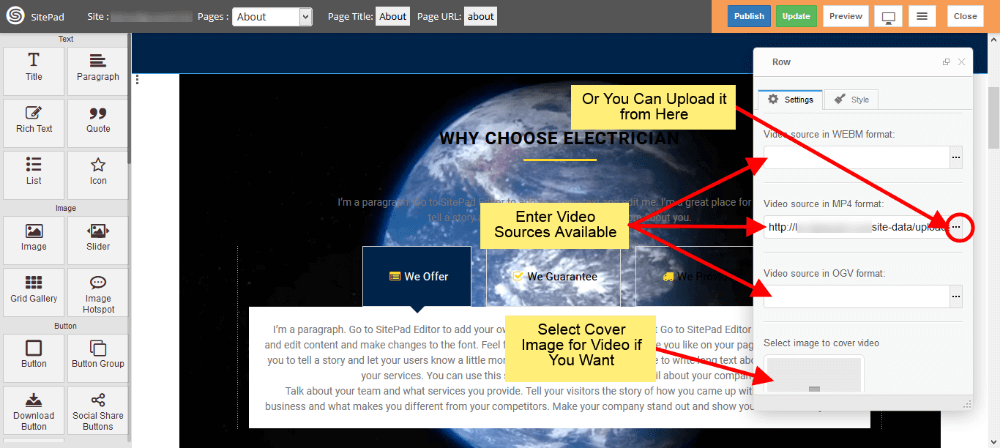
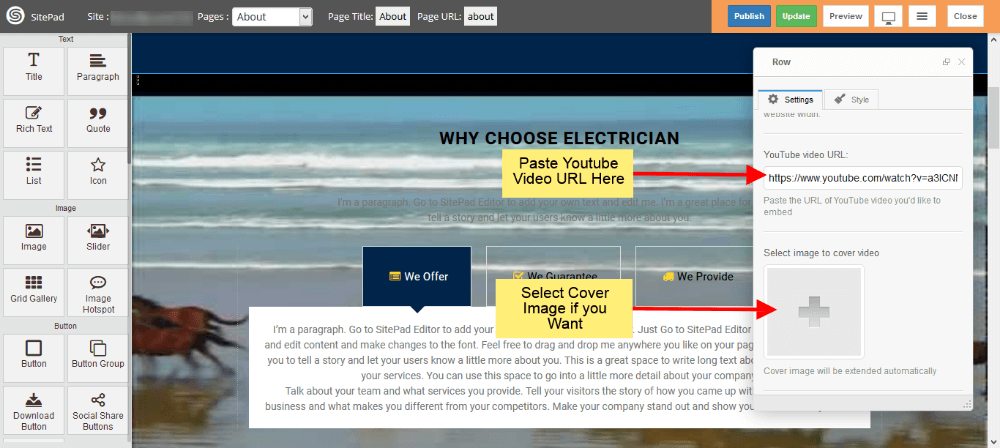
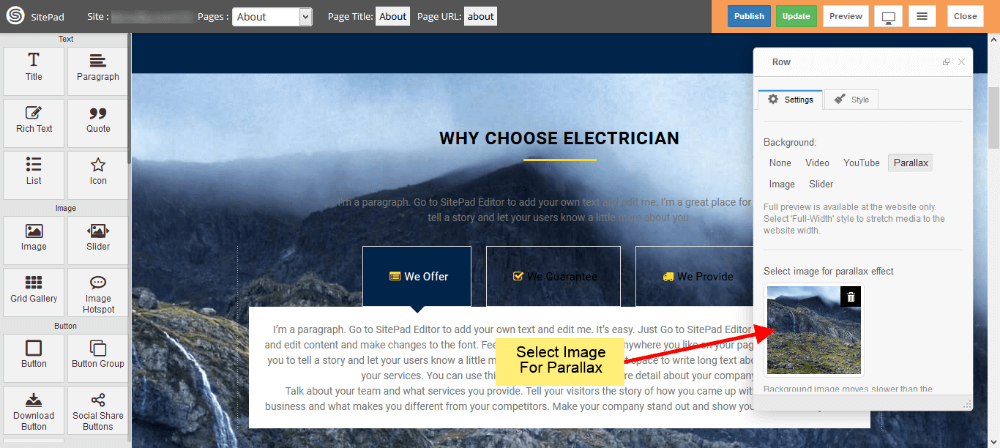
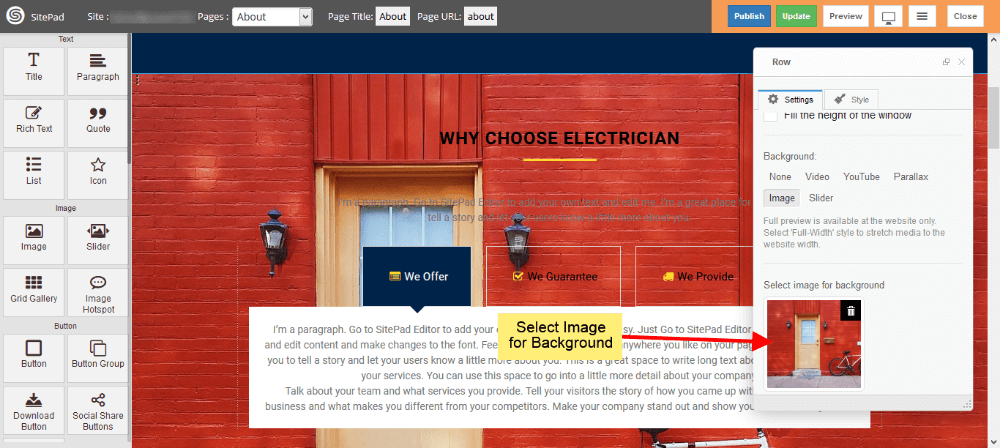
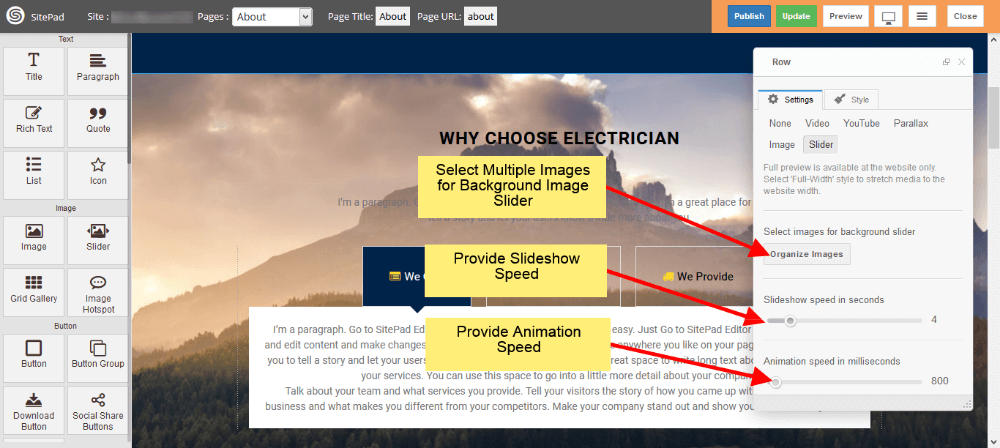
3) When you select one of the Option for Background then it will need some inputs just Fill that as shown below.
FOR VIDEO BACKGROUND
FOR YOUTUBE VIDEO BACKGROUND
FOR PARALLAX IMAGE BACKGROUND
FOR IMAGE BACKGROUND
FOR IMAGE SLIDER BACKGROUND
USING EDIT ELEMENT STYLE
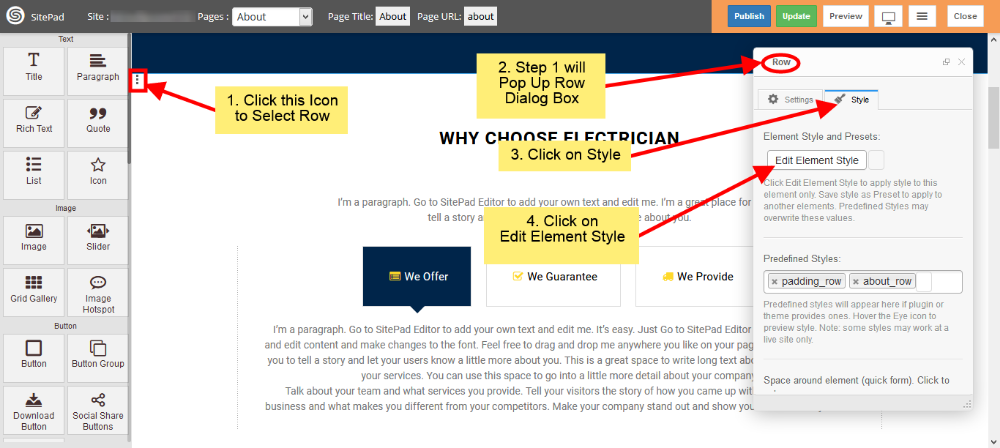
1) Once you open Page in Editor follow steps below
- Select Row where you want to Add Background by Clicking on Three Vertical Dots as shown image below.
- Step i will pop up the Dialog Box for that Row.
- Now Click on Style option in Dialog Box.
- Now Click on Edit Element Style.
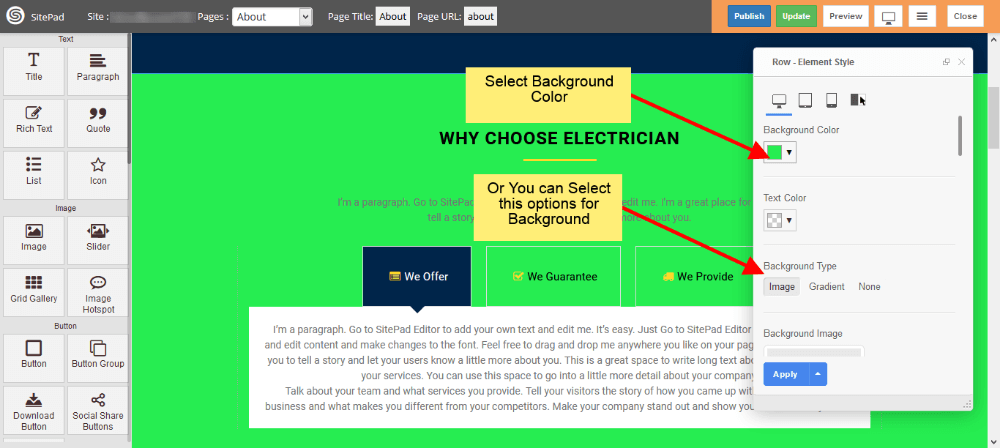
2) Now in Edit Element Style select Background Color or Background Type you want as shown in image below.
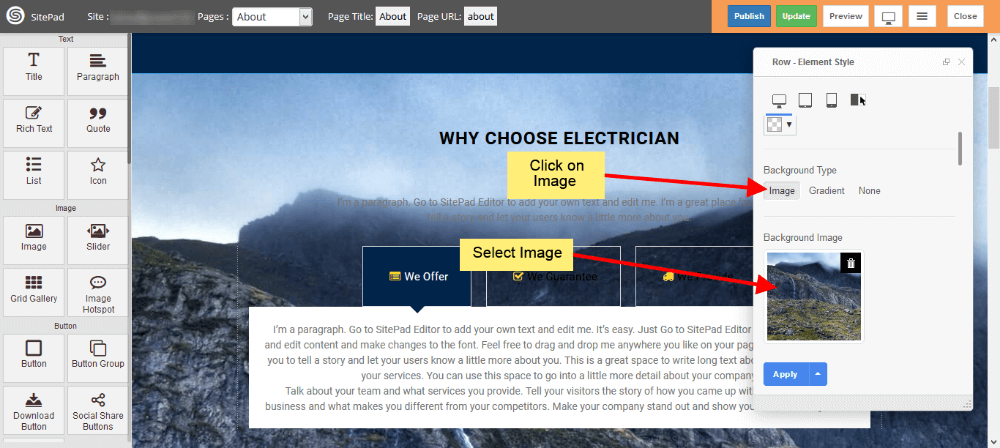
FOR IMAGE BACKGROUND
If you want Image Background then just click on Image and select Image you want as shown in image below.
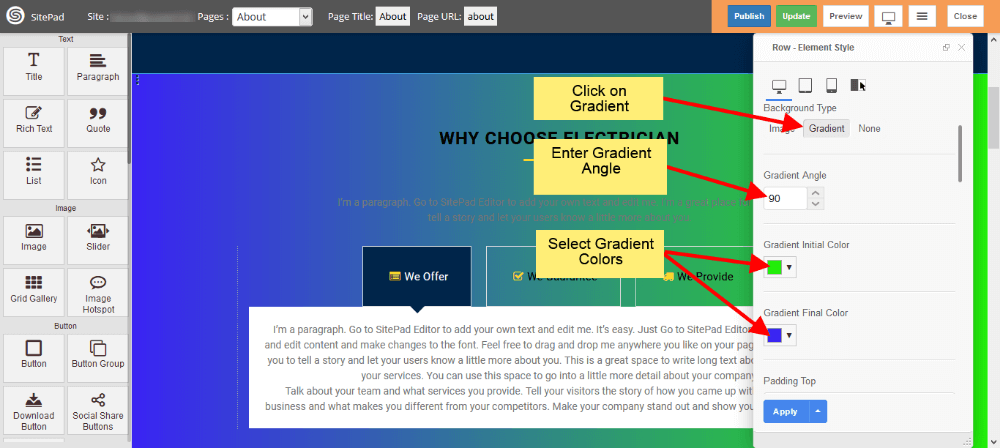
FOR GRADIENT BACKGROUND
If you want Gradient Background then just click on Gradient and select Gradient Angle and Color as shown in image below.
How to Edit Header and Footer
This Guide will Help you to edit Header and Footer Page.
GO TO PAGES AND EDIT
When you are on SitePad Website Builder dashboard. You will see Pages option on Sidebar Navigation Menu. Hover on Pages and Click on All Pages
Once you see all Pages. Click on the Edit Icon of the Header Page or Footer Page whichever you want to Edit shown like in the image below.

EDIT HEADER
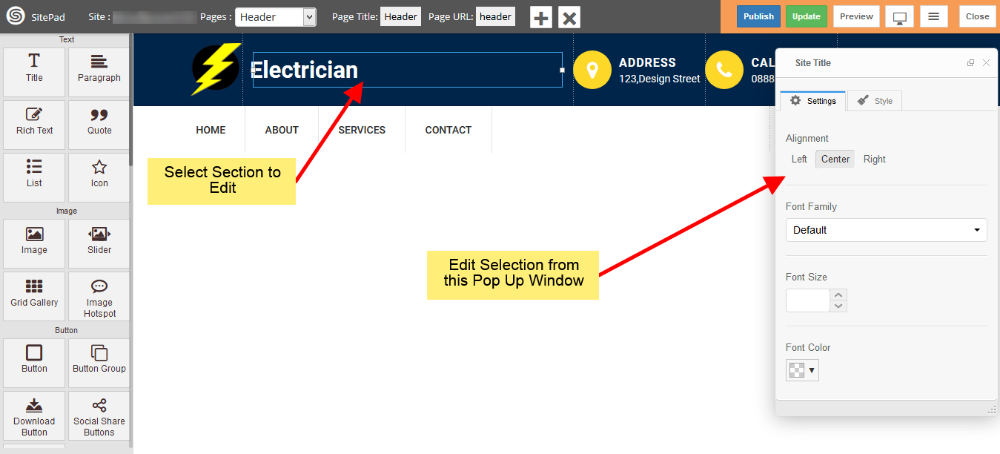
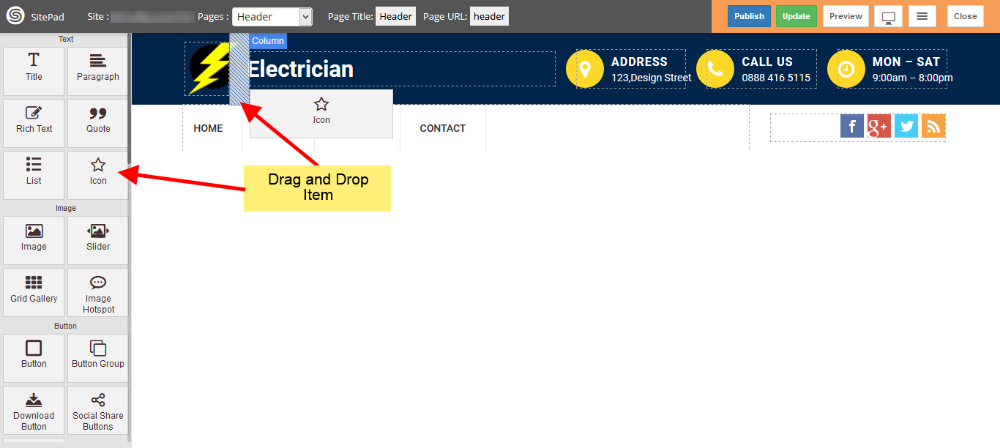
Once you open Header Page in editor you will be able to Edit all the stuff from Header Page as shown image below.
Note: You can also add extra items that you want to display in Header. Just Drag and Drop them as shown in image below.
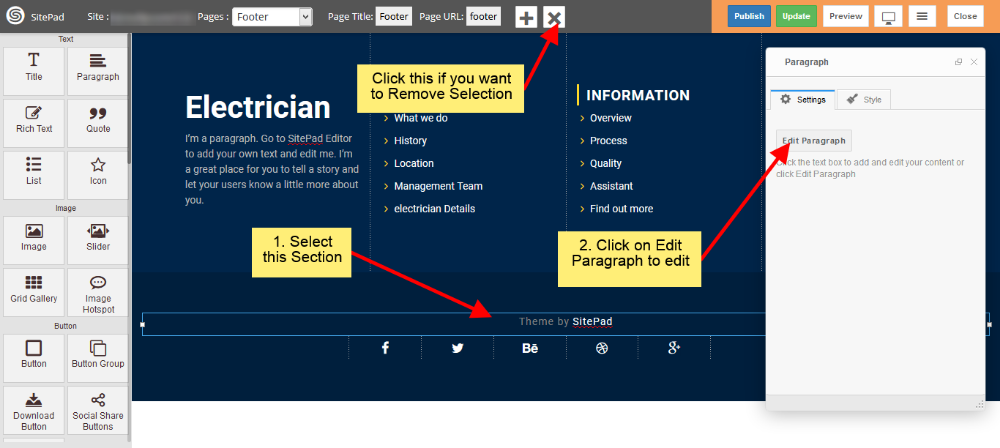
EDIT FOOTER COPYRIGHT TEXT
You can also edit Footer Page as similar to Header Page shown above. Click edit icon of Footer Page as shown in above images and edit.
How to Add Tags to Blog Post
In this tutorial, we will show you How to Add Tags to Blog Post.
GO TO SITEPAD EDITOR
From your Control Panel click on SitePad Website Builder. You will be redirected to SitePad Editor Server.
Once you are redirected to the Editor Server you will see Blog in the Main menu. Click on All Posts and then click on Edit Icon to edit the Post. You will be redirected to the Editor.

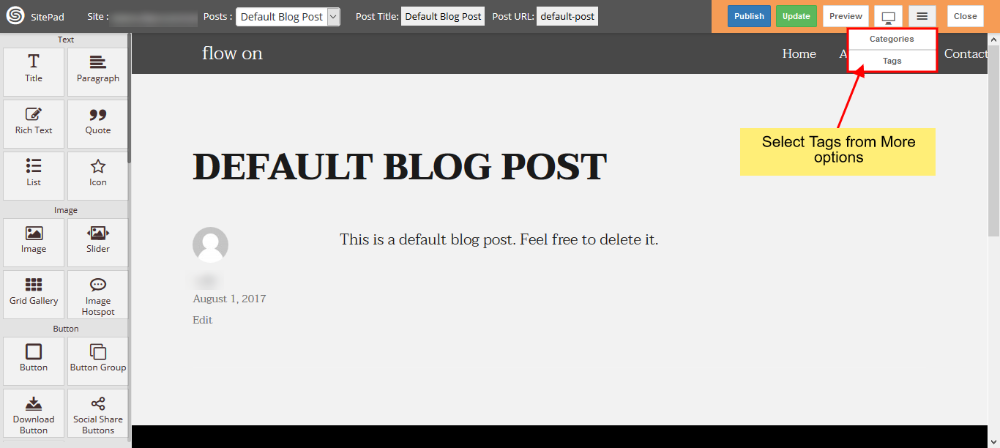
MORE OPTION AND TAGS BUTTON
In Editor, you will need to hover the mouse on More then select Tags Button
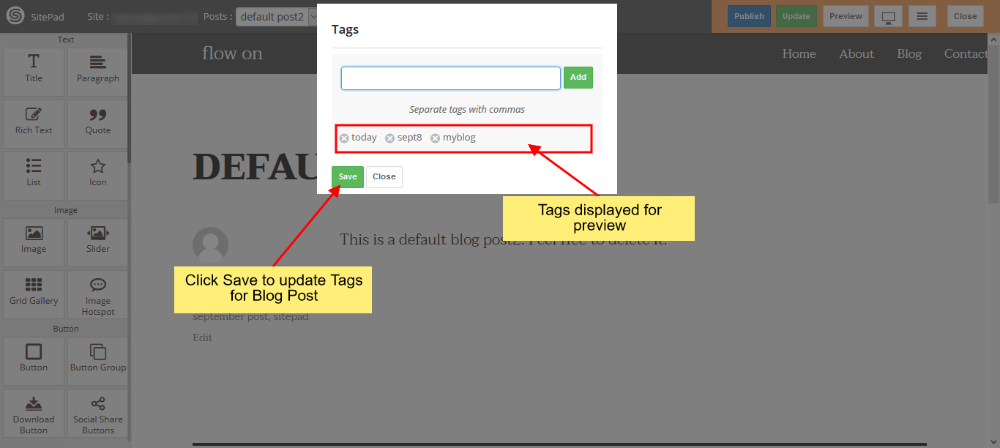
A dialog box will appear in which you can add a New Tags as shown in the image below.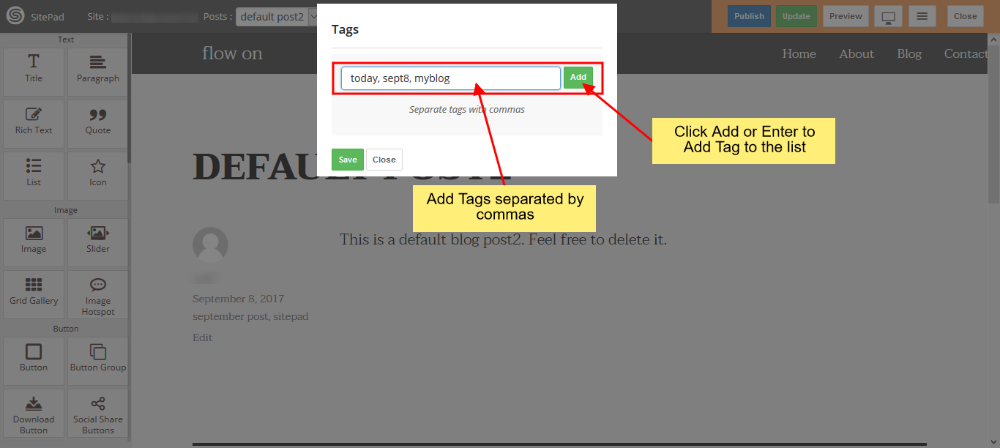
After selecting the Tags that you want to assign to your post click on Save to update the Tags for the Post as shown in the image below.
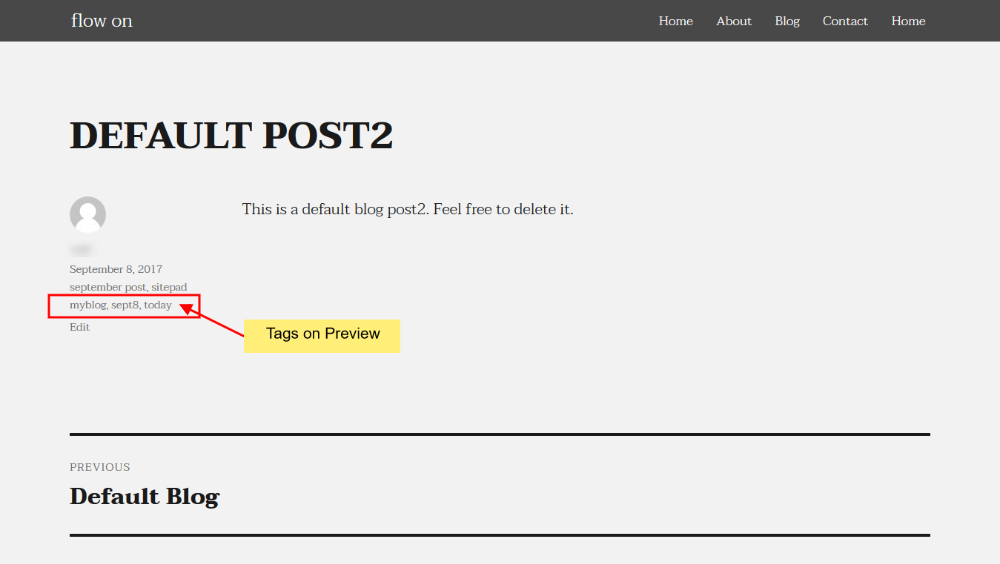
PREVIEW CHANGES
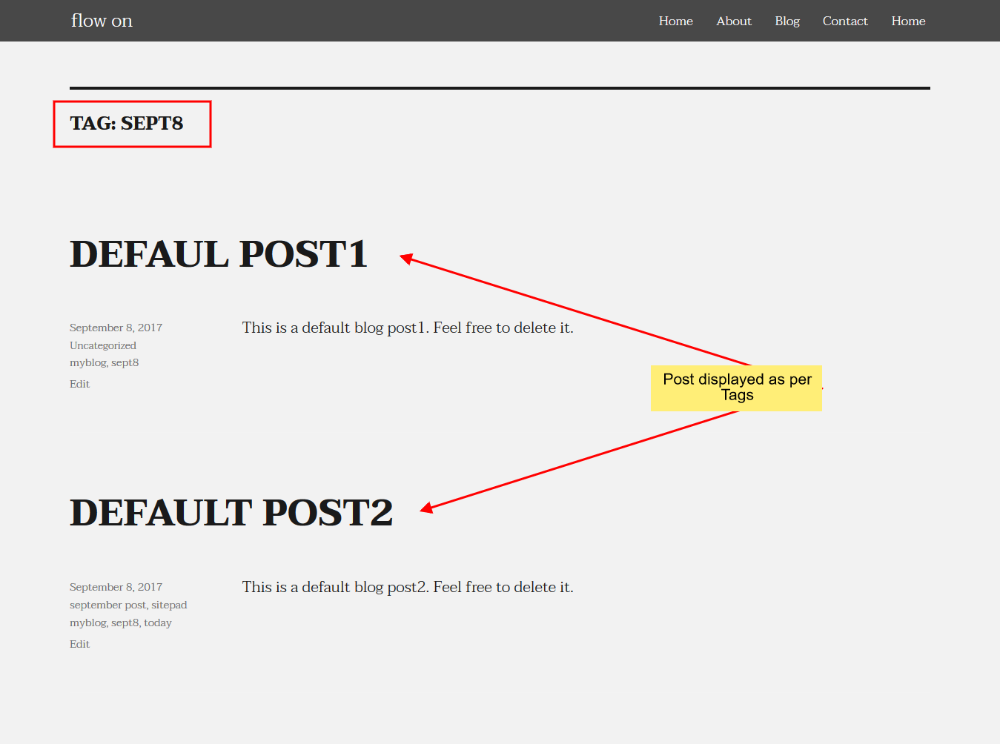
Also if you assign a single tag to more than one post and when you click on that tag name it will show all the blog post assigned to that tag as shown in the image below:.
How to Add Categories to Blog Post
In this tutorial, we will show you How to Add Categories to Blog Post.
For Adding Categories to your Blog Post you will need to access SitePad Editor.
GO TO SITEPAD EDITOR
From your Control Panel click on SitePad Website Builder. You will be redirected to SitePad Editor Server.
Once you are redirected to the Editor Server you will see Blog in the Main menu. Click on All Posts and then click on Edit Icon to edit the Post. You will be redirected to the Editor.
MORE OPTION AND CATEGORIES BUTTON
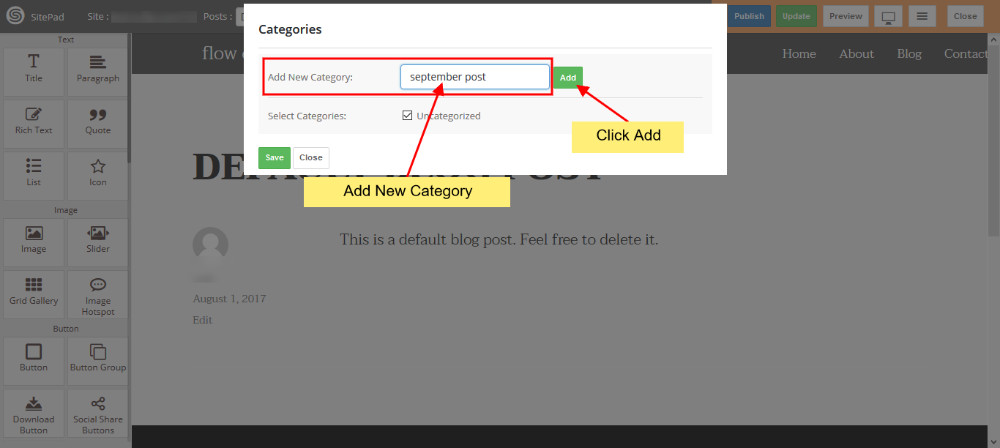
In Editor, you will need to hover the mouse on More then select Categories Button.
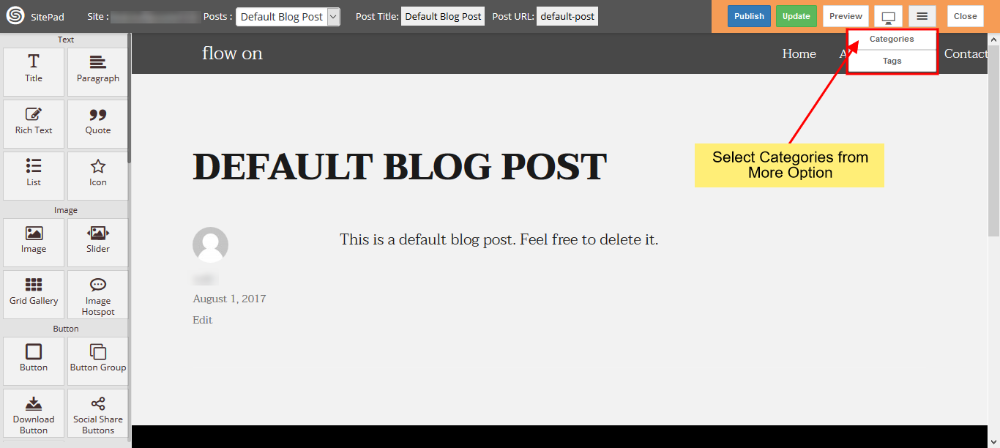
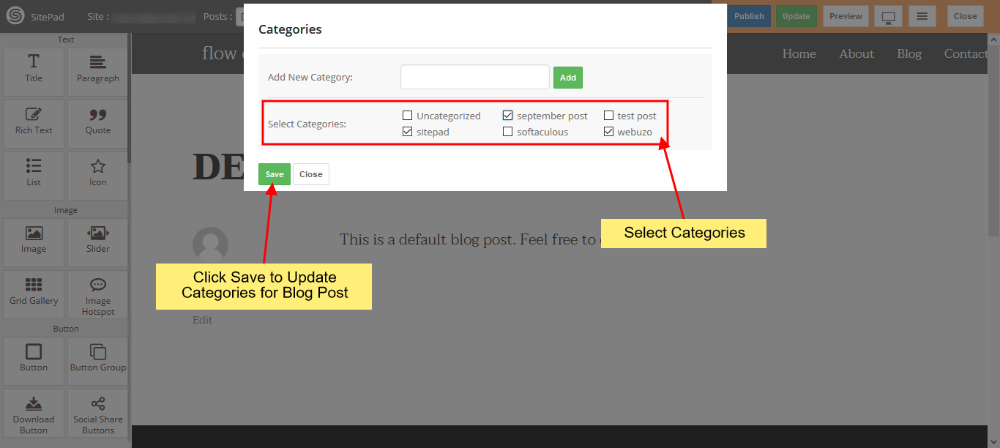
A dialog box will appear in which you can add a New Category as shown in the image below or you can select from different Categories already added.
After selecting which Categories you want to assign to your post then click on Save to update the categories for the Post as shown in the image below.
PREVIEW CHANGES
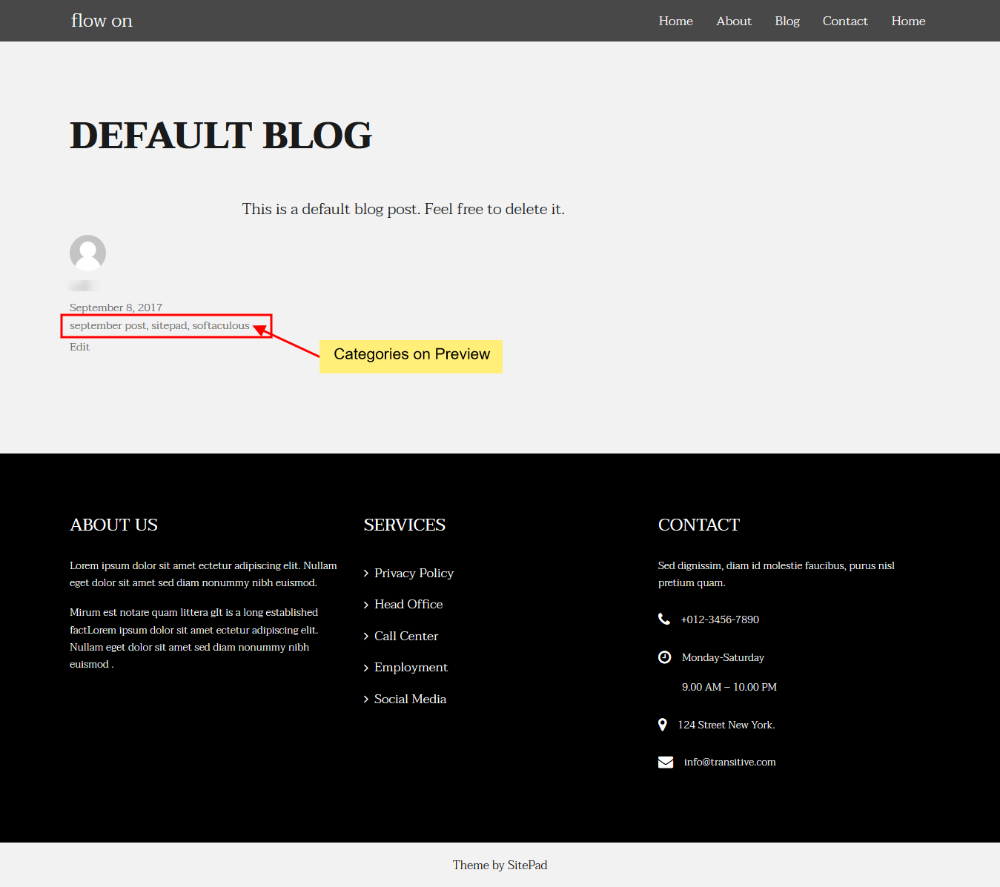
After assigning categories to the post, on preview, your post would look like the image given below:
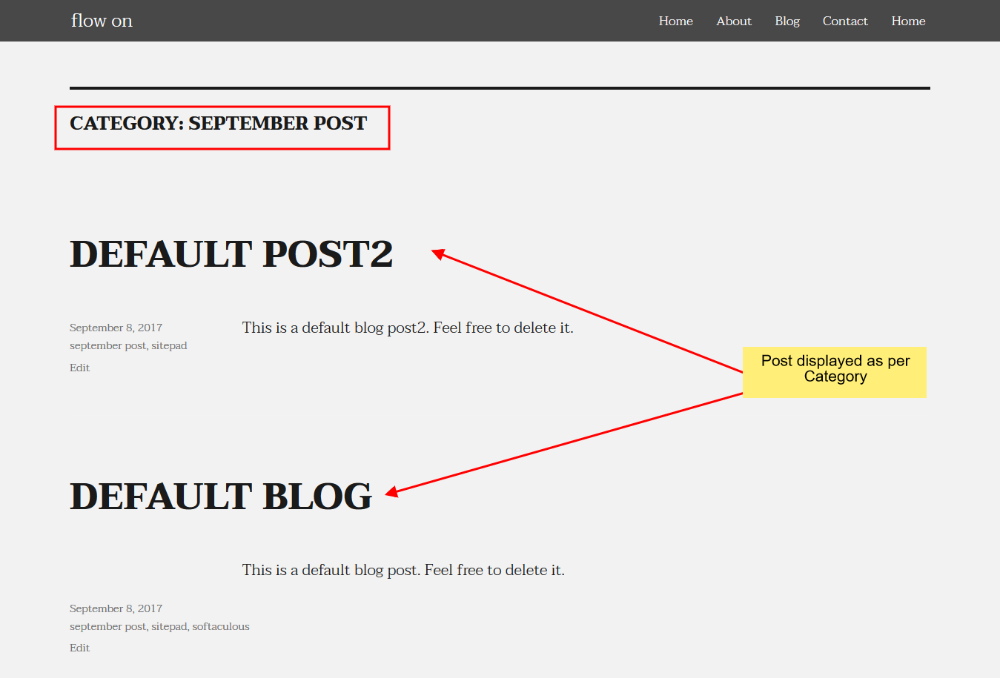
Also if you assign a single category to more than one post and when you click on that category name it will show all the blog post assigned to that category as shown in the image below:
How to Edit Custom Site Title
This documentation will guide you on How to Insert Site Title for Pages.
GO TO EDITOR
When on SitePad Website Builder Dashboard. Hover on Pages option given on the left sidebar and then click on All Pages. Once on all Pages Click on Edit Icon of Any Page.
You will be redirected to Editor.
SELECT SEO OPTION
On SitePad Editor hover on more menu on the navigation bar. When you hover on more menu three buttons will be drop down i.e Reset Page, SEO Options and Custom HTML.
Click on SEO Option.

INSERT SITE TITLE
On clicking SEO Option you will see a dialog box will appear. Insert Site Title for any Page using drop down menu.
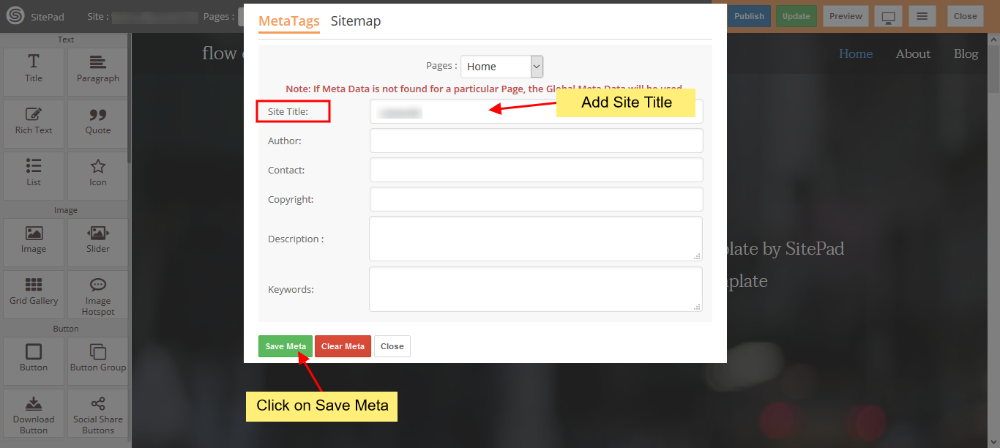
Once you have made the changes then click on Save Meta to save the Site Title.
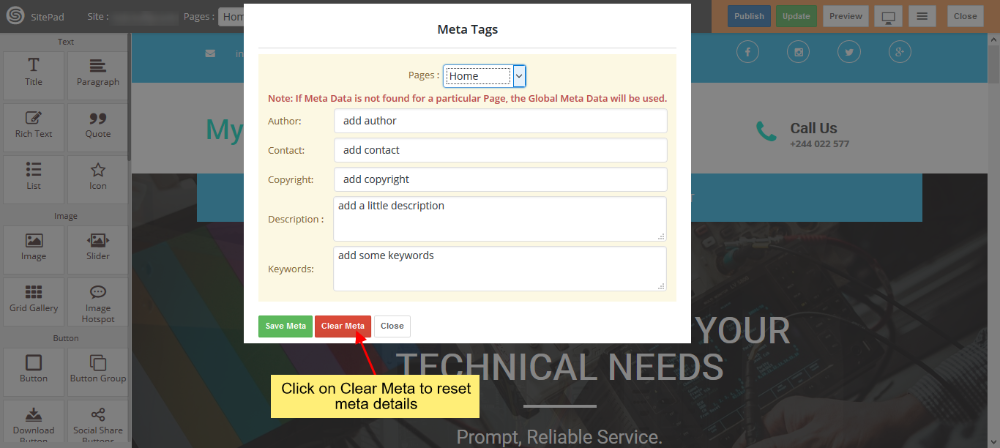
CLEAR META DETAILS
To Clear Site Title of the current page click on Clear Meta. Site Title will be reset to none.
How to Add CSS using Custom HTML
This documentation will guide you on How to Insert CSS using Custom HTML code.
GO TO EDITOR
When on SitePad Website Builder Dashboard. Hover on Pages option given on the left sidebar and then click on All Pages. Once on all Pages Click on Edit Icon of Any Page.
You will be redirected to Editor.
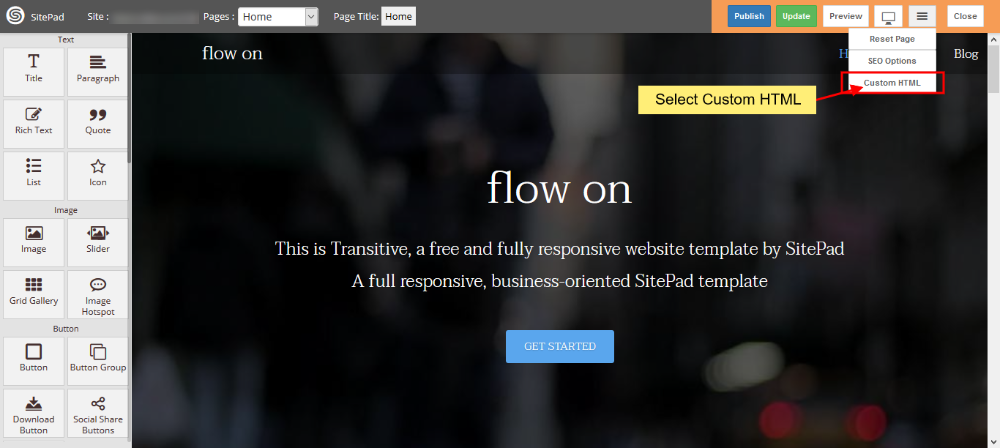
SELECT CUSTOM HTML
On SitePad Editor hover on more menu on the navigation bar. When you hover on more menu three buttons will be drop down i.e Reset Page, SEO Options and Custom HTML.
Click on Custom HTML.
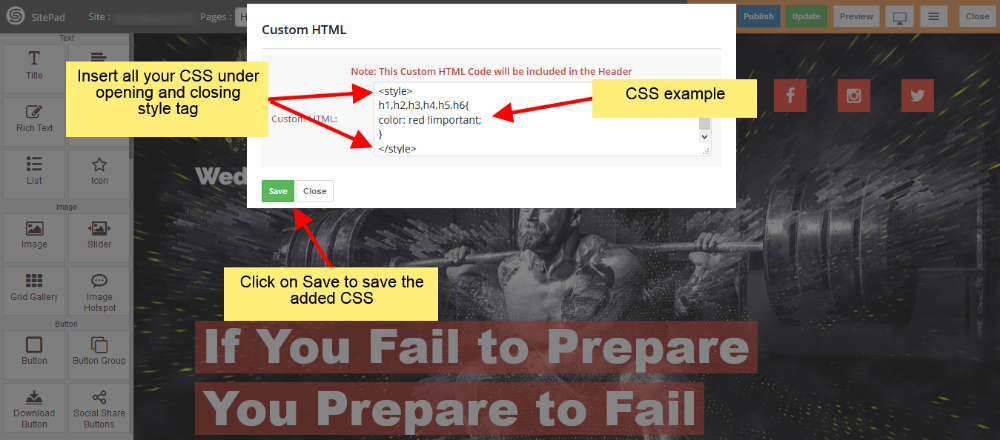
INSERT CSS IN CUSTOM HTML
On clicking Custom HTML you will see a dialog box will appear. Insert all your CSS under style tag as shown in image below.
How to Insert Custom HTML
This documentation will guide you on How to Insert Custom HTML code.
GO TO EDITOR
When on SitePad Website Builder Dashboard. Hover on Pages option given on the left sidebar and then click on All Pages. Once on all Pages Click on Edit Icon of Any Page.
You will be redirected to Editor.
SELECT CUSTOM HTML
On SitePad Editor hover on more menu on the navigation bar. When you hover on more menu three buttons will be drop down i.e Reset Page, SEO Options and Custom HTML.
Click on Custom HTML.
INSERT CUSTOM HTML FOR HEADER
On clicking Custom HTML you will see a dialog box will appear. Insert Custom HTML code for Header in the given textarea.

Once you have made the changes then click on Save to save the Custom HTML.
How to Reset Pages, Blogs or Site
This guide will show you how to Reset Pages, Reset Blogs and Reset Site.
RESET
When you are on SitePad Editor you will see Reset Button. Click on the Reset Button.

Then you will find three option. Choose an appropriate option.
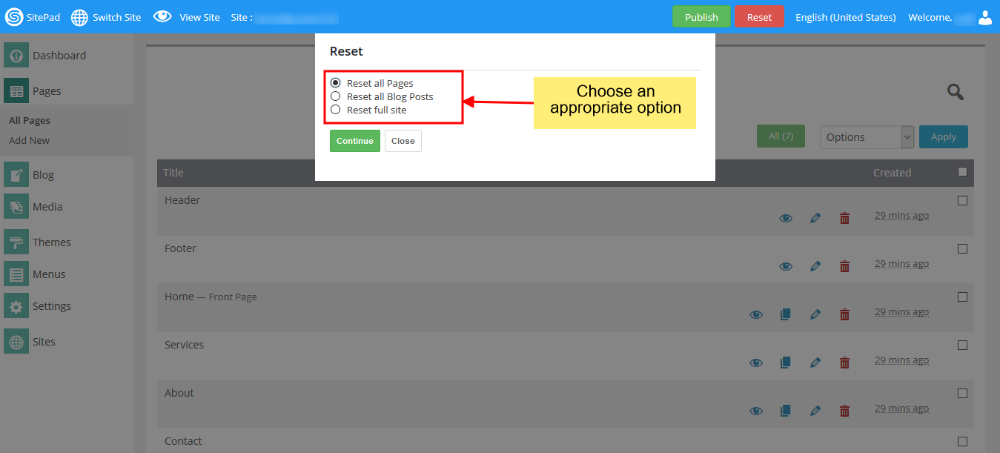
Note:
1. Reset all Pages – This will Reset only Pages.
2. Reset all Blog Posts – This will Reset only Blog Pages.
3. Reset full site – This will Reset full site (after reset you will need to start making the website from scratch).
Once you select the option then click on Continue Button. Then you will see a confirmation box.
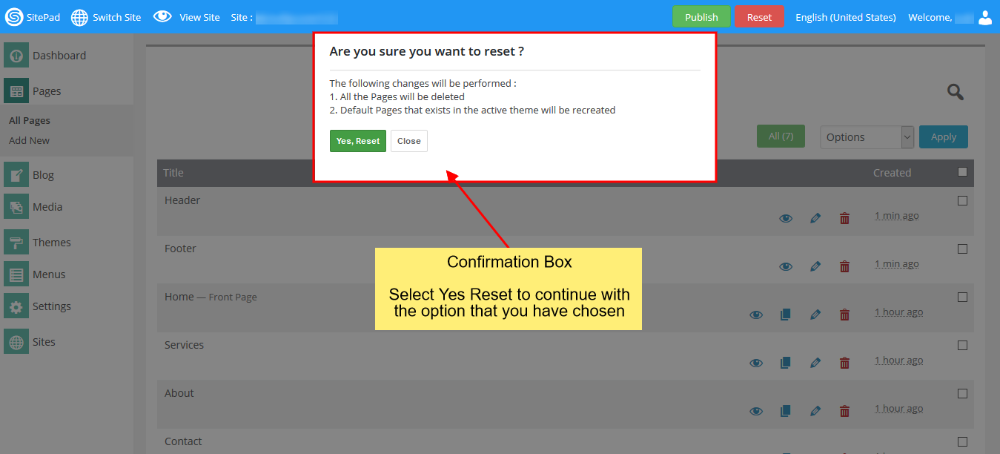
When you click on Yes, Reset Button it will process ahead with the option that you have just confirmed.
Once Reset is done it will reload the page.
Note: On Full Reset you will be redirected to Themes where you will need to select the new theme.
How to Change Language
You can change the SitePad Editor Language in two ways (second one is easier).
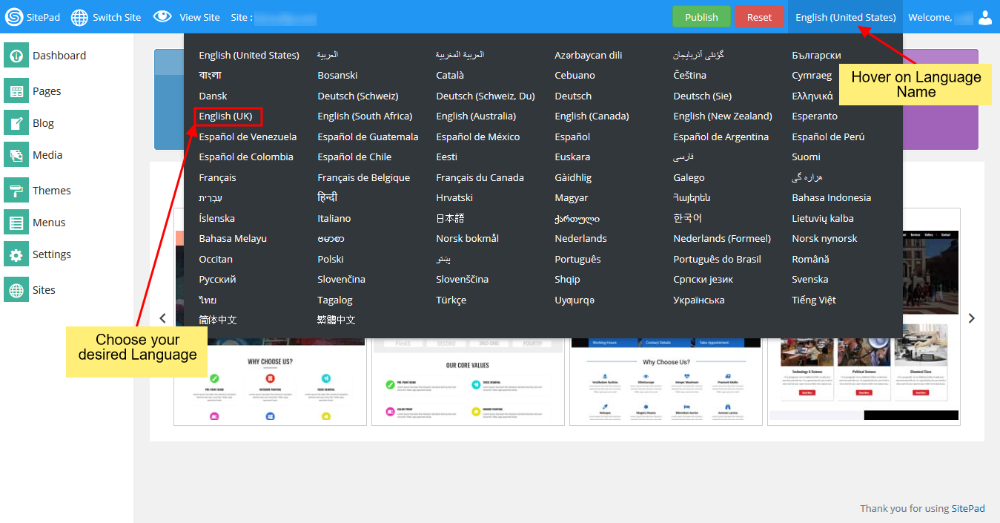
FROM NAVIGATION BAR
You can change language from the Navigation bar. i.e On Top Navigation bar where you see the selected language name being displayed you can hover on the name. This will open a drop down list of available languages you can select your desired language. Check out the example below.
FROM SETTINGS PAGE
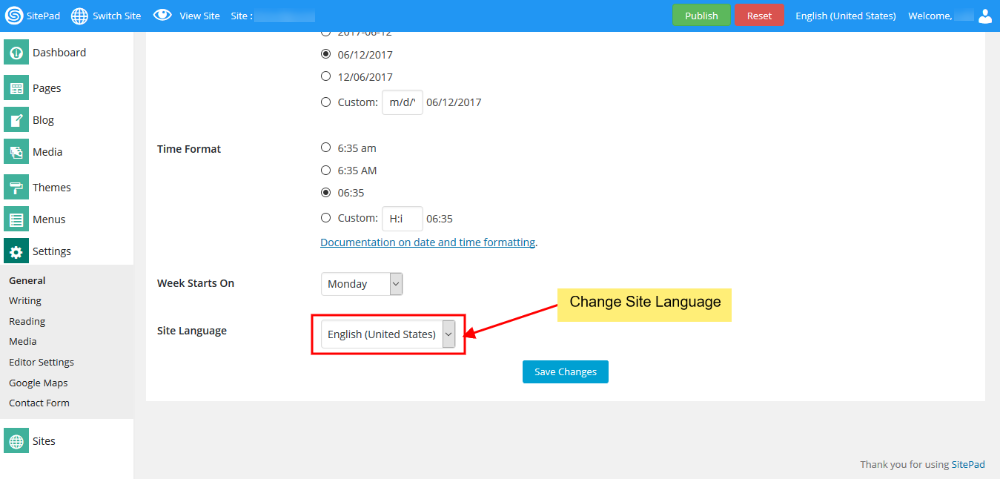
When you are on SitePad Editor dashboard. Hover on Settings and then click on General.
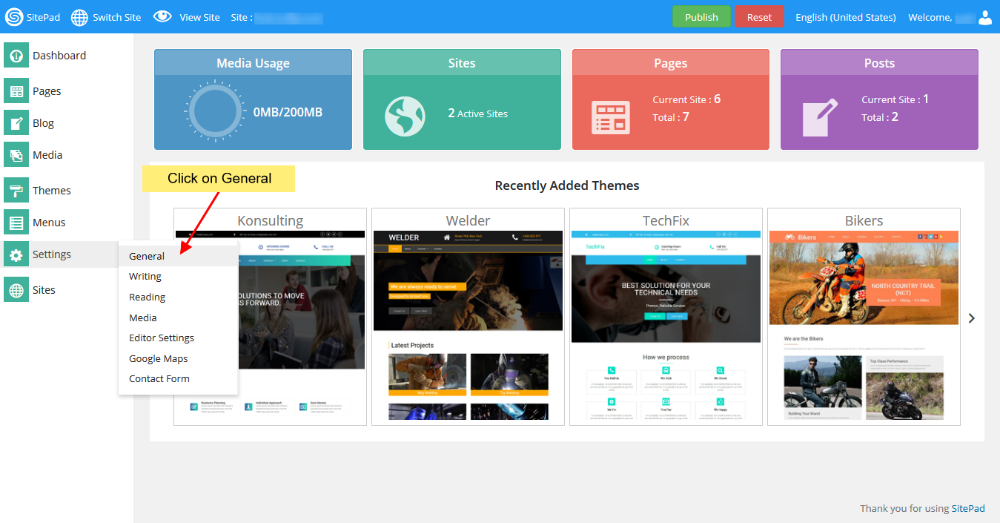
Once on General Settings page you will see the option Site Language as shown in the image below. You can select your desired language from the drop down list.
How to Clone a Site
This guide will show you how to Clone a Site.
CLONE A SITE
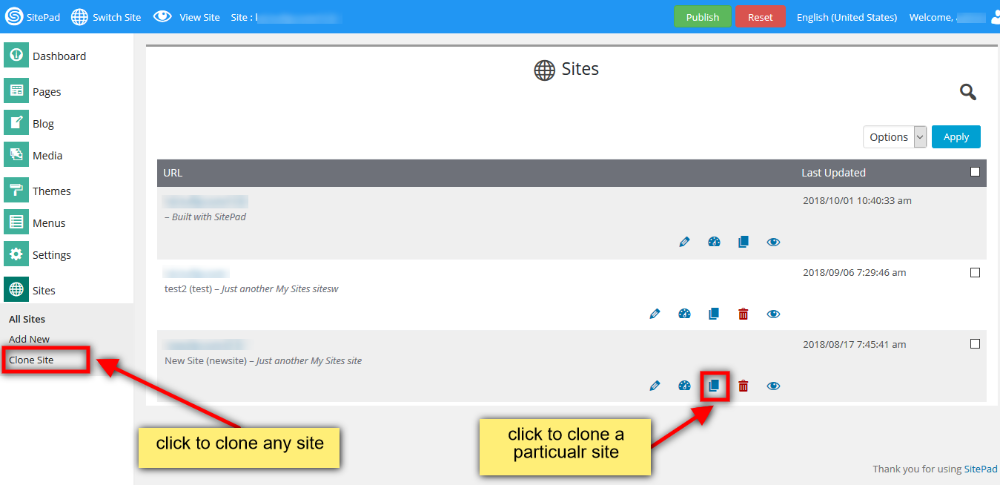
Click the Sites to display all the site that you have created from SitePad Dashboard.
Once you see all Sites. Click on the Clone Icon of the site that you want to clone or you can click on Clone Site as shown in the image below.
When you click on Clone Icon you will see all the options regarding the cloning.
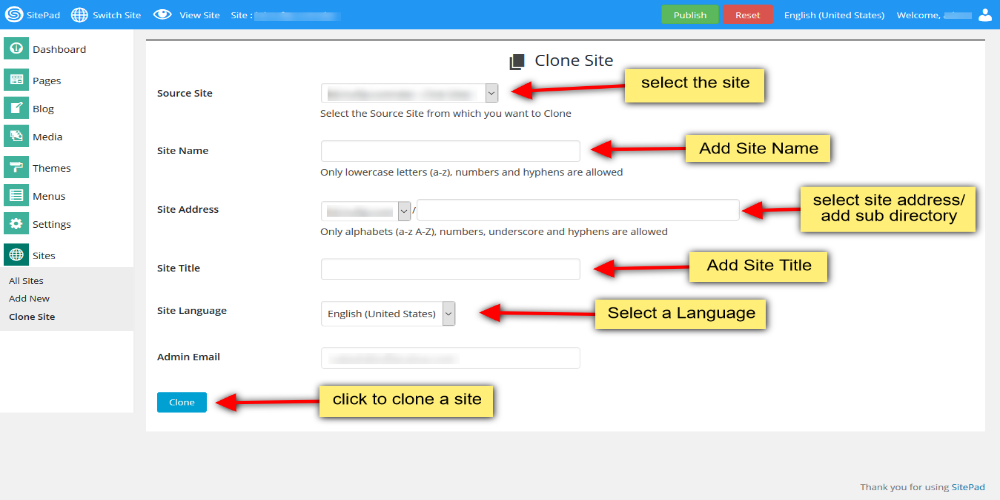
Select the site from source site dropdown list and Add New Site Name for website. Then enter the New Site Address (select from your domains) and then add new directory. Next you need to Enter Site Title. You can also change the language of your clone site and select it to your native language.
Once the website is cloned Successfully you will see the success message asking you to Visit Dashboard of the clone site or Edit newly created clone site.
How to Clone a Page
This guide will show you how to Clone a Page.
CLONE A PAGE
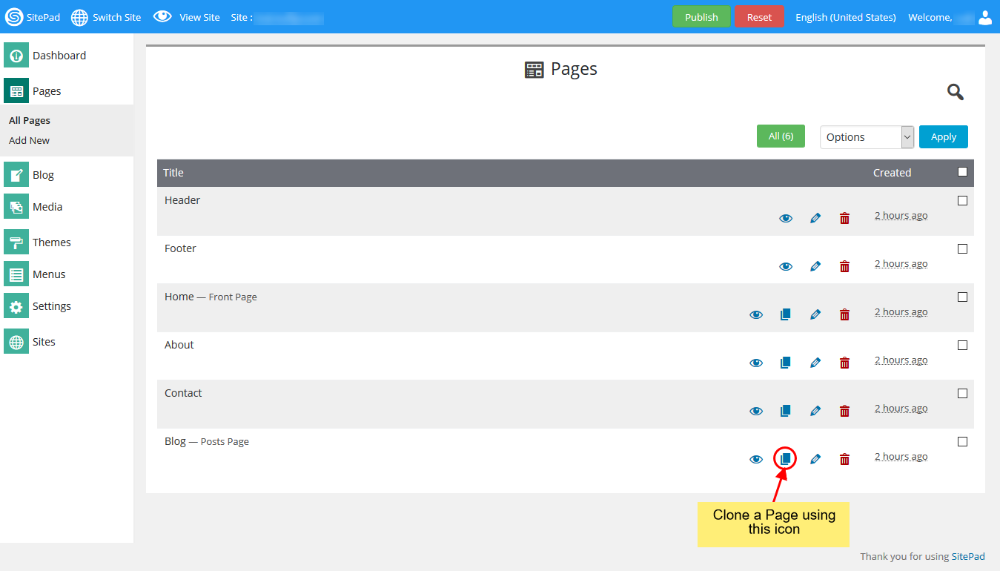
When you hover on Pages and Click on All Pages
Once you see all Pages. Click on the Clone Icon of the page you want to clone as shown in the image below.
After you click on Clone Icon you will be redirected to SitePad Editor of the newly clone page. You can provide the URL and Page Title and then click on Update and then edit the newly cloned page as per your requirement.
How to Create Menu
When the first Theme is selected it automatically populates the Menu but if you want to Edit or Create Menu you can follow this guide.
- Hover on Themes tab in the left sidebar and when you see Menus option click on it as shown in the image below. Please Note : The menu name should be Header Menu.
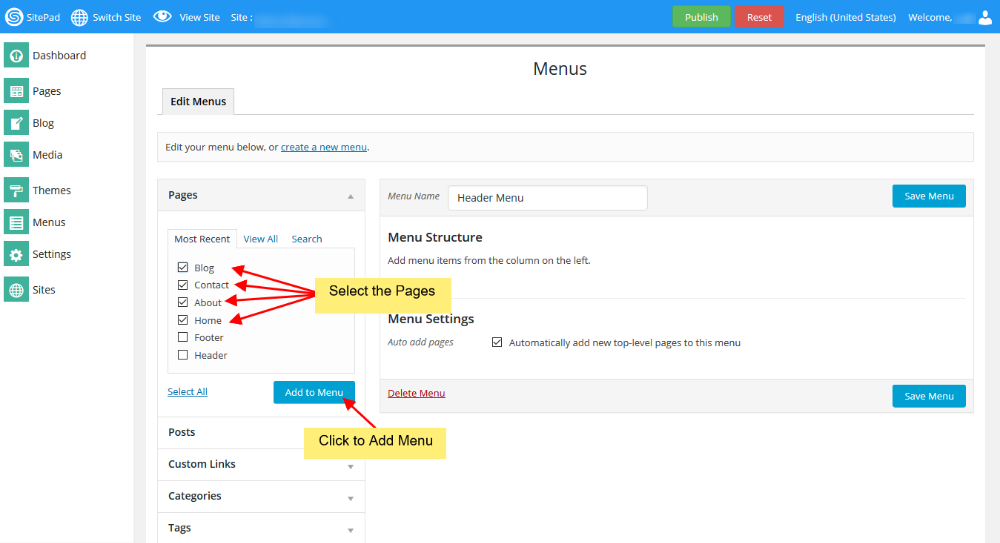
- Select the Pages that you want to show on your Header Menu after Selection click on Add Menu.
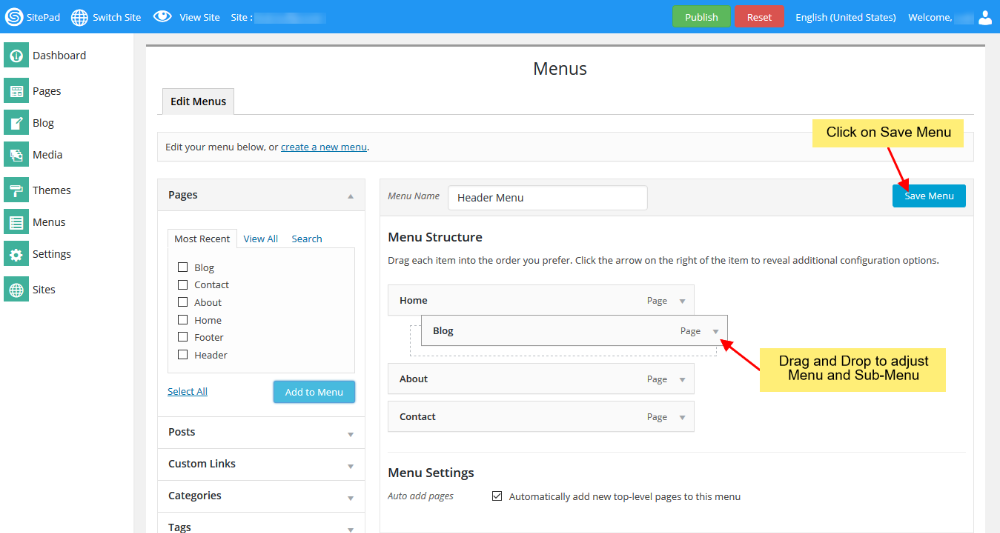
- Adjust the Menu and Sub Menu by using Drag & Drop once done Click on Save Menu.
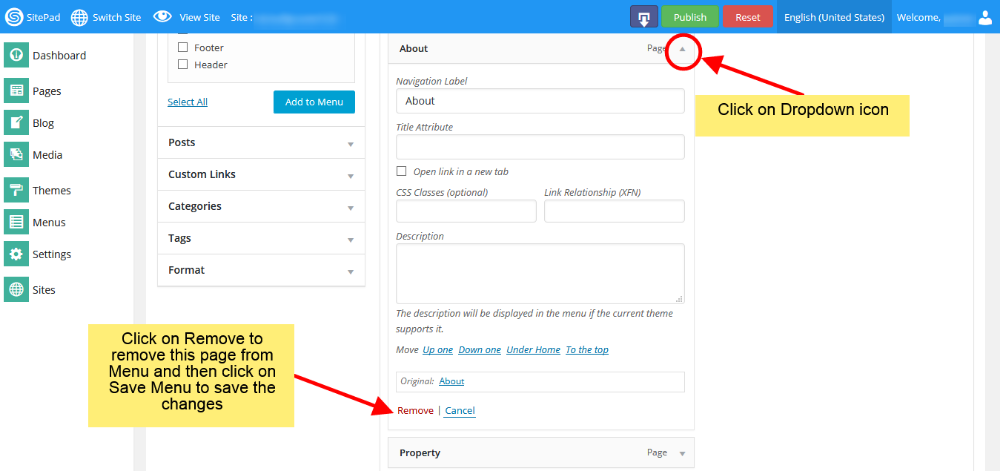
- If you want to remove any page from Menu you can do this by following below steps once done Click on Save Menu.
That’s it your done.
How to Add Add Site Title and Tagline
This documentation will show you how to add Site Title and Tagline to your website.
GO TO SETTINGS AND CLICK GENERAL
When you are on SitePad Website Builder dashboard. Hover on Settings tab in left menu and then click on General.
Once on General Settings page you will see editable options like Site Title, Tagline, Date Format, TimeZone, Time Format, Week Start On etc.
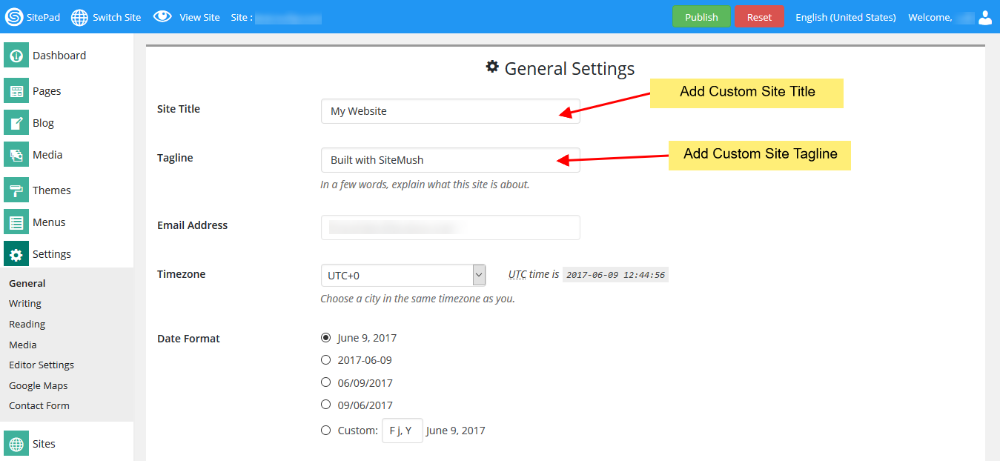
Enter the Site Title and Tagline for your website once you add it. Click on Save Changes button.
How to Add Custom Logo
This guide will show you how to Add a Custom Logo.
GO TO PAGES AND EDIT HEADER
When you are on SitePad Website Builder dashboard. You will see Pages option on Sidebar Navigation Menu. Hover on Pages and Click on All Pages
Once you see all Pages. Click on the Edit Icon of the Header Page shown like in the image below.

ADDING CUSTOM LOGO
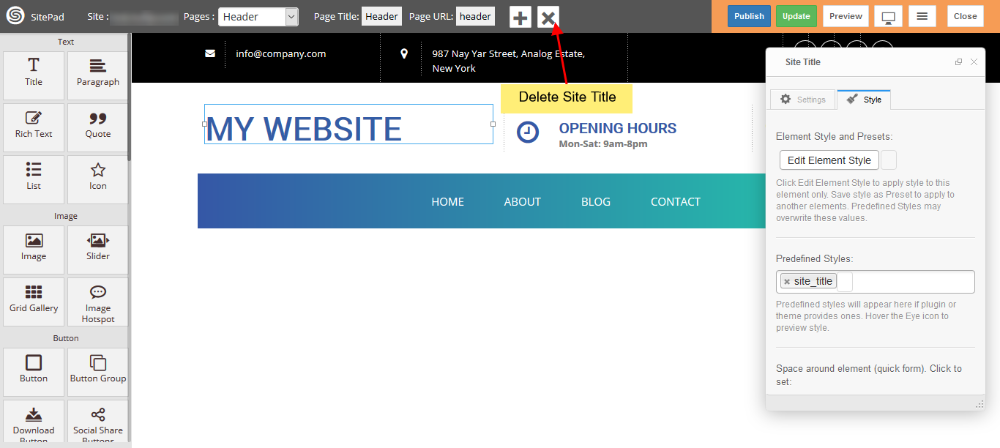
You will be redirected to SitePad Editor for Header. When you are in SitePad Editor if you want to add just the logo you will need to remove Site Title as shown in the below image and if you want the logo as well as text you do not need to remove the Site Title.
Now drag and drop Images Widget to a new column in the same row with menu as shown in the image below.

After you drop the Image Widget. You will see a dialog box with naming Insert Media shown in the image below.
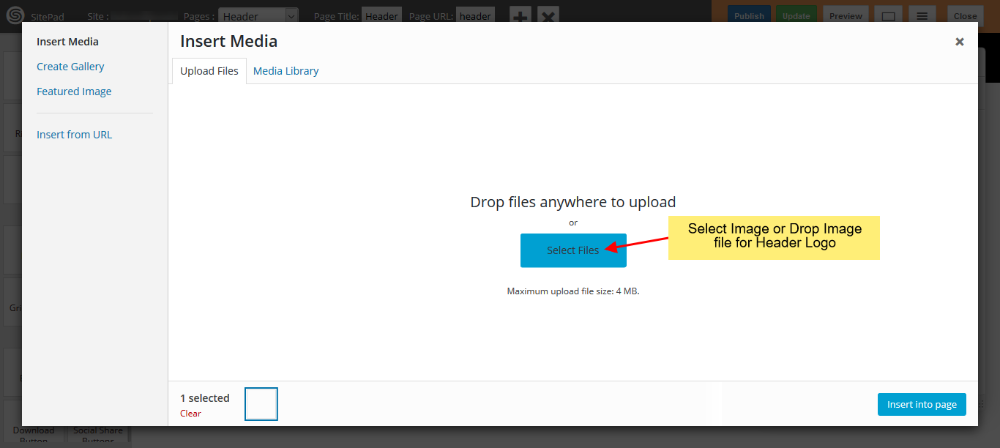
You can select the logo file or drop the file in the dialog box.
Once you upload the file Click on Insert into Page. Once the image is inserted you can adjust your logo column as per your menu.
Once Finished you can click on Update to Save if you want to edit other page.
How to Add New Blog
This guide is to help you add new Blog Post.
LOGIN IN TO CONTROL PANEL
Firstly Login to your Control Panel (e.g. cPanel’s url will be https://domain.com:2083) and login with your details. There click on the SitePad Icon or Link.
You will be redirected to SitePad Website Builder.
ADD NEW BLOG POST
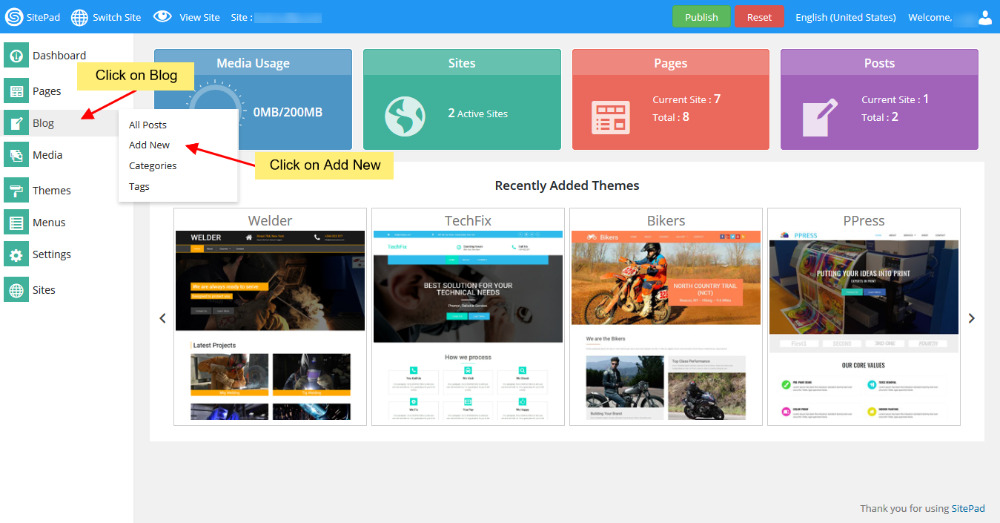
Once you are on SitePad Website Builder dashboard. You will see Blog option on Sidebar Navigation Menu.
Click on Blog and then click on Add New.
After you click on Add New it will redirect you to SitePad Website Editor.
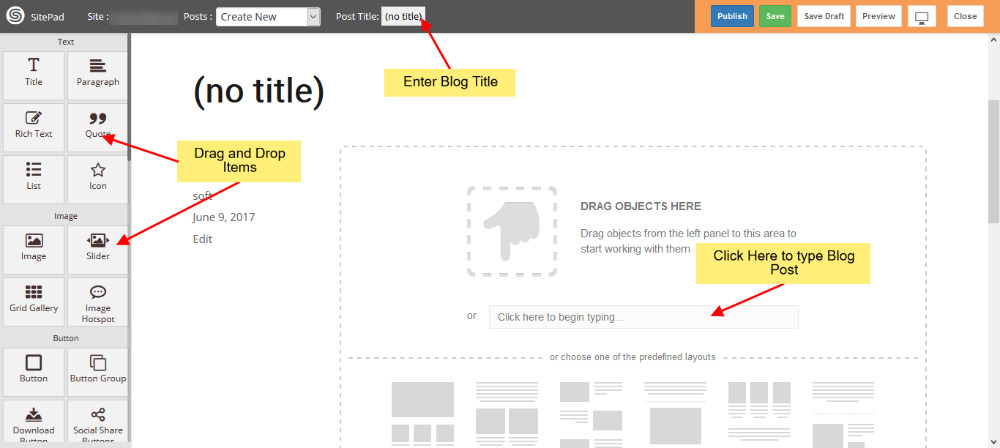
Enter the Blog Title then drag and drop items in your blog or you can even write a Blog Post by clicking on the textarea provided.
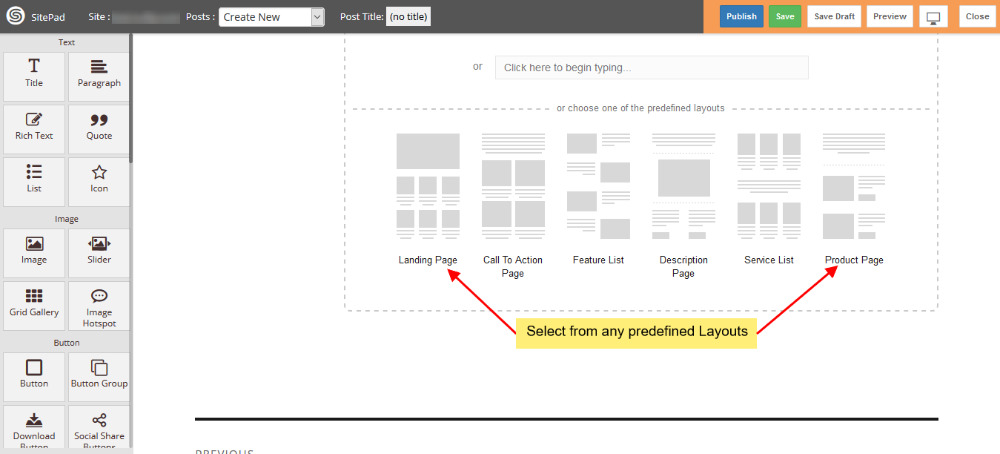
Also you can pick a predefined layout that we offer.
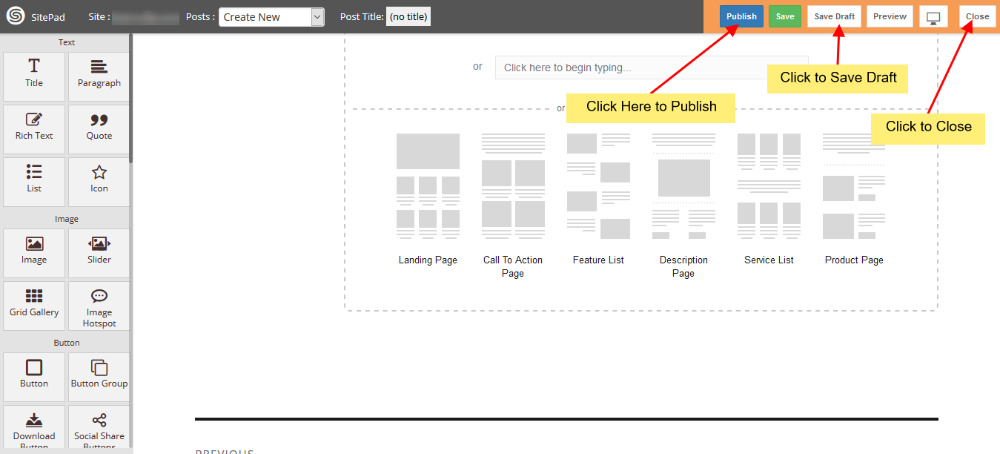
PUBLISH
After editing the blog post Click on Publish button to publish your blog post.
How to Add New Page
This guide will help you to Add New Page.
LOGIN IN TO CONTROL PANEL
Firstly Login to your Control Panel (e.g. cPanel’s url will be https://domain.com:2083) and login with your details. There click on the SitePad Icon or Link.
You will be redirected to Website Builder.
ADD NEW PAGE
Once you are on Website Builder dashboard. You will see Pages option on Sidebar Navigation M
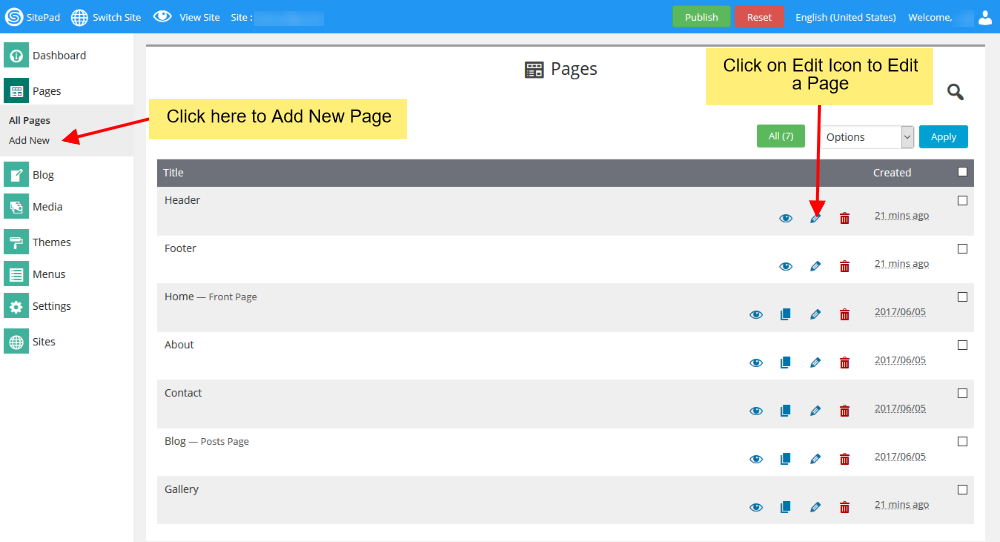
Click on Pages to Add new pages or Edit pages for your website.
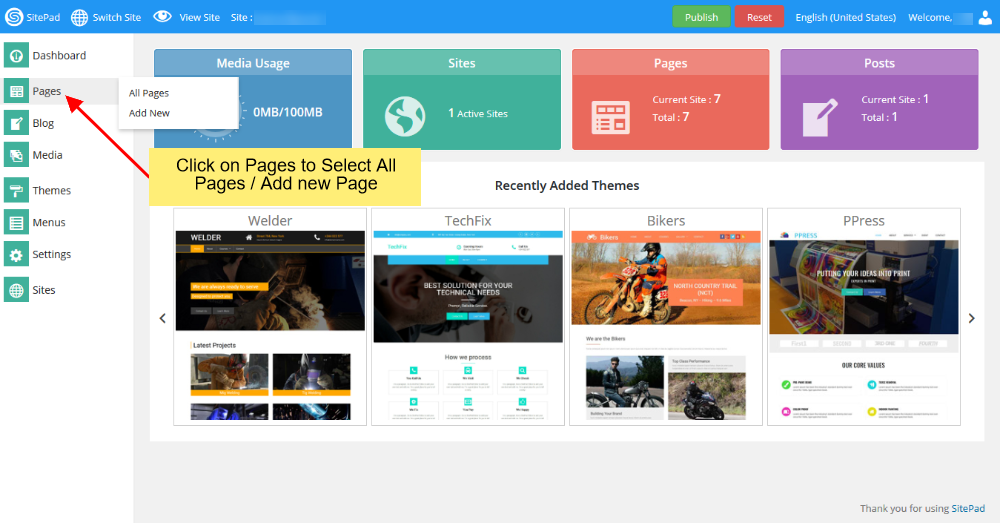
You can click on either option i.e Add Page or Click on Pages option to Select All Pages. When you select All Pages you can see certain options such as Edit Page, Delete Page, View Page etc.
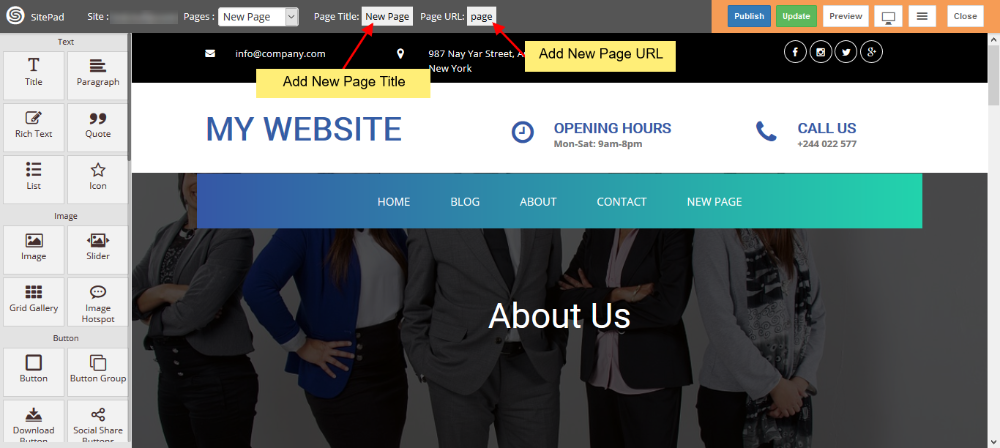
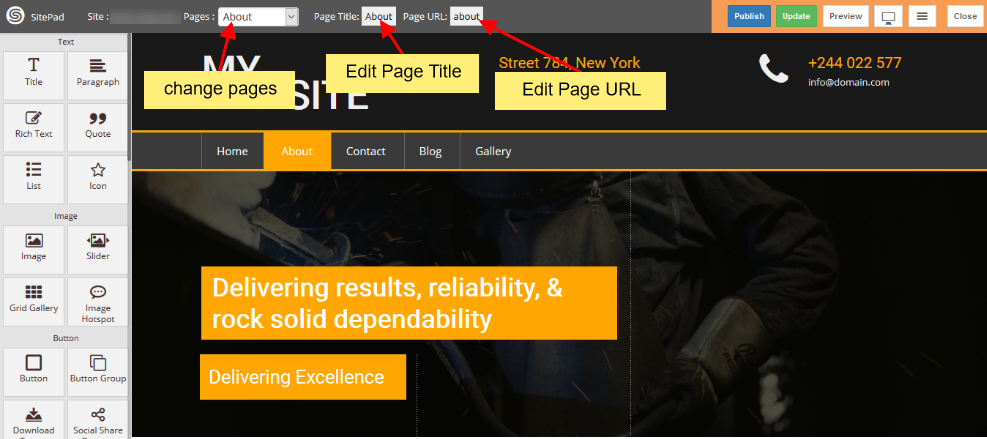
If you Select to Add New Page/Edit Page option. Then you will be redirected to Edit Page where you can Edit Page. If you select to Add new Page the page title will be New Page and Page url will be Page. You can change these both to your desire Page name and URL. By default the new page gets Added on the Menu Bar once you update the Menu Name changes to that of the Page Title.
You can also drag and drop different Widgets where ever you want the to see the elements. There are many different Widgets like Title, Paragraph, Slider, Service Box, Rich Text, Images, Videos, etc.
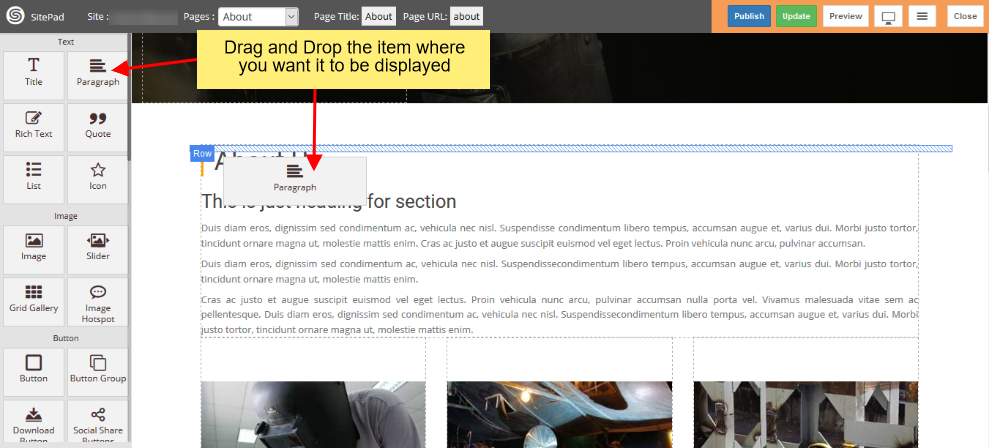
When the item is dropped on a particular position to Edit you will be able to find Action bar, Advance Option to Customize etc. for different types of Widgets.
Action Bar for Title
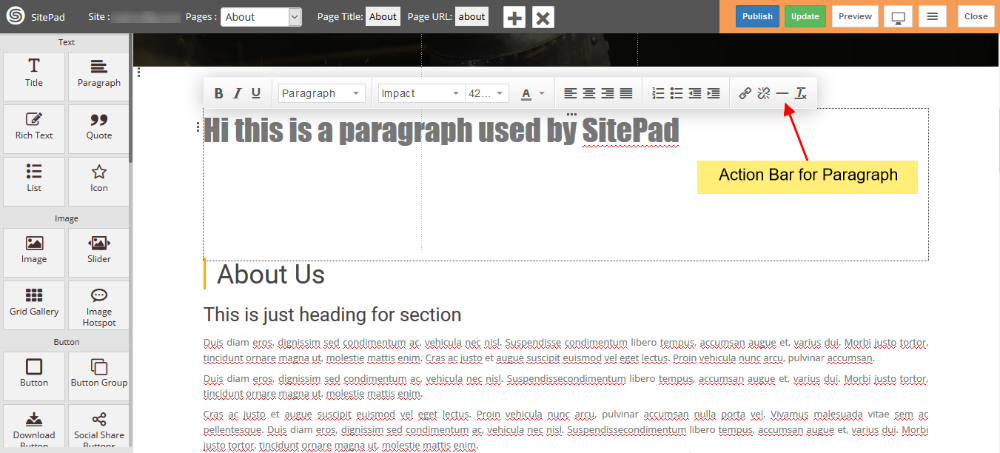
Advanced Option to Customize the Widget

You can select from different range of 40+ Widgets.
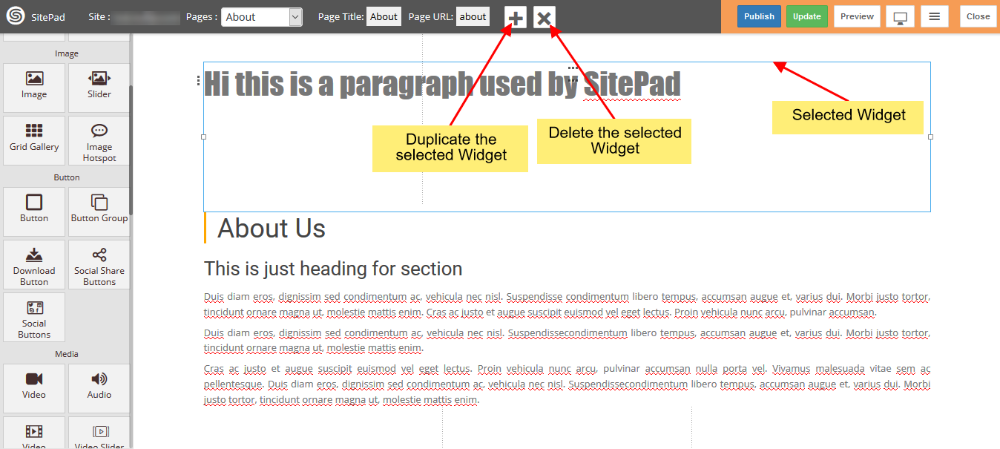
Duplicate a Widget or Delete a Widgets
PUBLISH
After you Finish Editing your work you can Publish your Website or you can update it and later on Publish it.
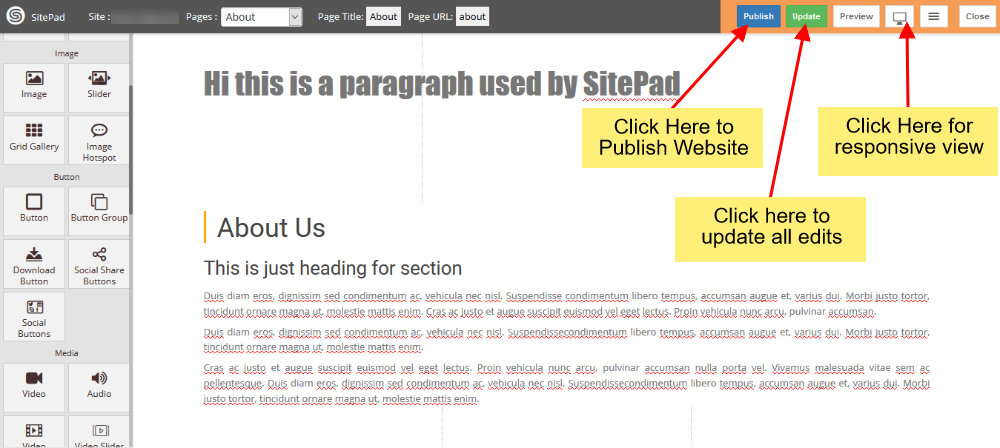
You can find these Finishing Option on the upper right corner of the editor.
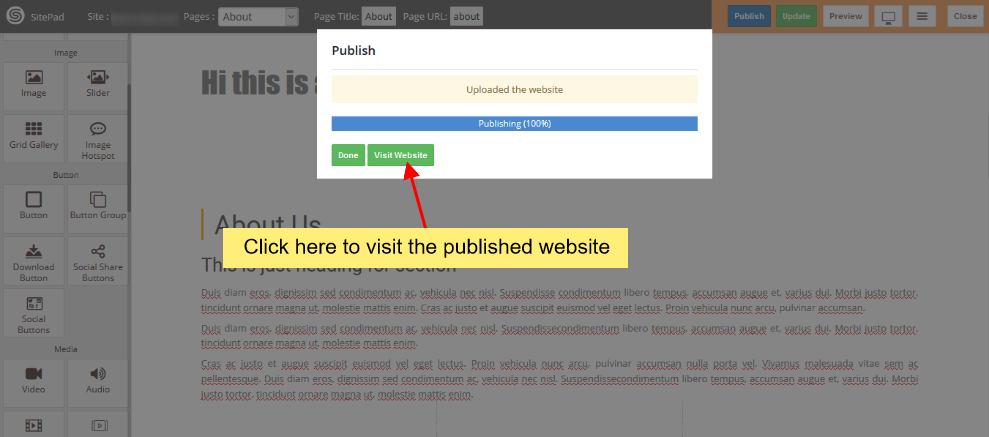
After you click on Publish button you will see progress bar. Once the progress bar is complete you will find visit website button you can check the website you Published.
Add New Site
This guide will show you how to Add New Site.
LOGIN IN TO CONTROL PANEL
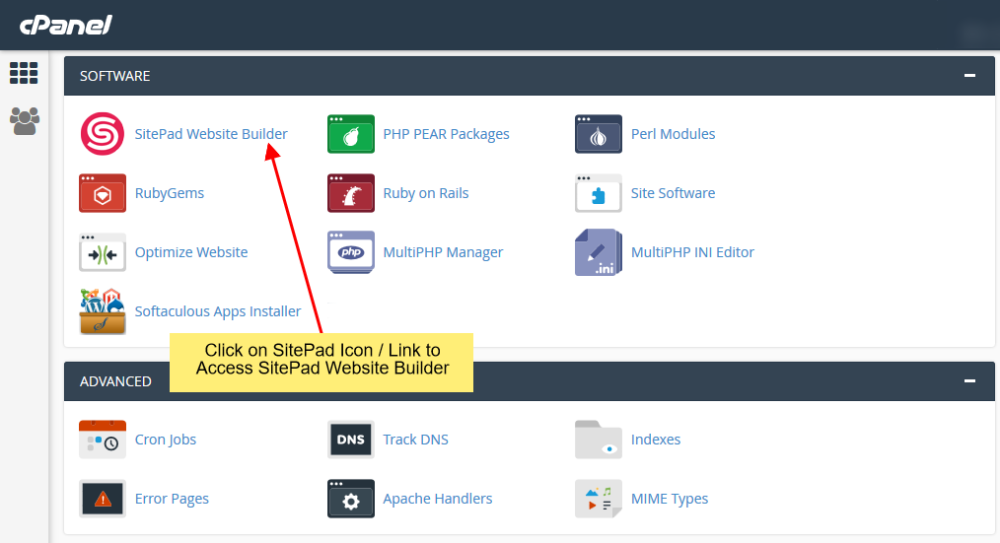
Firstly Login to your Control Panel (e.g. cPanel’s url will be https://domain.com:2083) and login with your details. There click on the SitePad Icon or Link.
You will be redirected to Website Builder.
ADD NEW SITE
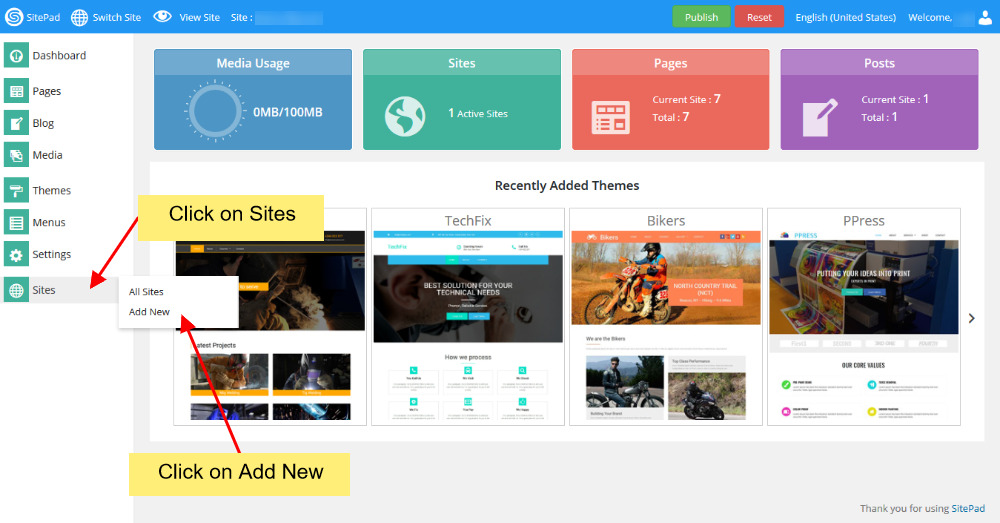
Once you are on SitePad Website Builder dashboard. You will see Sites option on Sidebar Navigation Menu.
Click on Sites and then Click on Add New Site.
Now you will see all the options regarding adding new sites.
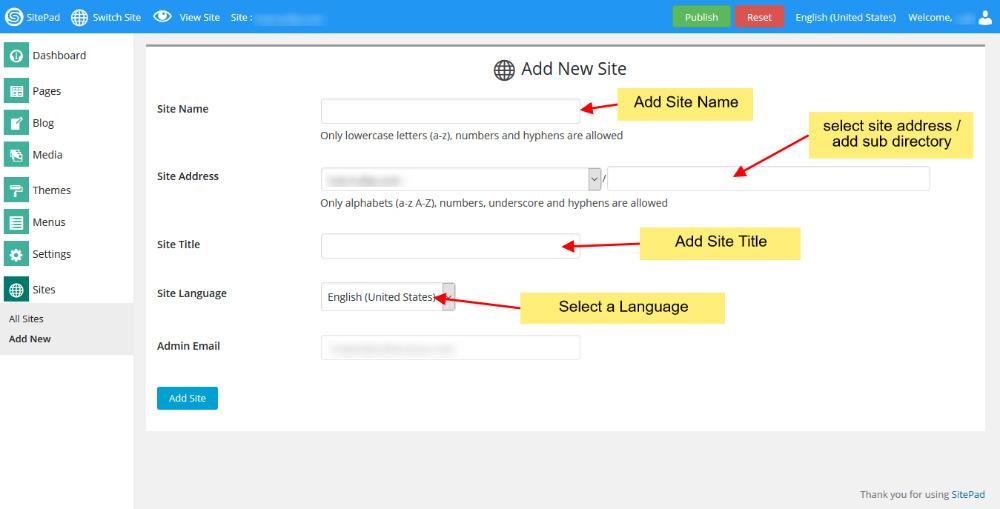
Add New Site Name for website to be shown on switch site. Then enter the New Site Address (select from your domains) and then add new directory. Next you need to Enter Site Title. You can also change the language of your new site and select it to your native language. Also if you want you can also add new admin email.
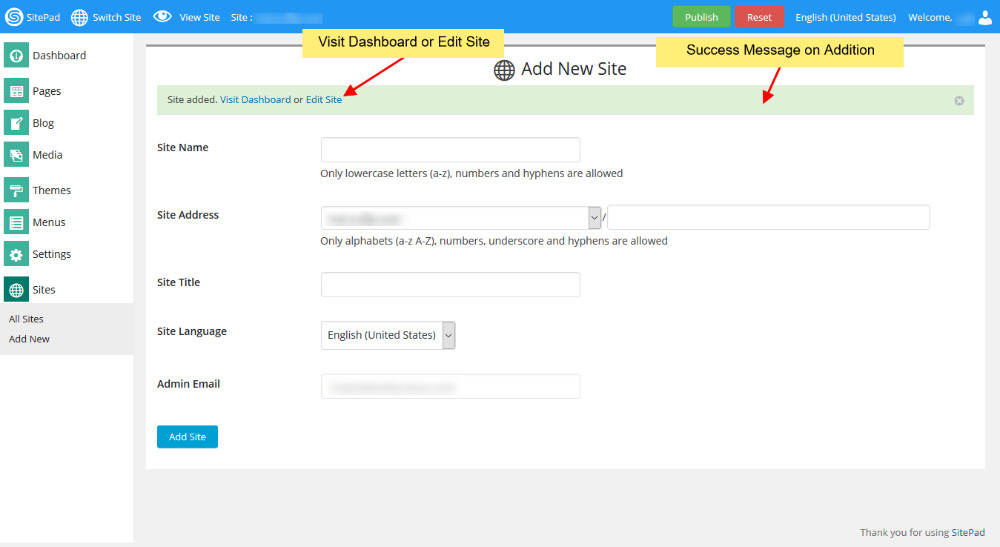
Once the website is added Successfully you will see the success message asking you to visit Dashboard of the new site or Edit newly created Site.
How to Create Website
This guide will help you how to Create a Website using SitePad Website builder.
LOGIN IN TO CONTROL PANEL
Firstly Login to your Control Panel (e.g. cPanel’s url will be https://domain.com:2083) and login with your details. There click on the SitePad Icon or Link.
You will be redirected to SitePad Website Builder.
SELECT A THEME
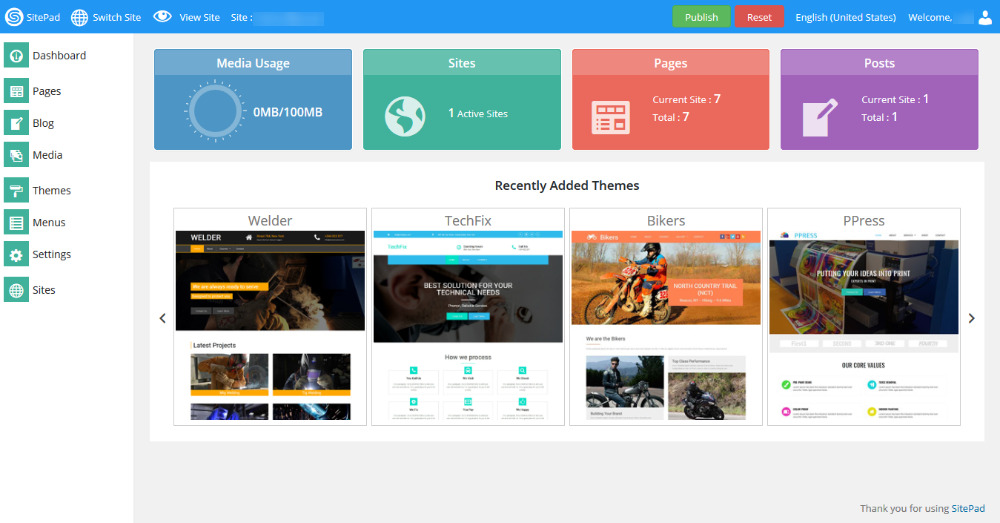
Once you are redirected to SitePad. You will need to select a Theme for your website
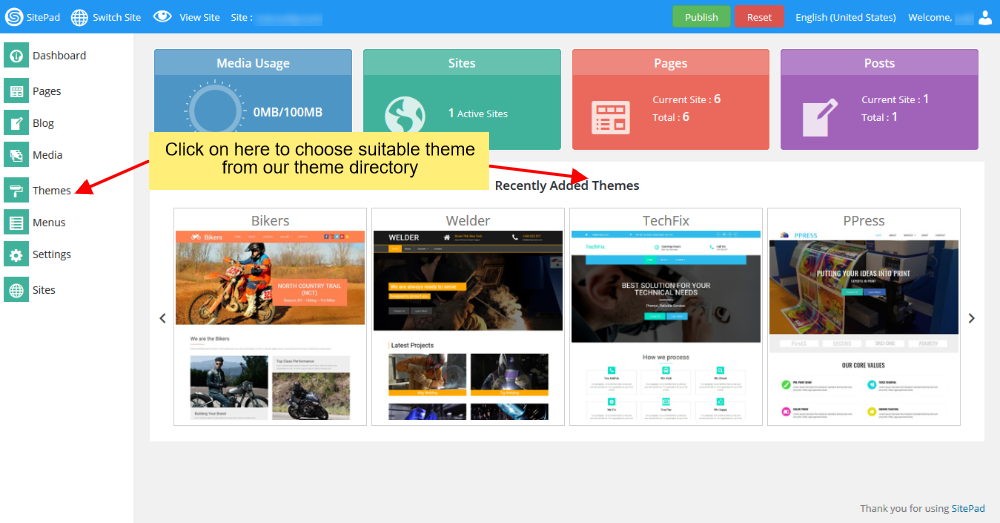
You can click on either option and you will be redirect to our Theme directory where you will need to select/choose a theme for your website. You can also search for a Theme through Theme Search Option. Checkout Theme details. Once you find a theme suitable for your website you can click on Activate button to Set the theme as a default theme for your Website Editing.
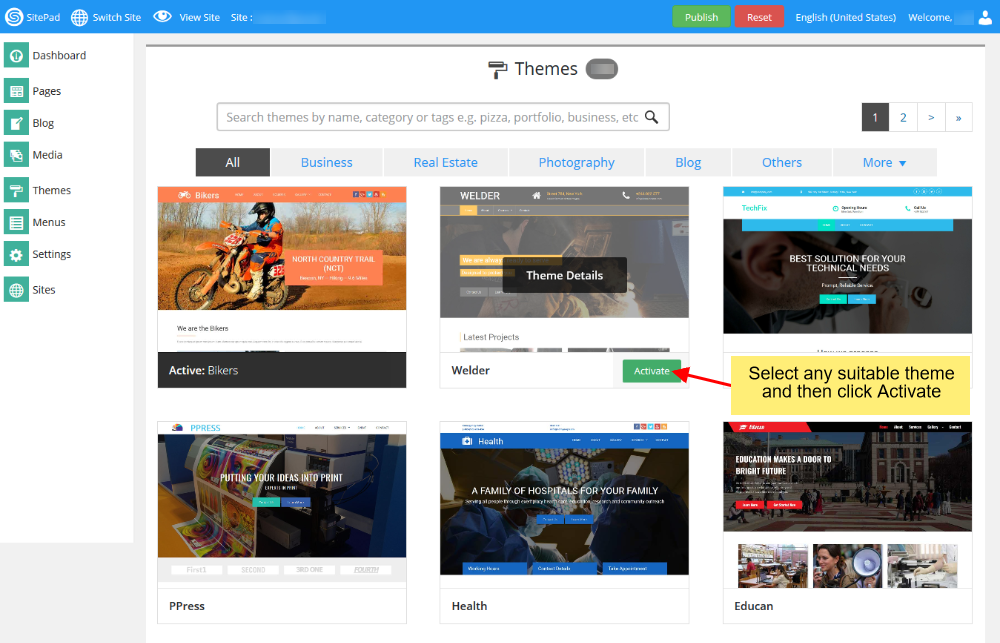
When theme is Activated. You can checkout for a preview of this Theme.
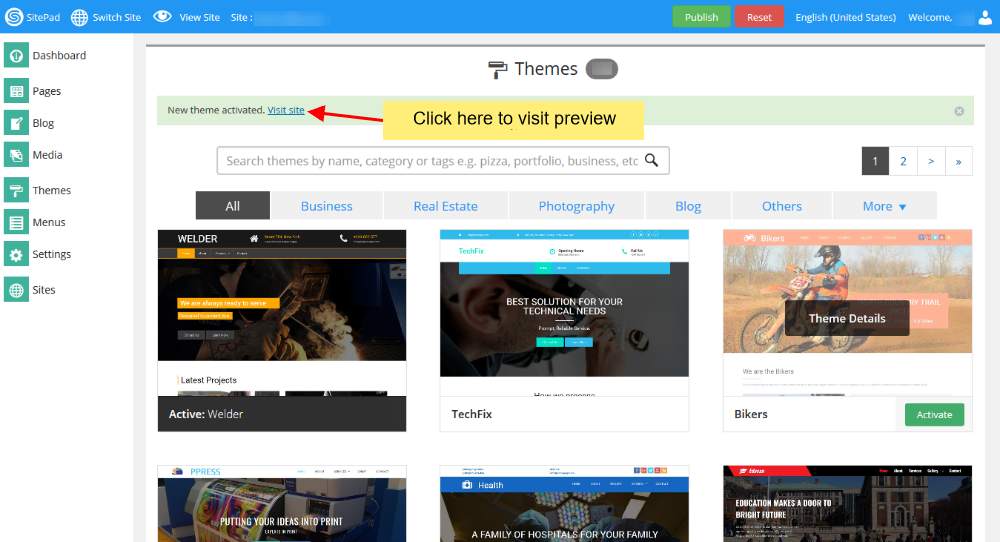
Click on Visit Site to Preview.
ADDING/EDITING PAGES
You can now Add new pages or Edit pages for your website.
You can click on either option i.e Add Page or Click on Pages option to Select All Pages. When you select All Pages you can see certain options such as Edit Page, Delete Page, View Page etc.
**Note: Do not delete Header and Footer page
If you Select to Add New Page/Edit Page option. Then you will be redirected to Edit Page where you can Edit Page. If you select to Add new Page the page title will be New Page and Page url will be Page. You can change these both to your desire Page name and URL. By default the new page gets Added on the Menu Bar once you update the Menu Name changes to that of the Page Title.
You can also drag and drop different Widgets where ever you want the to see the elements. There are many different Widgets like Title, Paragraph, Slider, Service Box, Rich Text, Images, Videos, etc
When the item is dropped on a particular position to Edit you will be able to find Action bar, Advance Option to Customize etc. for different types of Widgets.
PUBLISH
After you Finish Editing your work you can Publish your Website or you can update it and later on Publish it.
After you click on Publish button you will see progress bar. Once the progress bar is complete you will find visit website button you can check the website you Published.