# Settings, guides
# How to Install a .PFX SSL Certificate in cPanel Hosting
By default, PKCS # 12 / PFX is used in the Microsoft® Windows environment. On UNIX-based machines, you can also install .pfx extensions, but the .pfx extension must be converted before installing Apache as PEM format (.pem, .crt, .cer, and .key).
### CONVERT USING EXTERNAL WEBSITE
Conversion can be done on the following website:
[https://www.sslshopper.com/ssl-converter.html](https://www.sslshopper.com/ssl-converter.html "https://www.sslshopper.com/ssl-converter.html")
If you do not want to convert via the webpage, you can also use command line conversion based on the following command pattern:
### CONVERT USING LINUX:
```
openssl pkcs12 in certificate.pfx -out certificate.cer -nodes
```
### CONVERT USING WINDOWS:
It is necessary to install the OpenSSL library which can be obtained from the following page:
[http://slproweb.com/products/Win32OpenSSL.html](https://slproweb.com/products/Win32OpenSSL.html "http://slproweb.com/products/Win32OpenSSL.html")
After the installation, the conversion from the Windows command line can be done based on the following pattern:
```
cd C: \ Program Files \ OpenSSL-Win64 \ bin
openssl pkcs12 in d: \ Temp \ cert.pfx -out d: \ Temp \ cert.pem -nodes
```
After the conversion, the certificate will be a single file, the private key, so the resulting file should be opened with a word processor and the certificate and CACert must be inserted from the cPanel interface.
The certificate on the cPanel interface can be downloaded from the **SSL/TLS** menu under the **Certificates (CRT)** submenu.
# SSL Certificates and SNI Support Explained
#### WHAT IS THE SNI?
SNI is the abbreviation for Server Name Indication. An extension of the TLS protocol that allows servers to use multiple SSL certificates at an IP address. In practical terms, this means:
- the number of available IPv4 addresses is constantly decreasing, so with the SNIs currently used, the servers can be used more efficiently.
- in most cases, you do not need to use a dedicated dedicated IP address to run SSL certified websites.
#### DO I NEED TO BUY A DEDICATED IP ADDRESS TO USE THE PURCHASED SSL CERTIFICATE?
This depends on two things:
- that server supports this SNI
- the visitor browser supports this SNI
Currently, all our web servers support SNI, so you do not need to use a dedicated IP address to use the SSL certificate.
#### BROWSERS SUPPORT SNI
Servers support SNI it is also necessary that the visitors’ browsers also support the SNI. Typically, most browsers support SNI, but there are a few exceptions:
- All Internet Explorer versions running on Windows XP
- Safari browser running under Windows XP
- BlackBerry OS 7.1 and earlier versions
- WindowsMobile 6.5 and earlier versions
- The default browser used in Android OS 2.x
If you want visitors to the web site that you want to provide SSL certificates for most of these browsers, we recommend that you buy a dedicated IP address next to the SSL certificate.
#### MORE INFORMATION:
For more information about SNI, see the following link:
[https://en.wikipedia.org/wiki/Server\_Name\_Indication](https://en.wikipedia.org/wiki/Server_Name_Indication "https://en.wikipedia.org/wiki/Server_Name_Indication")
# How to Convert an SSL Certificate to Different Formats
Different platforms and devices require SSL certificates to be converted to different formats. For example, a Windows server exports and imports .pfx files while an Apache server uses individual PEM (.crt, .cer) files. For more information about the different SSL certificate types and how you can convert certificates on your computer using OpenSSL, see below.
### PEM FORMAT
The PEM format is the most common format that Certificate Authorities issue certificates in. PEM certificates usually have extentions such as **.pem, .crt, .cer, and .key**. They are Base64 encoded ASCII files and contain “—–BEGIN CERTIFICATE—–” and “—–END CERTIFICATE—–” statements. Server certificates, intermediate certificates, and private keys can all be put into the PEM format.
**Apache and other similar servers** use PEM format certificates. Several PEM certificates, and even the private key, can be included in one file, one below the other, but most platforms, such as Apache, expect the certificates and private key to be in separate files.
### DER FORMAT
The DER format is simply a binary form of a certificate instead of the ASCII PEM format. It sometimes has a file extension of **.der** but it often has a file extension of **.cer** so the only way to tell the difference between a DER .cer file and a PEM .cer file is to open it in a text editor and look for the BEGIN/END statements. All types of certificates and private keys can be encoded in DER format. DER is typically used with **Java platforms**. The SSL Converter can only convert certificates to DER format. If you need to convert a private key to DER, please use the [OpenSSL commands on this page](https://www.openssl.org/docs/manmaster/man1/rsa.html).
### PKCS#7/P7B FORMAT
The PKCS#7 or P7B format is usually stored in Base64 ASCII format and has a file extention of **.p7b or .p7c**. P7B certificates contain “—–BEGIN PKCS7—–” and “—–END PKCS7—–” statements. A P7B file only contains certificates and chain certificates, not the private key. Several platforms support P7B files including **Microsoft Windows and Java Tomcat**.
### PKCS#12/PFX FORMAT
The PKCS#12 or PFX format is a binary format for storing the server certificate, any intermediate certificates, and the private key in one encryptable file. PFX files usually have extensions such as **.pfx and .p12**. PFX files are typically used on **Windows machines** to import and export certificates and private keys. When converting a PFX file to PEM format, OpenSSL will put all the certificates and the private key into a single file. You will need to open the file in a text editor and copy each certificate and private key (including the BEGIN/END statments) to its own individual text file and save them as certificate.cer, CACert.cer, and privateKey.key respectively.
### OPENSSL COMMANDS TO CONVERT SSL CERTIFICATES ON YOUR MACHINE
It is highly recommended that you convert to and from .pfx files on your own machine using OpenSSL so you can keep the private key there. Use the following OpenSSL commands to convert SSL certificate to different formats on your own machine:
### OPENSSL CONVERT PEM
**Convert PEM to DER**
```
openssl x509 -outform der -in certificate.pem -out certificate.der
```
**Convert PEM to P7B**
```
openssl crl2pkcs7 -nocrl -certfile certificate.cer -out certificate.p7b -certfile CACert.cer
```
**Convert PEM to PFX**
```
openssl pkcs12 -export -out certificate.pfx -inkey privateKey.key -in certificate.crt -certfile CACert.crt
```
### OPENSSL CONVERT DER
**Convert DER to PEM**
```
openssl x509 -inform der -in certificate.cer -out certificate.pem
```
### OPENSSL CONVERT P7B
**Convert P7B to PEM**
```
openssl pkcs7 -print_certs -in certificate.p7b -out certificate.cer
```
**Convert P7B to PFX**
```
openssl pkcs7 -print_certs -in certificate.p7b -out certificate.cer
```
```
openssl pkcs12 -export -in certificate.cer -inkey privateKey.key -out certificate.pfx -certfile CACert.cer
```
### OPENSSL CONVERT PFX
**Convert PFX to PEM**
```
openssl pkcs12 -in certificate.pfx -out certificate.cer -nodes
```
If you need to convert a Java Keystore file to a different format, it usually easier to create a new private key and certificates but it is possible to convert a Java Keystore to PEM format.
# Safe and unsafe content on the web site
If the domain name is redirected to the secure HTTPS protocol after the certificate is installed, there may be a broken pad in the browser’s address bar. Which also displays a warning message for browsers.
The broken pad and warning messages are displayed because we display secure and unsafe items at the same time as the web page code. The website will only be completely safe – the green pad in the browser heading will appear – if all elements are displayed via HTTPS.
Example:
```
View Image
```
In the above HTML example, the URL of the image in the link is referred to as unsafe (http: //). That is, the visitor can view the rest of the content via a secure connection but not the image itself, so the visitor will see mixed content in the browser. The problem can be caused by external sources, JavaScript, and CSS files.
#### THIS PROBLEM CAN BE IMPROVED IN TWO WAYS:
#### USING RELATIVE LINKS
For content (such as images uploaded to the web page, CSS, and Javascript files) that can be accessed from the web site in a relative way.
Example:
```
View Image
```
#### ALL INCLUDED SOURCES ARE CALLED THROUGH AN SSL CONNECTION:
In this case, all references to the webpage – whether image, CSS, Javascript, or letter type file – are called via secure SSL (https://).
Example:
```
```
Unfortunately, this method can only be used if the remote content page is available through HTTPS.
If it is unavailable, you should unfortunately locally store previously included content and relate it in a relative way, or look for a source where the content you want to link is accessible through a secure connection.
- [How to generate a private key and CSR file with cPanel?](https://dotroll.com/en/knowledge-base/books/settings-guides-HCv/page/how-to-generate-a-csr-and-private-key-in-cpanel)
- [How to generate a private key and CSR from the Linux command line?](https://dotroll.com/en/knowledge-base/books/settings-guides-HCv/page/how-to-generate-a-csr-and-private-key-in-linux-via-command-line)
1. #### INSTALL OPENSSL
1. Open the following link in your browser: [https://slproweb.com/products/Win32OpenSSL.html](https://slproweb.com/products/Win32OpenSSL.html "https://slproweb.com/products/Win32OpenSSL.html")
2. On the page that appears, select the OpenSSL for the operating system architecture
- for a 32-bit operating system: Win32 OpenSSL v1.0.2p Light
- for a 64-bit operating system: Win64 OpenSSL v1.0.2p Light
and then download it.
3. Run the downloaded installation file and follow the installer instructions.
2. #### SET UP THE OPENSSL
After installing OpenSSL, it is necessary to set up the location of the OpenSSL configuration file for use. To do this, follow the steps below:
1. Click the **Start** menu, then the **Run** command
2. In open box type:`cmd`, then, click **OK**
3. A command prompt window appears type the following command at the prompt and press enter:
- 32 bit version:`cd \OpenSSL-Win32`
- 64 bit version:`cd \OpenSSL-Win64`
If OpenSSL is installed in another directory during installation, then the current path may differ from the above path
1. 4. Type the following command at the prompt and press enter:
- 32 bit version:`set OPENSSL_CONF=c:\OpenSSL-Win32\bin\openssl.cfg`
- 64 bit version:`set OPENSSL_CONF=c:\OpenSSL-Win64\bin\openssl.cfg`
5. Restart computer (mandatory).
3. #### GENERATE PRIVATE KEY AND CSR UNDER MICROSOFT WINDOWS
Follow the steps below to complete the private key and the associated CSR file:
1. Click the **Start** menu, then find the majd keresse meg a **Command Prompt** item, then right click and select **Run as administrator** option. Then follow the on-screen instructions.
2. In open box type:`cmd`, then, click **OK**
3. A command prompt window appears type the following command at the prompt and press enter
- 32 bit version:`cd \OpenSSL-Win32\bin`
- 64 bit version:`cd \OpenSSL-Win64\bin`
If OpenSSL is installed in another directory during installation, then the current path may differ from the above path
1. 4. At the command prompt, type the following command:`openssl req -new -newkey rsa:2048 -nodes -keyout server.key -out server.crt`
The above command will help you create a private or a CSR file. The generated private key file is named *server.key*, while the CSR file is named *server.csr*. Instead of naming the example, we recommend that you provide names that can easily be identified by the CSR file or the private key.
1. 5. The command is started by pressing the enter key. The program initially prepares the private key and requests the data needed to create the CSR file. After entering the data, press enter to enter.
- **Country Name**: You must enter the
- - the two capital letters of the headquarters of the organization
- in case of a person, two capital letters of the country of residence
Make sure you enter two uppercase country codes (for example, HU or FR) The full country code list is available through the following link: [https://www.iso.org/obp/ui/#search](https://www.iso.org/obp/ui/#search "https://www.iso.org/obp/ui/#search")
- - **State or Province Name**: Provide the state or county in which:
- the headquarters of the organization
- in the case of a natural person, the state or county of the city to which it belongs belongs
- **Locality Name**: Enter the
- organization headquaters city
- in the case of a natural person, the city in which you are staying
- **Organization Name**: Enter the
- organization’s full or abbreviated name
- in the case of a natural person, his full name
- **Organizational Unit Name**: you can enter the name of the department within that organization.
- **Common Name**: In this field, you must enter the domain name or subdomain name for which the certificate will be issued by the certificate issuer. This field does not need to enter “http://” “https://” prefixes.
The common name field should normally be the domain name, for example: example.com. If you require an SSL certificate for a subdomain, you must enter the subdomain.example.com. If you want to request a wildcard SSL certificate, you should start with \*, for example: \*.example.com where example.com represents the domain name.
- - **Email Address**: You can specify an email address that can be used to contact you.
- **Challenge password**: It is enough to leave the field empty, press enter to move on.
- **Optional company name**: It is enough to leave the field empty, press enter to move on.
6. OpenSSL creates and saves the private key as *server.key* after the data is provided, while the CSR file is named *server.csr*. Then, when ordering the SSL certificate, you must submit the contents of the *server.csr* file to issue the dance. You do not have to send the private key.
After generating, use the following command to display the contents of the CSR file
```
notepad server.csr
```
it looks like the next one:
```
-----BEGIN CERTIFICATE REQUEST-----
CSR CODE
-----END CERTIFICATE REQUEST-----
```
The information given in the certificate signup request can be viewed using the following command:
```
openssl req -noout -text -in server.csr
```
When generating a CSR file, a private key is created that will allow the certificate to be installed after the certificate is issued. After generating a private key, it is recommended to save the private key to a location where it is easy to find in the future. If the private key is missing then the certificate can not be installed, in which case the certificate release process must be repeated.
There are several options for creating a private key and its associated CSR file:
- [How to generate a private key and CSR file with cPanel?](https://dotroll.com/en/knowledge-base/books/settings-guides-HCv/page/how-to-generate-a-csr-and-private-key-in-cpanel)
- [How to generate a private key and CSR on the Microsoft Windows system?](https://dotroll.com/en/knowledge-base/books/settings-guides-HCv/page/how-to-generate-a-csr-and-private-key-on-windows)
1. 1. Log in to your account via SSH
2. At the command prompt, type the following command:
```
openssl req -new -newkey rsa:2048 -nodes -keyout server.key -out server.crt
```
The above command will help you create a private or a CSR file. The generated private key file is named *server.key*, while the CSR file is named *server.csr*. Instead of naming the example, we recommend that you provide names that can easily be identified by the CSR file or the private key.
3. The command is started by pressing the enter key. The program initially prepares the private key and requests the data needed to create the CSR file. After entering the data, press enter to enter.
- - **Country Name**: You must enter the
- - the two capital letters of the headquarters of the organization
- in case of a person, two capital letters of the country of residence
Make sure you enter two uppercase country codes (for example, HU or FR) The full country code list is available through the following link: [https://www.iso.org/obp/ui/#search](https://www.iso.org/obp/ui/#search "https://www.iso.org/obp/ui/#search")
- - **State or Province Name**: Provide the state or county in which:
- the headquarters of the organization
- in the case of a natural person, the state or county of the city to which it belongs belongs
- **Locality Name**: Enter the
- organization headquaters city
- in the case of a natural person, the city in which you are staying
- **Organization Name**: Enter the
- organization’s full or abbreviated name
- in the case of a natural person, his full name
- **Organizational Unit Name**: you can enter the name of the department within that organization.
- **Common Name**: In this field, you must enter the domain name or subdomain name for which the certificate will be issued by the certificate issuer. This field does not need to enter “http://” “https://” prefixes.
The common name field should normally be the domain name, for example: example.com. If you require an SSL certificate for a subdomain, you must enter the subdomain.example.com. If you want to request a wildcard SSL certificate, you should start with \*, for example: \*.example.com where example.com represents the domain name.
- - **Email Address**: You can specify an email address that can be used to contact you.
- **Challenge password**: It is enough to leave the field empty, press enter to move on.
- **Optional company name**: It is enough to leave the field empty, press enter to move on.
4. OpenSSL creates and saves the private key as *server.key* after the data is provided, while the CSR file is named *server.csr*. Then, when ordering the SSL certificate, you must submit the contents of the *server.csr* file to issue the dance. You do not have to send the private key. After generating, use the following command to display the contents of the CSR file
`cat server.csr`
it looks like the next one:
`-----BEGIN CERTIFICATE REQUEST-----CSR CODE-----END CERTIFICATE REQUEST-----`
The information given in the certificate signup request can be viewed using the following command:
`openssl req -noout -text -in server.csr`
Replace the example.com domain name with your domain name.
```
RewriteEngine On
RewriteCond %{HTTPS} off
RewriteRule (.*) https://example.com/$1 [R=301,L]
```
# How to Set Up WordPress with SSL and HTTPS
f you are starting a new site and/or want to use HTTPS everywhere on your site, then you need to update your site URL.
- You can do this by going to **Settings** -> **General** and updating your **WordPress Address (URL)** and **Site Address (URL)** address fields.
Now if you’re adding SSL to your existing site, then you need to setup WordPress SSL redirect from HTTP to HTTPS.
- You can do this by adding the following code in your ***.htaccess*** file: ```
RewriteEngine On
RewriteCond %{SERVER_PORT} 80
RewriteRule ^(.*)$ https://www.yoursite.com/$1 [R,L]
```
Don’t forget to replace yoursite.com with your site URL.
Open your wp-config.php and find the “That’s all, stop editing! Happy blogging.” row, and place above this code:
```
define('FORCE_SSL_ADMIN', true);
// in some setups HTTP_X_FORWARDED_PROTO might contain
// a comma-separated list e.g. http,https
// so check for https existence
if (strpos($_SERVER['HTTP_X_FORWARDED_PROTO'], 'https') !== false)
$_SERVER['HTTPS']='on';
```
# How to Redirect HTTP to HTTPS
#### REDIRECT ALL WEB TRAFFIC
To force all web traffic to use HTTPS insert the following lines of code in the .htaccess file in your website’s root folder.
```
RewriteCond %{REQUEST_URI} !^/[0-9]+\..+\.cpaneldcv$
RewriteCond %{REQUEST_URI} !^/\.well-known/pki-validation/[A-F0-9]{32}\.txt(?:\ Comodo\ DCV)?$
RewriteEngine On
RewriteCond %{SERVER_PORT} 80
RewriteRule ^(.*)$ https://www.example.com/$1 [R=301,L]
```
Be sure to replace *www.example.com*with your actual domain name.
#### REDIRECT ONLY SPECIFIED DOMAIN
To force a specific domain to use HTTPS, use the following lines of code in the .htaccess file in your website’s root folder:
```
RewriteCond %{REQUEST_URI} !^/[0-9]+\..+\.cpaneldcv$
RewriteCond %{REQUEST_URI} !^/\.well-known/pki-validation/[A-F0-9]{32}\.txt(?:\ Comodo\ DCV)?$
RewriteEngine On
RewriteCond %{HTTP_HOST} ^example\.com [NC]
RewriteCond %{SERVER_PORT} 80
RewriteRule ^(.*)$ https://www.example.com/$1 [R=301,L]
```
Make sure to replace *example\\.com* with the domain name you’re trying force to https. Additionally, you need to replace *www.example.com* with your actual domain name.
#### REDIRECT SPECIFIED FOLDER
If you want to force SSL on a specific folder you can insert the code below into a .htaccess file placed in that specific folder:
```
RewriteCond %{REQUEST_URI} !^/[0-9]+\..+\.cpaneldcv$
RewriteCond %{REQUEST_URI} !^/\.well-known/pki-validation/[A-F0-9]{32}\.txt(?:\ Comodo\ DCV)?$
RewriteEngine On
RewriteCond %{SERVER_PORT} 80
RewriteCond %{REQUEST_URI} folder
RewriteRule ^(.*)$ https://www.example.com/folder/$1 [R=301,L]
```
Make sure you change the *folder* reference to the actual folder name. Then be sure to replace *www.example.com/folder* with your actual domain name and folder you want to force the SSL on.
# How to Generate a CSR and Private Key in cPanel
To issue a certificate, you need a certificate signing request, briefly a CSR file. Based on the data provided in the CSR file, the certificate issuer will issue the certificate that can later be used, among other things, to secure websites. The certificate signing request can be made on the cPanel interface before the certificate is ordered.
When generating a CSR file, a private key is created that will allow the certificate to be installed after the certificate is issued. cPanel also generates and stores the private key, which can be accessed on cPanel at any time.
There are several options for creating a private key and its associated CSR file
- [How to generate a private key and CSR from the Linux command line?](https://dotroll.com/en/knowledge-base/books/settings-guides-HCv/page/how-to-generate-a-csr-and-private-key-in-linux-via-command-line "How to generate a private key and CSR from the Linux command line?")
- [How to generate a private key and CSR on the Microsoft Windows system?](https://dotroll.com/en/knowledge-base/books/settings-guides-HCv/page/how-to-generate-a-csr-and-private-key-on-windows "How to generate a private key and CSR on the Microsoft Windows system?")
1. Log in to cPanel.
2. Find the **SSL/TLS** and click on it to load.
{%CAPTION%}
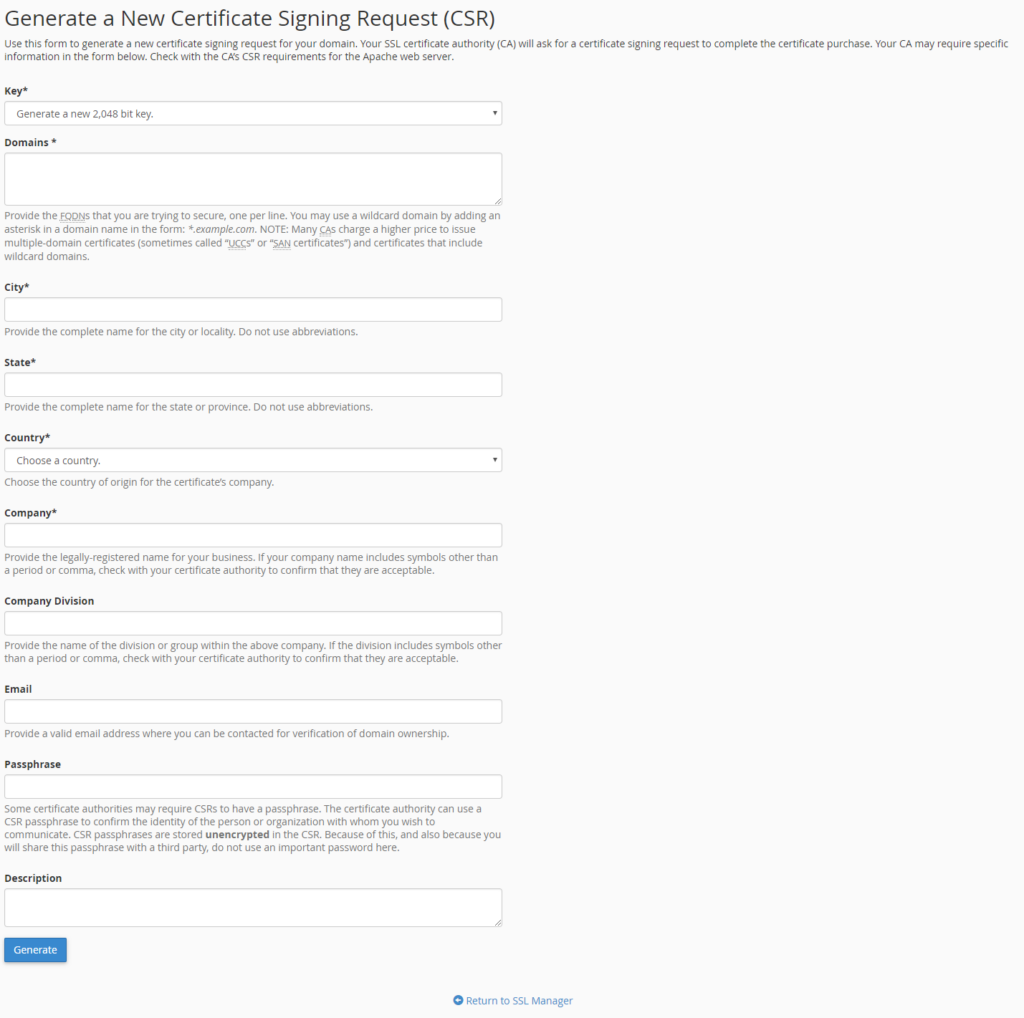
3. In the SSL/TLS page find the **Certificate Signing Requests (CSR)** and click the **Generate, view, or delete SSL certificate signing requests.** link.
{%CAPTION%}
4. You will need to enter the following information on the page that appears (*fill in the marked fields*):
- **Key**: If you have not previously created a secret key, you can choose the secret key strength.
- **Domains**: In this field, you must enter the domain name or subdomain name for which the certificate will be issued by the certificate issuer. This field does not need to enter “http://” “https://” prefixes.
The domains field should normally be the domain name, for example: example.com. If you require an SSL certificate for a subdomain, you must enter the subdomain.example.com. If you want to request a wildcard SSL certificate, you should start with \*, for example: \*.example.com where example.com represents the domain name. If you enter multiple domain names, enter a domain name per line.
- - **City**: Enter the
- organization headquaters city
- in the case of a natural person, the city in which you are staying
-
- - **State** : Provide the state or county in which:
- the headquarters of the organization
- in the case of a natural person, the state or county of the city to which it belongs belongs
- **Country**: From the drop-down list, select:
- country of the organization
- in the case of a natural person, your country of residence
- **Company**: Enter the:
- organization’s full or abbreviated name
- in the case of a natural person, his full name
- **Company Division**: you can enter the name of the department within that organization.
- **Email**: You can specify an email address that can be used to contact you.
- **Passphrase**: You can specify a passpharse. Some certificate authorities may require CSRs to have a passphrase.
- **Description**: For easier identification, it is a good idea to give a unique name to the CSR file.
- 5. Once you have entered the data, click the **Generate** button.
6. After generation, the page will display the CSR file in two formats. You will need to copy the text that appears in the **Encoded Certificate Signing Request** part to the order which looks like this: ```
-----BEGIN CERTIFICATE REQUEST-----
CSR CODE
-----END CERTIFICATE REQUEST-----
```