# Setting up Microsoft Outlook Express with IMAP protocol

Create a mailbox! ([How to create E-mailbox in cPanel?](https://dotroll.com/en/knowledge-base/books/e-mail/page/how-to-create-an-email-account-in-cpanel))

After creating the mailbox, in the cPanel interface, under **Email Accounts** in the **Mail** box, scroll down to **Email Accounts** and click **Set Up Mail Client**. cPanel will display the information required for setup.

<p class="callout info">If you want to use the mail.yourdomain.tld server in the description, replace it with your own domain name.</p>

<p class="callout info">If you want to use the hostingID.loginssl.com server, enter your cPanel username instead of hostingID.</p>

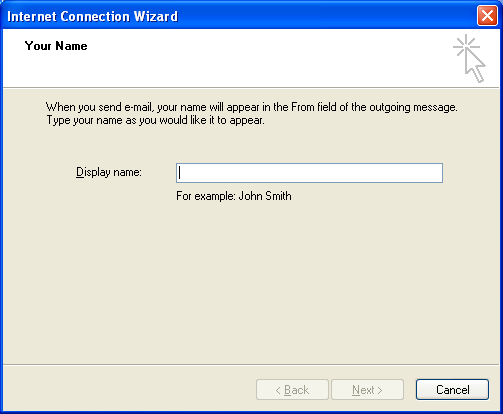
#### ADD A MAILBOX

After installing and starting the program, you can use the **Internet Connection Wizard** to set up your mailbox.

<div class="vc_row wpb_row vc_row-fluid" id="bkmrk-"><div class="wpb_column vc_column_container vc_col-sm-12"><div class="vc_column-inner"><div class="wpb_wrapper"><div class="wpb_text_column wpb_content_element "><div class="wpb_wrapper"><div class="wp-caption alignnone">![Internet Connection Wizzard - Name](https://dotroll.com/wp-content/uploads/2020/08/Outlook_Express_en_1.png)</div></div></div></div></div></div></div>Internet Connection Wizzard – Name

<div class="vc_row wpb_row vc_row-fluid" id="bkmrk--1"><div class="wpb_column vc_column_container vc_col-sm-12"><div class="vc_column-inner"><div class="wpb_wrapper"><div class="wpb_text_column wpb_content_element "><div class="wpb_wrapper"><div class="wp-caption alignnone" id="bkmrk--2"></div></div></div></div></div></div></div>As a first step, enter your name, you can enter anything here, but it is advisable to enter an identifier, a name with which those to whom you will send a letter can identify you. So this name will be seen as the sender by those who receive an email from you.

<div class="vc_row wpb_row vc_row-fluid" id="bkmrk--3"><div class="wpb_column vc_column_container vc_col-sm-12"><div class="vc_column-inner"><div class="wpb_wrapper"><div class="wpb_text_column wpb_content_element "><div class="wpb_wrapper"><div class="wp-caption alignnone">![Internet Connection Wizzard - Your Name](https://dotroll.com/wp-content/uploads/2020/08/Outlook_Express_en_2.png)</div></div></div></div></div></div></div>Internet Connection Wizzard – Your Name

<div class="vc_row wpb_row vc_row-fluid" id="bkmrk--4"><div class="wpb_column vc_column_container vc_col-sm-12"><div class="vc_column-inner"><div class="wpb_wrapper"><div class="wpb_text_column wpb_content_element "><div class="wpb_wrapper"><div class="wp-caption alignnone" id="bkmrk--5"></div></div></div></div></div></div></div>You will then need to enter the email address you created in the cPanel interface.

<div class="vc_row wpb_row vc_row-fluid" id="bkmrk--6"><div class="wpb_column vc_column_container vc_col-sm-12"><div class="vc_column-inner"><div class="wpb_wrapper"><div class="wpb_text_column wpb_content_element "><div class="wpb_wrapper"><div class="wp-caption alignnone">![Internet Connection Wizzard - IMAP Connection](https://dotroll.com/wp-content/uploads/2020/08/Outlook_Express_en_4b.png)</div></div></div></div></div></div></div>Internet Connection Wizzard – IMAP Connection

<div class="vc_row wpb_row vc_row-fluid" id="bkmrk--7"><div class="wpb_column vc_column_container vc_col-sm-12"><div class="vc_column-inner"><div class="wpb_wrapper"><div class="wpb_text_column wpb_content_element "><div class="wpb_wrapper"><div class="wp-caption alignnone" id="bkmrk--8"></div></div></div></div></div></div></div>If you click **Next**, you have the option of specifying the **Incoming mail (POP3, IMAP, or HTTP) server** and the **Outgoing mail (SMTP) server**. For **IMAP** mail, both Incoming and Outgoing mail servers will be as follows:

**hostingID.loginssl.com**

You must enter your hosting ID, which is the same as the username for the cPanel interface, before the address ending in .loginssl.com in the image and above. To view your cPanel login at [https://admin.dotroll.com](https://admin.dotroll.com/?swcfpc=1), follow these steps:

<div class="vc_row wpb_row vc_row-fluid" id="bkmrk-after-logging-in%2C-cl"><div class="wpb_column vc_column_container vc_col-sm-12"><div class="vc_column-inner"><div class="wpb_wrapper"><div class="wpb_text_column wpb_content_element "><div class="wpb_wrapper">1. After logging in, click Services / My Services in the Top menu bar.
2. On the page that appears, click the Active button at the end of the hosting service line for that domain name.
3. In the middle of the page, under the Hosting Information tab, you will find the cPanel user name.

</div></div></div></div></div></div>After entering the information, click Next.

The next step is to enter the email address associated with the mailbox and the password set for it.

<div class="vc_row wpb_row vc_row-fluid" id="bkmrk--9"><div class="wpb_column vc_column_container vc_col-sm-12"><div class="vc_column-inner"><div class="wpb_wrapper"><div class="wpb_text_column wpb_content_element "><div class="wpb_wrapper"><div class="wp-caption alignnone">![Internet Connection Wizzard - Account login name and password](https://dotroll.com/wp-content/uploads/2020/08/Outlook_Express_en_5.png)</div></div></div></div></div></div></div>Internet Connection Wizzard – Account login name and password

<div class="vc_row wpb_row vc_row-fluid" id="bkmrk--10"><div class="wpb_column vc_column_container vc_col-sm-12"><div class="vc_column-inner"><div class="wpb_wrapper"><div class="wpb_text_column wpb_content_element "><div class="wpb_wrapper"><div class="wp-caption alignnone" id="bkmrk--11"></div></div></div></div></div></div></div>In the Account Name field, enter the **full email address** created in the cPanel interface. In the password field, enter the password that you set for the affected mailbox.  
When entering the password, make sure that the password can contain uppercase and lowercase letters as well as numbers. Check **Remember password**.

<p class="callout danger">Do not select the **Log on using Secure Password Authentication** option in the window.</p>

After entering the information, click **Next**.

On the next page, the **Wizard** congratulates you. Click **Finish** to successfully set up your email address.

<div class="vc_row wpb_row vc_row-fluid" id="bkmrk--12"><div class="wpb_column vc_column_container vc_col-sm-12"><div class="vc_column-inner"><div class="wpb_wrapper"><div class="wpb_text_column wpb_content_element "><div class="wpb_wrapper"><div class="wp-caption alignnone">![Internet Connection Wizzard - Finish](https://dotroll.com/wp-content/uploads/2020/08/Outlook_Express_en_6.png)</div></div></div></div></div></div></div>Internet Connection Wizzard – Finish

<div class="vc_row wpb_row vc_row-fluid" id="bkmrk--13"><div class="wpb_column vc_column_container vc_col-sm-12"><div class="vc_column-inner"><div class="wpb_wrapper"><div class="wpb_text_column wpb_content_element "><div class="wpb_wrapper"><div class="wp-caption alignnone" id="bkmrk--14"></div></div></div></div></div></div></div>#### CHANGE MAILING SETTINGS

After that, Outlook Express starts. After startup, click **Tools** / **Accounts…** in the top menu bar.

<div class="vc_row wpb_row vc_row-fluid" id="bkmrk--15"><div class="wpb_column vc_column_container vc_col-sm-12"><div class="vc_column-inner"><div class="wpb_wrapper"><div class="wpb_text_column wpb_content_element "><div class="wpb_wrapper"><div class="wp-caption alignnone">![Internet Accounts window](https://dotroll.com/wp-content/uploads/2020/08/Outlook_Express_en_7.png)</div></div></div></div></div></div></div>Internet Accounts window

<div class="vc_row wpb_row vc_row-fluid" id="bkmrk--16"><div class="wpb_column vc_column_container vc_col-sm-12"><div class="vc_column-inner"><div class="wpb_wrapper"><div class="wpb_text_column wpb_content_element "><div class="wpb_wrapper"><div class="wp-caption alignnone" id="bkmrk--17"></div></div></div></div></div></div></div>In the **Internet Accounts** window, select the server you just specified.

Tip: Clicking the Mail tab displays only the servers used for mail.

After selecting, click the **Properties** button.

<div class="vc_row wpb_row vc_row-fluid" id="bkmrk--18"><div class="wpb_column vc_column_container vc_col-sm-12"><div class="vc_column-inner"><div class="wpb_wrapper"><div class="wpb_text_column wpb_content_element "><div class="wpb_wrapper"><div class="wp-caption alignnone">![Mailbox Properties - General tab](https://dotroll.com/wp-content/uploads/2020/08/Outlook_Express_en_8.png)</div></div></div></div></div></div></div>Mailbox Properties – General tab

<div class="vc_row wpb_row vc_row-fluid" id="bkmrk--19"><div class="wpb_column vc_column_container vc_col-sm-12"><div class="vc_column-inner"><div class="wpb_wrapper"><div class="wpb_text_column wpb_content_element "><div class="wpb_wrapper"><div class="wp-caption alignnone" id="bkmrk--20"></div></div></div></div></div></div></div>Clicking the **Properties** button will accept the **General** tab. Here you can enter another name, e-mail address, reply e-mail address. Alternatively, you can rename the account here to better identify it.

The **Servers** tab is important, here you can check the most important components of your account settings.

<div class="vc_row wpb_row vc_row-fluid" id="bkmrk--21"><div class="wpb_column vc_column_container vc_col-sm-12"><div class="vc_column-inner"><div class="wpb_wrapper"><div class="wpb_text_column wpb_content_element "><div class="wpb_wrapper"><div class="wp-caption alignnone">![Mailbox Properties - Servers tab](https://dotroll.com/wp-content/uploads/2020/08/Outlook_Express_en_9b.png)</div></div></div></div></div></div></div>Mailbox Properties – Servers tab

<div class="vc_row wpb_row vc_row-fluid" id="bkmrk--22"><div class="wpb_column vc_column_container vc_col-sm-12"><div class="vc_column-inner"><div class="wpb_wrapper"><div class="wpb_text_column wpb_content_element "><div class="wpb_wrapper"><div class="wp-caption alignnone" id="bkmrk--23"></div></div></div></div></div></div></div>Incoming (IMAP) mail server, Outgoing (**SMTP**) server, and account name and password.

In the **Outgoing Mail Server** section, select the **My server requires authentication** check box before the line.

Then click the **Settings…** button that becomes active.

<div class="vc_row wpb_row vc_row-fluid" id="bkmrk--24"><div class="wpb_column vc_column_container vc_col-sm-12"><div class="vc_column-inner"><div class="wpb_wrapper"><div class="wpb_text_column wpb_content_element "><div class="wpb_wrapper"><div class="wp-caption alignnone">![Outgoing Mail Server - Log on parameters](https://dotroll.com/wp-content/uploads/2020/08/Outlook_Express_en_10.png)</div></div></div></div></div></div></div>Outgoing Mail Server – Log on parameters

<div class="vc_row wpb_row vc_row-fluid" id="bkmrk--25"><div class="wpb_column vc_column_container vc_col-sm-12"><div class="vc_column-inner"><div class="wpb_wrapper"><div class="wpb_text_column wpb_content_element "><div class="wpb_wrapper"><div class="wp-caption alignnone" id="bkmrk--26"></div></div></div></div></div></div></div>By default, the first radio button is selected. **Use same settings as my incoming mail server**, you must change this to **Log on using** and re-enter the email address and password for the mailbox. Check **Remember password**.

<p class="callout danger">Do not select the **Log on using Secure Password Authentication** option in the window.</p>

After entering the information, click **OK**.

#### CHANGE ADVANCED SETTINGS

After the pop-up window closes, click the **Advanced** tab

<div class="vc_row wpb_row vc_row-fluid" id="bkmrk--27"><div class="wpb_column vc_column_container vc_col-sm-12"><div class="vc_column-inner"><div class="wpb_wrapper"><div class="wpb_text_column wpb_content_element "><div class="wpb_wrapper"><div class="wp-caption alignnone">![Mailbox Properties - Advanced tab](https://dotroll.com/wp-content/uploads/2020/08/Outlook_Express_en_11b.png)</div></div></div></div></div></div></div>Mailbox Properties – Advanced tab

<div class="vc_row wpb_row vc_row-fluid" id="bkmrk--28"><div class="wpb_column vc_column_container vc_col-sm-12"><div class="vc_column-inner"><div class="wpb_wrapper"><div class="wpb_text_column wpb_content_element "><div class="wpb_wrapper"><div class="wp-caption alignnone" id="bkmrk--29"></div></div></div></div></div></div></div>On the Advanced tab, you need to make the following settings:

<div class="vc_row wpb_row vc_row-fluid" id="bkmrk-check-the-box-next-t"><div class="wpb_column vc_column_container vc_col-sm-12"><div class="vc_column-inner"><div class="wpb_wrapper"><div class="wpb_text_column wpb_content_element "><div class="wpb_wrapper">- Check the box next to **This server requires a secure connection (SSL)**.
- Server ports should be set to **465** for **Outgoing mail (SMTP)** and **993** for **Incoming mail (IMAP)**.

</div></div></div></div></div></div>On the last **IMAP** tab, you can turn on the **Check for new messages in all folders** option and specify **Special folders**.

<div class="vc_row wpb_row vc_row-fluid" id="bkmrk--30"><div class="wpb_column vc_column_container vc_col-sm-12"><div class="vc_column-inner"><div class="wpb_wrapper"><div class="wpb_text_column wpb_content_element "><div class="wpb_wrapper"><div class="wp-caption alignnone">![Mailbox Properties - IMAP tab](https://dotroll.com/wp-content/uploads/2020/08/Outlook_Express_en_12.png)</div></div></div></div></div></div></div>Mailbox Properties – IMAP tab

<div class="vc_row wpb_row vc_row-fluid" id="bkmrk--31"><div class="wpb_column vc_column_container vc_col-sm-12"><div class="vc_column-inner"><div class="wpb_wrapper"><div class="wpb_text_column wpb_content_element "><div class="wpb_wrapper"><div class="wp-caption alignnone" id="bkmrk--32"></div></div></div></div></div></div></div>Under **Store special folders on IMAP server**, you can specify the **Sent Items path** and the **Drafts path**.  
If you want the software to check for new messages in each folder, select the check box before **Check for new messages in all folders**.  
If you also want to access sent messages in the [webmail](https://webmail.webspacecontrol.com/) interface, check the **Store special folders on IMAP Server**, and the enter **Sent Items** in the **Sent Items path** box.  
If you also want to synchronize drafts to the server, enter **Drafts** in the box next to **Drafts path** under **Store special folders on IMAP Server**.

The settings can be saved by clicking **OK**.