- How to Set Up Email on iPhone Using IMAP
- How to Set Up Email on iPhone and iPad
- Why Are My Emails Delayed and How to Fix It
- What Email Protocols (IMAP, POP3, SMTP) Are and How They Work
- How to Set Up Email in Mac Mail
- Setting up Microsoft Outlook 2000 with IMAP protocol
- Setting up Microsoft Outlook 2000 with POP3 protocol
- Setting up Microsoft Outlook 2007/2010/2013 with IMAP protocol
- Setting up Microsoft Outlook 2007/2010/2013 with POP3 protocol
- Setting up Microsoft Outlook Express with IMAP protocol
- How to Change the Number of Mail Server Connections
- How to Create an Email Account in cPanel
- How to Protect Your Email from Spam
- Setting up Microsoft Outlook Express with POP3 protocol
- Why Emails Go to Gmail Spam and How to Fix It
- How to Use an External Email Provider with Free Hosting
How to Set Up Email on iPhone Using IMAP
LOG IN TO THE CPANEL INTERFACE AND CREATE THE MAILBOX YOU WANT TO SET UP
- Log in to the cPanel interface.
- Create a mailbox! (How to create e-mailbox in cPanel?)
- After creating the mailbox, in the cPanel interface, under E-mail Accounts in the Mailbox, scroll down to E-mail Accounts and click Set Up Mail Client. CPanel will display the information required for setup.
If you want to use the mail.yourdomain.tld server in the description, replace it with your own domain name.
If you want to use the hostingID.loginssl.com server, enter your cPanel username instead of hostingID.
THE SETUP PROCEDURE:
- On your device, go to the Settings menu and select Mail.
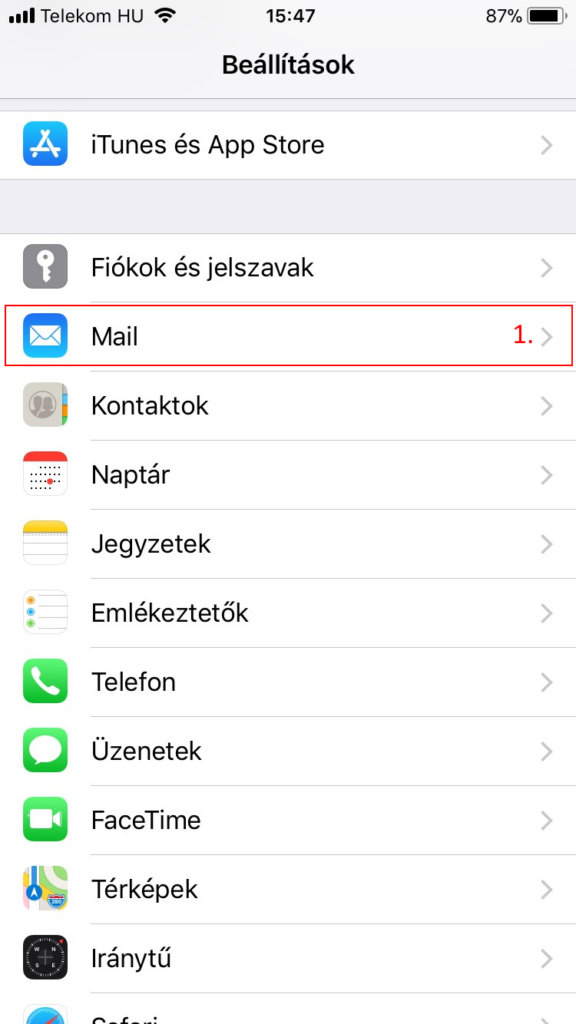
Settings / Mail
- On the page that appears, select Add Account
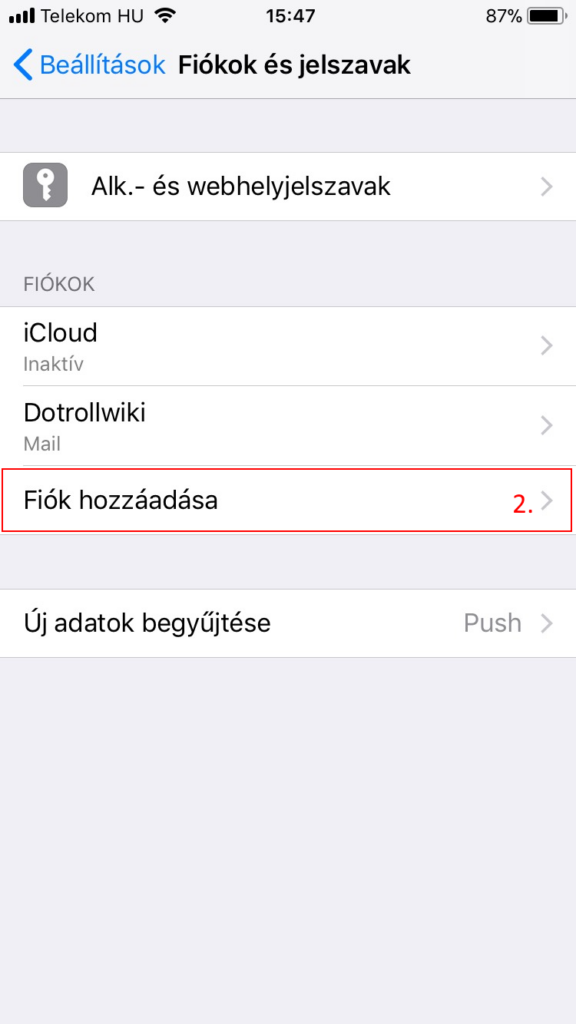
Accounts and Passwords / Adding account
- On the Add Account screen, select Other
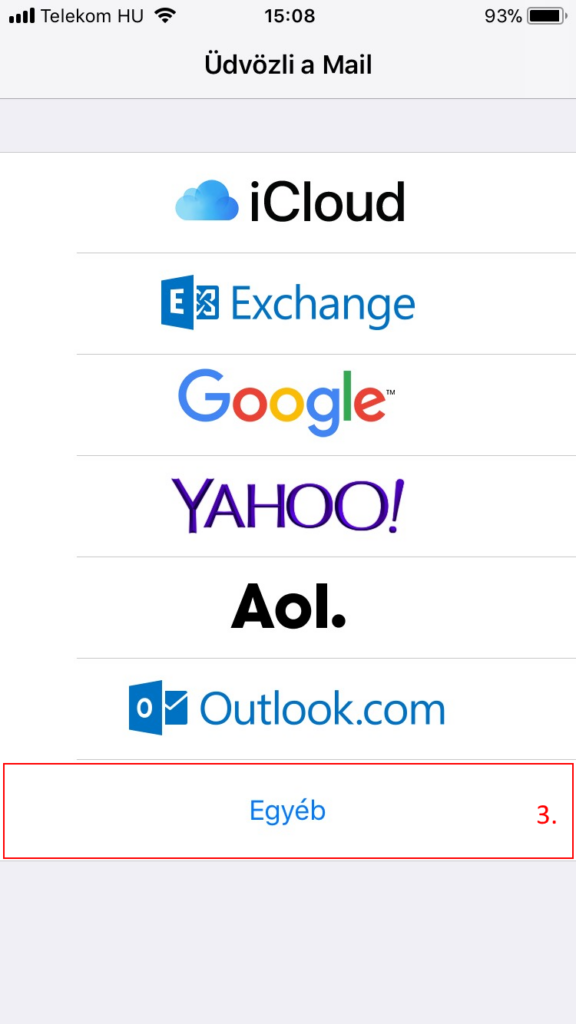
Welcome the Mail / Other
- On the next screen, select Add Mail Account
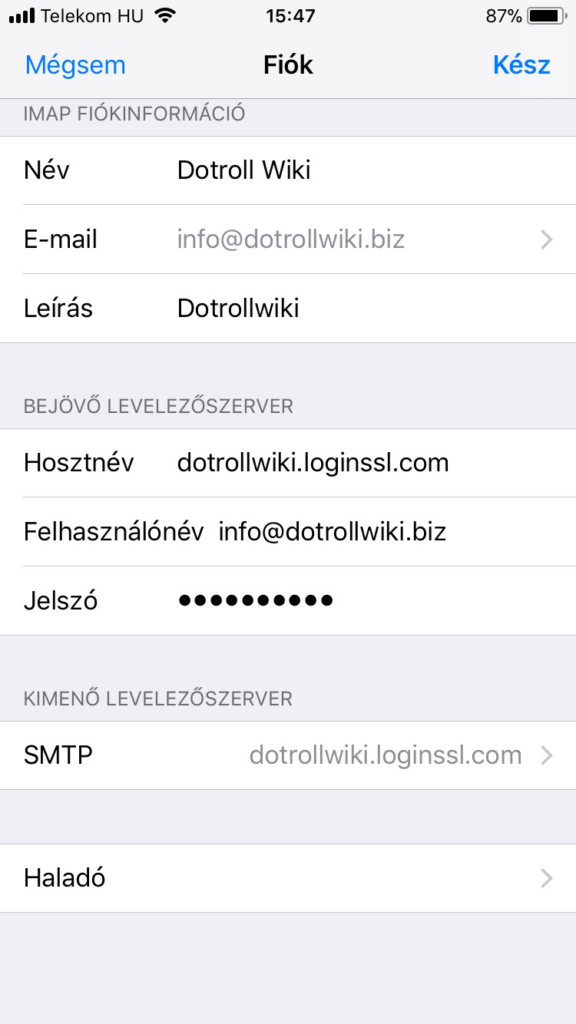
- On the New Account screen, fill in the mailbox information form with the following information based on the information in the image, then tap
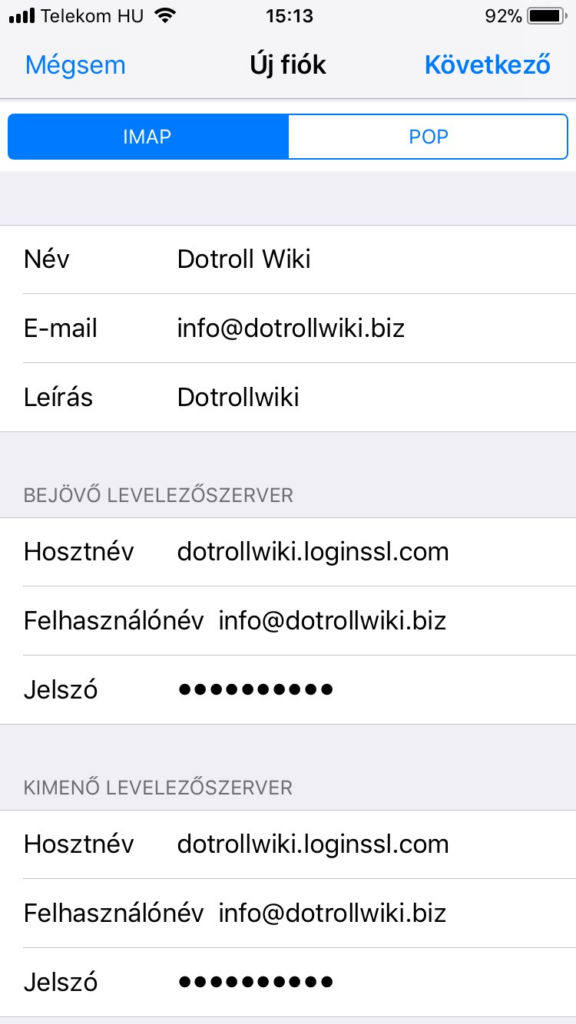
New account
the Next option
For IMAP mail, both Incoming and Outgoing mail servers are as follows:
hostingID.loginssl.com- After logging in, click Services / My Services in the top menu bar.
- On the page that appears, click the Active button at the end of the hosting service line for that domain name.
- In the middle of the page, under the Hosting Information tab, you will find the cPanel user name.
- The device automatically tries to connect to the mail server based on the entered information.
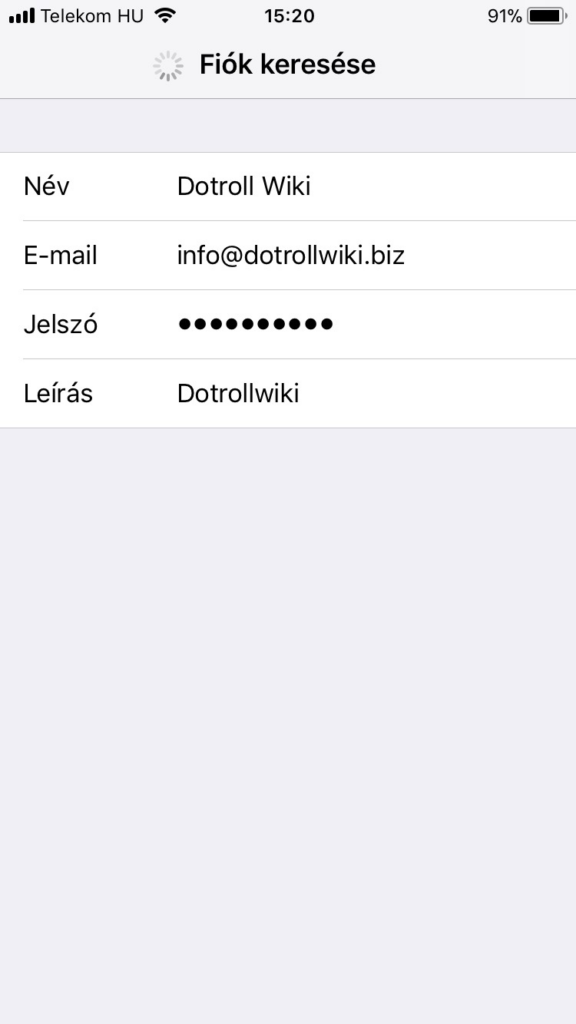
Searching Account
- After a successful connection, the following screen will appear
Accounts
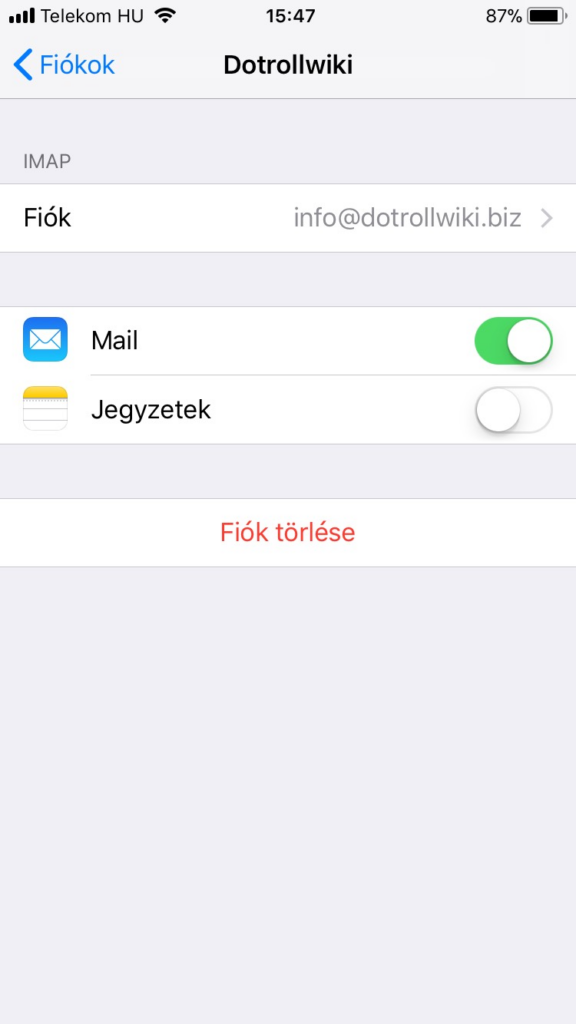
- After that, if you tap > next to the set account, you can view the account details or update the account settings here.
Accounts Information
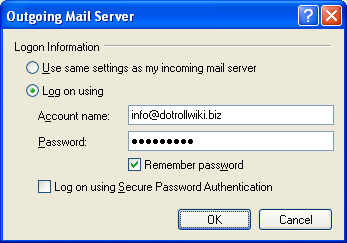
- Mail sending information can be set by touching the > sign at the end of the SMTP line

SMTP
- Here, tap > next to the configured server, and then make sure the outgoing mail server is set up as shown.

Outgoing Mail Server
- You can specify other advanced settings for your account by selecting Advanced Settings at the bottom of the screen
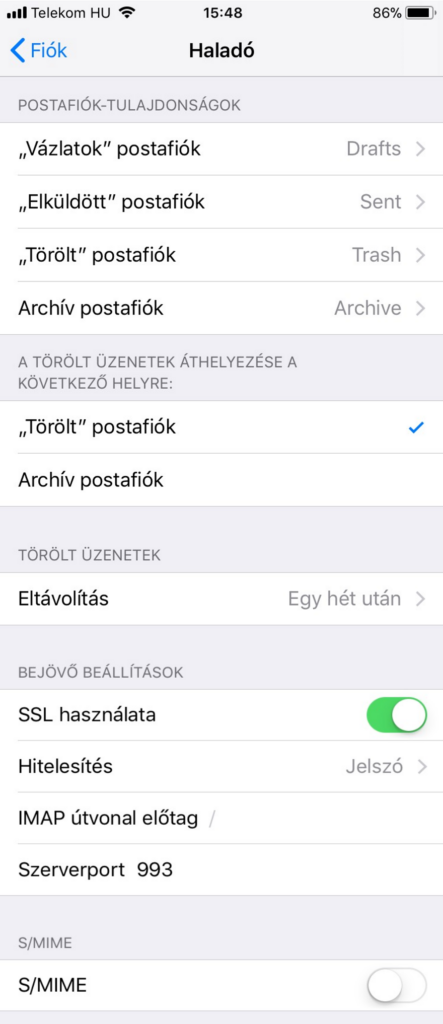
Advanced
How to Set Up Email on iPhone and iPad
LOG IN TO THE CPANEL INTERFACE AND CREATE THE MAILBOX YOU WANT TO SET UP
- Use your device to log in to the cPanel interface.
- Create a mailbox! (How to create E-mailbox is cPanel?)
DOWNLOAD PROFILE TO YOUR DEVICE
- After you have created the mailbox in the cPanel interface, scroll down to the Email accounts section in the Mailbox under Email accounts and click on Connect Tools.

Connect Devices
- Tap the IMAP SSL/TLS link to download the profile with configuration settings.

IMAP over SSL/TLS
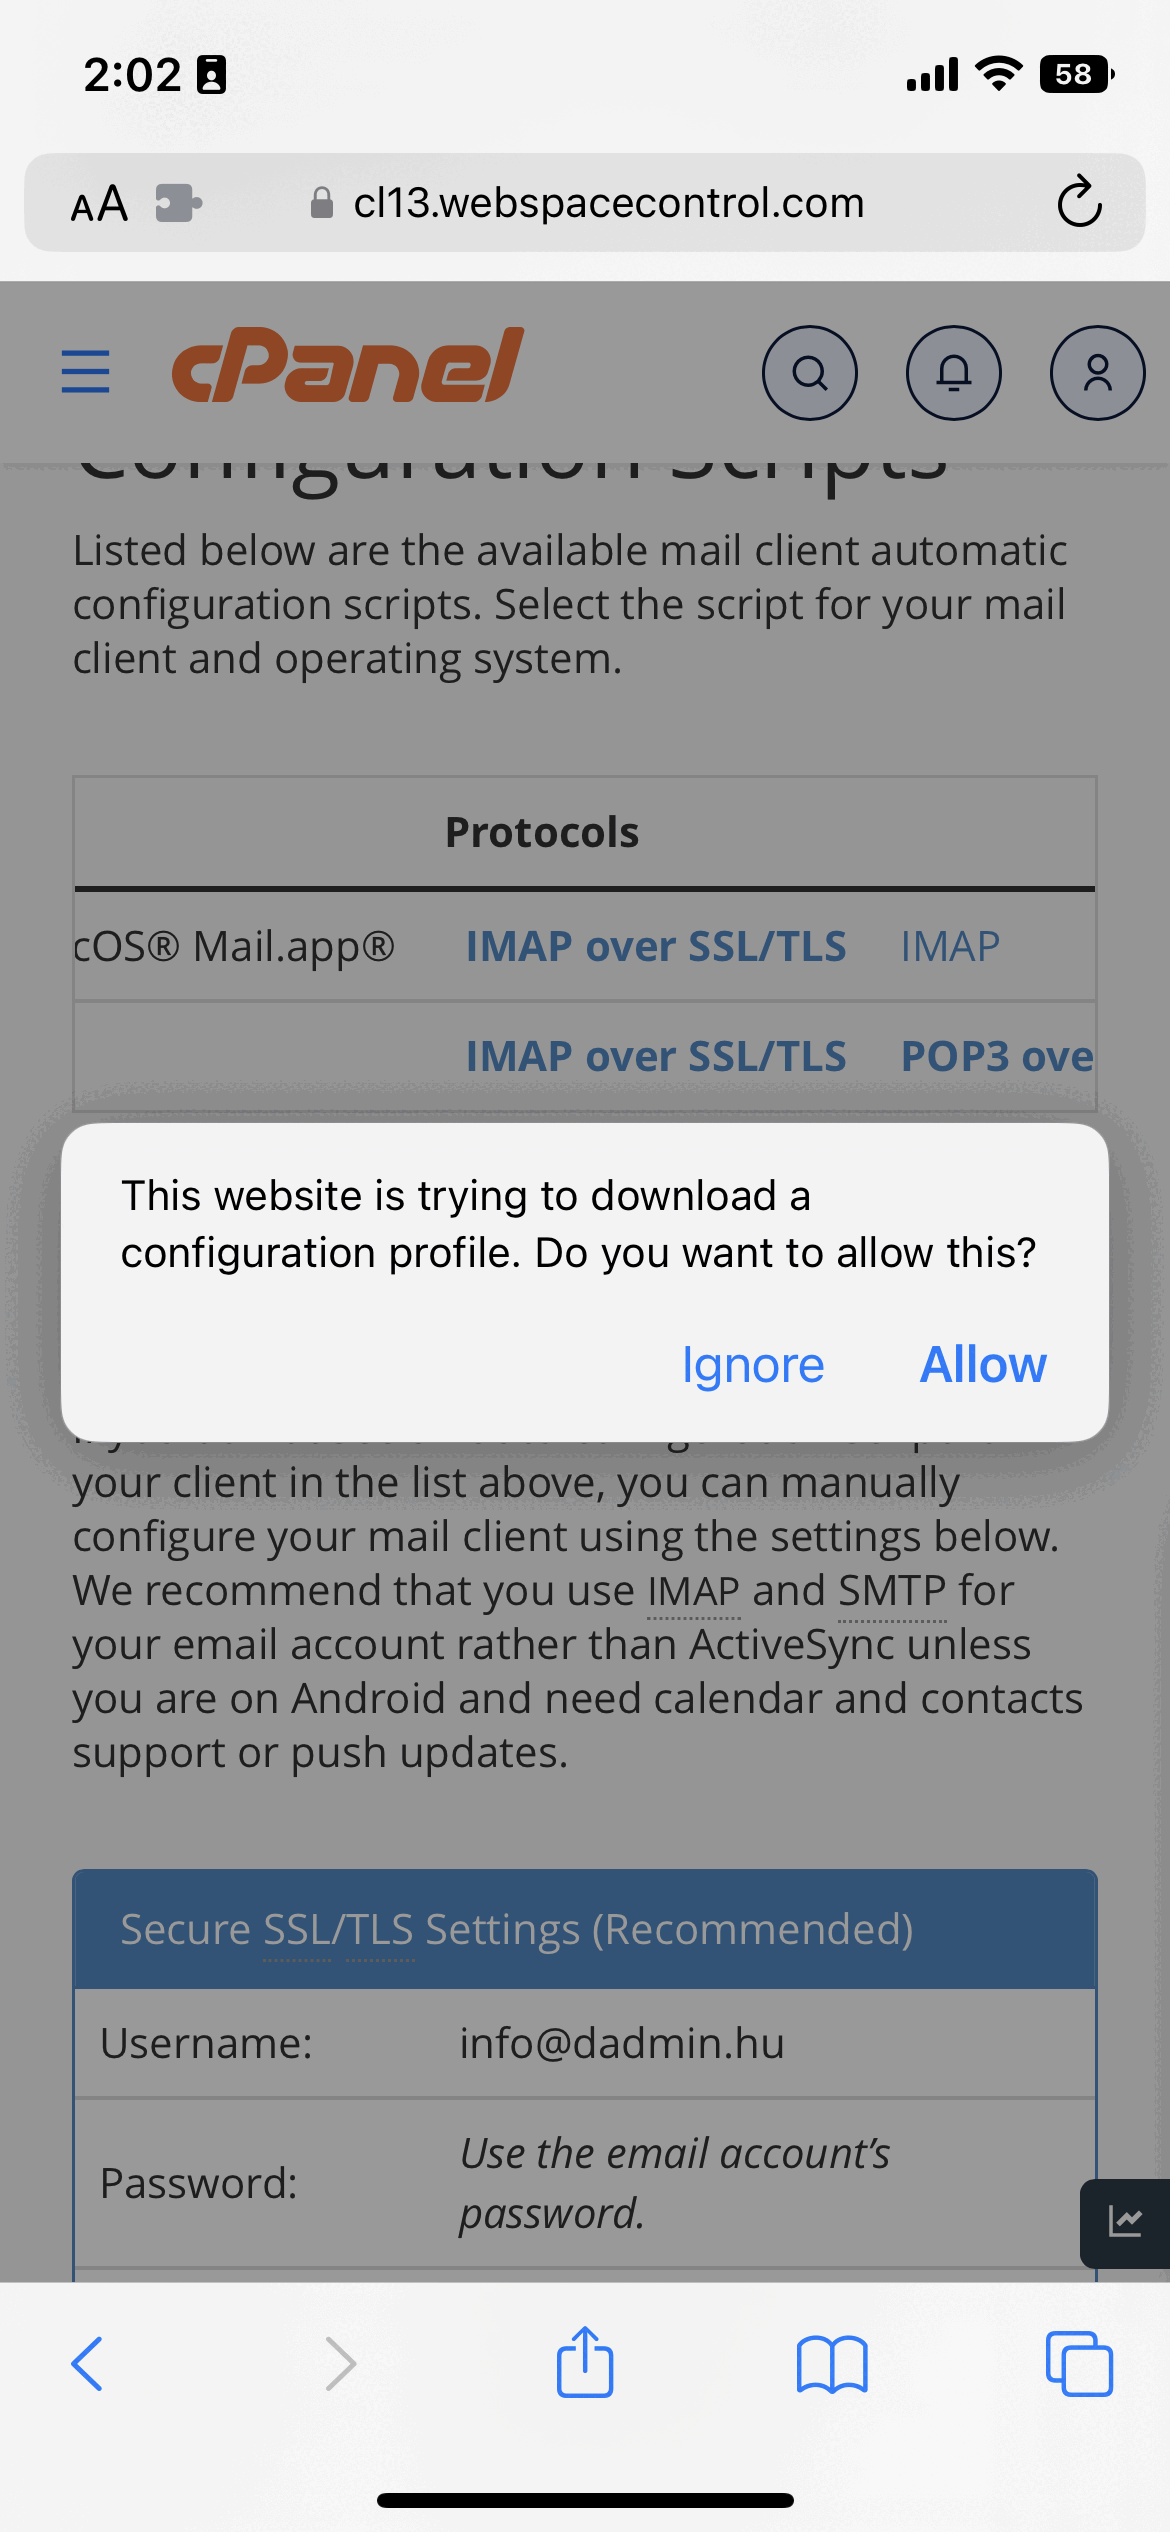
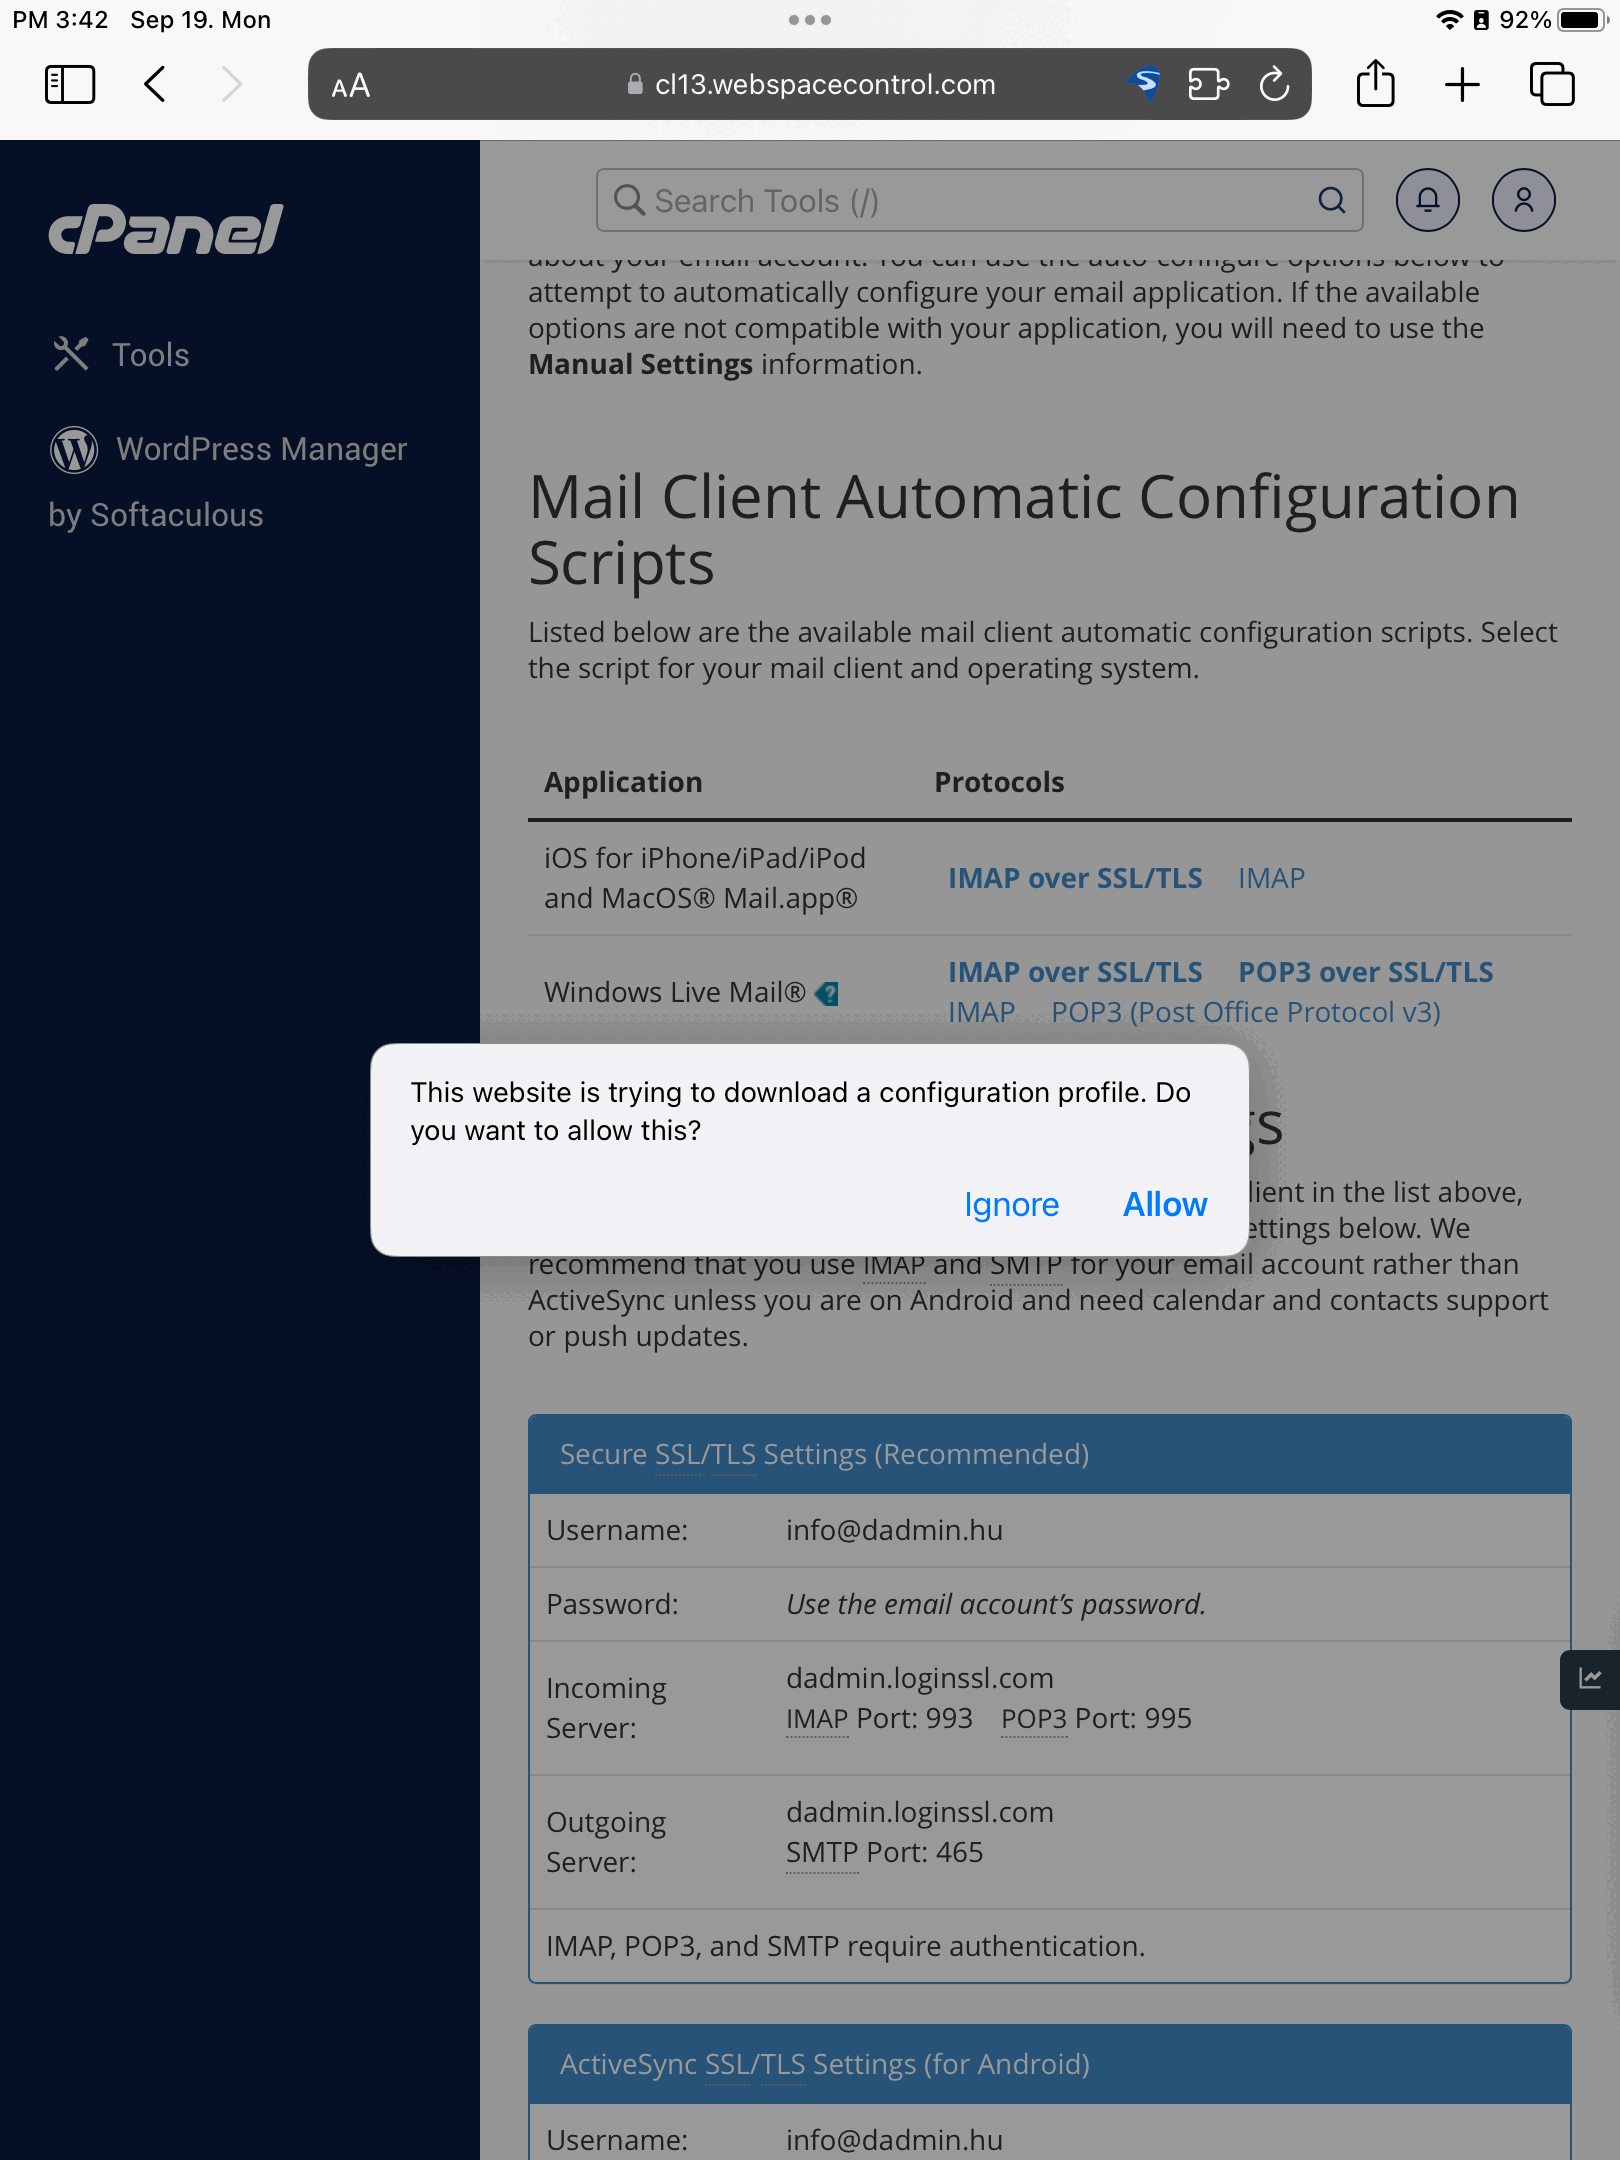
- The interface will display the following message, approve it:
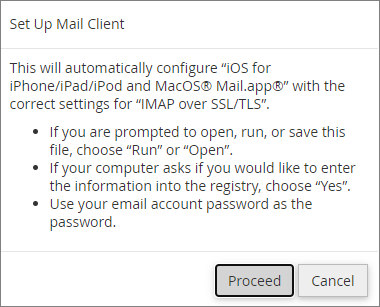
Set Up Mail Client
SETUP PROCEDURE
The setup is similar for iPhone and iPad. To set up, follow the steps below:
- Approve the warning message that appears to download the profile to your device.
- Navigate to the Settings menu, where you tap Profile downloaded under your Apple profile.
- The device will then load the data in the saved configuration file and display it, tap Install here.
- Then tap the Install button at the bottom.
- Enter the password for the mailbox you want to set up, then tap Next in the top right corner.
- Finally, tap Done.
Quick setup Mail on iPhone
Quick setup Mail on iPad
Why Are My Emails Delayed and How to Fix It
The email may cause the retardation of messages Greylist.
Greylist technique with distinguished efficiency useful the SPAM-et against senders. His essence, that the each single e-mail at the time of a reception it SMTP server the letter sender notes his IP address, the sender’s and the addressee’s data. If the given letter is a sender the IP address of a server the cPanel does not figure in the database of a server yet, then it SMTP server the e-mail rejects it with a temporary mistake delivery. The correctly configured a sender is waiting until 5-10 minutes, and tries to deliver the e-mail again then. The second attempt the e-mail occurs already delivery. The server handles it as a good entry already until 3 days following this, and everything accepts the e-mail promptly in a case.
SWITCHING OFF GREYLIST IN THE CPANEL WEBHOSTING:
Find the Configure Greylist menu item and click it, then click the grey Off button.
What Email Protocols (IMAP, POP3, SMTP) Are and How They Work
IMAP
IMAP (Internet Message Access Protocol) is a remote mailbox access protocol. It provides you with the comfort of accessing your mailbox from anywhere at the cost, that your mail needs to be stored on the server.
POP3
POP3 (Post Office Protocol 3) is a mail retreival protocol. You can use it to download mail from the mail server to your local computer. If you wish to use your mailbox from multiple locations, use of IMAP is recommended.
SMTP
SMTP (Simple Mail Transfer Protocol) is a protocol for sending mail. For it is not very resistant to spoofing, multiple technologies have been implemented to alleviate the problem.
How to Set Up Email in Mac Mail
Create a mailbox! (How to create E-mailbox in cPanel?)
After creating the mailbox, in the cPanel interface, under Email Accounts in the Mail box, scroll down to Email Accounts and click Set Up Mail Client. cPanel will display the information required for setup.
If you want to use the mail.yourdomain.tld server in the description, replace it with your own domain name.
If you want to use the hostingID.loginssl.com server, enter your cPanel username instead of hostingID.
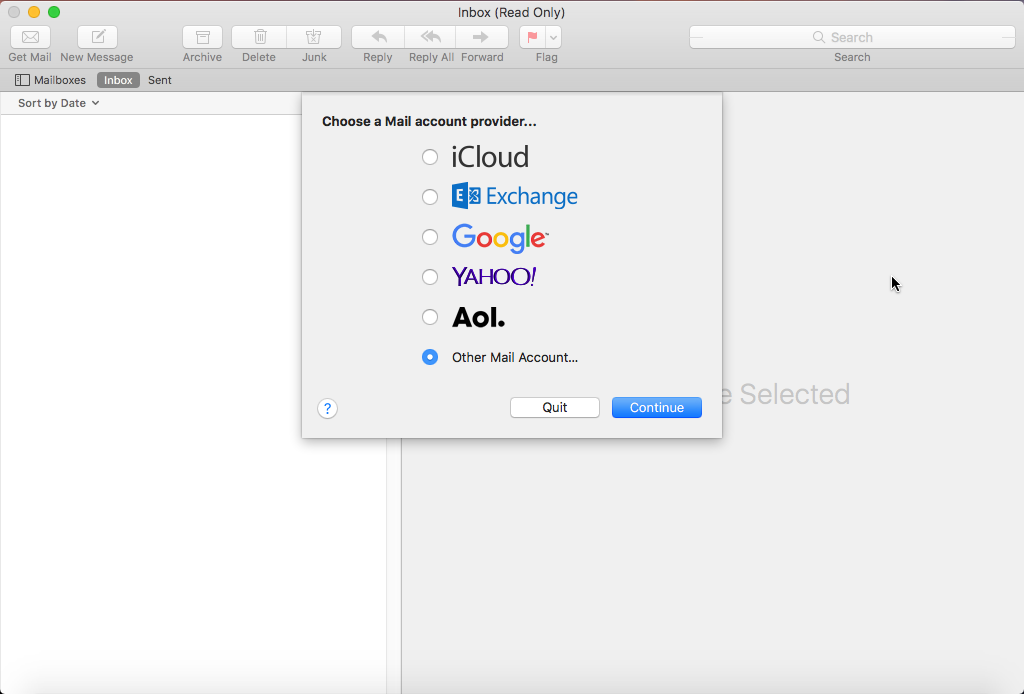
SETTING MAILBOX IN FIRST TIME START
Start the Mail app, if you have not set up a mailbox previously, then the mailbox setup option will be displayed.
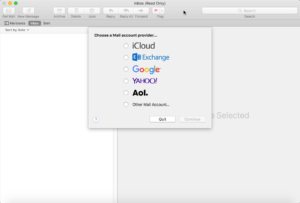
Choose a Mail account provider…
As first step check Other Mail Account… option, then click on Continue button.
Other Mail Account…
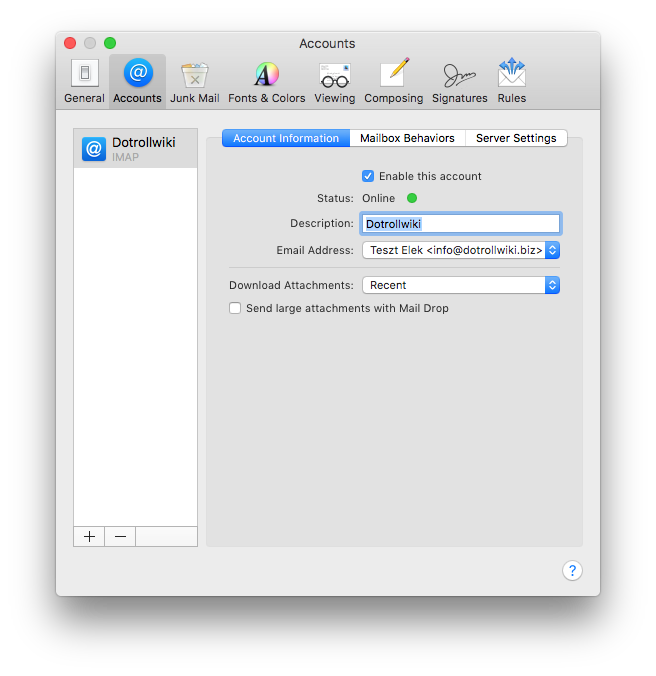
In the next window, enter your name, you can write anything here, but it’s a good idea to provide an ID and a name that will allow those who send you a letter to identify you. So this name will be sent as the sender name to those who receive you email. You will then need to enter the email address as well as the password set for that mailbox that you created on cPanel.
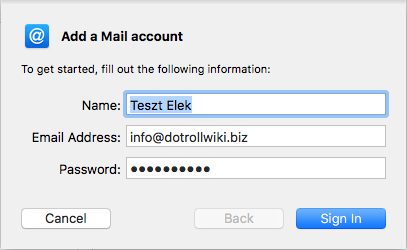
Add a Mail account
After that click on Sign In button. The mail client attempts to connect to the mailbox based on the data provided, if it does not succeed, the following window will appear:
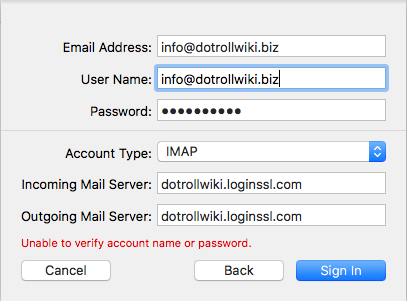
Sign in
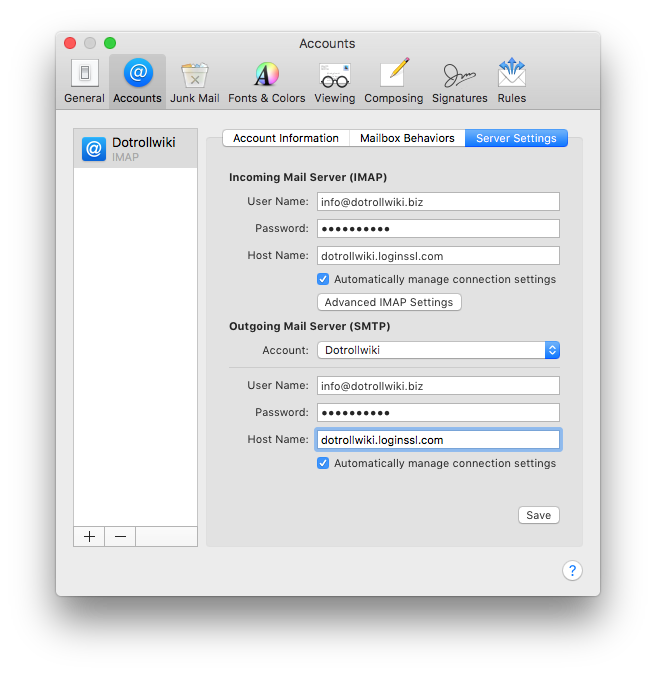
In the window Incoming Mail Server: and in Outgoing Mail Server: fields, enter the mail server that will be as follows:
cpanelusername.loginssl.com
In the image or above .loginssl.com, you’ll need to enter the user name for the cPanel interface. You can look for The cPanel login name at https://admin.dotroll.com site as it follows:
- After logging in, click on the Services / My Services menu in the top menu bar.
- On the page that appears, click on the Active button at the end of the hosting service line which belongs to the domain name.
- In the middle of the page, you can find the cPanel username under the Hosting Information tab.
Once you have entered the data, click again on Sign In button.

Select the apps you want to use with this account:
As a final step, click on Done button.
ADD A SECOND MAILBOX
The settings for the set mailbox are located within Mail app, in the Mail menu Accounts… menu. If a mailbox is already set up in your Mail app, you can set up a new account here:
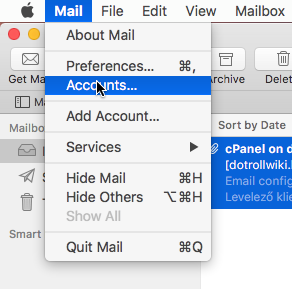
Mail / Accounts… menu
On the appearing Internet Accounts window, you can find a + mark at the lower left corner of the window, with this you can add a new mailbox to the Mail client or modify some of the existing accounts.
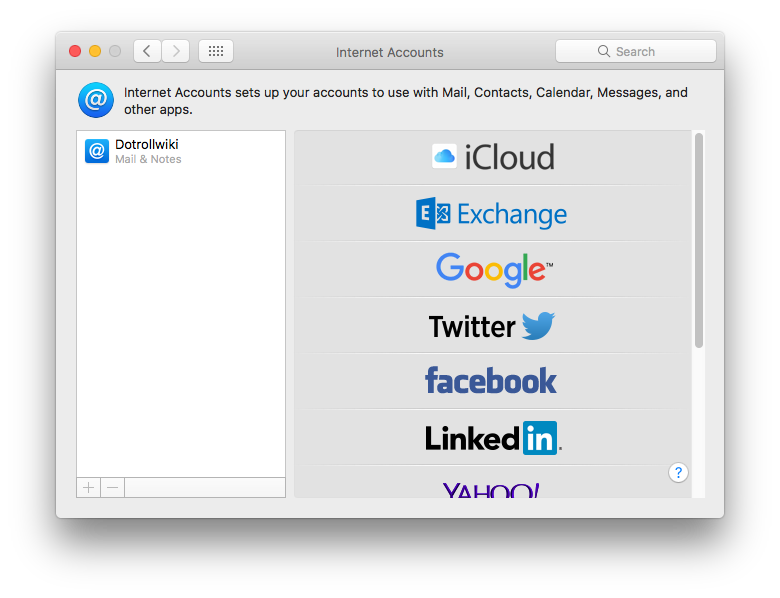
Internet Accounts
If you click on an existing account you will have the option to:
- to change the mailbox name within Mail app
- to change the name displayed at the sender name
- to change the sender’s email address
- to change the password for the mailbox
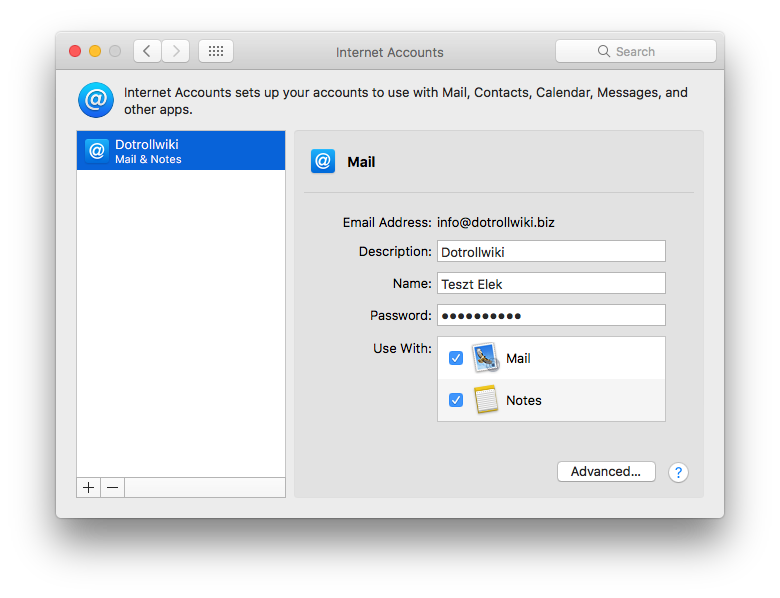
Internet Accounts – Mail setup
Click on Advanced … button to modify the incoming mail server.
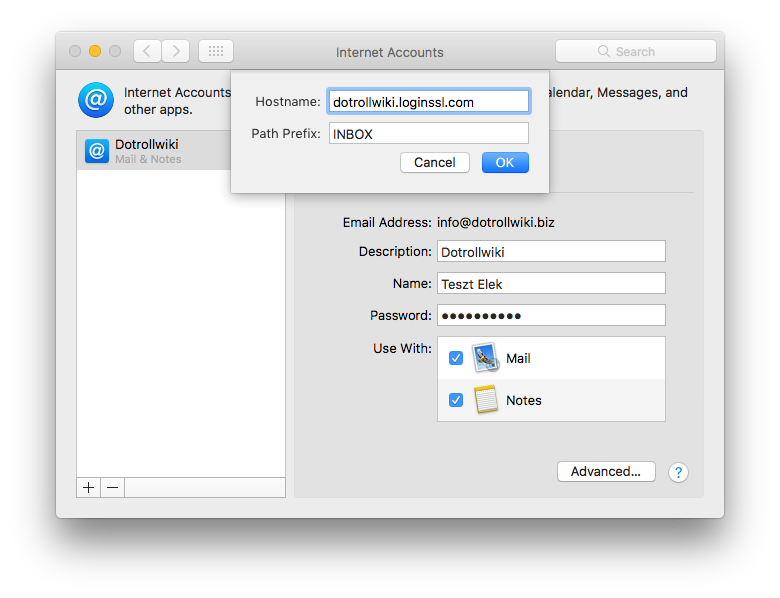
Internet Accounts – Mail setup – Advanced…
By clicking Mail in the Mail app, you can click on Preferences … to customize your mailbox.
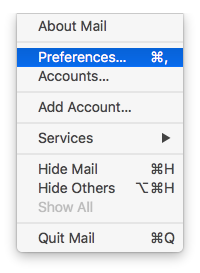
Mail / Prefetences… menu
Accounts popup
You can enable or disable that mailbox, which is useful if your account is set up on multiple devices, but a password has been changed for that account.
Mail Behaviors
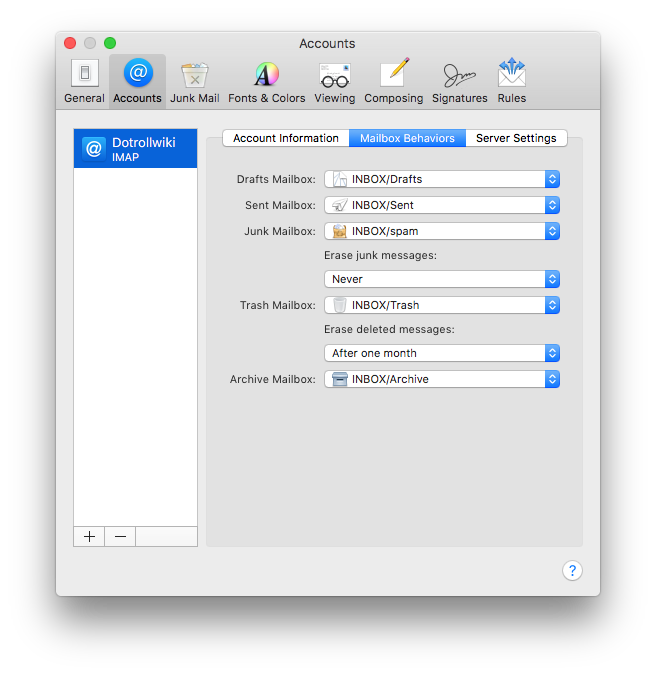
You can specify which folders the client should use in the mailbox.
Server settings
On the Server Settings tab, you can change the incoming and outgoing mail server settings.
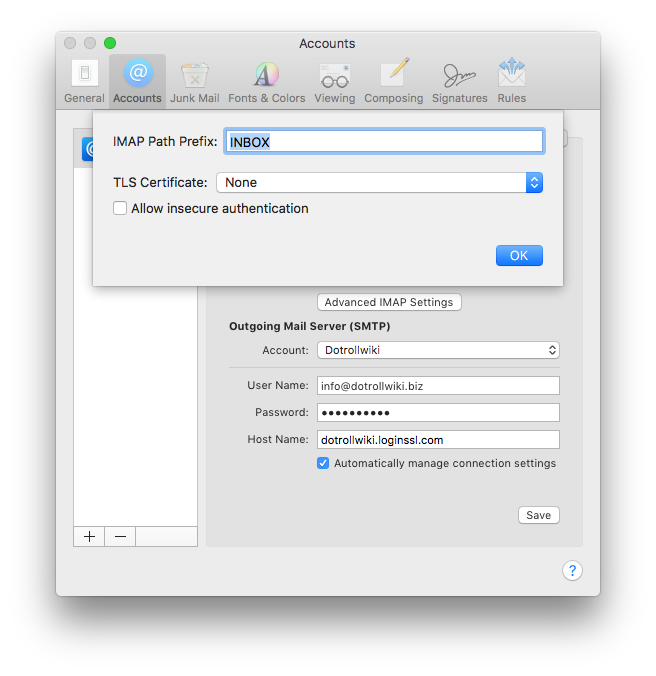
IMAP Path Prefix
Setting up Microsoft Outlook 2000 with IMAP protocol
Create a mailbox! (How to create E-mailbox in cPanel?)
After creating the mailbox, in the cPanel interface, under Email Accounts in the Mail box, scroll down to Email Accounts and click Set Up Mail Client. cPanel will display the information required for setup.
If you want to use the mail.yourdomain.tld server in the description, replace it with your own domain name.
If you want to use the hostingID.loginssl.com server, enter your cPanel username instead of hostingID.
ADDING MAILBOX
After you install and start the program, you can use Outlook 2000 to set up your mailbox.
As a first step, click Next.
In the next window, select None and click Next.
Then select Internet Only, and then click Next.
Confirm the warning that appears by pressing Yes.
Enter your name in the next window, you can enter anything here, but it is advisable to enter an ID with which those to whom you send a letter can identify you. So this name will be seen as the sender by those who receive an email from you.
You will then need to enter the email address you created in the cPanel interface.
If you click Next, you have the option to specify the Incoming mail (POP3 or IMAP) server and the Outgoing mail (SMTP) server. For IMAP mail, both Incoming and Outgoing mail servers will be as follows:
hostingID.loginssl.com
- After logging in, click Services / My Services in the Top menu bar.
- On the page that appears, click the Active button at the end of the hosting service line for that domain name.
- In the middle of the page, under the Hosting Information tab, you will find the cPanel user name.
After entering the information, click Next.
The next step is to enter the email address associated with the mailbox and the password set for it.
In the Account Name field, enter the full email address created in the cPanel interface. In the password field, enter the password that you set for the affected mailbox.
When entering the password, make sure that the password can contain uppercase and lowercase letters as well as numbers. Check Remember password.
Do not select the Log on using Secure Password Authentication(SPA) option in the window.
After entering the information, click Next.
On the next page, the Wizard congratulates you. Click Finish to successfully set up your email address.
CHANGING THE SENDING SETTINGS
After that, Outlook Express starts. After startup, click Tools/Accounts… in the top menu bar.
In the Internet Accounts window, select the server you just specified.
Tip: Clicking the Mail tab displays only the servers used for mail.
After selecting, click the Properties button.
Clicking the Properties button will accept you from the General tab. Here you can enter another name, e-mail address, reply e-mail address. Alternatively, you can rename the account here to better identify it.
The Servers tab is important, here you can check the most important components of your account settings.
Incoming (IMAP) mail server, Outgoing (SMTP) server, and account name and password.
In the Outgoing mail server section, select the Server A requires authentication check box before the line.
Then click the Settings… button that becomes active.
By default, the first radio button is selected. Using the same settings as the incoming mail server, you must change this to Login and re-enter the email address and password for the mailbox. Check Remember password.
Do not select the Log on using Secure Password Authentication(SPA) option in the window.
After entering the information, click OK.
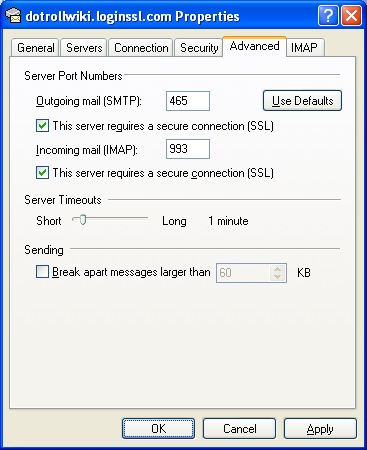
CHANGING ADVANCED SETTINGS
After the pop-up window closes, click the Advanced tab
On the Advanced tab, you need to make the following settings:
- Select the Check server requires a secure connection (SSL) check box before the lines.
- Server ports 465 should be set for outgoing mail (SMTP) and 993 for incoming mail (IMAP).
On this tab you have the option to keep the mails on the server.
Please note that if you also store your mail on the server, the mail stored above will take up storage space in your email account, so there may even be a situation where your storage space is full!
The settings can be saved by clicking OK.
Setting up Microsoft Outlook 2000 with POP3 protocol
Create a mailbox! (How to create E-mailbox in cPanel?)
After creating the mailbox, in the cPanel interface, under Email Accounts in the Mail box, scroll down to Email Accounts and click Set Up Mail Client. cPanel will display the information required for setup.
If you want to use the mail.yourdomain.tld server in the description, replace it with your own domain name.
If you want to use the hostingID.loginssl.com server, enter your cPanel username instead of hostingID.
ADDING MAILBOX
After you install and start the program, you can use Outlook 2000 to set up your mailbox.
As a first step, click Next.
In the next window, select None and click Next.
Then select Internet Only, and then click Next.
Confirm the warning that appears by pressing Yes.
Enter your name in the next window, you can enter anything here, but it is advisable to enter an ID with which those to whom you send a letter can identify you. So this name will be seen as the sender by those who receive an email from you.
You will then need to enter the email address you created in the cPanel interface.
If you click Next, you have the option to specify the Incoming mail (POP3 or IMAP) server and the Outgoing mail (SMTP) server. For POP3 mail, both Incoming and Outgoing mail servers will be as follows:
hostingID.loginssl.com
- After logging in, click Services / My Services in the Top menu bar.
- On the page that appears, click the Active button at the end of the hosting service line for that domain name.
- In the middle of the page, under the Hosting Information tab, you will find the cPanel user name.
After entering the information, click Next.
The next step is to enter the email address associated with the mailbox and the password set for it.
In the Account Name field, enter the full email address created in the cPanel interface. In the password field, enter the password that you set for the affected mailbox.
When entering the password, make sure that the password can contain uppercase and lowercase letters as well as numbers. Check Remember password.
Do not select the Log on using Secure Password Authentication(SPA) option in the window.
After entering the information, click Next.
On the next page, the Wizard congratulates you. Click Finish to successfully set up your email address.
CHANGING THE SENDING SETTINGS
After that, Outlook Express starts. After startup, click Tools/Accounts… in the top menu bar.
In the Internet Accounts window, select the server you just specified.
Tip: Clicking the Mail tab displays only the servers used for mail.
After selecting, click the Properties button.
Clicking the Properties button will accept you from the General tab. Here you can enter another name, e-mail address, reply e-mail address. Alternatively, you can rename the account here to better identify it.
The Servers tab is important, here you can check the most important components of your account settings.
Incoming (POP3) mail server, Outgoing (SMTP) server, and account name and password.
In the Outgoing mail server section, select the Server A requires authentication check box before the line.
Then click the Settings… button that becomes active.
By default, the first radio button is selected. Using the same settings as the incoming mail server, you must change this to Login and re-enter the email address and password for the mailbox. Check Remember password.
Do not select the Log on using Secure Password Authentication(SPA) option in the window.
After entering the information, click OK.
CHANGING ADVANCED SETTINGS
After the pop-up window closes, click the Advanced tab
On the Advanced tab, you need to make the following settings:
- Select the Check server requires a secure connection (SSL) check box before the lines.
- Server ports 465 should be set for outgoing mail (SMTP) and 995 for incoming mail (POP3).
On this tab you have the option to keep the mails on the server.
Please note that if you also store your mail on the server, the mail stored above will take up storage space in your email account, so there may even be a situation where your storage space is full!
The settings can be saved by clicking OK.
Setting up Microsoft Outlook 2007/2010/2013 with IMAP protocol
Create a mailbox! (How to create E-mailbox in cPanel?)
After creating the mailbox, in the cPanel interface, under Email Accounts in the Mail box, scroll down to Email Accounts and click Set Up Mail Client. cPanel will display the information required for setup.
If you want to use the mail.yourdomain.tld server in the description, replace it with your own domain name.
If you want to use the hostingID.loginssl.com server, enter your cPanel username instead of hostingID.
ADD A MAILBOX
The first time you start Outlook Mail, you’ll need to create a profile and enter your information.
If you are not starting Outlook for the first time, you need to click the Tools menu, Account Settings, and then click New on the Email tab in the window that appears.
As a first step, select Manually configure server settings or additional server types, and then click Next.
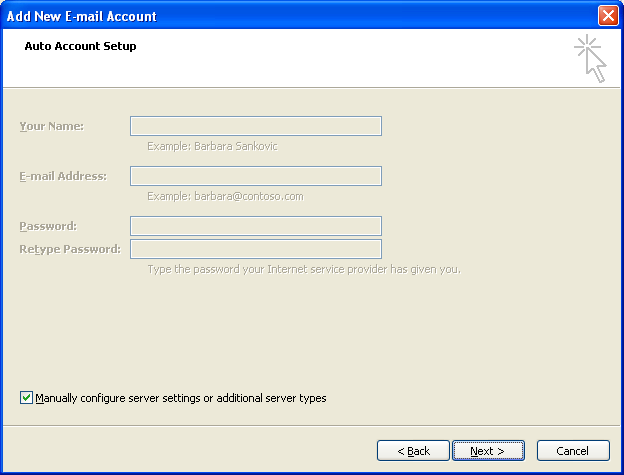
Add New E-mail Account – Auto Account Setup
In the next window, select Internet E-mail and click Next.

Add New E-mail Account – Choose E-mail Service
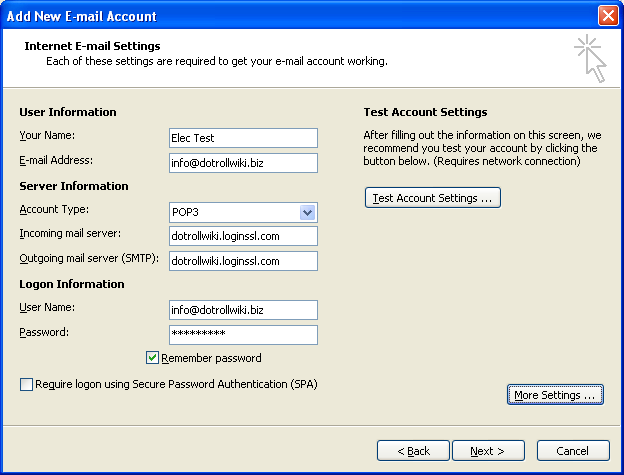
You will then select the option to enter your connection details.
In the User data section, enter your name in the Name field, you can enter anything here, but it is advisable to enter an identifier, a name with which those to whom you send a letter can identify you. So this name will be seen as the sender by those who receive an email from you. Also in the Email Address field, the email address you created in the cPanel interface.
In the Server Information section, you can select the Account type, which can be POP3 or IMAP. In the Incoming mail server and Outgoing mail server (SMTP) fields, you must specify the server through which you want to use mail. For IMAP mail, both Incoming and Outgoing mail servers will be as follows:
hostingID.loginssl.com
Before the address ending in .loginssl.com in the image and above, you must enter your hosting ID, which is the same as the username for the cPanel interface. To view your cPaneles login at https://admin.dotroll.com, follow these steps:
- After logging in, click Services / My Services in the Top menu bar.
- On the page that appears, click the Active button at the end of the hosting service line for that domain name.
- In the middle of the page, under the Hosting Information tab, you will find the cPanel user name.
In the Login Information section, enter the email address associated with the mailbox and the password set for it.
In the Username field, enter the full email address created in the cPanel interface. In the password field, enter the password that you set for the affected mailbox.
When entering the password, make sure that the password can contain uppercase and lowercase letters as well as numbers. Check Remember password.
Do not select the Log on using Secure Password Authentication(SPA) option in the window.
After entering the information, click the More settings… button.

Add New E-mail Account – Internet E-mail Settings
CHANGE MAILING SETTINGS
In the pop-up window that appears, click the Outgoing Mail Server tab. Here, select the Outgoing mail server (SMTP) requires authentication check box.
By default, the first radio button is selected. Using the same settings as my incoming mail server, you must change this to Log on using with the following information and re-enter the email address and password for the mailbox. Check Remember password.
Do not select the Log on using Secure Password Authentication(SPA) option in the window.
After selecting, click the Properties button.
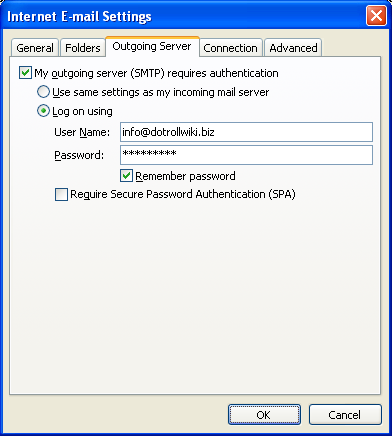
Internet E-mail Settings – Outgoing Server tab
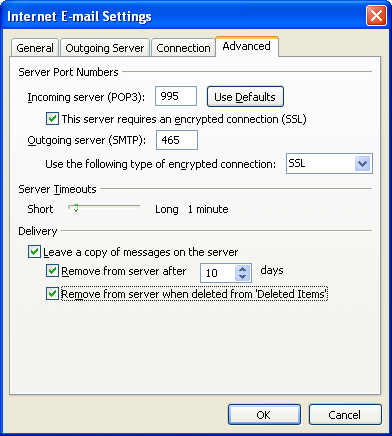
Then click the Advanced tab
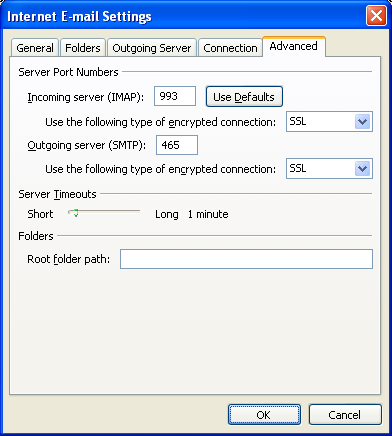
Internet E-mail Settings – Advanced tab
On the Advanced tab, you need to make the following settings:
Under Incoming server (IMAP) For Use the following type of encrypted connection, select SSL from the drop-down list following.
Under Outgoing server (SMTP) For Use the following type of encrypted connection, select SSL from the drop-down list following.
In the box behind Outgoing server (SMTP), enter 465.
In the Delivery section, if you select Leave a copy of messages on the server, the client will make a copy of that message to the local device during the download.
We recommend that you select Remove from server after and enter a time interval in days after which the client deletes mail from the server if you have set a small mailbox quota in the cPanel interface.
With the Remove from server when deleted from the “Deleted Items” folder, the client will also remove the mail from the server after deleting the mail, so that the mailbox cannot be accidentally filled.
The settings can be saved by clicking OK.
After entering the information, click Next.
On the next page, the Wizard congratulates you.
Click Finish to successfully set up your email address.
Setting up Microsoft Outlook 2007/2010/2013 with POP3 protocol
Create a mailbox! (How to create E-mailbox in cPanel?)
After creating the mailbox, in the cPanel interface, under Email Accounts in the Mail box, scroll down to Email Accounts and click Set Up Mail Client. cPanel will display the information required for setup.
If you want to use the mail.yourdomain.tld server in the description, replace it with your own domain name.
If you want to use the hostingID.loginssl.com server, enter your cPanel username instead of hostingID.
ADD A MAILBOX
The first time you start Outlook Mail, you’ll need to create a profile and enter your information.
If you are not starting Outlook for the first time, you need to click the Tools menu, Account Settings, and then click New on the Email tab in the window that appears.
As a first step, select Manually configure server settings or additional server types, and then click Next.
Add New E-mail Account – Auto Account Setup
In the next window, select Internet E-mail and click Next.
Add New E-mail Account – Choose E-mail Service
You will then select the option to enter your connection details.
In the User data section, enter your name in the Name field, you can enter anything here, but it is advisable to enter an identifier, a name with which those to whom you send a letter can identify you. So this name will be seen as the sender by those who receive an email from you. Also in the Email Address field, the email address you created in the cPanel interface.
In the Server Information section, you can select the Account type, which can be POP3 or IMAP. In the Incoming mail server and Outgoing mail server (SMTP) fields, you must specify the server through which you want to use mail. For POP3 mail, both Incoming and Outgoing mail servers will be as follows:
hostingID.loginssl.com
Before the address ending in .loginssl.com in the image and above, you must enter your hosting ID, which is the same as the username for the cPanel interface. To view your cPaneles login at https://admin.dotroll.com, follow these steps:
- After logging in, click Services / My Services in the Top menu bar.
- On the page that appears, click the Active button at the end of the hosting service line for that domain name.
- In the middle of the page, under the Hosting Information tab, you will find the cPanel user name.
In the Login Information section, enter the email address associated with the mailbox and the password set for it.
In the Username field, enter the full email address created in the cPanel interface. In the password field, enter the password that you set for the affected mailbox.
When entering the password, make sure that the password can contain uppercase and lowercase letters as well as numbers. Check Remember password.
Do not select the Log on using Secure Password Authentication(SPA) option in the window.
After entering the information, click the More settings… button.
Add New E-mail Account – Internet E-mail Settings
CHANGE MAILING SETTINGS
In the pop-up window that appears, click the Outgoing Mail Server tab. Here, select the Outgoing mail server (SMTP) requires authentication check box.
By default, the first radio button is selected. Using the same settings as my incoming mail server, you must change this to Log on using with the following information and re-enter the email address and password for the mailbox. Check Remember password.
Do not select the Log on using Secure Password Authentication(SPA) option in the window.
After selecting, click the Properties button.
Internet E-mail Settings – Outgoing Server tab
Then click the Advanced tab
Internet E-mail Settings – Advanced tab
On the Advanced tab, you need to make the following settings:
Under Incoming server (POP3) For Use the following type of encrypted connection, select SSL from the drop-down list following.
Under Outgoing server (SMTP) For Use the following type of encrypted connection, select SSL from the drop-down list following.
In the box behind Outgoing server (SMTP), enter 465.
In the Delivery section, if you select Leave a copy of messages on the server, the client will make a copy of that message to the local device during the download.
We recommend that you select Remove from server after and enter a time interval in days after which the client deletes mail from the server if you have set a small mailbox quota in the cPanel interface.
With the Remove from server when deleted from the “Deleted Items” folder, the client will also remove the mail from the server after deleting the mail, so that the mailbox cannot be accidentally filled.
The settings can be saved by clicking OK.
After entering the information, click Next.
On the next page, the Wizard congratulates you.
Click Finish to successfully set up your email address.
Setting up Microsoft Outlook Express with IMAP protocol
Create a mailbox! (How to create E-mailbox in cPanel?)
After creating the mailbox, in the cPanel interface, under Email Accounts in the Mail box, scroll down to Email Accounts and click Set Up Mail Client. cPanel will display the information required for setup.
If you want to use the mail.yourdomain.tld server in the description, replace it with your own domain name.
If you want to use the hostingID.loginssl.com server, enter your cPanel username instead of hostingID.
ADD A MAILBOX
After installing and starting the program, you can use the Internet Connection Wizard to set up your mailbox.
Internet Connection Wizzard – Name
As a first step, enter your name, you can enter anything here, but it is advisable to enter an identifier, a name with which those to whom you will send a letter can identify you. So this name will be seen as the sender by those who receive an email from you.
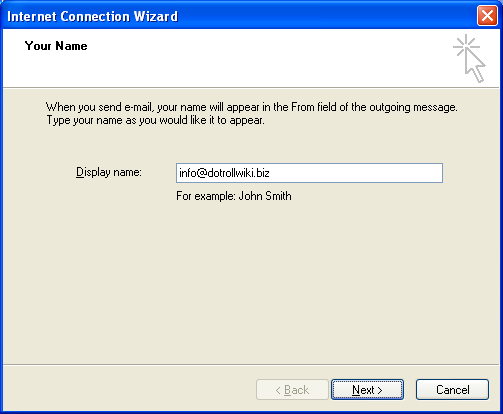
Internet Connection Wizzard – Your Name
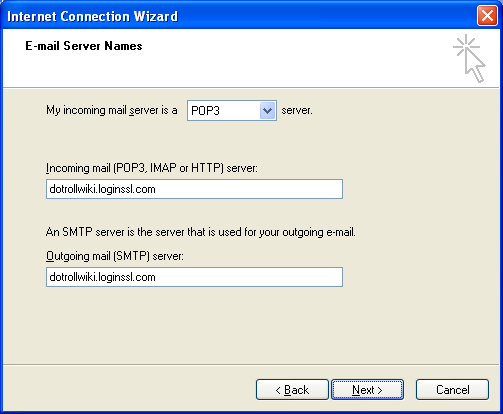
You will then need to enter the email address you created in the cPanel interface.

Internet Connection Wizzard – IMAP Connection
If you click Next, you have the option of specifying the Incoming mail (POP3, IMAP, or HTTP) server and the Outgoing mail (SMTP) server. For IMAP mail, both Incoming and Outgoing mail servers will be as follows:
hostingID.loginssl.com
You must enter your hosting ID, which is the same as the username for the cPanel interface, before the address ending in .loginssl.com in the image and above. To view your cPanel login at https://admin.dotroll.com, follow these steps:
- After logging in, click Services / My Services in the Top menu bar.
- On the page that appears, click the Active button at the end of the hosting service line for that domain name.
- In the middle of the page, under the Hosting Information tab, you will find the cPanel user name.
After entering the information, click Next.
The next step is to enter the email address associated with the mailbox and the password set for it.
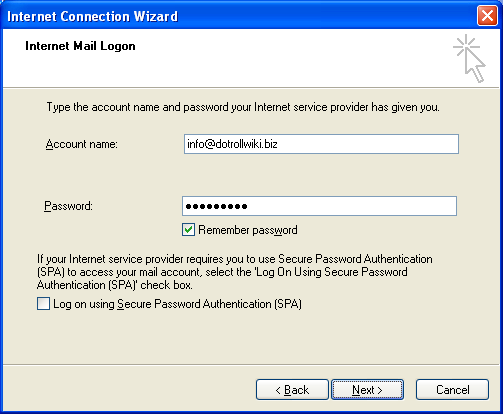
Internet Connection Wizzard – Account login name and password
In the Account Name field, enter the full email address created in the cPanel interface. In the password field, enter the password that you set for the affected mailbox.
When entering the password, make sure that the password can contain uppercase and lowercase letters as well as numbers. Check Remember password.
Do not select the Log on using Secure Password Authentication option in the window.
After entering the information, click Next.
On the next page, the Wizard congratulates you. Click Finish to successfully set up your email address.
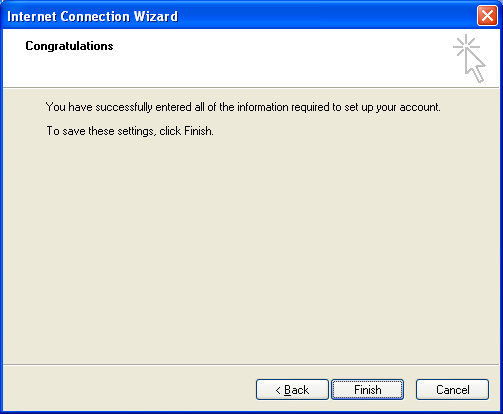
Internet Connection Wizzard – Finish
CHANGE MAILING SETTINGS
After that, Outlook Express starts. After startup, click Tools / Accounts… in the top menu bar.
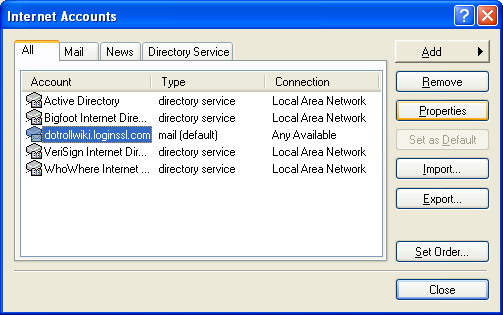
Internet Accounts window
In the Internet Accounts window, select the server you just specified.
Tip: Clicking the Mail tab displays only the servers used for mail.
After selecting, click the Properties button.
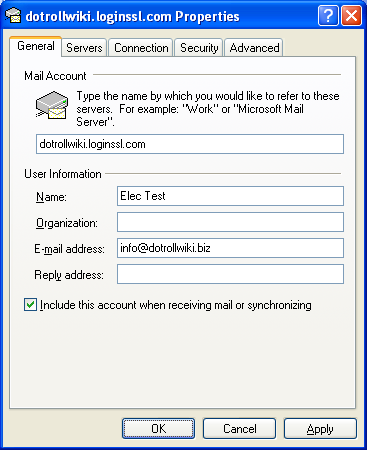
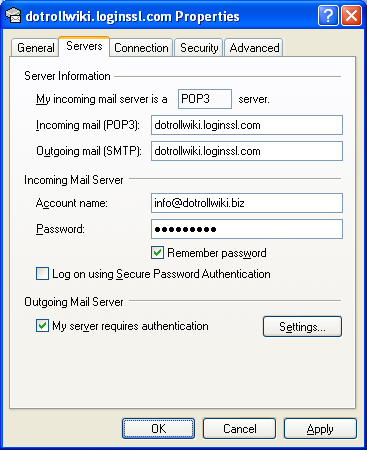
Mailbox Properties – General tab
Clicking the Properties button will accept the General tab. Here you can enter another name, e-mail address, reply e-mail address. Alternatively, you can rename the account here to better identify it.
The Servers tab is important, here you can check the most important components of your account settings.
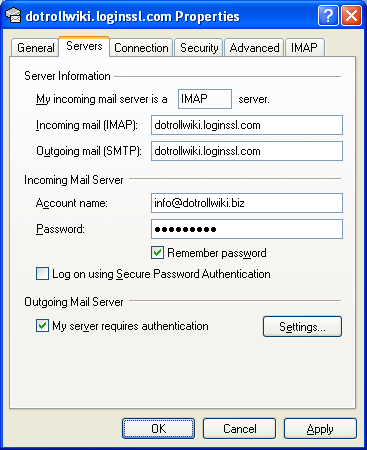
Mailbox Properties – Servers tab
Incoming (IMAP) mail server, Outgoing (SMTP) server, and account name and password.
In the Outgoing Mail Server section, select the My server requires authentication check box before the line.
Then click the Settings… button that becomes active.
Outgoing Mail Server – Log on parameters
By default, the first radio button is selected. Use same settings as my incoming mail server, you must change this to Log on using and re-enter the email address and password for the mailbox. Check Remember password.
Do not select the Log on using Secure Password Authentication option in the window.
After entering the information, click OK.
CHANGE ADVANCED SETTINGS
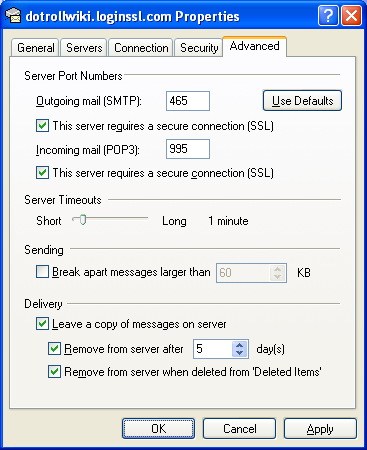
After the pop-up window closes, click the Advanced tab
Mailbox Properties – Advanced tab
On the Advanced tab, you need to make the following settings:
- Check the box next to This server requires a secure connection (SSL).
- Server ports should be set to 465 for Outgoing mail (SMTP) and 993 for Incoming mail (IMAP).
On the last IMAP tab, you can turn on the Check for new messages in all folders option and specify Special folders.
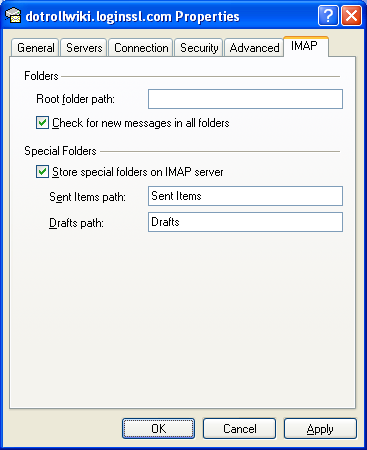
Mailbox Properties – IMAP tab
Under Store special folders on IMAP server, you can specify the Sent Items path and the Drafts path.
If you want the software to check for new messages in each folder, select the check box before Check for new messages in all folders.
If you also want to access sent messages in the webmail interface, check the Store special folders on IMAP Server, and the enter Sent Items in the Sent Items path box.
If you also want to synchronize drafts to the server, enter Drafts in the box next to Drafts path under Store special folders on IMAP Server.
The settings can be saved by clicking OK.
How to Change the Number of Mail Server Connections
If multiple mailboxes are used by using multiple parallel mail clients running an IP address, some clients may not be able to connect to the server.
FOR THUNDERBIRD:
In this case, under Tools / Account Settings, select the Server Settings under the mailbox.
Click the Advanced button, then in the Maximum number of server connections to cache, reduce the set value to 1, and then click OK.
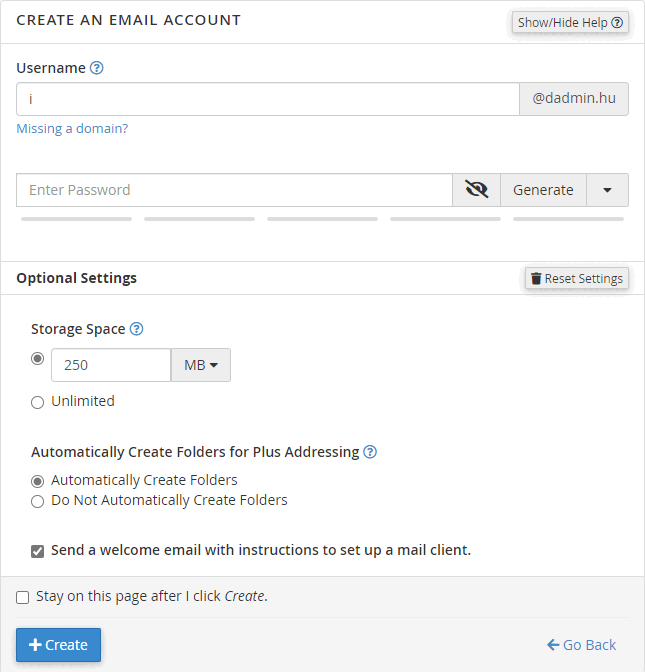
How to Create an Email Account in cPanel
- Enter the cPanel interface with your username and password. You can access cPanel’s interface with any domain name that is included on the cPanel server. http://yourdomainname.tld/cpanel.
CREATE A MAILBOX
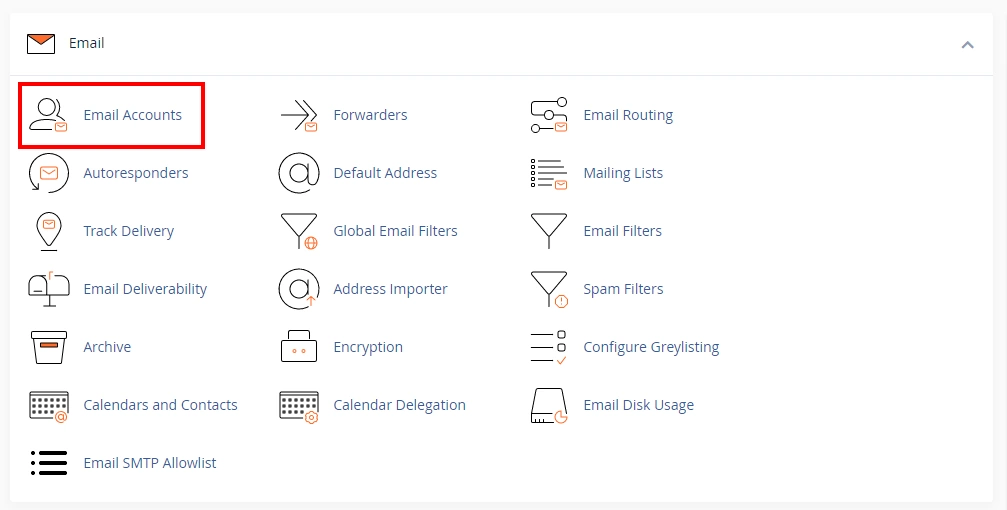
- After logging in, find the Email Accounts menu, and click on it.
- On the page that appears, click the Create button.
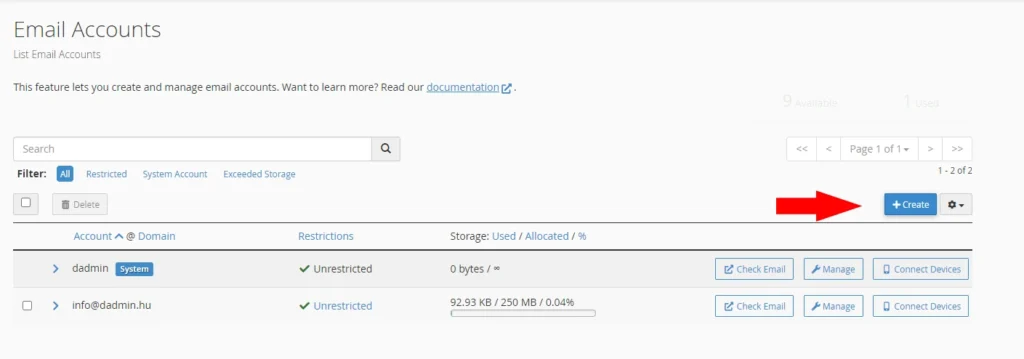
SET MAILBOX PROPERTIES
-
- After loading the page, you must provide the following information:
- Under Domain, select the domain name for which you want to create a mailbox.
- Enter the prefix for @ for the Username
- In Security, you have the option:
- To set a Password
- Enter the password for the mailbox or generate a password.
- Set the mailbox size
- or if you want to use the email address you want to create as just one email forwarding, you can enter a destination email address for which you want to send mail.
- To set a Password
- Once you have made the settings, click Create.
How to Protect Your Email from Spam
DKIM
DKIM (DomainKeys Identified Mail) is a cryptographic method for signing mail. Mail is signed with the private key on the mail server. The public key may be retreived from the domains TXT record for verification.
SPF
WORKING
The SMTP protocol was not originally designed to be very resistant to spoofing. SPF tries to help by reading rules about sender servers from the domain TXT records.
PROBLEMS
SPF does not take redirected mail into account. Due to SPF, all redirected mail would be discarted as fake.
RECOMMENDATION
Don’t use SPF. Instead, use DKIM.
Further reading:
Wikipedia
Why you shouldn’t jump on the SPF bandwagon
Sender Policy Framework project
DCC
DCC (Distributed Checksum Clearinghouses) creates a checksum from all mail. If the same checksum is detected many times, the spam score is increased.
PYZOR
Pyzor is an offspring of Razor and works in a similar manner. Mail checksums are collected and checked against multiple rules on central servers.
RAZOR
Razor is a closed source community spam filter. Further reading: Vipul’s Razor
Setting up Microsoft Outlook Express with POP3 protocol
Create a mailbox! (How to create E-mailbox in cPanel?)
After creating the mailbox, in the cPanel interface, under Email Accounts in the Mail box, scroll down to Email Accounts and click Set Up Mail Client. cPanel will display the information required for setup.
If you want to use the mail.yourdomain.tld server in the description, replace it with your own domain name.
If you want to use the hostingID.loginssl.com server, enter your cPanel username instead of hostingID.
ADD A MAILBOX
After installing and starting the program, you can use the Internet Connection Wizard to set up your mailbox.
Internet Connection Wizzard – Name
As a first step, enter your name, you can enter anything here, but it is advisable to enter an identifier, a name with which those to whom you will send a letter can identify you. So this name will be seen as the sender by those who receive an email from you.
Internet Connection Wizzard – Your Name
You will then need to enter the email address you created in the cPanel interface.
Internet Connection Wizzard – POP3 Connection
If you click Next, you have the option of specifying the Incoming mail (POP3, IMAP, or HTTP) server and the Outgoing mail (SMTP) server. For POP3 mail, both Incoming and Outgoing mail servers will be as follows:
hostingID.loginssl.com
You must enter your hosting ID, which is the same as the username for the cPanel interface, before the address ending in .loginssl.com in the image and above. To view your cPanel login at https://admin.dotroll.com, follow these steps:
- After logging in, click Services / My Services in the Top menu bar.
- On the page that appears, click the Active button at the end of the hosting service line for that domain name.
- In the middle of the page, under the Hosting Information tab, you will find the cPanel user name.
After entering the information, click Next.
The next step is to enter the email address associated with the mailbox and the password set for it.
Internet Connection Wizzard – Account login name and password
In the Account Name field, enter the full email address created in the cPanel interface. In the password field, enter the password that you set for the affected mailbox.
When entering the password, make sure that the password can contain uppercase and lowercase letters as well as numbers. Check Remember password.
Do not select the Log on using Secure Password Authentication option in the window.
After entering the information, click Next.
On the next page, the Wizard congratulates you. Click Finish to successfully set up your email address.
Internet Connection Wizzard – Finish
CHANGE MAILING SETTINGS
After that, Outlook Express starts. After startup, click Tools / Accounts… in the top menu bar.
Internet Accounts window
In the Internet Accounts window, select the server you just specified.
Tip: Clicking the Mail tab displays only the servers used for mail.
After selecting, click the Properties button.
Mailbox Properties – General tab
Clicking the Properties button will accept the General tab. Here you can enter another name, e-mail address, reply e-mail address. Alternatively, you can rename the account here to better identify it.
The Servers tab is important, here you can check the most important components of your account settings.
Mailbox Properties – Servers tab
Incoming (POP3) mail server, Outgoing (SMTP) server, and account name and password.
In the Outgoing Mail Server section, select the My server requires authentication check box before the line.
Then click the Settings… button that becomes active.
Outgoing Mail Server – Log on parameters
By default, the first radio button is selected. Use same settings as my incoming mail server, you must change this to Log on using and re-enter the email address and password for the mailbox. Check Remember password.
Do not select the Log on using Secure Password Authentication option in the window.
After entering the information, click OK.
CHANGE ADVANCED SETTINGS
After the pop-up window closes, click the Advanced tab
Mailbox Properties – Advanced tab
On the Advanced tab, you need to make the following settings:
- Check the box next to This server requires a secure connection (SSL).
- Server ports should be set to 465 for Outgoing mail (SMTP) and 995 for Incoming mail (POP3).
On this tab you have the option to keep the mails on the server.
Please note that if you also store your mail on the server, the mail stored above will take up storage space in your email account, so there may even be a situation where your storage space is full!
The settings can be saved by clicking OK.
Why Emails Go to Gmail Spam and How to Fix It
In the case of your webhosting sent letters to the Gmail system classifies unsolicited mail (spam), you should check the following steps:
-
- In the cPanel interface find the Email box, and click, the Email Deliverability menu.
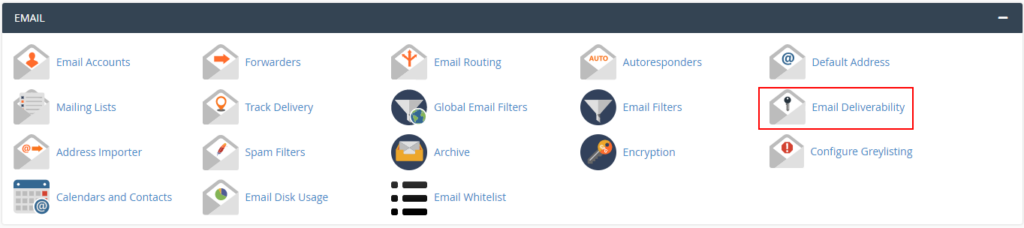
Email Deliverability
- On the page that appears, click the Manage button next to that domain name.
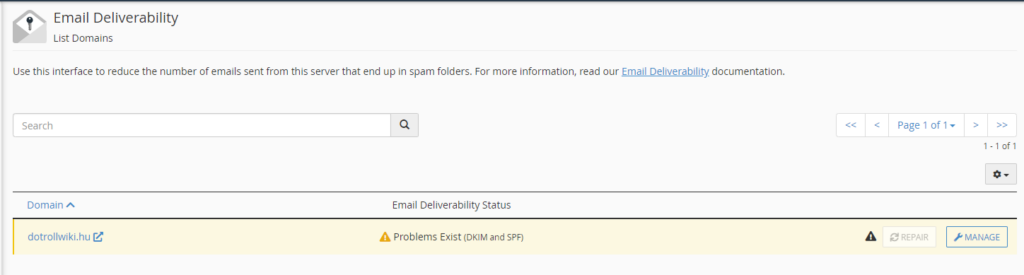
Manage domain
- After loading the page, click on the Install the suggested record button for incorrect or missing items.
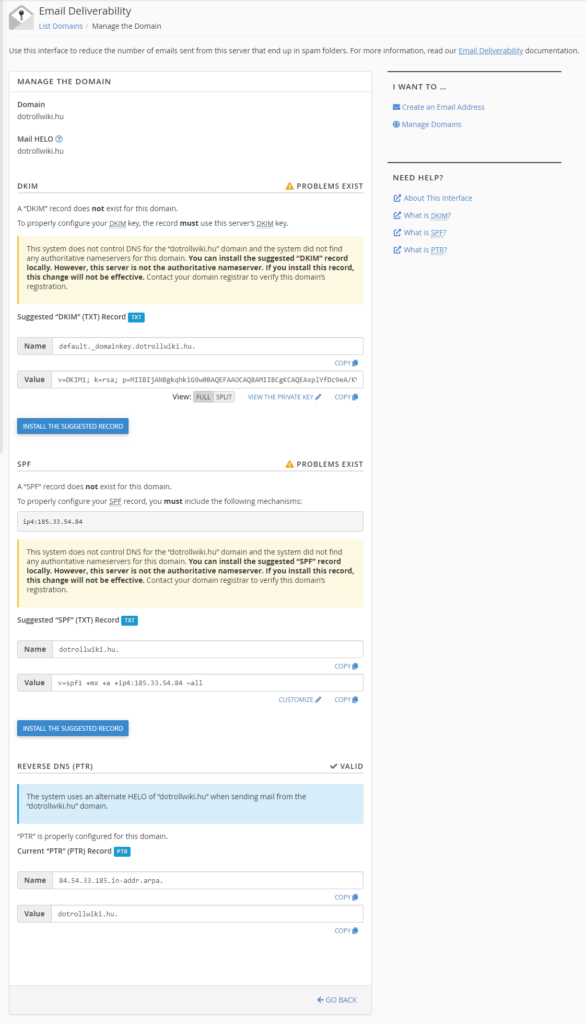
Install the suggested record’s
- In the cPanel interface find the Email box, and click, the Email Deliverability menu.
In case you use the name servers for the hosting, cPanel will automatically set the two TXT records required for the domain name, so you have no further action to take.
If for some reason your unique domain name servers to use the name you need to set up a nameserver TXT records manually.
- To query the TXT record in Microsoft Windows:
- Windows XP: Start Menu -> Run -> Type “cmd” without quotes -> Enter Enter
- Windows Vista / 7 / 8 / 8.1 / 10: Start Menu -> enter in the search box without “cmd” quotes -> Enter Enter!
To query the SPF record, enter the following in the window that appears:
nslookup -q=TXT the_indicated_domain_namewe will get a similar answer:
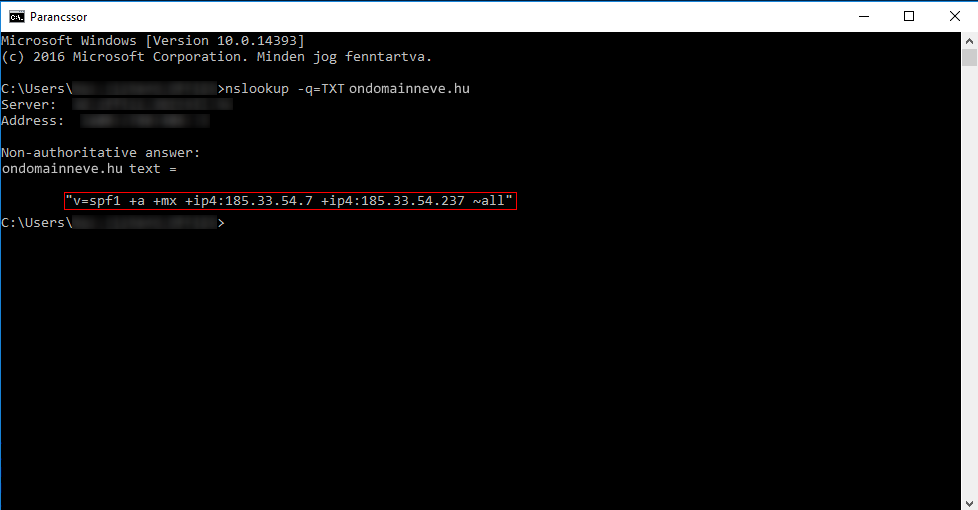
Query SPF record
To query the DKIM record, enter the following:
nslookup -q=TXT default._domainkey.the_indicated_domain_namewe will get a similar answer:
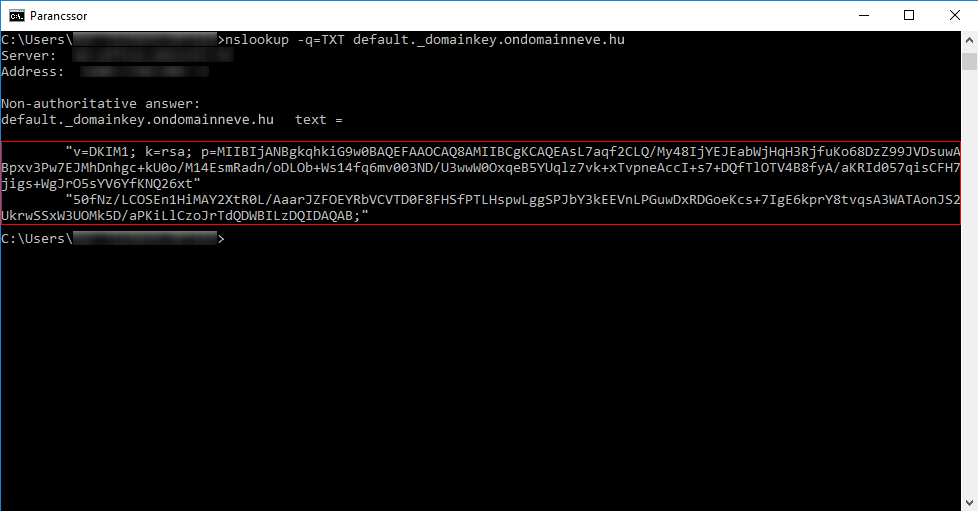
Query DKIM record
In both cases, the data contained in the quotation marks received as a divorce should be included as a TXT record in the domain name DNS zone.
In addition, we recommend that you set a DMARC record for the domain name in the domain name DNS zone.
Read more here.
You can test your settings here:
https://www.mail-tester.com/spf-dkim-check