cPanel
- How to Set Up Email on iPhone and iPad
- How to Set Up TortoiseSVN
- How to Install and Run Python Django in cPanel
- How to Use Node.js in cPanel Hosting
- Common Issues After a MySQL Server Upgrade and How to Fix Them
- How to Add Addon and Parked Domains in cPanel
- How to Install an SSL Certificate in cPanel
- How to Set Up Redis Access in cPanel Hosting
- What to Do If You Forgot Your cPanel Password
- How to Access AWStats Without Logging Into cPanel
- How to Create a Database Backup in cPanel
- How to Generate and Configure SSH Keys
- How to Use lsPHP on cPanel Hosting
- How to Use the Redirect Tool in cPanel
- How to Create and Edit Files Using cPanel File Manager
How to Set Up Email on iPhone and iPad
LOG IN TO THE CPANEL INTERFACE AND CREATE THE MAILBOX YOU WANT TO SET UP
- Use your device to log in to the cPanel interface.
- Create a mailbox! (How to create E-mailbox is cPanel?)
DOWNLOAD PROFILE TO YOUR DEVICE
- After you have created the mailbox in the cPanel interface, scroll down to the Email accounts section in the Mailbox under Email accounts and click on Connect Tools.

Connect Devices
- Tap the IMAP SSL/TLS link to download the profile with configuration settings.

IMAP over SSL/TLS
- The interface will display the following message, approve it:
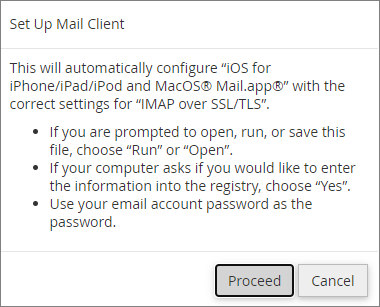
Set Up Mail Client
SETUP PROCEDURE
The setup is similar for iPhone and iPad. To set up, follow the steps below:
- Approve the warning message that appears to download the profile to your device.
- Navigate to the Settings menu, where you tap Profile downloaded under your Apple profile.
- The device will then load the data in the saved configuration file and display it, tap Install here.
- Then tap the Install button at the bottom.
- Enter the password for the mailbox you want to set up, then tap Next in the top right corner.
- Finally, tap Done.
Quick setup Mail on iPhone
Quick setup Mail on iPad
How to Set Up TortoiseSVN
-
GENERATE SSH KEY, OR SET IT UP
-
CONNECT VIA SSH
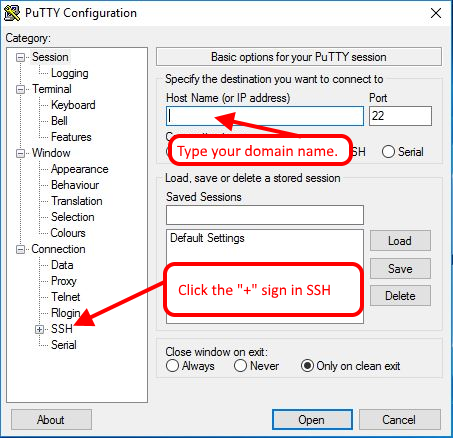
PuTTY login
In Host Name (or IP address), enter the name of your main domain.Port is the default port 22.
Next, click the “+” sign next to SSH.
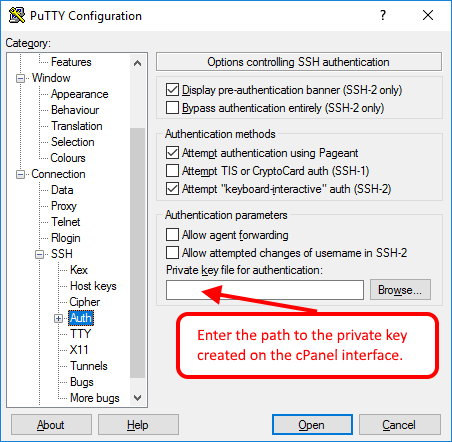
PuTTY login
In the Private key file for authentication box, enter the key for the cPanel interface or the private key that you created earlier.
You can then save the configuration, but you can also connect to your storage immediately. -
CREATING SVN DIRECTORY
The directory and the repository itself must be created through SSH:
   cd wwwroot
   mkdir svn
   cd svn
   svnadmin create reponeve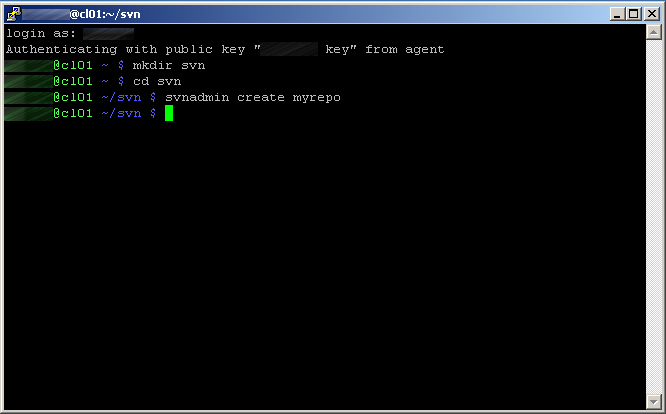
Create SVN repo
-
SETUP TORTOISESVN
In TortoiseSVN, only the name of the program required for the connection is required.
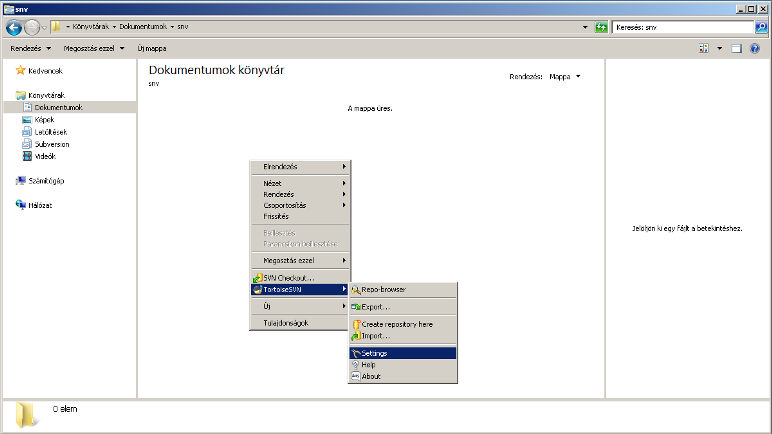
TortoiseSVN Settings
Click the right mouse button in the folder, and select Tortoise SVN/Network menu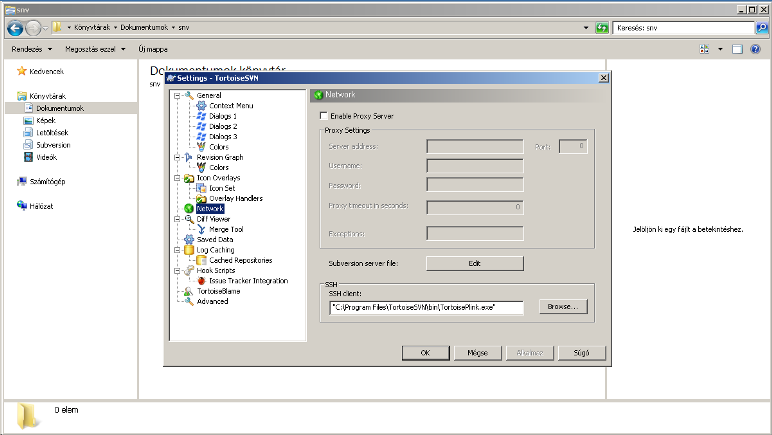
TortoiseSVN Settings
Click the Browse button for SSH client, then enter the path for the folloving line:C:\Program Files\TortoiseSVN\bin\TortoisePlink.exeNext click Ok.
-
CHECKOUT
To set up the repository, click the right mouse button, then select SVN Checkout… menu
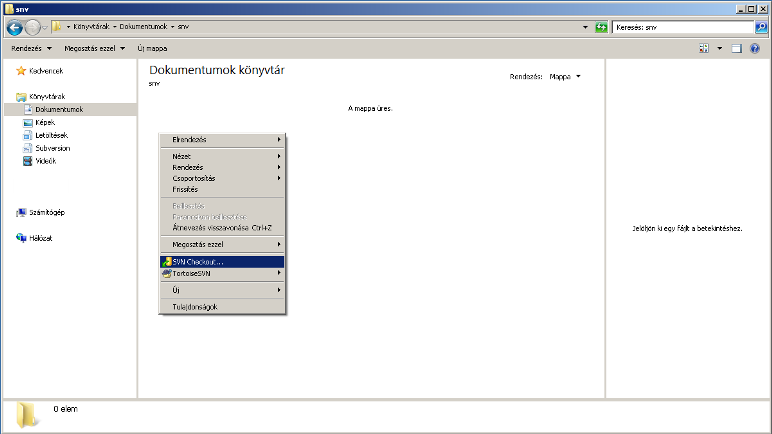
Checkout
To use SVN, you must specify the repository URL as follows:svn+ssh://az_on_fodomain_neve/home/tarhelyazonosito/path/to/svn/repo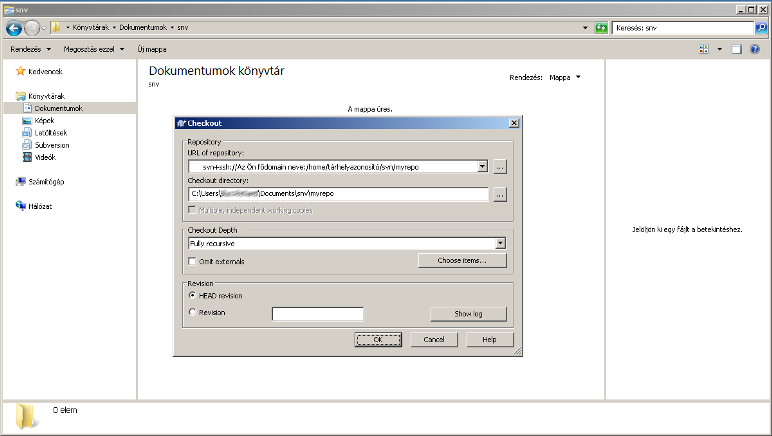
SVN repository URL
How to Install and Run Python Django in cPanel
Django is a Python-based framework that allows you to create websites quickly and easily. Use this description to set up the Django framework. After setup, you will get a working Django page that allows you to:
- Load static pages with a specific domain name
- Loading the Django administration interface
- SQLite database usage
CREATE A PYTHON APPLICATION IN THE CPANEL INTERFACE
- Log in to your cPanel account
- Find the Python application setup menu item and click on it
- Setting up a Python application
- On the page that appears, click Create Application
- For Python version, select version 3.8.1.
- Enter the application directory (Application root /home/cpanel_username/), for example: application
- In the Application URL section, select the domain name and leave the following field blank.
- Also leave the Application launch file and Application entry point fields blank.
- On the page that appears, click Create Application
In this case, cPanel will automatically create the passenger_wsgi.py file and the default interpreted boot environment.
-
-
- In the field after Passenger log file, you can enter the name of the log file that can help you troubleshoot.
- Then click the Create button in the upper right corner. cPanel then creates the Python application and sets the environment variables.
- Copy the command after Enter to the virtual environment. To enter to virtual environment, run the command: at the top of the page, as you will need this command to configure the application.
-
SETTING UP DJANGO
After creating a Python application, the following tasks must be performed from the command line (You can also use the Terminal menu item in the cPanel interface for this purpose, but you can also connect to the repository using an SSH client.):
- Installing Django
- Create and configure the Django project
- Configure the Passenger for use with Django
Procedure for the above steps:
- Log in to your webspacee via SSH or launch the Terminal menu item available from the cPanel interface.
- Activate the virtual environment by pasting and running the previously copied command, for example:
source /home/cpanel_username/virtualenv/application/3.8/bin/activate && cd /home/cpanel_username/application
The command line now begins with (application: 3.8), indicating that the application is working in a virtual environment with Python 3.8. All of the following commands in this article assume that you are working in a Python virtual environment. If you log out of the SSH session (or deactivate the virtual environment with the deactivate command), make sure that you have reactivated the virtual environment before performing any of the following steps.
- To install Django, issue the following commands:
cd ~
pip install django==2.1.8
To verify the Django installation, issue the following command:
django-admin --version
- Create the Django project by issuing the following command:
django-admin startproject application ~/application
- Create static project directories by issuing the following commands:
mkdir -p ~/application/templates/static_pages
mkdir ~/application/static_files
mkdir ~/application/static_media
- Using a text editor, open the ~/application/application/settings.py file and make the following changes to the file:
- Find the ALLOWED_HOSTS line item and make changes as follows. Replace example.com with your own domain name:
ALLOWED_HOSTS = ['example.com']
- Locate the TEMPLATES block and modify it as follows:
TEMPLATES = [ { 'BACKEND': 'django.template.backends.django.DjangoTemplates', 'DIRS': [os.path.join(BASE_DIR,'templates')], 'APP_DIRS': True, 'OPTIONS': { 'context_processors': [ 'django.template.context_processors.debug', 'django.template.context_processors.request', 'django.contrib.auth.context_processors.auth', 'django.contrib.messages.context_processors.messages', ], }, }, ] - Find the line STATIC_URL and add the following lines:
STATIC_URL = '/static/'
STATIC_ROOT = os.path.join(BASE_DIR, 'static_files')

MEDIA_URL = '/media/'
MEDIA_ROOT = os.path.join(BASE_DIR, "static_media")
- Find the ALLOWED_HOSTS line item and make changes as follows. Replace example.com with your own domain name:
- Using a text editor, open the ~/application/application/urls.py file, then delete the entire contents and paste the following contents:
from django.contrib import admin from django.urls import path, include from django.conf import settings from django.conf.urls.static import static from django.conf.urls import url from django.views.generic.base import TemplateView urlpatterns = [ path('admin/', admin.site.urls), url(r'^$', TemplateView.as_view(template_name='static_pages/index.html'), name='home'), ] + static(settings.MEDIA_URL, document_root=settings.MEDIA_ROOT) urlpatterns += static(settings.STATIC_URL, document_root=settings.STATIC_ROOT) - Using a text editor, open the file ~/application/passenger_wsgi.py then delete the entire contents and paste the following contents:
import os import sys import django.core.handlers.wsgi from django.core.wsgi import get_wsgi_application # Set up paths and environment variables sys.path.append(os.getcwd()) os.environ['DJANGO_SETTINGS_MODULE'] = 'alkalmazas.settings' # Set script name for the PATH_INFO fix below SCRIPT_NAME = os.getcwd() class PassengerPathInfoFix(object): """ Sets PATH_INFO from REQUEST_URI because Passenger doesn't provide it. """ def __init__(self, app): self.app = app def __call__(self, environ, start_response): from urllib.parse import unquote environ['SCRIPT_NAME'] = SCRIPT_NAME request_uri = unquote(environ['REQUEST_URI']) script_name = unquote(environ.get('SCRIPT_NAME', '')) offset = request_uri.startswith(script_name) and len(environ['SCRIPT_NAME']) or 0 environ['PATH_INFO'] = request_uri[offset:].split('?', 1)[0] return self.app(environ, start_response) # Set the application application = get_wsgi_application() application = PassengerPathInfoFix(application) - Then create the default index.html file within the ~/application/templates/static_pages directory. this file is a default static file that displays only the text Hello World.
- Issue the following command:
python ~/application/manage.py migrate
- Create the administrator user using the following command: To do this, first issue the following command:
python ~/application/manage.py createsuperuser
When prompted for the Username, type the new user name and press enter.
When prompted for an email address, type the email address and press enter.
When prompted for the administrator password, type the new password, and then press enter:
- You can compile static content by issuing the following command:
python ~/application/manage.py collectstatic
When prompted to overwrite existing files, type yes and then press enter.
- Restart Python in the cPanel interface.
- To do this, find and click Python Setup in the cPanel
- On the Web Applications tab, locate the application, and then click Restart Application in the Actions column.
- The last step is to test the application via the set URL:
- In a browser, open the website (http://www.example.com/) where the index.html file should appear. It is important to replace the domain name example.com with the domain name you are using.
- The next step is to open the address http://www.example.com/admin/ where the administration interface of the Django application should appear. It is important to replace the domain name example.com with the domain name you are using.
In case the desired content does not appear in the browser, try running the application from the command line using the following command:
python ~/application/passenger_wsgi.py
In this case, the console will display the cause of the error. If you specified the logging path when setting up Python, errors are also recorded in the log file.
MORE INFORMATION
Since the current application is already running, you can actually start developing your own application, for which you can find further help at the following links:
- The official documentation for Django is available at: http://docs.djangoproject.com.
- For Django extensions, visit https://github.com/django-extensions/django-extensions.
- The south library is a popular add-on to database migrations that you can learn more about at https://pypi.python.org/pypi/South.
- The fabric library helps simplify application development, more detailed information can be found here http://docs.fabfile.org.
How to Use Node.js in cPanel Hosting
Node.JS based programs can be run in our hosting packages. To run the programs, the following settings must be made on the storage.
USE IN DEFAULT CGI MODE
It is possible to run NodeJS scripts via the #!/bin/env node shebang line and the appropriate Apache handler in cgi mode. If the Node.JS program you want to run is jscrpt, then you need to add the appropriate Apache administrator. Use cPaneles File Manager or an FTP client to connect to the storage space and then log in to the library where you uploaded the files and folders of the program.
Create a .htaccess file and upload it with the following content:
AddHandler cgi-script .jscript
The setting can be set globally, in this case the entire storage will be valid.
In this case, log on to the cPanel interface and then find the Apache Keypad in the Advanced Settings box.

Advanced / Apache Handlers
On the page that appears, add the following extension in the Create an Apache Handler section:
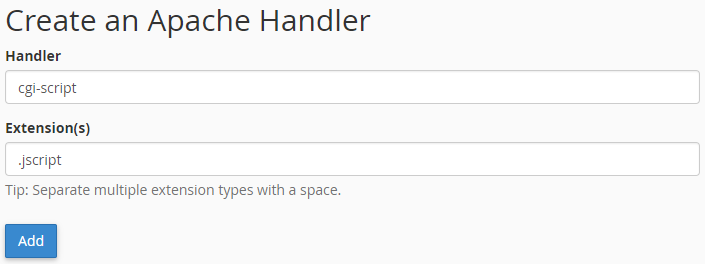
Create an Apache Handler
Handler: cgi-script
Extension(s): .jscript
You can test your storage settings by creating the following popup file. Make a file with the text editor (for example, Notepad ++) with the following content:
#!/bin/env node
console.log("Content-Type: text/html;charset=UTF-8\n");
console.log("Hello World!");
Save the file as a test.jscript file under UNIX standard lineup (LF), then upload it to your storage. After uploading, the file must be set to 755 or rwxr-xr-x. You can modify the privilege using the FTP client program. Then, in the browser, call the prepared page (http://yourdomainname.tld/test.jscript) here in Hello World! must be inscribed.
SET UP ALTERNATIVE CGI MODE
After making the settings in this description, the .js files from the browser will be run by the cgi-bin/cgi-node program. To use CGI-Node.js, download the latest release from http://www.cgi-node.org/downloads.
They suggest that you download the cgi-node.min.js file, as this web site provides faster service. Rename the downloaded file to cgi-node, open with a text editor and replace the first line with:
#!/bin/env nodeNext, find the SessionPath variable in the file. Set a variable as a directory that can not be accessed through a browser. For example: /home/YOUR_CPANEL_USER_NAME/tmp/cgi-node-session. Then save the file and then upload it to your cgi-bin folder. Also set a 755 privilege for the file.
If you specify a non-existent directory in the file, you will create it on your storage after uploading it.
Next, create a .htaccess file in the root directory of the web site with the following content.
Action     cgi-node     /cgi-bin/cgi-node
 AddHandler cgi-node     .js
To test your settings, you need to create a file with a text editor in your site’s root directory. The file contains the following content:
CgiNodeInfo();For example, save the created file, for example, as body.jscript, then call the page (http://yourdomainanme.tld/test.jscript). Your browser will display a spreadsheet that will show the variables in the run environment.
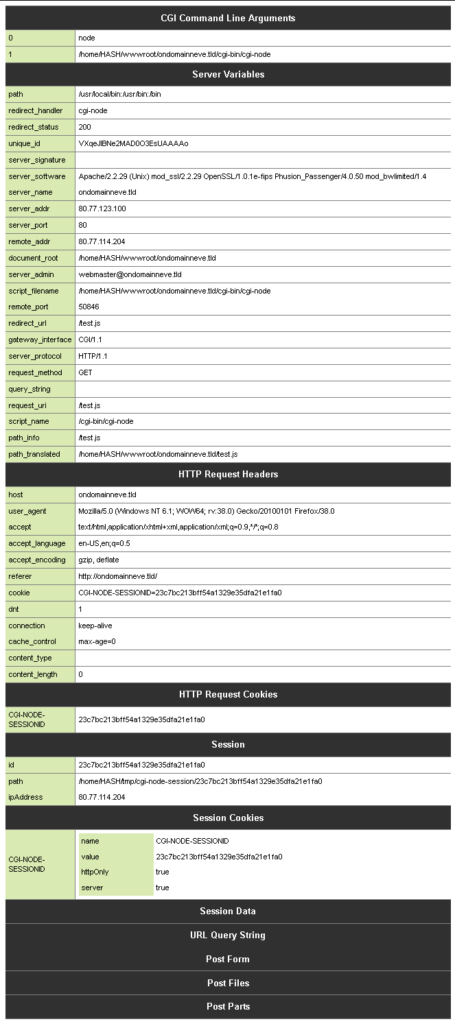
Node.JS test page
Common Issues After a MySQL Server Upgrade and How to Fix Them
If you encounter an error message similar to the following during the operation that you want to perform on the MySQL server:
Field 'field_name' doesn't have a default valueThen we recommend that you run the following query after building a MySQL connection:
Up to PHP version 5.7 you should use the following code:
mysql_query("SET SESSION sql_mode = ''");From PHP version 7.0 or higher, you should use the following line of code:
mysqli_query("SET SESSION sql_mode = ''");How to Add Addon and Parked Domains in cPanel
For paid web hosting services, you have the option to add additional domain names beyond your domain name to your storage. You can also check the number of additional domain names that you specify in each hosting package on the page below: Storage Services.
WHAT IS THE ADDITIONAL DOMAIN NAME?
For cPanel storage, a main domain name that is assigned to the public_html folder is set at the time of ordering.
If you have more than one registered domain name (even with other registrars), you can switch to cPaneles hosting.
WHAT IS ALIAS?
You can set the domain name alias as unlimited to any cPaneles hosting package. If a domain name is used for aliases, it will display the same content as the main domain name in the browser after it is set up. The alias that are added to the cPanel interface can only be assigned to the public_html folder. If you add a domain name as alias to your storage, you will also need to migrate the name servers to cPaneles named names for correct operation.
IN WHICH CASE CAN I NOT ADD A DOMAIN NAME TO AN ADDITIONAL DOMAIN NAME OR ALIAS?
If you can not connect to storage if the domain name has been previously added to another hosting as an Additional Domain Name or alias. In this case, the domain name must first be separated from the other storage.
PRE REQUIREMENTS FOR THE ADDON DOMAINS:
Prior to setup, we recommend that you check the cPanel interface number for the currently added and add-in Additional Domain Names. This can be viewed on the cPanel interface in the left column of stats in the Additional Domains line. If you are using the add-on domains that you can add, you can switch to a hosting package here.
Add an additional domain name to the cPanel interface
In cPanel, in the Domains box, select Additional Domains.
Here, you’ll need to provide the following information:

Add an Alias domain name to the cPanel interface
In cPanel, in the Domains box, select the Alias menu.
The following data must be provided:

Finally, click Add Domain. You can convert the accented domain names on the page below: Convert an accent domain name
NAME SERVER CHANGE PROCESS
For a domain name registered with DotRoll:
If the domain name is registered in the DotRoll system, the name servers of the domain name must be changed on the DotRoll administrative interface after the registration.
To do this, follow these steps:
- Enter DotRoll.com with your username and password.
- Click Domains -> My Domains
- Click the Active button for that domain name
- In the left Manage box, click Nameservers
- Check the Use webhosting nameservers option
- Click Change Nameservers button of the bottom.
For a domain name registered with another registrar organization:
In case the domain name was registered with another registrar organization, the name servers of the given registrar organization must be changed to:
- Primary Nameserver: ns1.webspacecontrol.com
- Secondary Nameserver: ns2.webspacecontrol.com
After changing the name servers, you have to wait until the DNS settings are updated; this may take up to 24-72 hours depending on the ISPs.
How to Install an SSL Certificate in cPanel
If the certificate was previously installed on storage, you can configure it through the cPaneles interface as follows:
- Log on to the cPanel interface and find and click on SSL/TLS in the Security box.
- On the page that appears, select the Install and Manage SSL for your site (HTTPS).
- Once the page has been loaded, locate the Install an SSL Website section and select the Domain name under Domain label from the drop-down list and click Autofill by Domain button.
- Then scroll down to the bottom of the page and click the Install Certificate button.
The server then installs the certificate to that page, and from then on, the affected domain name can be accessed through HTTP and HTTPS.
By installing the certificate, the current http:// links will not automatically be changed, so you have to provide for redirects to the http:// protocol for https://.
For more information on setting forwarding, see:
If the certificate was previously installed on storage, you can configure it through the cPaneles interface as follows:
Log on to the cPanel interface and find and click on SSL / TLS Manager in the Security box.On the page that appears, select the Manage SSLs site under SSL installation and management for your site (HTTPS).Once the page has been loaded, locate the SSL site installation section and select the domain name under Domain Name from the drop-down list and click Auto-fill Domain Name button.Then scroll down to the bottom of the page and click the Install Certificate button.
The server then installs the certificate to that page, and from then on, the affected domain name can be accessed through HTTP and HTTPS.
Warning: By installing the certificate, the current http: // links will not automatically be changed, so you have to provide for redirects to the http: // protocol for https: //.
For more information on setting forwarding, see:
How to Set Up Redis Access in cPanel Hosting
On our web servers, it is possible to use the Redis database with the following parameters:
- uses the storage resources
- max 1 database
- max 100 MB database size
- listening unix domain socketen: /tmp/redis.sock
- password protected, password can be viewed/modifiy here: /var/run/redis/redis.pwd
Setup:
On the cPanel interface, open to the Cron Jobs menu, then add the following task by running it every 5 minutes.
/etc/rc.d/init.d/redis-peruser check >/dev/null 2>&1After you take the corn job, you have to wait 5-10 minutes to get the password required to use the Redis database.
The password for cPanel storage can be found in the following file:
/home/HASH/.cagefs/var/run/redis/redis.pwdHASH must be replaced by the cPaneles login name.
What to Do If You Forgot Your cPanel Password
If you forget your storage, you will be able to set up a new password after signing in at DotRoll.com
After logging in, click Services in the top menu bar
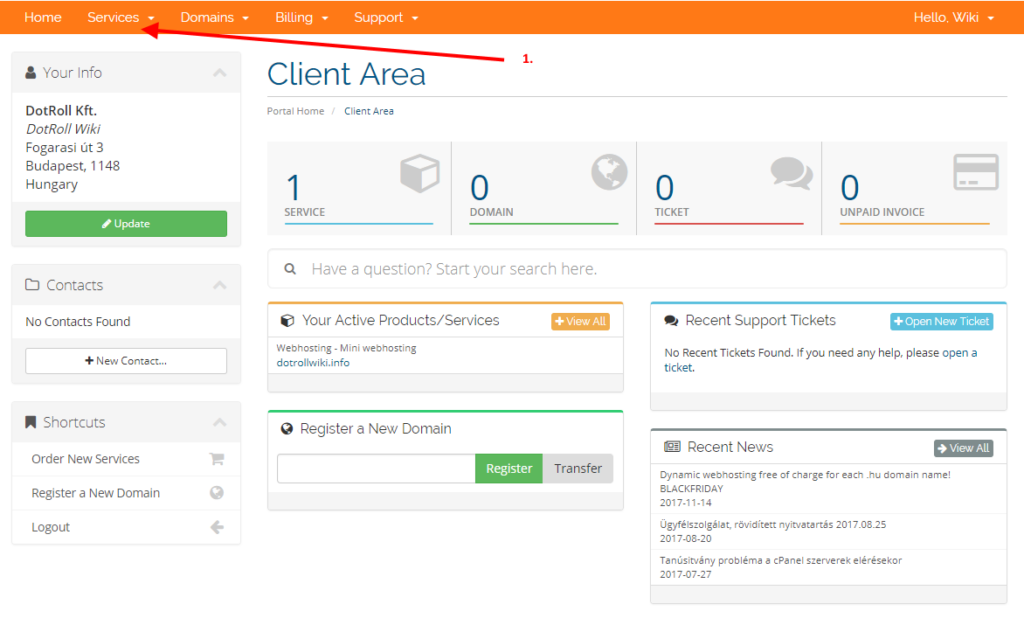
then to My Services

My Services
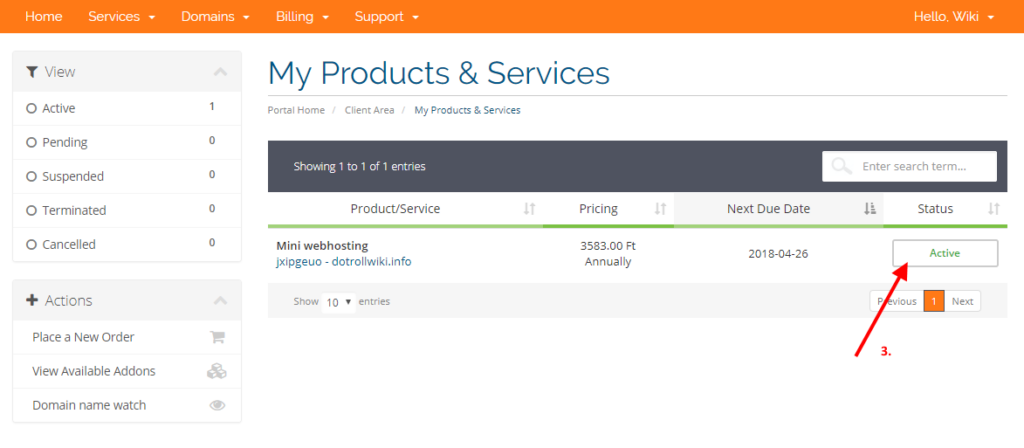
On the page that appears, click on the Active button in the hosting service line:
On the left side of the page, click Change Password:
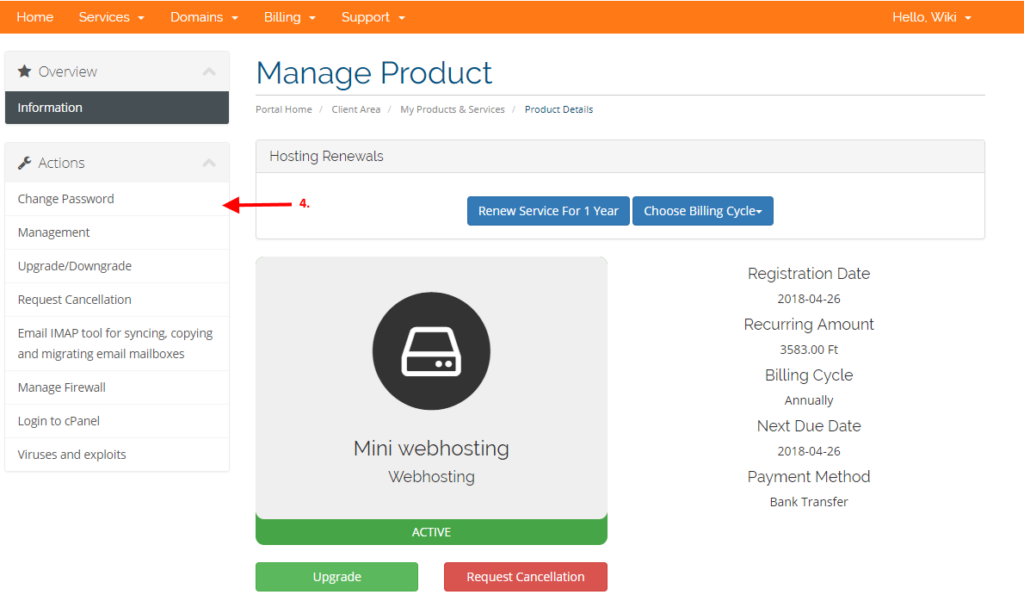
Click Change Password menu
On the page that appears, you can set up a new password.

Set new password
After changing the password, only the newly set password can be accessed by the following features:
- cPanel interface
- connecting to the default FTP user (ftp: //cpanel_username@ftp.yourdomainname.tld)
- the default email account password (cpanel_username@yourdomainname.tld)
How to Access AWStats Without Logging Into cPanel
Yes, it is possible to access your AWStats directly through your domain name.
However, doing this requires you to add a script to your site and configure it. In other words you need to manually install AWStats for your domain.
In order to install AWStats on your domain you can follow the steps below:
- Download Awstats from their website here.
- Extract the contents of the file to your computer.
- Use an FTP client (or File Manager in cPanel) to upload the contents of both the cgi-bin and icon folders into the root directory of your domain.
- Change the permissions of the awredir.pl and awstats.pl files to 755 (in the cgi-bin directory). You can do that with your FTP client.
- The next step is to download the AWStats configuration file from your account to your local computer from /tmp/awstats/awstats.yourdomain.tld.conf
- Open this file with a text editor and go to the “DirIcons” line. Change the value to: DirIcons=”/icon/“.
- Upload the modified file to the cgi-bin folder.
Now you can access your statistics at http://www.yourdomain.tld/cgi-bin/awstats.pl?config=yourdomain.tld
To access HTTPS statistics open your browser the following URL: http://www.yourdomain.tld/cgi-bin/awstats.pl?config=yourdomain.tld&ssl
Note: Please password protect the /cgi-bin folder so that only authorized users can access it (found under cPanel -> Files -> Directory Privacy).
How to Create a Database Backup in cPanel
Almost every modern website uses a MySQL database. More popular content management systems, such as WordPress, Magento, Joomla, store all data in a MySQL database. If, for some reason, we want to back up the database, such as a MySQL server update, then it is possible to extract the data stored in the database or to recover the dump in case of a possible error.
COMPRESS A FOLDER
After you connect to the server via SSH, you can create a backup by issuing the following command:
mysqldump -u user_name -p database_name --single-transaction | gzip -2 > db.sql.gzBy issuing the above command, you create a compressed dump with a single transaction token.
Of course, it is also possible to make an uncompressed dump, but it will take a lot more time and more space will be spent on dumped content.
mysqldump -u user_name -p database_name > db.sqlEXTRACT AN ARCHIVE
You can do this by issuing the following command
gunzip < db.sql.gz | mysql -u user_name -p database_nameTo restore an uncompressed database, use the following command:
mysql -u user_name -p database_name < db.sqlHow to Generate and Configure SSH Keys
The common way to connect to the server via SSH is to use a username and a password. But to increase security, you can use a pair of keys(a private one and a public one) to connect to the server.
The public key will be on the server. The private key will be on your computer. When you are trying to connect, the server compares the two keys. If they are the right ones, you will be able to access it.
We will show in this post how to generate the pair of keys and connect to your server with PuTTY.
To generate and use public and private keys in cPanel:
- Log in to cPanel scroll down to the SECURITY section -> SSH Acces
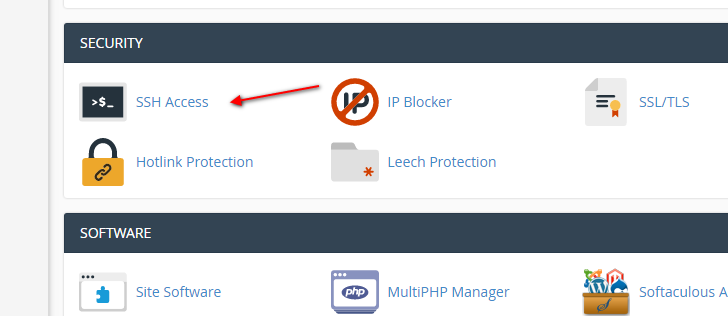
SSH Access
- Click the Manage SSH Keys button
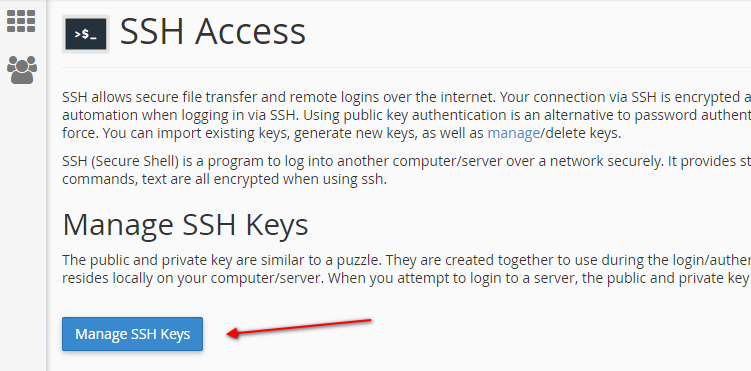
Manage SSH Keys
- On the next page, you can create a new key or import an existing key.
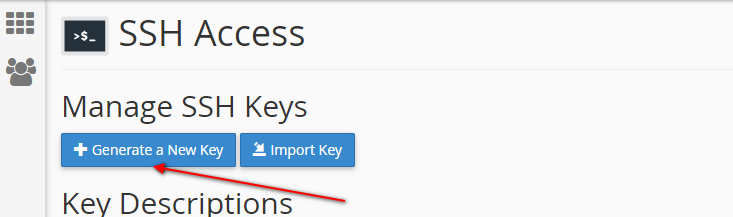
Generate a New Key or Import Key
- Click the Generate a New Key button
- On the next page, enter the name of the key and the password for the key.
- Key Name – you can leave the default value
- Key Password – enter the password for the key and confirm it
- Key Type (RSA or DSA) – let the default value
- Key Size (2048 or 4096) – let the default value
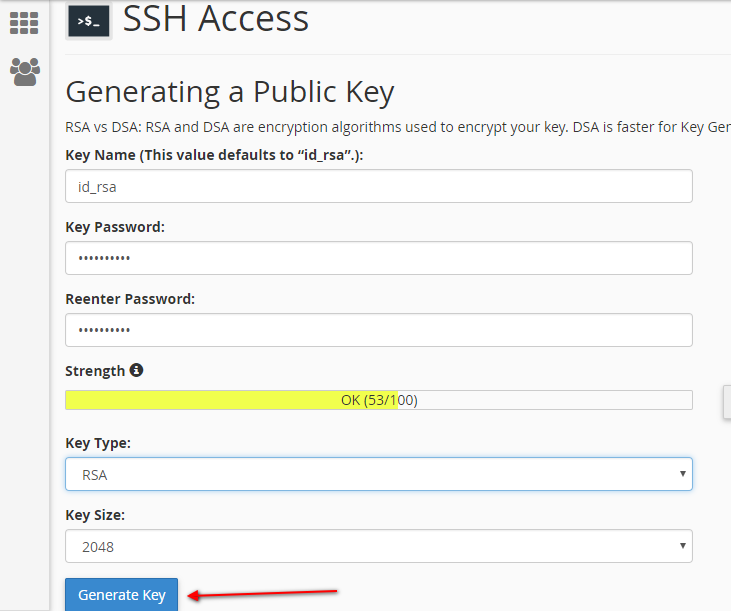
Generate new key
cPanel recommendations:
RSA vs DSA: RSA and DSA are encryption algorithms used to encrypt your key. DSA is faster for Key Generation and Signing and RSA is faster for Verification.
- Click the Generate Key button. You will see a confirmation message: Key Generation Complete! with some details:
Generating public/private rsa key pair.
Enter passphrase (empty for no passphrase):
Enter same passphrase again:
Your identification has been saved in /home/username/.ssh/id_rsa.
Your public key has been saved in /home/username/.ssh/id_rsa.pub.
The key fingerprint is:
b7:9a:55:59:c1:a7:6a:31:5c:9a:40:50:e9:73:24:a0
- Click the Go Back button
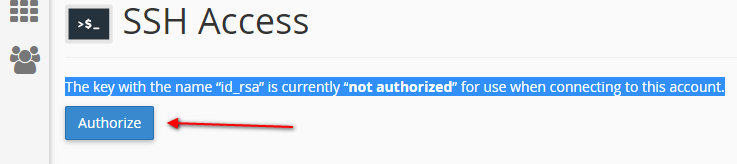
- Now you need to authorize the public key. (the Authorization Status is not authorized). Click the Manage link
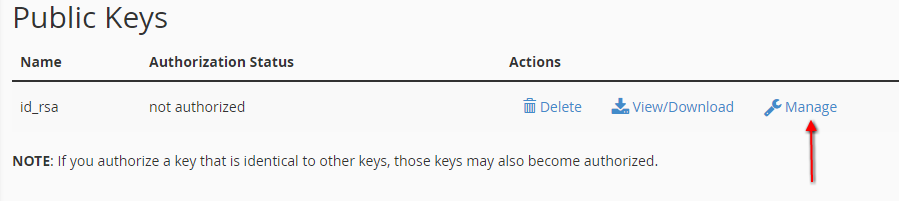
Manage Public keys
- You will see a message The key with the name “id_rsa” is currently “not authorized” for use when connecting to this account. Click the Authorize button. The success message is: The key “id_rsa.pub” has been authorized.
- Click the Go Back button
- Go to the Private Keys sections and click the View/Download link.

View or Download private SSH key
The key that appears on the page that appears can be saved in several formats:
- If you want to connect to the server via MAC or a LINUX distribution, copy the key from the box under Open SSH Key Keyname Open Key and paste it into a simple text editor (such as Notepad, Notepad ++). The last step is to save the file.
- convert the Private Key to PPK format
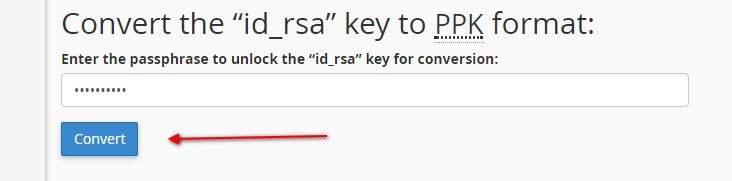
Convert private key to PuTTY PPK format
In case you want to connect to the server with PuTTY, you have to enter the password set for the key and click the Convert button.
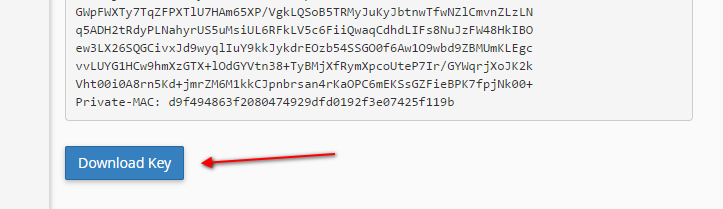
Download converted key
Copy the key from the box under Private SSH Key Keyname Open Key and paste it into a simple text editor (such as Notepad, Notepad ++). As a final step, specify the folder where you want to save the Private Key and name the key so that its extension is in .ppk format.
How to Use lsPHP on cPanel Hosting
WHAT IS LSPHP?
lsphp – PHP + LSAPI.
WHAT IS LSAPI?
LiteSpeed Server Application Programming Interface (LSAPI) is designed specifically for seamless, optimized communication between LiteSpeed Web Server and third party web applications. The lsapi is the fastest and most reliable way to serve PHP pages. It has a low memory footprint and understands PHP directives from .htaccess files.
Works with the PHP versions available in the PHP version option on the cPanel interface.
If you don’t want to use the default PHP version under on your domain name, you need to create a .htaccess file in a particular domain name assigned to a folder (document_root) will be placed into one of the following lines. After setting recursively, all sub-directories will be applied to the setting.
PHP version 4.4:
AddHandler application/x-httpd-lsphp44 .php .php5 .php4 .php3PHP version 5.1:
AddHandler application/x-httpd-lsphp51 .php .php5PHP version 5.2:
AddHandler application/x-httpd-lsphp52 .php .php5PHP version 5.3:
AddHandler application/x-httpd-lsphp53 .php .php5PHP version 5.4:
AddHandler application/x-httpd-lsphp54 .php .php5PHP version 5.5:
AddHandler application/x-httpd-lsphp55 .php .php5PHP version 5.6:
AddHandler application/x-httpd-lsphp56 .php .php5PHP version 7.0:
AddHandler application/x-httpd-lsphp70 .php .php5PHP version 7.1:
AddHandler application/x-httpd-lsphp71 .php .php5PHP version 7.2:
AddHandler application/x-httpd-lsphp72 .php .php5PHP version 7.3:
AddHandler application/x-httpd-lsphp73 .php .php5PHP version 7.4:
AddHandler application/x-httpd-lsphp74 .php .php5PHP version 8.0:
AddHandler application/x-httpd-lsphp80 .php .php5PHP version 8.1:
AddHandler application/x-httpd-lsphp81 .php .php5The module enabled per PHP version is a global setting, but you can change your php.ini settings with a .php.ini file placement. Starting with PHP 5.4 version, you can put a .user.ini file, each of which can override PHP settings for that folder (and its subdirectories).
How to Use the Redirect Tool in cPanel
This tutorial will how you how to use the Redirects tool which will allow you to redirect your domain names.
- 301 or 302 Redirect
- Url to Redirect
- Destination URL
- WWW Redirect options
- Wild Card Redirect
- Login to your cPanel account.
- Click the Domains tab, near the top of the page.
301 OR 302 REDIRECT
From the add redirect menu, you will need to choose which type of redirect to use.
- Permanent 301: A 301 redirect will update the visitors bookmarks and direct search engines to the new site.
- Temporary 302: A 302 redirect will redirect the visitor or search engine, but will not update the bookmark and the search engine will continue to index to the original page.
URL TO REDIRECT
- Choose your domain name you would like to redirect, using the drop-down menu.
- If you would like to redirect a single page or directory; you can use the text field following the drop-down menu to enter the name of the folder or file.
DESTINATION URL
Enter the full URL of the page you will be redirecting to in the “redirects to ->” text field.
Note: You need to enter the protocol as well, e.g. http://, https:// or ftp://
WWW REDIRECT OPTIONS
Select if you will be redirecting www. or not.
- Only redirect with www. – This option will only redirect visitors that use www. as part of the URL
- Redirect with or without www. – This option will redirect all visitors.
- Do Not Redirect www. – This option will not redirect visitors that use www. as part of the URL
- Wild Card Redirect – Click the “Wild Card Redirect’ if you would like to redirect to the same file on the new destination.
Click the “Add” button to create the redirect.
How to Create and Edit Files Using cPanel File Manager
You can create a file through FTP or SSH, and you can access the descriptions below through the following links:
The following description is just an example of how to create or modify a file with cPanel’s built-in File Manager. Following the description, make sure you create the file at the right place. If you modify it, edit the file you want.
CREATE A FILE
You can create a new file in two ways:
-
VIA ONLINE INTERFACE
- Sign in to https://admin.dotroll.com with your username and password.
- Then, in the top menu bar, click Services / My Services.
- Select the hosting service that is associated with the domain name Addon domain or Alias and then click on it.
- On the page that appears, in the Manage Resource box on the left, select File Manager.
- After loading, select the document_root folder for the domain name that you want to create the file for. You can access each folder by clicking on the folder name.
- Next, click on the Create new file button in the middle of the right side of the page.
- In the popup window that appears, under the File Name box, type the name of the file, then click the Create button.
-
VIA CPANEL INTERFACE
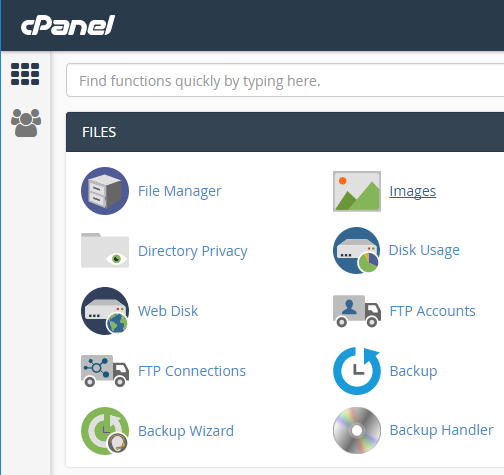
- Log in to the cPanel interface.
- Find and click on File Manager in the Files box. The File Manager pane will open on a new tab
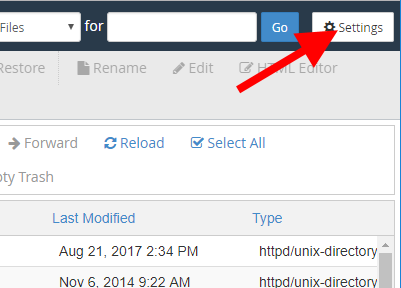
- In the upper right corner, click the Settings button.
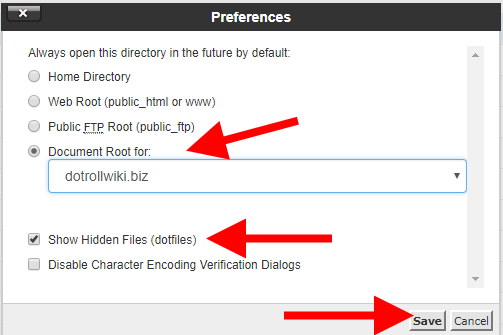
- Select the home directory of the affected domain, then select Show Hidden Files (dotfiles) and click the Save button.
- Click the File button in the upper left
- Under the New filename: label, enter the file name and extension you want to create, and then click Create New File button.
MODIFY A FILE
Unfortunately, direct editing of files is only possible with the cPanel interface.
- Log in to the cPanel interface
- Find and click on File Manager in the Files box.
- In the upper right corner, click the Settings button.
- Select the home directory of the affected domain, then select Show Hidden Files (dotfiles) and click the Save button.
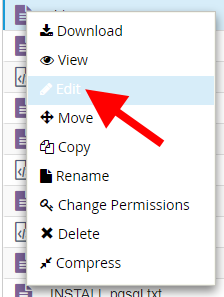
- Find the document_root folder for that domain name and include the file you want to edit, right-click and select Edit.
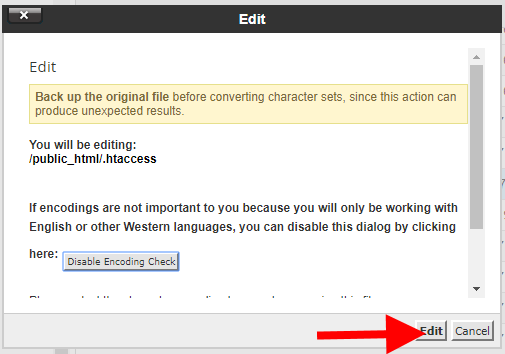
- Click the Edit button in the window that appears.
- In the editor that opens, make the necessary changes
- Lastly, save your changes to the word editor by using the Save Changes button in the upper right corner.